 01-26-2014, 03:51 PM
|
#21
|
|
Registered User
Join Date: Sep 2013
Location: Southern California
Posts: 143
|
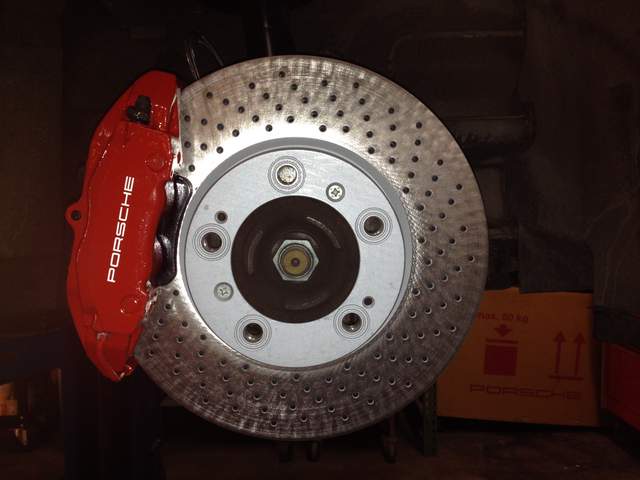
I just noticed that the caliper connecting lines are painted on my car. I'd like to have those be a bare metal look, but how to strip the paint off them? New ones cost $50 each.
|

|

|
 01-26-2014, 04:08 PM
|
#22
|
|
Registered User
Join Date: Nov 2009
Location: Winnipeg MB
Posts: 2,485
|
Remove them and use a wire wheel on your bench grinder.
__________________
'99 black 986
|

|

|
 01-30-2014, 12:29 PM
|
#23
|
|
Registered User
Join Date: Dec 2010
Location: South Wales UK
Posts: 139
|
Hi
I did mine a few years back and did a how to on our UK BoXa.net forum heres a link:-
http://www.boxa.net/forum/index.php?showtopic=47899&page=3
I painted mine, but as said the preperation is the most important, this is what mine turned out like:-


loads more photos on the link.
Guvs.
|

|

|
 02-19-2014, 09:18 AM
|
#24
|
|
Registered User
Join Date: Sep 2013
Location: Southern California
Posts: 143
|

Well I went through the process and here are the results. It was a lot of work. Scrubbing, buffing, sanding to get the old surface prepped and ready to accept the paint. I went with the G2 kit. Followed the instructions to the letter, and made every attempt to be careful and thorough. Also went with the Ebay decals. My honest impression overall: not exactly blown away. They will look good from a distance, especially against the backdrop of a new set of rotors, but up close the brush strokes are clearly visible, and the paint didn't "lie down" to the extent advertised. I even went with a sponge brush for the final coat to ensure smoother finish. Also, the decal adhesive is clearly visible beneath the printing. Again, after following the instructions to the letter. If I had to do it over again, I think I'd go with stencils. Don't think I'd go with powder coating as I've heard too many opinions to the contrary.
|

|

|
 02-19-2014, 10:37 AM
|
#25
|
|
Registered User
Join Date: Nov 2009
Location: Winnipeg MB
Posts: 2,485
|
I used the decals and they look fine, no outline or adhesive showing, BUT, I spray painted the calipers with VHT, let them cure for a couple of days, then applied the decals and let them dry for a couple of days, and then applied a few coats of clear VHT. I thought they turned out really well.
I read enough reviews of the G2 stuff ahead of time that I was pretty sure that brush strokes were going to be a problem, which is why I didn't go that route.
So, now you've done the prep, you could wet sand the calipers to get a flat color with no brush strokes, re-apply fresh decals, spray on some clear coat, and you would most likely be happy with the end result.
__________________
'99 black 986
|

|

|
 02-19-2014, 11:40 AM
|
#26
|
|
Registered User
Join Date: Jun 2012
Location: Bedford, TX
Posts: 2,755
|
I used the VHT method and couldn't be happier. The decals IMO came out great, I don't see any adhesive. Also used a clear coat.
__________________
______________________________________________
2001 Boxster S Lapis Blue
TS Cat Bypass Pipes and exhaust
iPad Mini Dash Install
DEPO Tail Lights
|

|

|
 02-19-2014, 03:05 PM
|
#27
|
|
Registered User
Join Date: Sep 2013
Location: Southern California
Posts: 143
|
Appreciate the feed back, thank you. One question about the decals: the instructions said to wet the caliper surface and the front/back of the decal itself with a dilute hand soap and water solution. Then, use a small squeegee (that wasn't supplied) to press out the underlying water and position the decal. Did you guys follow this procedure? I'm hoping the cloudiness will dissipate over time; otherwise I'm going to peel them off and do a stencil. Final note, the G2 kit specifically says not to use a spray on clear coat as it could be incompatible with the epoxy based paint, so I didn't. I'm now questioning that directive as well. In the end, I'm sure they will be fine and look nice.

|

|

|
 02-19-2014, 03:38 PM
|
#28
|
|
Registered User
Join Date: Nov 2009
Location: Winnipeg MB
Posts: 2,485
|
I just used water - no soap. If you want to shoot them with clear, spray some in the cap first and use a brush to dab it on a spot on the backside of the calipers (where it won't show) to see if it reacts badly before you spray the whole thing. When you do spray it, go with several very light coats and that will also reduce the chances of the clear lifting the red.
__________________
'99 black 986
|

|

|
 Posting Rules
|
You may not post new threads
You may not post replies
You may not post attachments
You may not edit your posts
HTML code is On
|
|
|
All times are GMT -8. The time now is 08:43 AM.
| |