 06-04-2013, 02:17 PM
|
#1
|
|
Registered User
Join Date: Apr 2013
Location: Saratoga, NY
Posts: 172
|
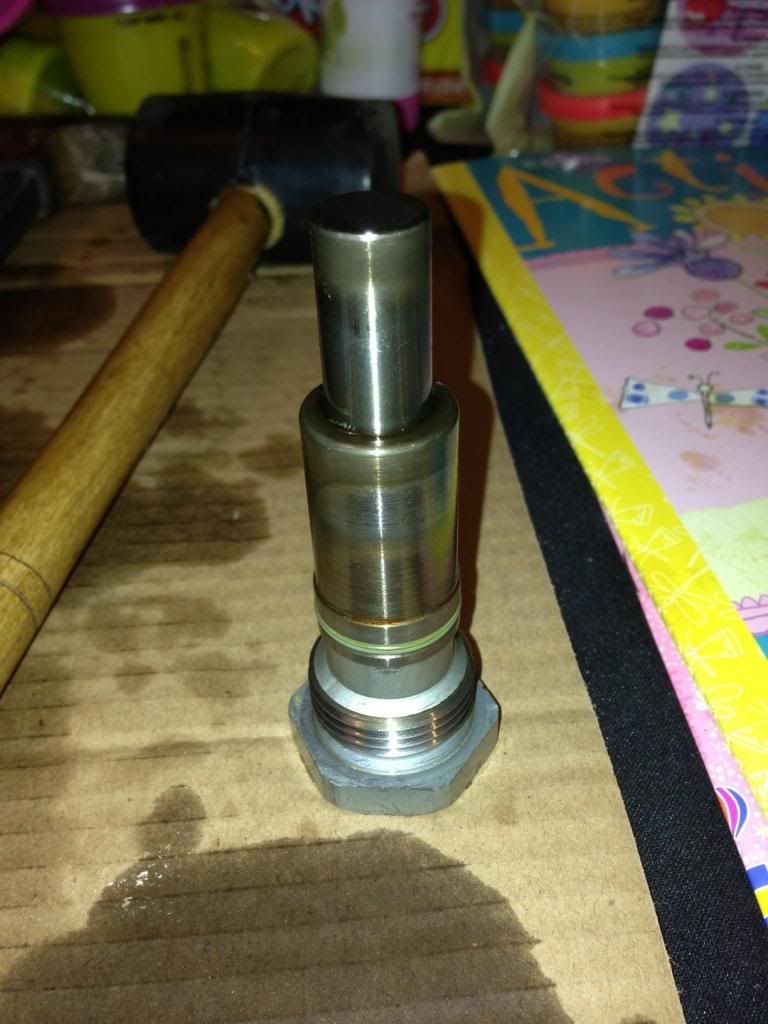
This is the tensioner below the A/C compressor.
Does that seem to be a bad wear pattern on the side? It is only worn on one side.
__________________
2001 Boxster S 6speed- weekend warrior
2015 Explorer Sport- New DD
2011 Taurus SHO- Sold
2010 CBR1000RR- Sold
|

|

|
|
06-12-2013, 10:02 AM
|
#2
|
|
Registered User
Join Date: Apr 2013
Location: Saratoga, NY
Posts: 172
|
Quote:
Originally Posted by BYprodriver

There is a 50% chance you are 360 degrees off for setting 4-6cyl cam timing. To verify remove the 1-3cyl green cam plugs to visually verify 1-3cyl cams are timed right. If the 1-3 cams are correct for TDC then 4-6 bank is 360 degrees off & you need to turn engine 1 revolution CLOCKWISE back to TDC. 1-3cyl cam notches will now be upside down & 4-6 cams are ready for install & timing.
|
Is there a safe way to turn this engine over without having the cylinder 4-6 cams installed? I can hold the chain and sprocket while someone turns the engine over for me, but I do not want to over pressurize cylinders since all 12 valves will be closed
__________________
2001 Boxster S 6speed- weekend warrior
2015 Explorer Sport- New DD
2011 Taurus SHO- Sold
2010 CBR1000RR- Sold
|
|
|
|
|
06-04-2013, 02:09 PM
|
#3
|
|
Registered User
Join Date: Apr 2013
Location: Saratoga, NY
Posts: 172
|
I am about to order the parts for the car- Lifters, sealant, IMSB, install kit, and timing tools. Before I do what else could I inspect and look at to check for failure? I am a little hesistant to spend the money on these parts if in fact I can't 100% verify anything failed.
I know the noise was a 1/2 speed noise telling me valvetrain
I know using a stethoscope, and 3 different sets of ears the noise was coming from the 4-6 cylinder head.
I know all the lifters looked and felt exactly the same when I had them submerged in oil.
I know all the valve springs look perfect
I know the compression is great in all 6 cylinders
I know all the spark plugs look good
I did notice the tensioner below the a/c compressor for cylinders 4-6 had definitely more play in it than the tensioner near the oil filter for the IMS chain. Is this normal? They are two differnet styles, but the one closest to the IMSB and oil filter I could barely move by hand. The tensioner for the cylinders 4-6 chain I could move from a standing 3 5/8" down to 3 1/8" using just the palm of my hand.
__________________
2001 Boxster S 6speed- weekend warrior
2015 Explorer Sport- New DD
2011 Taurus SHO- Sold
2010 CBR1000RR- Sold
Last edited by Wilson01S; 06-04-2013 at 02:13 PM.
|
|
|
|
|
06-04-2013, 04:01 PM
|
#4
|
|
Registered User
Join Date: Oct 2008
Location: O.C. CA
Posts: 3,709
|
Quote:
Originally Posted by Wilson01S
I am about to order the parts for the car- Lifters, sealant, IMSB, install kit, and timing tools. Before I do what else could I inspect and look at to check for failure? I am a little hesistant to spend the money on these parts if in fact I can't 100% verify anything failed.
I know the noise was a 1/2 speed noise telling me valvetrain
I know using a stethoscope, and 3 different sets of ears the noise was coming from the 4-6 cylinder head.
I know all the lifters looked and felt exactly the same when I had them submerged in oil.
I know all the valve springs look perfect
I know the compression is great in all 6 cylinders
I know all the spark plugs look good
I did notice the tensioner below the a/c compressor for cylinders 4-6 had definitely more play in it than the tensioner near the oil filter for the IMS chain. Is this normal? They are two differnet styles, but the one closest to the IMSB and oil filter I could barely move by hand. The tensioner for the cylinders 4-6 chain I could move from a standing 3 5/8" down to 3 1/8" using just the palm of my hand.
|
Due to the wear & inaccessible location of the tensioner, I would replace it.
Replace the VarioCam chain wear pads even if not showing any wear. The new updated parts are made of a superior material that is far more wear resistant & resonably priced too.
Seems the long oil change interval has allowed the lifters to become clogged.
Really look the vave springs over very well, checking for any broken springs.
|
|
|
|
|
06-04-2013, 07:18 PM
|
#5
|
|
Registered User
Join Date: Apr 2013
Location: Saratoga, NY
Posts: 172
|
OK great. Thanks for the advice- are the chain wear pads available from Pelican Parts? I inspected them all very closely, but I will recheck. Also would I be crazy to just replace the lifters from the drivers side head and not the passenger?
__________________
2001 Boxster S 6speed- weekend warrior
2015 Explorer Sport- New DD
2011 Taurus SHO- Sold
2010 CBR1000RR- Sold
|
|
|
|
|
06-05-2013, 09:36 AM
|
#6
|
|
Registered User
Join Date: Oct 2008
Location: O.C. CA
Posts: 3,709
|
Quote:
Originally Posted by Wilson01S
OK great. Thanks for the advice- are the chain wear pads available from Pelican Parts? I inspected them all very closely, but I will recheck. Also would I be crazy to just replace the lifters from the drivers side head and not the passenger?
|
Pelican has them here:
Pelican Parts - Product Information: 996-105-253-00-M100
Nothing wrong with doing lifters on one side & test driving before proceeding.
|
|
|
|
|
06-05-2013, 12:05 PM
|
#7
|
|
Registered User
Join Date: Apr 2013
Location: Saratoga, NY
Posts: 172
|
Quote:
Originally Posted by BYprodriver
|
Thanks Pro
__________________
2001 Boxster S 6speed- weekend warrior
2015 Explorer Sport- New DD
2011 Taurus SHO- Sold
2010 CBR1000RR- Sold
|
|
|
|
|
06-12-2013, 03:15 PM
|
#8
|
|
Registered User
Join Date: Apr 2013
Location: Saratoga, NY
Posts: 172
|
OK the timing mark on the intake cam (on the rear of the engine) is pointing 90* out toward the cam cover. The marks on the intake and exhaust cam (flywheel side of cylinders 1-3) are perfectly parallel with the seam between the cam cover and the head.
So I will need to rotate the engine 1 full turn clockwise,and repin the crankshaft so that I can then install cylinders 4-6 (which I now have the cams out of) so that they are perfectly parallel with the seam between the head and the cam cover correct?
Once I set the cam to cam timing with the new tensioner pads, and aligning the dots to the color coded index links on the chain, reinstall the cams, install the cam timing tool, reinstall the cam cover, and torque the cam cover down how do I know how to line the chain sprocket that is just dangling back up? Does it just bolt up and because the cams are timed together, and timed with the other head it should just work? It appears that the sprocket has some adjustments so I want to make sure everything is timed not only between the two heads, but with the IMS
Sorry for the long winded question.
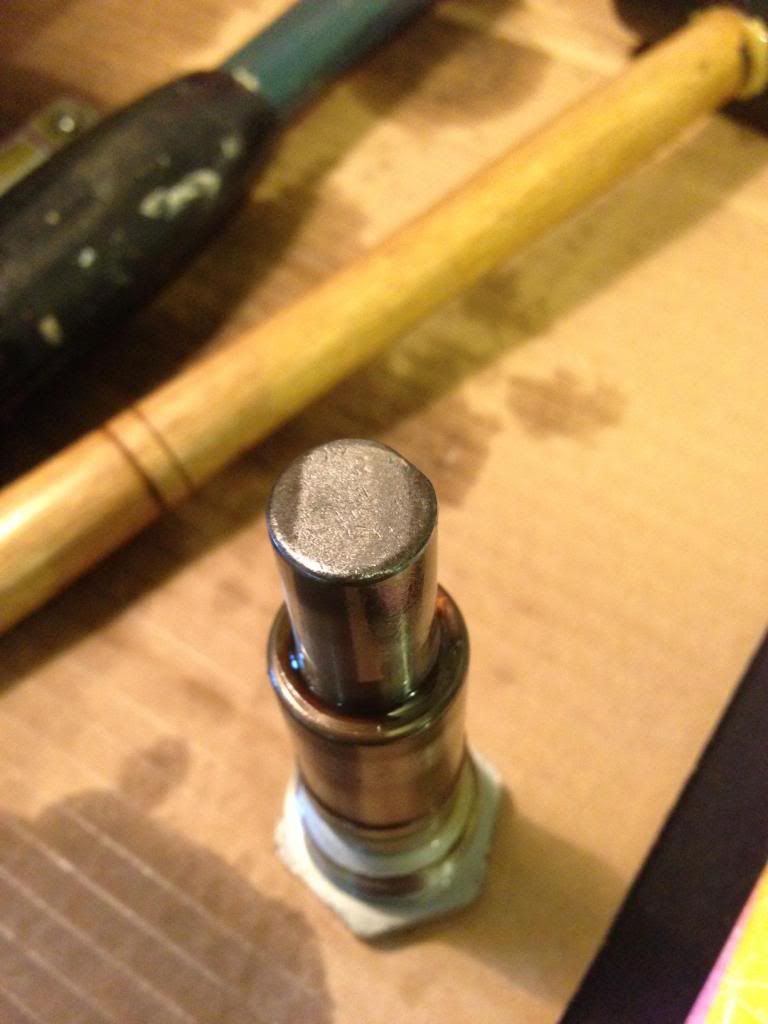
Also! Is there an updated tensioner for cyl 4-6 (below the a/c comp)? I ordered that tensioner and it is different than the one I took out. Seems to be about 2mm longer, and it has a large allen bolt instead of a hex head to tighten it with?
__________________
2001 Boxster S 6speed- weekend warrior
2015 Explorer Sport- New DD
2011 Taurus SHO- Sold
2010 CBR1000RR- Sold
|
|
|
|
|
06-12-2013, 04:41 PM
|
#9
|
|
Registered User
Join Date: Oct 2008
Location: O.C. CA
Posts: 3,709
|
Yes, rotate clockwise only, 1 full 360* & pin at TDC. Now bank 1-3 timing marks will flip upside down from prior position & now the smaller segment of the cam timing mark will face down. Install cams like you said, making sure to have all cam holding parts in place & torqued before releasing tension from Vario-Cam to cam chain. Then install gear sprocket with chain on exhaust cam with the special 10.9 grade bolts HANDTIGHT in the middle of the adjustment range.
Now install cam cover leaving oil pump & green cam plugs out. Next adjust cam timing with proper tool. Once timing is set slightly tighten exhaust cam gear sprocket bolts to hold timing in place & remove 1 bolt at a time, apply blue medium loctite & torque to 10.5 ft/lbs. Once all bolts are torqued rotate engine clockwise ONLY 1 revolution to TDC to check cam timing again. Repeat 1 revolution again to put 4-6 bank at TDC & verify correct cam timing for 4-6 cams. Install oil pump in head with 4-6 facing crankcase & coolant temp sensor.
New updated 4-6 chain tensioner will be a lower profile, perhaps for heat dispersion for A/C compressor. Tensioner installs with 11mm allenhead & has zero id rings unlike the others.
|
|
|
|
|
06-12-2013, 05:16 PM
|
#10
|
|
Registered User
Join Date: Apr 2013
Location: Saratoga, NY
Posts: 172
|
Awesome! Thanks for all that! I haven't tried yet, but does the cam timing tool actually have an adjustment? It seems like it would just go into the slot on the exhaust cam, and then bolt to the head? I will have to recompress the vario-cam tensioner as I released it as soon as I figured out how to snake in in between the cams keeping everything lined up.
__________________
2001 Boxster S 6speed- weekend warrior
2015 Explorer Sport- New DD
2011 Taurus SHO- Sold
2010 CBR1000RR- Sold
|
|
|
|
|
06-19-2013, 07:28 PM
|
#11
|
|
Registered User
Join Date: Apr 2013
Location: Saratoga, NY
Posts: 172
|
Finally got all my parts from Pelican! She will be going back together tomorrow night Friday on my day off and I hope to hear it running (quietly) Friday afternoon! One last question is there any certain way to install the lifters? What I mean is do they oil orifices on the sides need to be all aligned facing a certain way, or can the lifter just be plopped into the holes?
Thanks!
__________________
2001 Boxster S 6speed- weekend warrior
2015 Explorer Sport- New DD
2011 Taurus SHO- Sold
2010 CBR1000RR- Sold
|
|
|
|
|
06-20-2013, 09:35 AM
|
#12
|
|
Registered User
Join Date: Oct 2008
Location: O.C. CA
Posts: 3,709
|
Quote:
Originally Posted by Wilson01S
Finally got all my parts from Pelican! She will be going back together tomorrow night Friday on my day off and I hope to hear it running (quietly) Friday afternoon! One last question is there any certain way to install the lifters? What I mean is do they oil orifices on the sides need to be all aligned facing a certain way, or can the lifter just be plopped into the holes?
Thanks!
|
Pre fill the new lifters with new hot engine oil to test & then just install on top of the valve springs no particular orientation. The cams are hollow, tubular, so you can pre fill them with oil also once installed.
|
|
|
|
|
06-20-2013, 02:33 PM
|
#13
|
|
Registered User
Join Date: Apr 2013
Location: Saratoga, NY
Posts: 172
|
OK thanks!
I received the rest of my parts and when I was checking out the IMS retrofit kit from LN I have a question about some of the included pieces. In all the videos I have seen with the IMS bearing being replaced the bearing is installed with the installer tool and light taps from a mallet. What are the two hexagonal tools that are threaded inside and the allen bolt used for? I wish I had a picture but hopefully someone knows what I am talking about haha
Also can I time this engine with the 5 chain tool they supplied? Since I know the cams will be timed together via the cam-to-cam chain will holding just one cam and making sure the marks are parallel with the cam cover work? Is this to replace the P253 tool?
Also I have read and/or watched just about every write-up and video on the IMS bearing replacement, but none of them show the use of the Pelican kit (I would imagine because the LN kit is superior and more frequently used). Anyway my car has a dual row bearing, and this kit said it can accommodate both, but how is the new bearing installed with the 2 spacers it came with, and with using the flange from my double row bearing?
__________________
2001 Boxster S 6speed- weekend warrior
2015 Explorer Sport- New DD
2011 Taurus SHO- Sold
2010 CBR1000RR- Sold
|
|
|
|
|
06-20-2013, 09:16 PM
|
#14
|
|
Registered User
Join Date: Nov 2012
Location: Southern, CA
Posts: 460
|
Just my two cents worth, and I could be a bit off but here it goes ...
The two hexagonal tools if I understand what you are looking for are used to pull the original bearing. Connec it to the bearing stud, hold one, twist the other, and pop out comes the bearing.
From what I understanf the cam holding tool only holds one cam. It is theoretically possible, but the recommendation is to use a cam tool that holds both cams. Me, I plan to buy a set on eBay when I need it. About $275~$350 from what I've seen. Or ask if I can borrow a set on the forum possibly.
As for the Pelican kit, while it can work it scare me (and some others) with the simple thought of replacing a strong two bearing unit with a single bearing unit and a spacer. Nope, not ever going to happen on my car. It'll have to be a dual row bearing replacement from LN or possibly Casper Labs (heard about, but no other experiance). Mine will be replaced when I rebuilt the clutch some day.
__________________
1999 Boxster Zenith Blue Metallic/Savanna Beige
|
|
|
|
|
06-21-2013, 11:13 AM
|
#15
|
|
Registered User
Join Date: Apr 2013
Location: Saratoga, NY
Posts: 172
|
Guys did I just confuse myself and go 360 out on timing on one bank? Or is my timing spot on?
Starting with bank 1-3 The two marks on the exhaust cam are perfectly lined with the seam of the cam cover. The index mark on the intake cam is pointing outward.
With bank two the two marks on the exhaust cam are perfectly lined with the seam of the cam cover, but the index mark on the intake cam is also pointing outward.
So at the same time both intake cam index marks are pointing outward. Is that right? Or is one bank 360 off?
__________________
2001 Boxster S 6speed- weekend warrior
2015 Explorer Sport- New DD
2011 Taurus SHO- Sold
2010 CBR1000RR- Sold
|
|
|
|
|
06-24-2013, 12:42 PM
|
#16
|
|
Registered User
Join Date: Apr 2013
Location: Saratoga, NY
Posts: 172
|
Bueller...
__________________
2001 Boxster S 6speed- weekend warrior
2015 Explorer Sport- New DD
2011 Taurus SHO- Sold
2010 CBR1000RR- Sold
|
|
|
|
|
06-25-2013, 10:39 AM
|
#17
|
|
Registered User
Join Date: Apr 2013
Location: Saratoga, NY
Posts: 172
|
I found an online manual for removing and replacing valve tappets-
In the steps it says "Basic camshaft adjustment of cyl bank 1-3 the groove in the camshaft must face outward toward the cylinder head cover"
I have that done.
Now it says "basic camshaft adjustment for cylinder bank 4-6 groove must face inward toward the crankcase"
Are they referring the marks lining up like that at one time? Or should the mark for 1-3 be facing outward- make your adjustments to timing for bank 1-3. Then when you are ready for bank 4-6 spin the engine 360* relock the crank and check to see if the groove for 4-6 is now inward. If it is then make your adjustments?
If that's the case then I am 360 out on one bank, and would make sense why the exhaust manifold for 4-6 isn't getting warm and its missing on 3 cylinders.
__________________
2001 Boxster S 6speed- weekend warrior
2015 Explorer Sport- New DD
2011 Taurus SHO- Sold
2010 CBR1000RR- Sold
|
|
|
|
|
06-25-2013, 10:47 PM
|
#18
|
|
Registered User
Join Date: Nov 2010
Location: France
Posts: 32
|
Hello
Have you checked that post?
DIY: Setting Cam Timing on M96
sorry you have, I see you have posted.
Last edited by philou320; 06-25-2013 at 10:50 PM.
Reason: correction
|
|
|
|
|
06-30-2013, 10:07 AM
|
#19
|
|
Registered User
Join Date: Apr 2013
Location: Saratoga, NY
Posts: 172
|
Well got the timing figured out...stupid me when I set the cam to cam timing I had the cams upside down on my workbench......oh well won't make that mistake again!
Got it all back together and it fired right up beautifully this time....runs smooth as silk!
EXCEPT THE DAMN NOISE IS STILL THERE!
Oh well time to take the engine out and tear it down...
__________________
2001 Boxster S 6speed- weekend warrior
2015 Explorer Sport- New DD
2011 Taurus SHO- Sold
2010 CBR1000RR- Sold
|
|
|
|
|
07-03-2013, 07:05 AM
|
#20
|
|
Registered User
Join Date: Apr 2013
Location: Saratoga, NY
Posts: 172
|
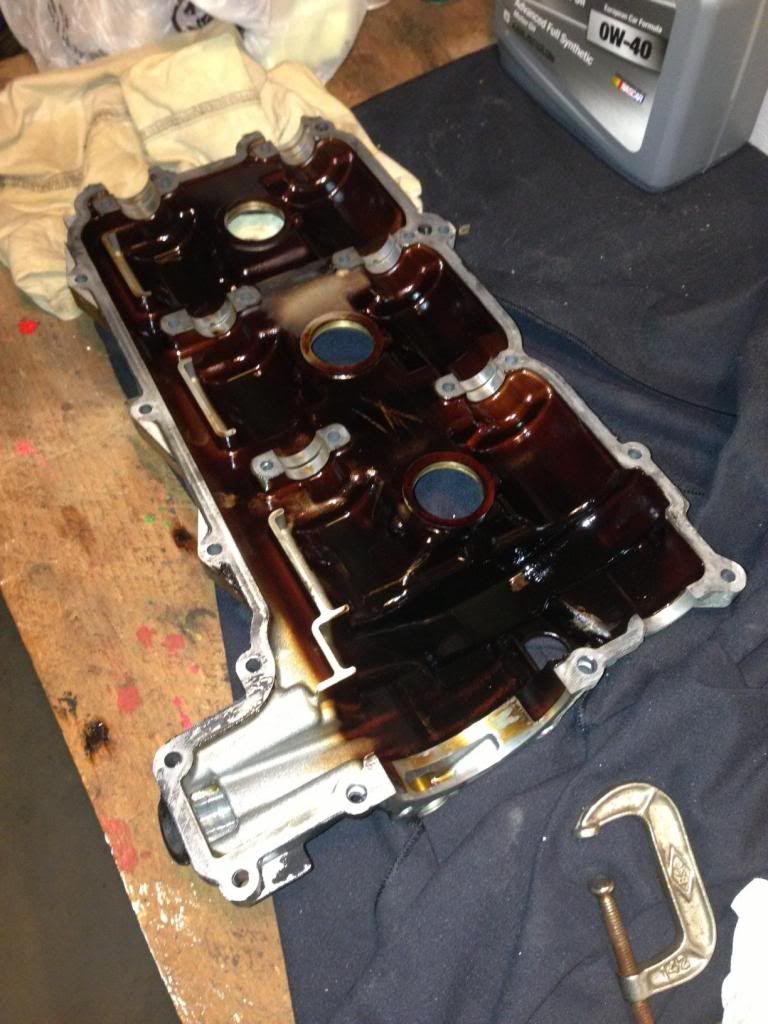
Well before I took the engine out I decided I better take the cam cover off for bank 1-3 to inspect.....glad I did.
Upon removal of the cam cover I immediately noticed a tremendous oil build up. It seems like this side of the engine was running a little hotter due to lack of lubrication. I am unsure if it has a clogged oil passage, or just the oil was so gummed up in the oil passages that it caused this side to run warmer. Anyway I checked the lifters for this side and sure enough two of them (one more than the other) could be collapsed almost by hand with a socket extension. I pumped them and dirt and oil came out that did not look healthy.
The cam cover for the 4-6 bank had maybe a slight discoloration. The underside was mostly a nice aluminum finish with maybe a slight golden hue- nothing I would call abnormal.
Now look at the cover for 1-3 and tell me what you think....
__________________
2001 Boxster S 6speed- weekend warrior
2015 Explorer Sport- New DD
2011 Taurus SHO- Sold
2010 CBR1000RR- Sold
|
|
|
|
| Thread Tools |
|
|
| Display Modes |
 Hybrid Mode Hybrid Mode
|
 Posting Rules
|
You may not post new threads
You may not post replies
You may not post attachments
You may not edit your posts
HTML code is On
|
|
|
All times are GMT -8. The time now is 09:15 PM.
| |


 Mean Motor Scooter


