 12-08-2011, 05:08 PM
|
#1
|
|
Autobahn Glanz
Join Date: Dec 2010
Location: Charlotte, NC
Posts: 1,282
|
Advice for my winter project
I have a 2000 'S' with 57k miles. I'll be doing my IMS this winter (soon) and wanted advice on the clutch. I figure while in there I'll do the clutch and was going to order the 3 piece clutch kit from either Porsche or Sachs (figure they are about the same) but then it occurred to me maybe I should see what needs to be replaced before I spend the money on the kit. If the pressure plate and throw-out bearing are good should I replace them just to to make sure I have the newest revisions of the hardware or is that a waste. I don't drive more then 3000 miles a year so not like the car gets a lot of use. The clutch seems fine now.
Thanks.
|

|

|
|
12-08-2011, 06:32 PM
|
#2
|
|
Ex Esso kid
Join Date: Dec 2005
Location: NY
Posts: 1,605
|
Just my opinion but at 57K miles if I was going in to change the IMS I'd pony up for the entire clutch kit while you have all of that disassembled. Whenever doing a clutch job the TO bearing is a given, I'd do the slave cylinder too.
|
|
|
|
|
12-09-2011, 07:27 AM
|
#3
|
|
Registered User
Join Date: Aug 2005
Location: Sanford NC
Posts: 2,614
|
IMS, RMS, complete clutch, CV boots.
It is enough trouble to get things apart, why not get all these common failure items at once as you are at the perfect mileage for renewal.
|

|
|
|
12-09-2011, 07:41 AM
|
#4
|
|
Registered User
Join Date: Nov 2010
Location: Philly
Posts: 594
|
This will probably be a $3000+ job altogether.
|
|
|
|
|
12-09-2011, 08:56 AM
|
#5
|
|
Registered User
Join Date: Oct 2008
Location: O.C. CA
Posts: 3,709
|
I get as much wear on the pressure plate where the T/O bearing contacts it as wear to the disc. Get the Sachs 3-piece kit & have flywheel & pressure plate balanced, that's the biggest source of imbalance in the engine. 
|
|
|
|
|
12-09-2011, 10:18 AM
|
#6
|
|
Certified Boxster Addict
Join Date: Nov 2010
Location: Los Angeles
Posts: 7,675
|
If you're doing the IMS, you might as well do the RMS (its relatively cheap and its right there).
I'd leave the CV boots alone unless you have a problem or reason to do something.
I'd suggest using the Sachs clutch 3-pc kit. Works great. I'd also suggest a single mass light weight flywheel (Aasco) to replace the stock dual mass unit that is probably just about worn out at $57K miles. Do a search on the LWFW becuase there is some difference of opinion on using it with regard to damping of engine vibrations. All I can say is that I've had no problems whatsoever.
__________________
1999 996 C2 - sold - bought back - sold for more
1997 Spec Boxster BSR #254
1979 911 SC
POC Licensed DE/TT Instructor
|
|
|
|
|
12-09-2011, 10:44 AM
|
#7
|
|
Rennzenn
Join Date: Feb 2005
Location: Virginia
Posts: 1,369
|
Are you doing the clutch yourself, or is someone else doing it?
FWIW, I replaced mine last year at 142,000 miles. It was the original, stock clutch, etc, and everything- FW, PP, clutch - had more miles to go. I replaced b/c I wanted to go with the LWFW and a stronger clutch. Anyway, my point is that if you are doing it yourself, do the dis-assembly before ordering any parts. See how things look inside and base your decision on that. My RMS had a light "velveting" around it, but was otherwise dry. I left it alone - it can be a gamble that an new seal will be any better. I left the IMS alone as well. It had no signs of leaking, etc, and with the mileage I figure things would have gone south already if I had a bad one.
|
|
|
|
|
12-09-2011, 02:39 PM
|
#8
|
|
Registered User
Join Date: Oct 2007
Location: Midwest
Posts: 1,746
|
I did the IMS, RMS and Clutch replacement while taking the transmission out for rebuild out in the Spring of 2010, my thoughts: Definitely do the entire Sachs Clutch kit, $335 shipped from ebay, I would personally do the IMS retrofit from LN Engineering while it is literally right in front of you (you'll likely recoup this money on resale, I did), the RMS is another animal, I did mine but not sure If I would of done it again. The one in my car was replaced ~9k miles prior and was not leaking, I replaced it while there but not sure I would do that again, JMO. Test your flywheel for deflection, if within spec clean nit up with a palm sander and put it back in. Good luck......Mark.
My Write-Up: IMS, RMS, Tranny R & R Tips - RennTech.org Forums
|
|
|
|
|
12-09-2011, 08:01 PM
|
#9
|
|
Autobahn Glanz
Join Date: Dec 2010
Location: Charlotte, NC
Posts: 1,282
|
Thank you everyone, you guys are all really helpful. Gives me a bunch to consider. I wasn't aware ebay had the Sachs kit for amount, that would be great. I can get the genuine porsche one (same stuff I know) for $560 but $335 is a big savings. The CV boots are new so i can skip that. Well let me keep doing my homework.
|
|
|
|
|
12-10-2011, 04:53 AM
|
#10
|
|
Registered User
Join Date: Jun 2007
Location: Littleton, CO
Posts: 456
|
Quote:
Originally Posted by mikefocke

IMS, RMS, complete clutch, CV boots.
It is enough trouble to get things apart, why not get all these common failure items at once as you are at the perfect mileage for renewal.
|
Hey Mike, you know way more about these cars than I do. That said, I don't understand why you would recommend doing CV boots without knowing the condition of them. It's not like they have anything to do with the clutch, RMS or IMS. What gives? What am I missing?
__________________
"Of all the extreme sports I've ever participated in- windsurfing, kite boarding, wake boarding, tow-in surfing and snowboarding- skiing, for me, made everything else easy."
-Chuck Patterson
|
|
|
|
|
12-10-2011, 05:25 AM
|
#11
|
|
Registered User
Join Date: Oct 2007
Location: Midwest
Posts: 1,746
|
I did my IMS, Clutch job spring of 2010 with 39k miles, at that time I inspected the CV boots and they were all fine. The PPI performed by the buyer fall of 2011 with 42k miles showed 3 of the 4 CV boots were split and in need of replacing. They fail with age along with usage, it's a "while you're there" job done much more easily with the tranny dropped.
|
|
|
|
|
12-10-2011, 05:29 AM
|
#12
|
|
Registered User
Join Date: May 2009
Location: Frederick, MD
Posts: 1,396
|
Quote:
Originally Posted by Pat
Hey Mike, you know way more about these cars than I do. That said, I don't understand why you would recommend doing CV boots without knowing the condition of them. It's not like they have anything to do with the clutch, RMS or IMS. What gives? What am I missing?
|
not to speak for mikefocke, but i think in general 60k is a reasonable amount of mileage to expect from the cv boots (especially the S) and since the car will be in the air and most of the stuff connected to the cv boots loose or removed, the cv boots should be an easier job to do than try to eke out a couple more miles.
my boots lasted around 75 on the base model.
__________________
"Speed has never killed anyone, suddenly becoming stationary... that's what gets you."
|
|
|
|
|
12-10-2011, 10:34 AM
|
#13
|
|
Registered User
Join Date: Aug 2005
Location: Sanford NC
Posts: 2,614
|
The CV joint boots in a 6-speed (recall the OP has an S model) fail earlier than those on a TIP or 5-speed due to the differing angles associated with the transmissions and the half shafts and the additional stress on the boots.
Do you have to do them at the same time...no. But sure would be easier to get to them once the transmission is out of the car.
Figuring out what preventative maintenance to do and when is an imprecise thing. I've both over and under maintained in my time.
|
|
|
|
|
12-25-2011, 08:27 AM
|
#14
|
|
Autobahn Glanz
Join Date: Dec 2010
Location: Charlotte, NC
Posts: 1,282
|
Christmas day update...
Weather has been warm in Charlotte still so I had perfect temps to dive into my project. I've really enjoyed it so far, it's like opening up a hidden world and seeing what I'll find. I'll likely be replacing a lot of parts though probably not necessary. Anyone that has talked with me on the forum knows I'm a little OCD about things. Everything that has come off the car has been cleaned up and is all shiny and when it comes to replacing things I'm the type that replaces everything before it breaks, in fact so little has been repaired on this car in the last 12 years it is amazing. My list of preventative repairs/maintenance is very long. Some observations:
- Worst part of the job...jacking the car up! Ya you can all laugh. It's 20inches off ground which is enough to work comfortably.
- CV boots recently repaired by previous owner.
- Slave cylinder will be replaced, it might be fine but the rubber area is tired and the pin keeps falling out, probably normal but now is an easy time.
- The little plastic thing that hold the throwout clip is cracked, I might have done it by accident.
- Clutch disk seems pretty worn though I'm not sure what the wear rate is on these so it could have lasted much long maybe, donno. I'll compare it to the new one when I get it an see.
- Pressure plate and throwout bearing seem fine but again I'm in there. If I didn't have the money, I wouldn't replace them, I'll help stimulate the economy.
- The car has had two leaky spots on the oil fill tube, NOW is the time to do it and it still will be a pain. It has made a sticky mess of the right side of engine.
- Flywheel seems fine, though I'm not sure how one does the flex test, it does have some spring left in it but I'm not sure it is twist-able, what am I missing here?
- My two forward O2 sensors had been replaced by previous owner, I might do the back, to be honest that right side connector is not easy to reach with the transmission in. I could change the other three in 20 minutes with transmission in but that back right one I think would be a pain imo.
- The AOS is right in front of me, I do get Porsche parts at cost + 10%, might stimulate economy a little more  .
- RMS...well it appeared to only be oozing maybe a tiny tiny bit, I know I'll get different views on replacing this. I'll probably do it just because I like the experience and I'm guessing mine is not the most up to date one.
- IMS...no leaks...cover still on. Will update ones I get the cover off. It's a double row.
Here a some pics after I cleaned off the break dust. The worst dust had gathered in a triangle from the RMS down...as mentioned just a tiny bit pasty.
Once I finish the job I'll post all costs of the total job, including all the wonderful tools I always wanted to add to my collection.
Cheers!

|
|
|
|
|
12-25-2011, 09:59 AM
|
#15
|
|
Registered User
Join Date: Oct 2011
Location: sac. ca
Posts: 156
|
Whip,
If yours is a double row bearing, will you send me the old one if I pay for shipping?
Also here is a suggestion on the RMS, if you roll the spring out of the seal carefully, unscrew the spring, cut 2mm off the big side of the spring, screw it back together, and carefully roll it back into place it will make for a tighter seal around the crankshaft.
Happy holidays
|
|
|
|
|
12-26-2011, 06:40 AM
|
#16
|
|
Autobahn Glanz
Join Date: Dec 2010
Location: Charlotte, NC
Posts: 1,282
|
Quote:
Originally Posted by feelyx
Whip,
....
Also here is a suggestion on the RMS, if you roll the spring out of the seal carefully, unscrew the spring, cut 2mm off the big side of the spring, screw it back together, and carefully roll it back into place it will make for a tighter seal around the crankshaft.
Happy holidays
|
Guess I need to see what you are talking about, not familiar with this at all!
|
|
|
|
|
12-26-2011, 07:36 AM
|
#17
|
|
Registered User
Join Date: Jan 2007
Location: BC
Posts: 1,357
|
Thanks for taking the time to post all your experiences here. I'm thinking of doing this job myself, but not sure how much I want to invest in special tools.
__________________
2001 Boxster, 5 spd, Seal Grey
|
|
|
|
|
12-26-2011, 07:49 AM
|
#18
|
|
Registered User
Join Date: Oct 2011
Location: sac. ca
Posts: 156
|
Quote:
Originally Posted by WhipE350
Guess I need to see what you are talking about, not familiar with this at all!
|
I will try and get you some pics of this today.
|
|
|
|
|
12-26-2011, 10:19 AM
|
#19
|
|
Autobahn Glanz
Join Date: Dec 2010
Location: Charlotte, NC
Posts: 1,282
|
Quote:
Originally Posted by clickman
Thanks for taking the time to post all your experiences here. I'm thinking of doing this job myself, but not sure how much I want to invest in special tools.
|
Hey no problem...some of the special tools I've made myself. I'll keep you posted...going to go play 9 holes then replace the oil fill tube and the RMS. Might also get the cover off the IMS and see what shape it's in.
|
|
|
|
|
12-26-2011, 07:49 PM
|
#20
|
|
Autobahn Glanz
Join Date: Dec 2010
Location: Charlotte, NC
Posts: 1,282
|
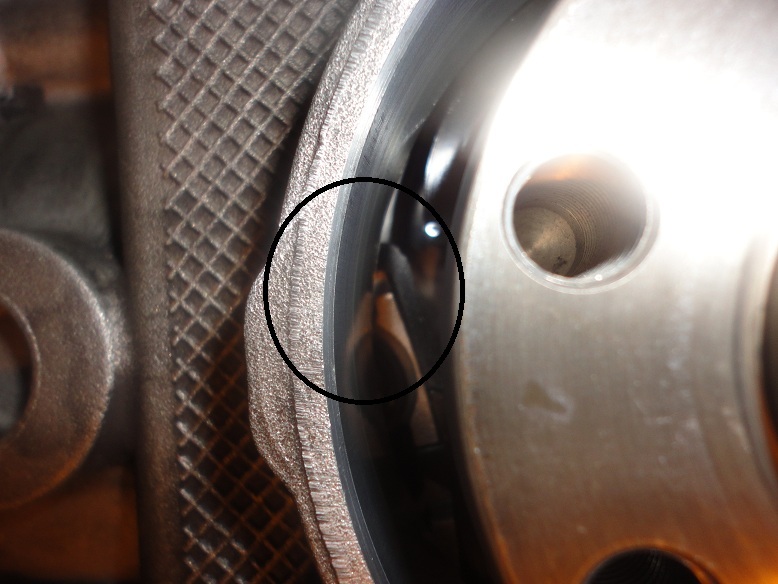
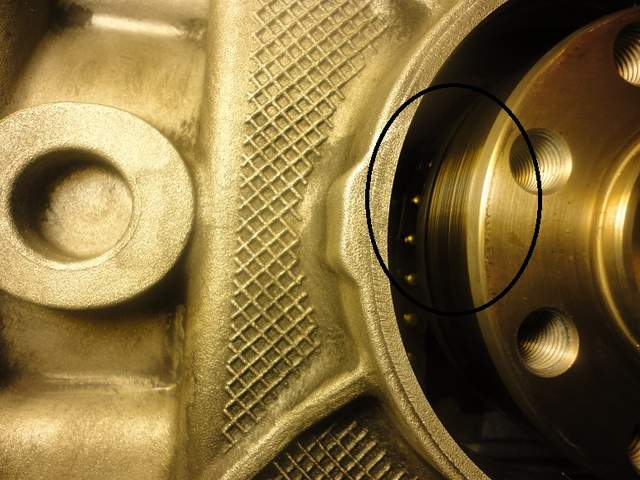
Only got the RMS done tonight. Interesting project. I measured the existing one while in and it was between 10 and 12mm from the crank, it wasn't consistent. Made a little tool that would measure about 13mm. Bentley says to insert a little more then 11m so it hits a fresh surface on the crank. From the pictures below it can be seen that there is some surface to work with both on the crank and the block.
Some more thoughts and observations for those learning along with me and for those with more knowledge to comment on:
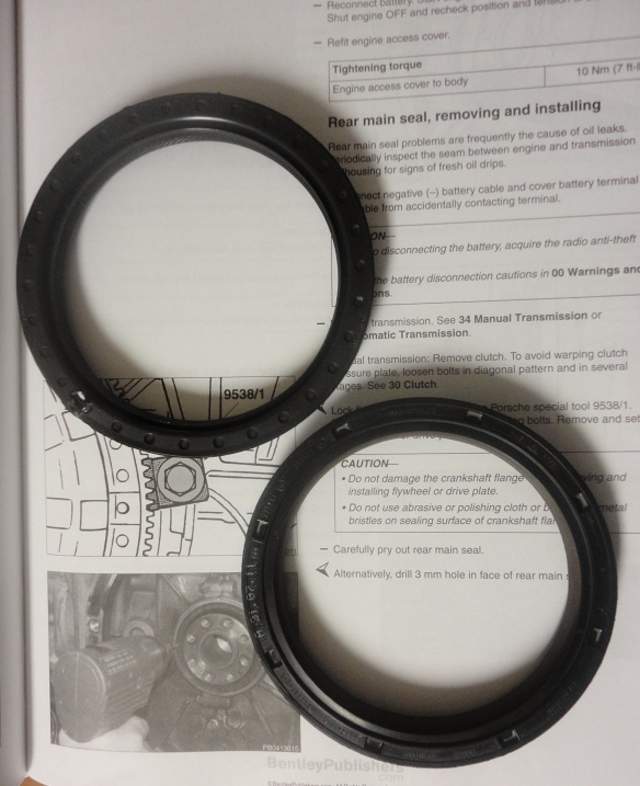
- The new seal has extra ridges on the outside, the inside (crank side) seems to have some extra ridges also and is just slightly different in design (see 3rd pic). If you are all familiar with the ridged seals that go under external doors in your house it kind of reminds me of that.
- While putting the new one on, make sure it goes on the crank side properly, it is easy to flop it over and do it wrong. I was reading elsewhere today where someone had that problem, I immediately saw what they were talking about....however once on it will be OK, Turn it back and forth a little and you'll see.
- I see why the shops have a special tool, these seals are squirmy little buggers, while gently tapping in they like to seat quickly on one outside edge and not the other. Before you go too far start over. Get it started on the outside edge completely before starting to tap it in past the point of no return. This happens because they are ridged and the fit is tight...well at least it seems that way to me.
- I used a little soft piece of wood to tap around and around to get it most of the way, then I used a perfect fitting piece of PVC to get it to the right depth. Since they do like to go in easier on one side then the other I generally used the PVC to just work the section that was not being so nice. In the end it was a perfect 13mm from crank side in. I will say that extra 2mm is very noticeable on the outside edge.
- Take your time, I can see it would be easy to seat it in too far.
- As a beginner on this it is amazes me that crank can spin on this for so long and not leak more. Also I'm not surprised that they ooze a little. I also can see how leaks could form.
Think I'll do the nasty messy oil fill tube next. My parts guy had that part handy, said they have to replace them all the time. Not a lot of room to get at it, but I"ll ******************** and gripe a bunch and get it done. Then do my best to clean up what only a few hundred drops can do over 57k miles...dirt magnets.
|
|
|
|
 Posting Rules
|
You may not post new threads
You may not post replies
You may not post attachments
You may not edit your posts
HTML code is On
|
|
|
All times are GMT -8. The time now is 12:52 AM.
| |


 Whip986S - SOLD but will live the good life!
 Peter Jr - SOLD but not forgotten!
 The Silver Surfer (SOLD)
 The Black Widow
 Nite
Nite Mean Motor Scooter
 986RS
986RS Long term project...
 Fiat 500 Abarth Cabriolet
 Linear Mode


