 10-05-2011, 12:09 PM
|
#21
|
|
Registered User
Join Date: Oct 2009
Location: USA
Posts: 63
|
Lens removal
Madmods,
I recently bought a set of used Litronic headlights that have badly scratched lenses and would like to transfer all of the parts to my original headlight frames which have excellent lenses. My problem is removing the lens. I read your steps, thanks for the work on your part, and tried to remove one of the lenses from the used set. I applied the heat from the heat gun to the case rather than the lens, thinking a melted lens would not be what I wanted. I heated all around the case until it was hot to the touch, about 20 minutes worth. I tried to pry and nothing was loose. Heated for another 15 minutes and still nothing. Tried ten more and prying with what I thought was a lot of force I finally got some movement. Then I realized I could not find a good pry point. The lens was soft and I ended up scratching the under side of the outer lens ring. I did get the lens removed but made it pretty much useless. Any thoughts on how I might do better?
Jim
|

|

|
|
01-04-2012, 09:13 AM
|
#22
|
|
2006 987
Join Date: Dec 2006
Location: st. louis
Posts: 443
|
Quote:
Originally Posted by madmods

Went to the store this weekend I got a quote on the full kit. The kit includes:
2x Bi-xenon projectors (same as mine, small & light, the only one I've found that was fitting)
2x HID 35 watts ballasts
2x HID bulbs (6,000k, or pure white)
3x Cup shaped covers (needs two, the extra one is for practice - requires cutting)
3x Tubes of Industrial adhesive (silicone based, black) (same as what the manufacturer uses)
The full kit to retrofit your 986 headlights to Litronic is right there above!
$300 (+$35 Int'l shipping, Registered mail, 10-12 days)
Who wants a kit? This can ship out this week... pass the note
|
Are you still selling these kits? If so I'm interested
|
|
|
|
|
01-04-2012, 02:14 PM
|
#23
|
|
Registered User
Join Date: Oct 2009
Location: USA
Posts: 63
|
Madmods,
I recently bought a set of used Litronic headlights that have badly scratched lenses and would like to transfer all of the parts to my original headlight frames which have excellent lenses. My problem is removing the lens. I read your steps, thanks for the work on your part, and tried to remove one of the lenses from the used set. I applied the heat from the heat gun to the case rather than the lens, thinking a melted lens would not be what I wanted. I heated all around the case until it was hot to the touch, about 20 minutes worth. I tried to pry and nothing was loose. Heated for another 15 minutes and still nothing. Tried ten more and prying with what I thought was a lot of force I finally got some movement. Then I realized I could not find a good pry point. The lens was soft and I ended up scratching the under side of the outer lens ring. I did get the lens removed but made it pretty much useless. Any thoughts on how I might do better?
Jim
I heated my assembly in the oven for 30 minutes at 200 degrees. I then used a two inch wide stiff putty knife and it worked great. Insert the putt knife in the center at the top of the lens. Put the knife in 1/2 inch and raise the handle of the knife, do not press down. The underside of the lens can be scratched so only pry on the outside edge of the lens. If you pry on the underside you will scratch the silver coating. I attached a photo to show what I am referring to. 
|
|
|
|
|
06-20-2013, 07:23 AM
|
#24
|
|
Registered User
Join Date: Jun 2010
Location: The Netherlands
Posts: 53
|
Guys, i am going to do the conversion, but I need to know where to get the Cup shaped aluminium covers for the headlights and how they look like. Can someone help? Thanks!
|
|
|
|
|
06-20-2013, 10:19 PM
|
#25
|
|
Custom User Title Here
Join Date: Mar 2012
Location: Ft. Leonard Wood
Posts: 6,169
|
You can buy bi-xenon retrofit kits with shrouds. I think the OP custom made his shrouds because the projectors he used didn't come with them.
Current retrofit kits will come with projectors, shrouds, halos(if you want them), bulbs, ballasts, and all mounting hardware...everything you need.
Something like this is what you want. No "cup" needed 
During installation.

Installed.

__________________
https://youtube.com/@UnwindTimeVintageWatchMuseum
Last edited by particlewave; 06-20-2013 at 10:23 PM.
|
|
|
|
|
06-21-2013, 01:53 AM
|
#26
|
|
Registered User
Join Date: Jun 2010
Location: The Netherlands
Posts: 53
|
Thanks Particlewave! Yes I can buy the projectors with shrouds (that what was meant with cups  ! )
I wil get everything via retrofitlab.
Also, how to you mount the projectors is the housing? Do you have to fasten them with screws? Sealtant? And how do you figure out the "aim" por position of the projection?
Thanks!
|
|
|
|
|
06-21-2013, 10:55 AM
|
#27
|
|
Custom User Title Here
Join Date: Mar 2012
Location: Ft. Leonard Wood
Posts: 6,169
|
The projectors have a "stem" that mounts through the existing bulb hole in your headlight. There is a thick silicone washer that sits between the projector and the existing reflector in the headlight and serves two purposes; It acts as a mini shock absorber, and it also keeps the projector perfectly centered in the existing reflector. I didn't take very many pictures during my installation, but I found some online that may help illustrate this. Once mounted, the projectors are one with the old reflector. This means that adjusting them is exactly the same as it would be with a stock headlight; Just use the adjusting screws on the headlight. Since my original headlights were already adjusted correctly, after installing the projectors, no adjustment was needed. They were already perfectly aligned.
Also, I think different kits use different mounting methods, so I'm not sure about others. I was on a very tight budget, so I had to order a cheaper kit from Hong Kong. The kit that I ordered was $140 shipped(everything included), compared to about $325 from theretrofitsource.com.
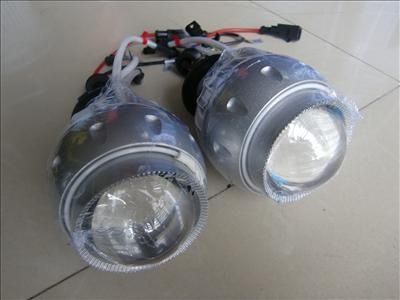
Here is a picture of the kit that I ordered. Quality was good and I'm very happy with them.

Here you can see the mounting stem. It is hollow and the bulb mounts directly into it.
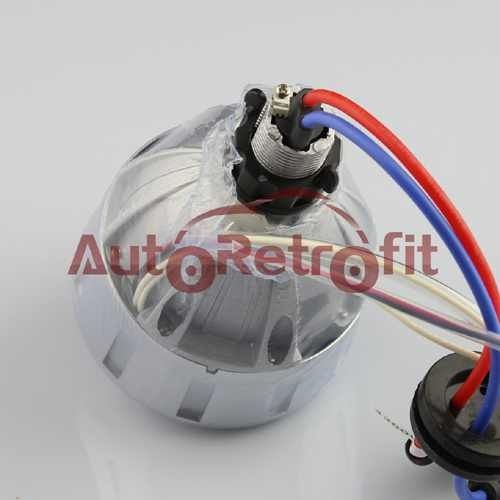
Here is one of mine installed. Side note: Don't mount the ballast inside of the housing as shown in this picture. This will cause it to overheat. They should be mounted to the outside rear of the housing.

__________________
https://youtube.com/@UnwindTimeVintageWatchMuseum
Last edited by particlewave; 06-21-2013 at 10:59 AM.
|
|
|
|
|
06-21-2013, 12:28 PM
|
#28
|
|
Registered User
Join Date: Jan 2007
Location: BC
Posts: 1,355
|
I'm still hoping someone with the stock Daytime Running Lights will do one of these conversions and show me how. I can't figure it out.
It appears that you non-DRL folks are wiring low beam wires to the projector bulb and splitting off the high beam power to the cutoff shield solenoid. This was verified by a vendor; this gives the equivalent of 4 high beams. Good so far.
Here's the clanker: the stock DRL uses the low beams, so the DRL supplies reduced voltage to the lows in DRL mode, which would be an issue for the projector. Vendor: The reduced DRL voltage generally isn't compatible with aftermarket HIDs, but with some advanced configuring you should be able to set it up.
It's the "advanced configuring" that I'm having trouble with, so please chime in if you've made it work.
__________________
2001 Boxster, 5 spd, Seal Grey
Last edited by clickman; 06-21-2013 at 03:14 PM.
|

|
|
|
06-21-2013, 01:33 PM
|
#29
|
|
Custom User Title Here
Join Date: Mar 2012
Location: Ft. Leonard Wood
Posts: 6,169
|
Well, I don't have stock daytime running lamps so I'm not sure how they are set up in OEM.
The projectors themselves are powered this way; The bulb is wired into the low beam power, as this power is on whether the low beam or high beam is selected(stock high beam uses both low and high beam bulbs), and the high beam wire operates the shutter solenoid.
My led halos are wired into the stock running light circuit and come on with the running lights.
It's my understanding that models with daytime running lamps use the low beam in a low-power application as daytime running lamps.
Someone did a write up on this DIY section... Basically, you would need to determine the amount of power supplied by the OEM DRL circuit, the power needed by the DRLs that you wish to use, and go from there.
Example;
Low beams = 12v
DRLs = 6v(just guessing here)
You would need to design a circuit that supplies power to aftermarket DRLs when input voltage is 6v, but shuts off when input voltage is high(12v).
There may be another way to do it with the existing circuits in the car, but I'm not sure.
As far as using the HID projectors as DRL's in a low-power mode, that's not possible. Likewise, the low-power will not be enough to fire the ballast so it should not cause a problem with the HID set up.
__________________
https://youtube.com/@UnwindTimeVintageWatchMuseum
Last edited by particlewave; 06-21-2013 at 01:37 PM.
|
|
|
|
|
06-21-2013, 03:18 PM
|
#30
|
|
Registered User
Join Date: Jan 2007
Location: BC
Posts: 1,355
|
Quote:
Originally Posted by particlewave
You would need to design a circuit that supplies power to aftermarket DRLs when input voltage is 6v, but shuts off when input voltage is high(12v).
|
That's exactly the part I need help with.
__________________
2001 Boxster, 5 spd, Seal Grey
|
|
|
|
|
06-21-2013, 03:22 PM
|
#31
|
|
Custom User Title Here
Join Date: Mar 2012
Location: Ft. Leonard Wood
Posts: 6,169
|
A simple 12v relay should work in theory. Setup so that when voltage is low, the circuit is closed, providing power through the relay, and open when 12v is supplied to the solenoid, cutting power.
I'm sure there is a thread on this. I'll see if I can find it
__________________
https://youtube.com/@UnwindTimeVintageWatchMuseum
|
|
|
|
|
06-21-2013, 03:57 PM
|
#32
|
|
Custom User Title Here
Join Date: Mar 2012
Location: Ft. Leonard Wood
Posts: 6,169
|
This is the thread, however I don't think it will help you as this was for a car without OEM DRLs.
This is what I had in mind. Simple and cheap, but it would depend upon the power supplied by the OEM DRLs.
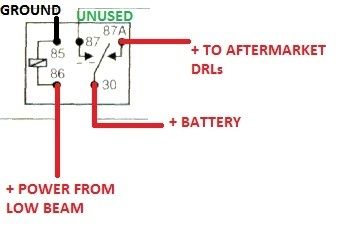
That +Battery should be supplied via a switched power source that is on with the ignition.
If the OEM DRL power supply is too high, it would activate the solenoid and it wouldn't work. However, I think the power would be low enough for it to work. An easy way to find out would be to tap the low beam positive power supply in the connector, and hook it up to the relay solenoid(don't forget to ground the other end of the solenoid), turn ignition on to power the OEM DRL circuit, and see if it throws the solenoid. If not, great! Then switch on headlights and make sure that the solenoid is activated, breaking the circuit.
Since I don't have OEM DRLs, you'd have to do the legwork here
__________________
https://youtube.com/@UnwindTimeVintageWatchMuseum
Last edited by particlewave; 06-22-2013 at 10:21 PM.
|
|
|
|
|
06-22-2013, 08:30 AM
|
#33
|
|
Registered User
Join Date: Jun 2010
Location: The Netherlands
Posts: 53
|
Great information Particlewave! I am also interested in the Bi-Xenon kit you bought. I found a few on Ebay, but it is always difficult to tell what the quality is! Are your Angel eyes LED? Are you happy the the brightness?
If you have a link to where I can purchase the Bi-Xenon kit you have please send it to me!
Thanks again for the info!
|
|
|
|
|
06-22-2013, 12:14 PM
|
#34
|
|
Custom User Title Here
Join Date: Mar 2012
Location: Ft. Leonard Wood
Posts: 6,169
|
The angel eyes that came with the kit were CCFL(fluorescent), but I broke one. I made my own led angel eyes. I would recommend the CCFLs, though. They look nice and it would be difficult to find LEDs the exact size. I'll look that kit up for you when I can...I'm at work, so not much time right now.
__________________
https://youtube.com/@UnwindTimeVintageWatchMuseum
|
|
|
|
|
06-22-2013, 10:17 PM
|
#35
|
|
Custom User Title Here
Join Date: Mar 2012
Location: Ft. Leonard Wood
Posts: 6,169
|
 This is the kit that I ordered. This is the kit that I ordered.
It's $150 now, but still a good deal. When ordering, specify H1 bulbs, the color temperature that you want, and angel eye color. I went with 4300k and they are a very bright white(don't like the blue look on headlights).
__________________
https://youtube.com/@UnwindTimeVintageWatchMuseum
|
|
|
|
|
06-22-2013, 10:26 PM
|
#36
|
|
Custom User Title Here
Join Date: Mar 2012
Location: Ft. Leonard Wood
Posts: 6,169
|
__________________
https://youtube.com/@UnwindTimeVintageWatchMuseum
Last edited by particlewave; 06-22-2013 at 10:31 PM.
|
|
|
|
|
10-21-2013, 12:45 PM
|
#37
|
|
Registered User
Join Date: Aug 2012
Location: United Kingdom
Posts: 20
|
Hey Particleweave.
I'm looking at doing a similar mod with what looks like the same kit. Can I ask, do you still have the standard high beams fitted? The reason I ask is the "flash" function is usually pretty poor on a bi-xenon car if the lights are off. They take so long to warm up that the moment is gone by the time you've flashed the high beams.
|
|
|
|
|
10-21-2013, 01:25 PM
|
#38
|
|
Registered User
Join Date: Sep 2013
Location: Montreal, QC. (currently expat to Shanghai)
Posts: 3,249
|
Most of us who've done a retrofit keeps the high beam H7 halogen bulb in place mate. It sit right below the bi-xenon projector. Flashy-flash enough!
__________________
______________________________
'97 Boxster base model 2.5L, Guards Red/Tan leather, with a new but old Alpine am/fm radio.
|
|
|
|
|
10-21-2013, 02:11 PM
|
#39
|
|
Registered User
Join Date: Aug 2012
Location: United Kingdom
Posts: 20
|
Thanks Nine8Six. So is the bi-xenon part redundant or have you hooked up the H7s & the gaurd that flips on the HIDs?
|
|
|
|
|
10-21-2013, 02:18 PM
|
#40
|
|
Registered User
Join Date: Sep 2013
Location: Montreal, QC. (currently expat to Shanghai)
Posts: 3,249
|
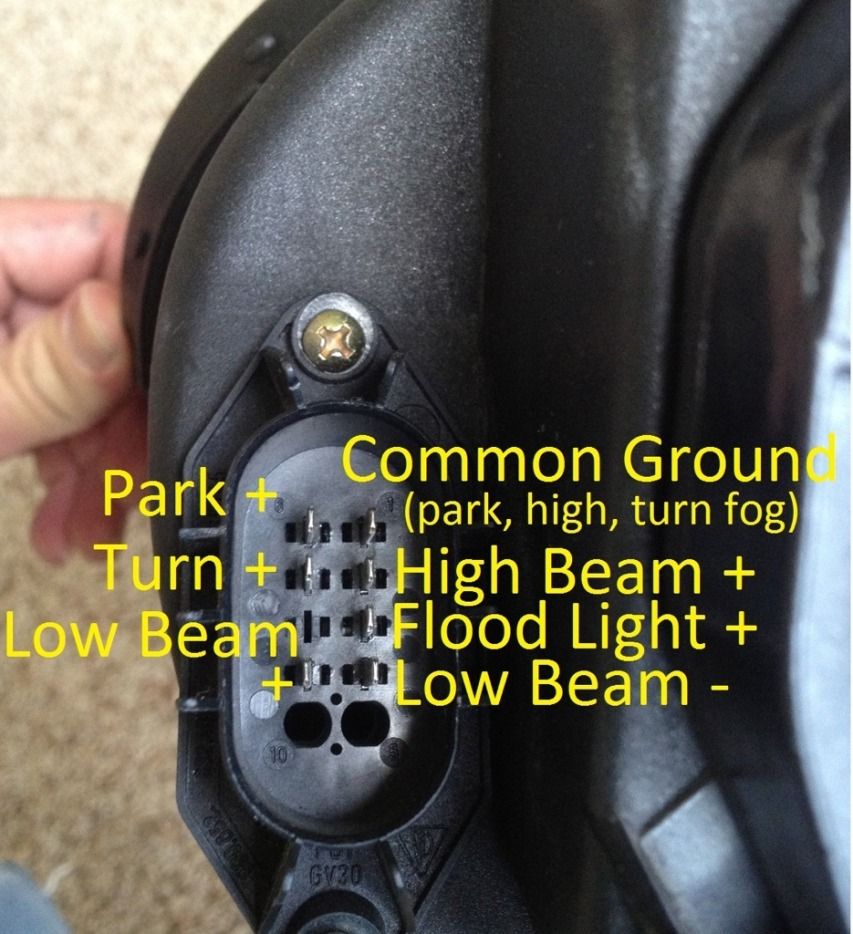
HID Ballast > to Low beam H7 connector (get rid of the halogen bulb)
Bi-xenon Solenoid > to the High beam H7 connector (keep the halogen bulb in place)
The solenoid only draws a meaningless 0.03 amp when activated so no crisis for the high beam circuitry.
Hope this helps
__________________
______________________________
'97 Boxster base model 2.5L, Guards Red/Tan leather, with a new but old Alpine am/fm radio.
|
|
|
|
 Posting Rules
|
You may not post new threads
You may not post replies
You may not post attachments
You may not edit your posts
HTML code is On
|
|
|
All times are GMT -8. The time now is 05:56 PM.
| |


 Boxster
 2006 Porsche Boxster 987


 Linear Mode


