Go Back   986 Forum - The Community for Porsche Boxster & Cayman Owners > Porsche Boxster & Cayman Forums > DIY Project Guides

Post Reply
 
LinkBack Thread Tools Display Modes
Old 07-13-2020, 02:20 PM   #1
Boxster_S_Dude
 
Join Date: Jun 2020
Location: San Jose, CA
Posts: 7
Garage
Short Shifter Install

I installed a short shifter over the weekend. It took me about 1 hour to do the install. I think it will take 2-3 hours for a novice who hasn't done this before. It is best to have a buddy help you if available.

I have 13 photos but could only put 10 into the post apparently. So i cover steps 1 thru 8 and will add steps 9 and 10 to the thread once published.

Short Shifter Kit was purchased from Amazon.

PQYRACING PQY Short Shifter Quick Gear Shifter Kit Compatible with Porsche 911/996 Turbo AWD Boxster

I installed this kit into my 2000 Boxster S.

The kit was $60.99

Link: https://www.amazon.com/gp/product/B07HG21BR6/ref=ppx_yo_dt_b_asin_title_o03_s00?ie=UTF8&psc=1

I did the install using the following steps.

Step 1

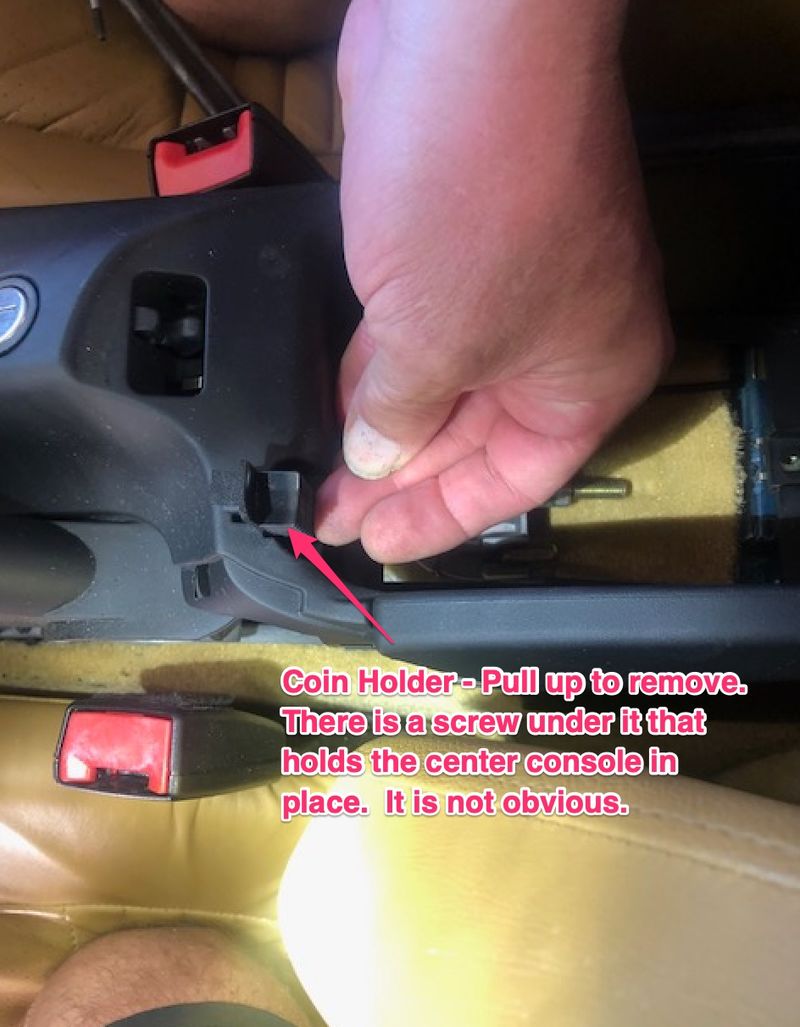
Remove Center Console. Unscrew and unplug. See photo.
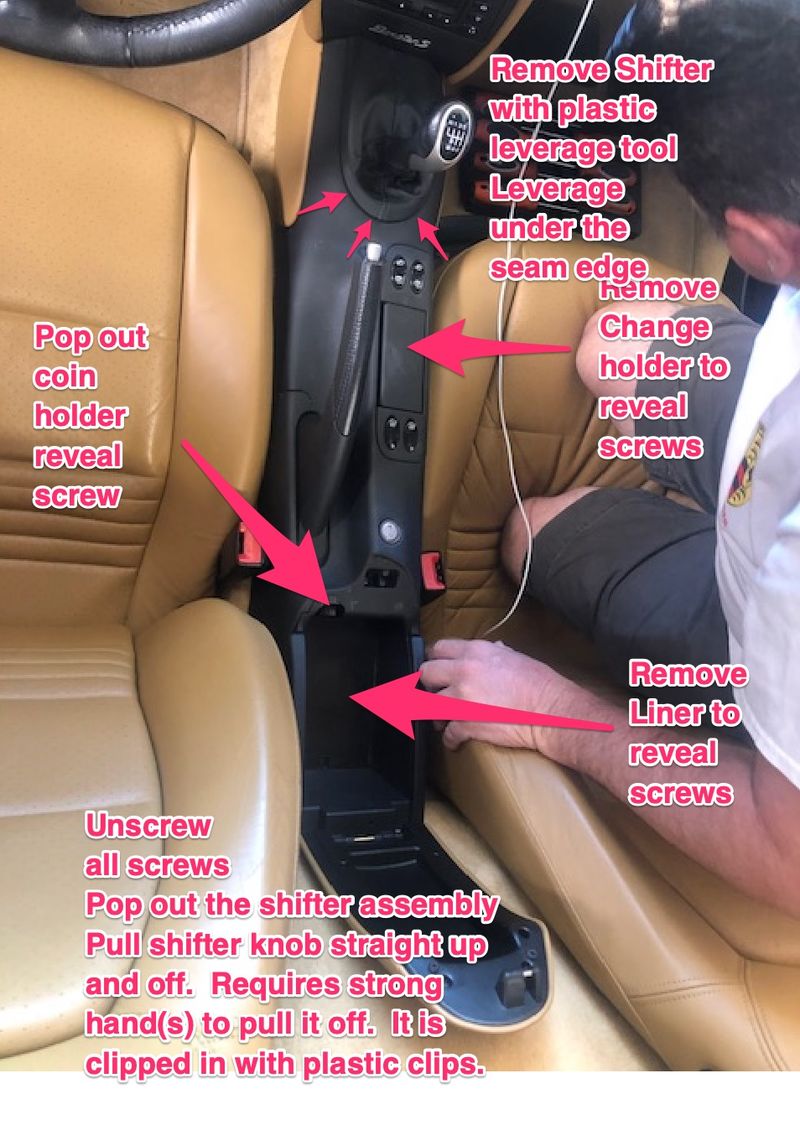

Also note that there is a key screw below the coin holder here.


Step 2

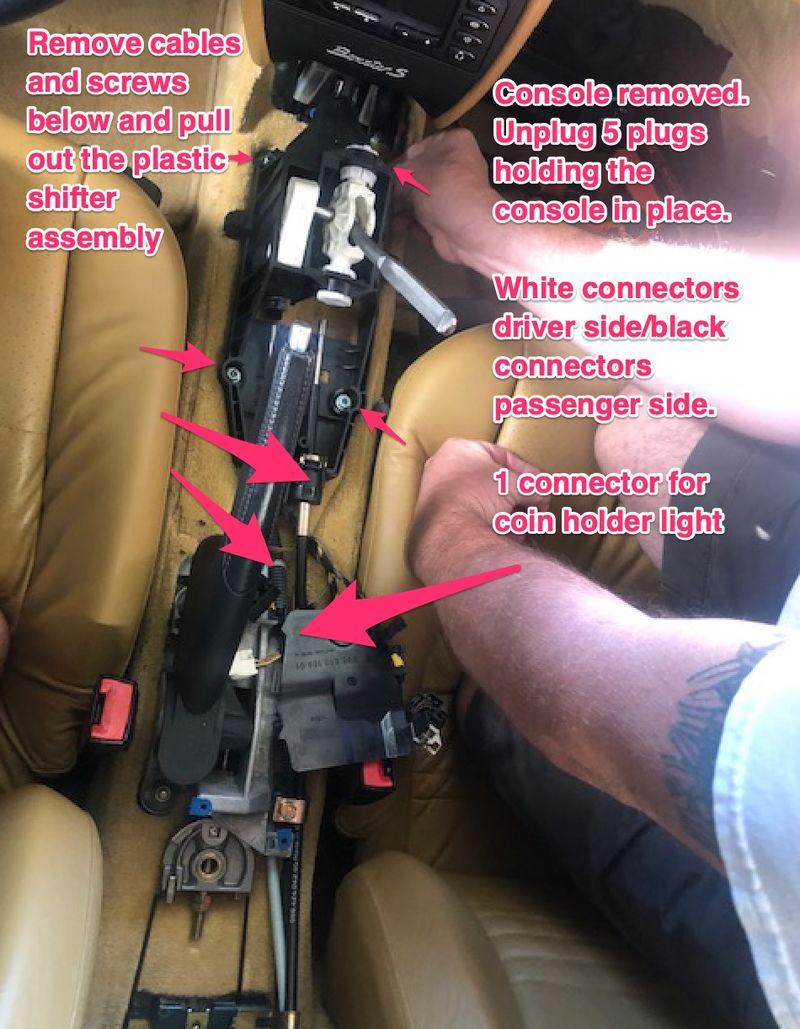
Remove Shifter Plastic Assembly with Stick


Step 3

Remove Stick


Step 4

More Stick Removal

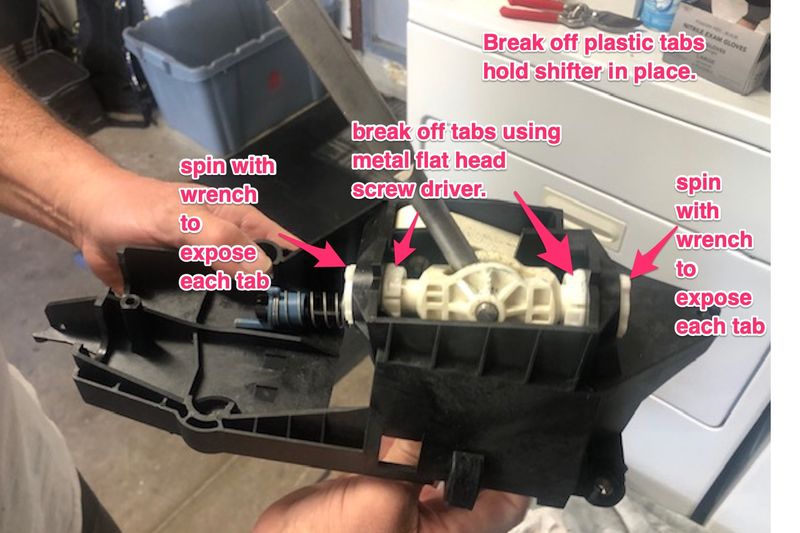
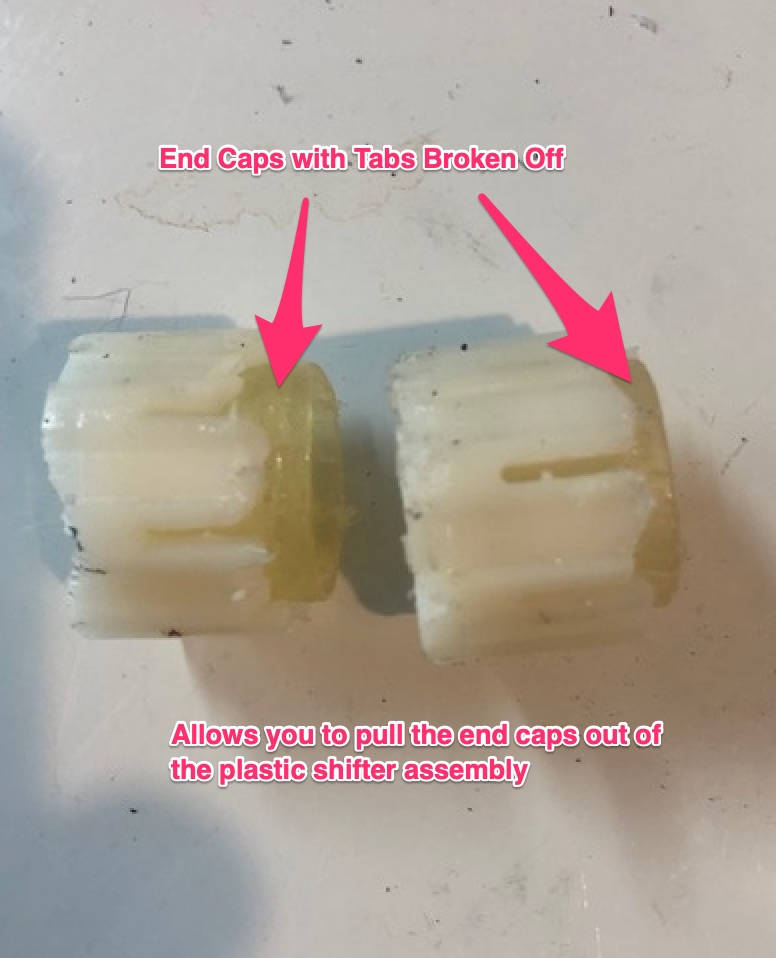
Break the plastic tabs off of the shifter end caps. See photos below. I used a metal flat head screw driver. You can also clip them if you have the right cutting equipment. Bottom line, the plastic end caps won't come out without breaking the tabs.

Photo after breaking tabs on end caps and pulling them out.
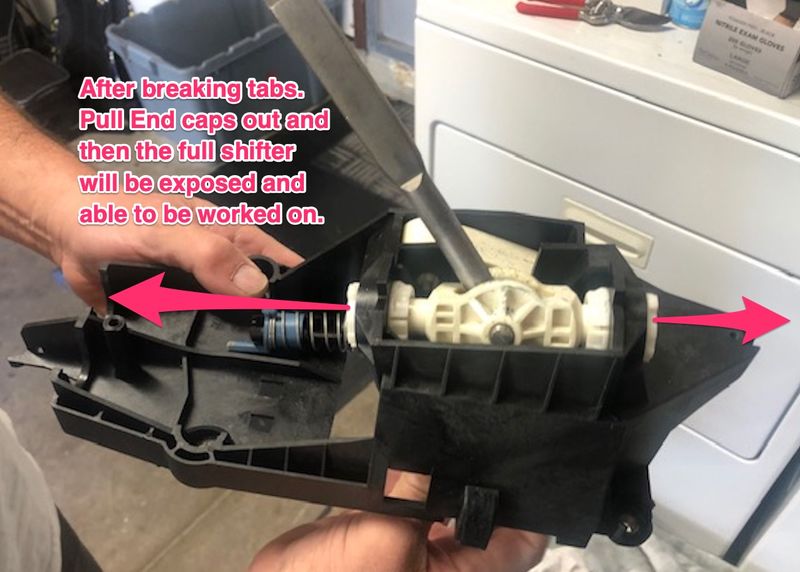


Photo of full assembly before pulling end caps out.


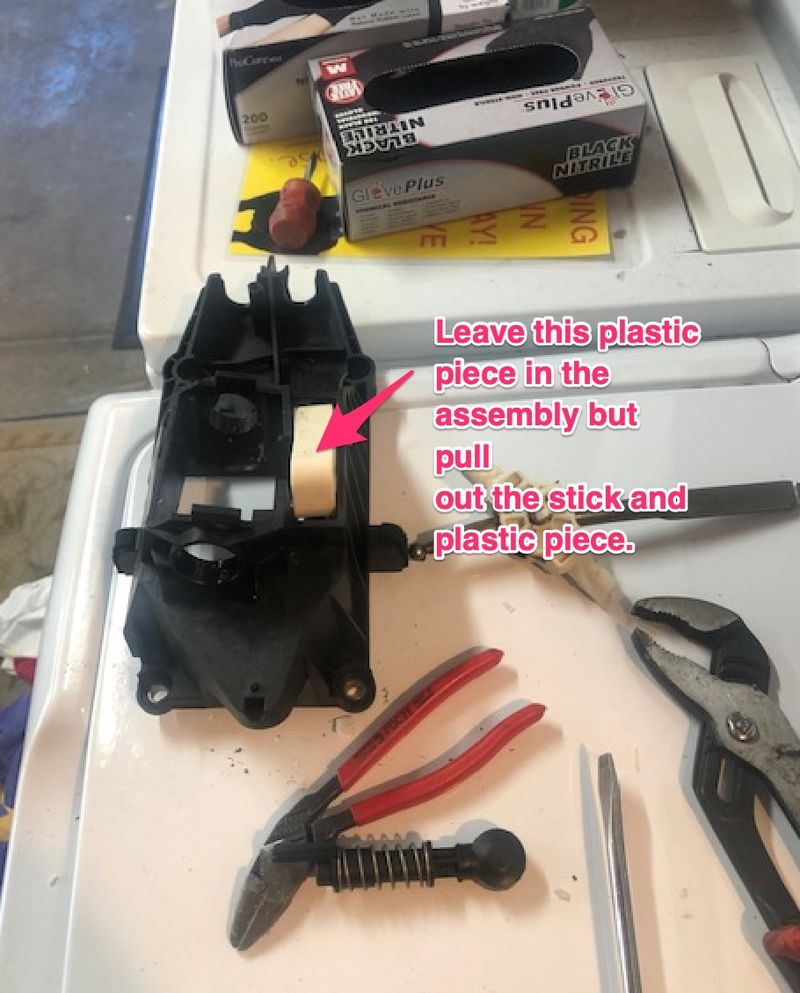
Step 5

Pull out stick and plastic piece.


Step 6

Install New Short Shifter into plastic assembly.
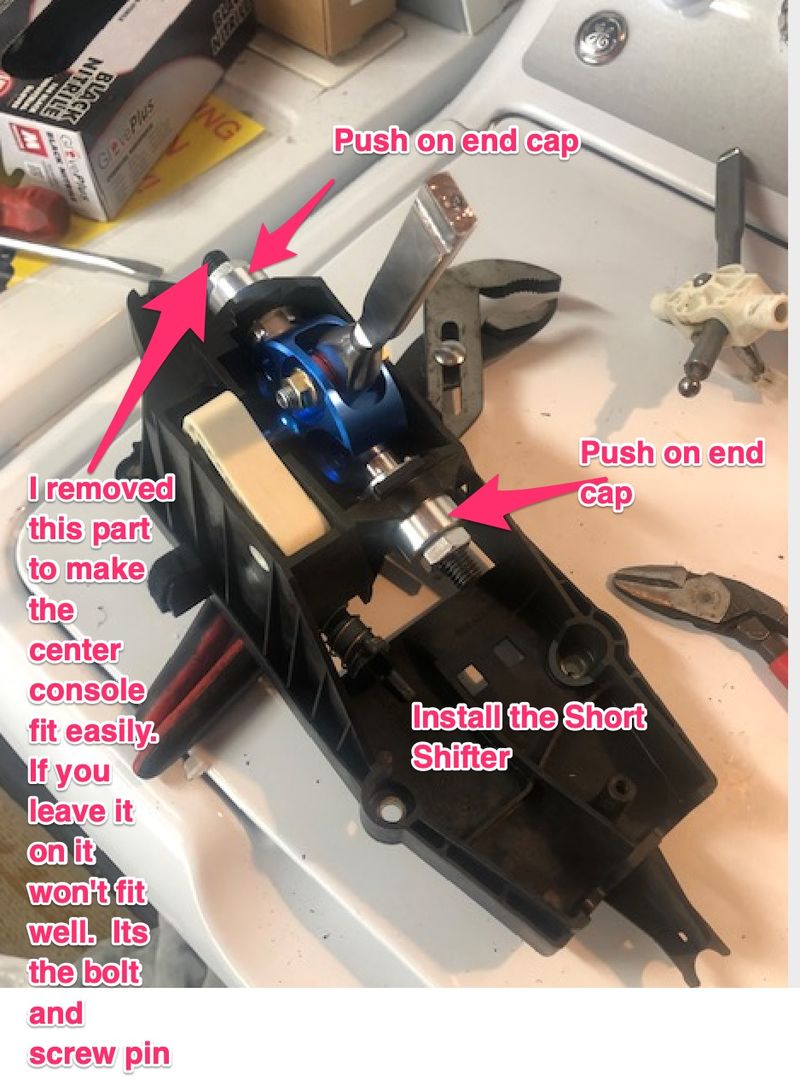


Step 7

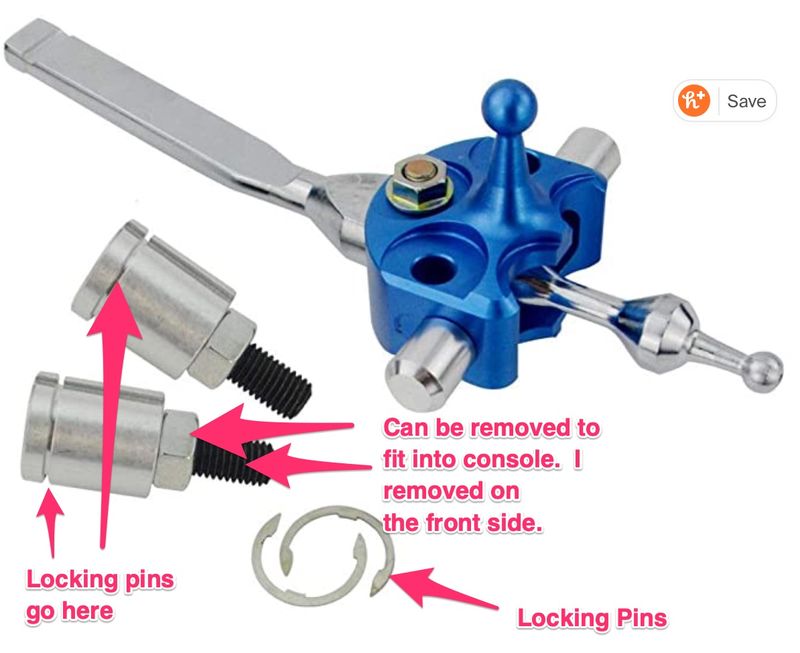
You will need to push the end caps on and install the locking pins. I had to remove the front bolt and nut that was hooked to the front end cap to fit the center console into place otherwise it would not fit. It doesn't have a mechanical play on the 2000 Boxster S so it is not needed. See photo...it will be self explanatory when you see the short shifter. Hopefully the below photo explains it a bit.

Step 8

Insert the locking pins in place to hold the end caps in place. I put the front locking pin with my hands and screw driver but had to use a wrench to squeeze the assembly in place so that I could put in the back locking pin. I squeezed the wrench and inserted the pin by hand. It went in about 30%. I used a rubber mallet and screw driver. I put the flat head of the screw driver against the top of the pin and hit the screw driver with the rubber mallet and it went into place. It might take two people to perform this maneuver.


I removed step 9 and step 10 and will add it to this thread once published.

2000_Boxster_S_Owner is offline   Reply With Quote
Old 07-14-2020, 03:26 PM   #2
Boxster_S_Dude
 
Join Date: Jun 2020
Location: San Jose, CA
Posts: 7
Garage
Step 9 and Step 10

Step 9

Screw in the Shifter assembly to where it was before you removed it. Make sure to remove the bolt and nut or the center console won't fit into place.


Step 10

Place the middle console on over the e-break and back into place. Screw in the screws and connect the power window and seat heaters as well as the ash tray light.

Remember, the white connector are on the driver side of the center console and the black connectors go on the passenger side of the console. Windows are up front and seat heater is toward the back. The light is self explanatory as it is the only plug.

I'll show step 2 again...


Once you have the center console on you will need to snap the stick leather cover in place and put the stick knob back on by pushing the knob straight on to the stick.

The final product should look like this when finished.


Note: The shifter will feel stiff when you shift it outside of the console. Once you put it in the console, it will feel as expected or as before.
2000_Boxster_S_Owner is offline   Reply With Quote
Old 03-31-2021, 08:55 AM   #3
Registered User
 
Join Date: Mar 2021
Posts: 1
Thanks for write up. How do you like it so far ? I just ordered the same one so interested to hear.

Rick
Ricurb7 is offline   Reply With Quote
Old 12-24-2023, 05:44 PM   #4
Registered User
 
Join Date: Mar 2023
Location: St Pete, Fl.
Posts: 2
I installed this tonight.
FIrstly, the lever needs to be taken out of the blue assembly and rotated, the lean should be away from the driver.

second, this lever has a longer bottom shaft which requires you to remove the green shift assembly floor plate to provide the required clearence.

Attaching the c-clips can be a real PIA. but work with a partner to apply pressure and slip the clips in.

lastly, I didnt have to remove the forward-most bolt. If you do this install with the top down you should be able to pitch the center consule vertically in order to re-seat under the bat-wing.
joeta4 is offline   Reply With Quote
Old 12-28-2023, 07:46 AM   #5
Registered User
 
Join Date: Jan 2023
Location: Ontario, Canada
Posts: 200
I used the same one, and I actually flipped it so the lean was towards the driver, as I prefer it that way. I only used it for about a month then got a BAD one, the ebay one is just way too short, and a Porsche mechanic who's opinion I respect told me that it was a bad idea as it could cause issues with the transmission. The BAD shifter is shorter than stock, but not nearly as short as the ebay one. Plus I got the threaded one so it opens up more possibilities for shift knobs.

redpepperracing is offline   Reply With Quote
Post Reply

Tags
short shifter install


Posting Rules
You may not post new threads
You may not post replies
You may not post attachments
You may not edit your posts

BB code is On
Smilies are On
[IMG] code is On
HTML code is On
Trackbacks are On
Pingbacks are On
Refbacks are On


All times are GMT -8. The time now is 12:00 PM.


Powered by vBulletin® Version 3.8.7
Copyright ©2000 - 2025, vBulletin Solutions, Inc.
Content Relevant URLs by vBSEO 3.6.0
Copyright 2024 Pelican Parts, LLC - Posts may be archived for display on the Pelican Parts Website -    DMCA Registered Agent Contact Page