Go Back   986 Forum - The Community for Porsche Boxster & Cayman Owners > Porsche Boxster & Cayman Forums > DIY Project Guides

Post Reply
 
LinkBack Thread Tools Display Modes
Old 04-29-2018, 09:34 AM   #1
Registered User
 
oldskool73's Avatar
 
Join Date: May 2015
Location: Sydney, Australia
Posts: 335
Fix sagging soft-top coming unstuck at rear

My car's a '97 but I fitted an '03 glass roof a year or two ago.

Recently I started to notice slight wrinkles at the rear corners of the top, and over time this has evolved to the point that the whole rear and glass has started to droop inwards, and the rear seams are showing higher than they should ...


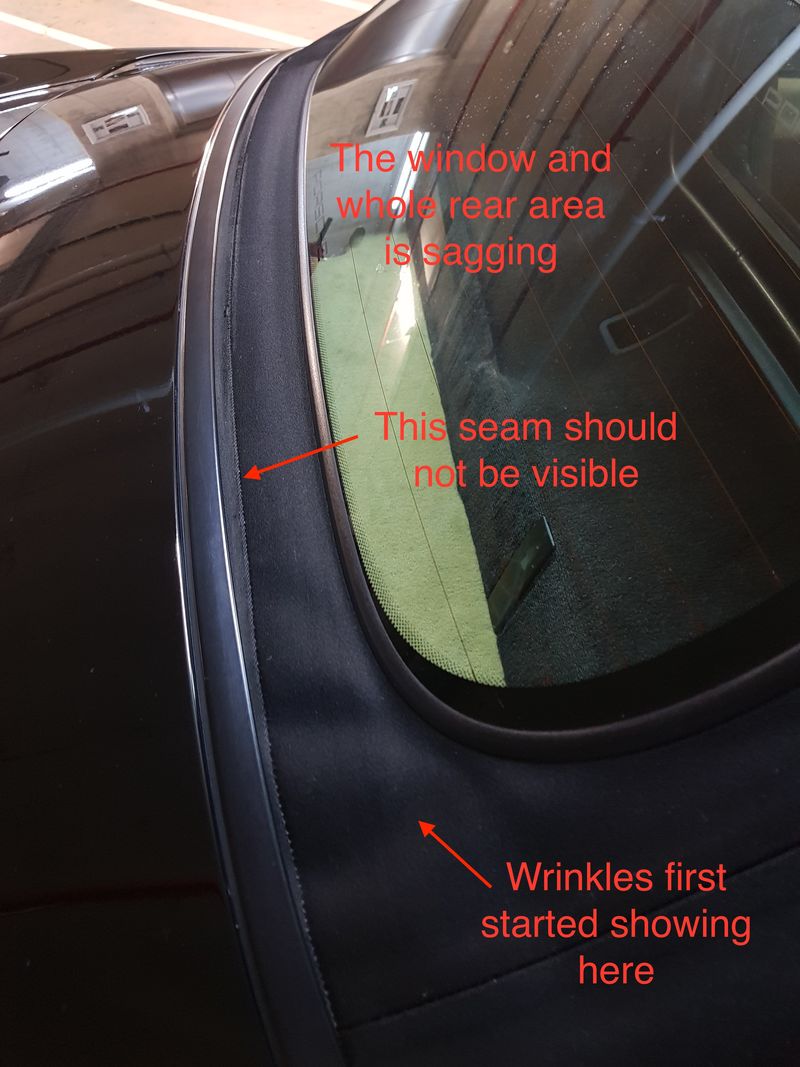
With the top in the service position you can see the problem, the rear canvas has pulled out of it's original folded position, allowing slack in the back part of the roof.


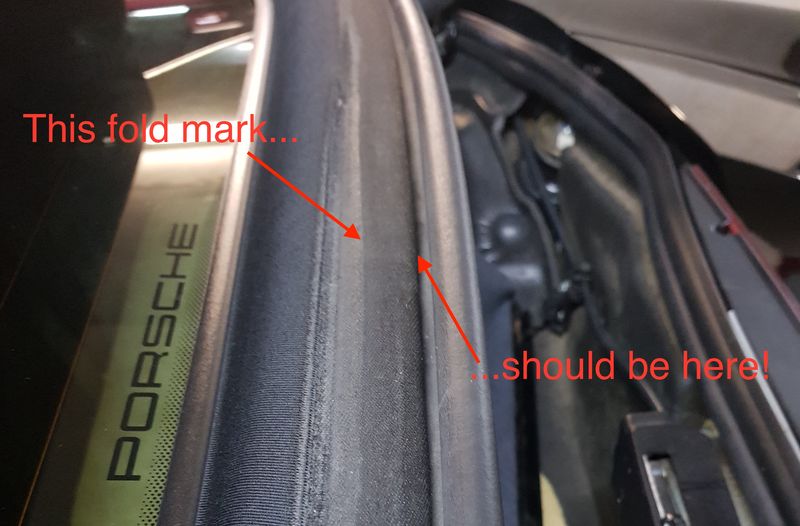
I think this was caused, at least in part, by me over-tightening the hold down cables

Fixing this is pretty simple... we need to remove the rubber strip that holds the top in place, tighten and re-affix the top, then re-insert the rubber strip. The only new part we need is something to re-stick the top. I used the #03684 3M tape that's been mentioned on here a few times...


https://www.digikey.com/products/en/tapes-adhesives-materials/tape/908?k=06384%20TAPE

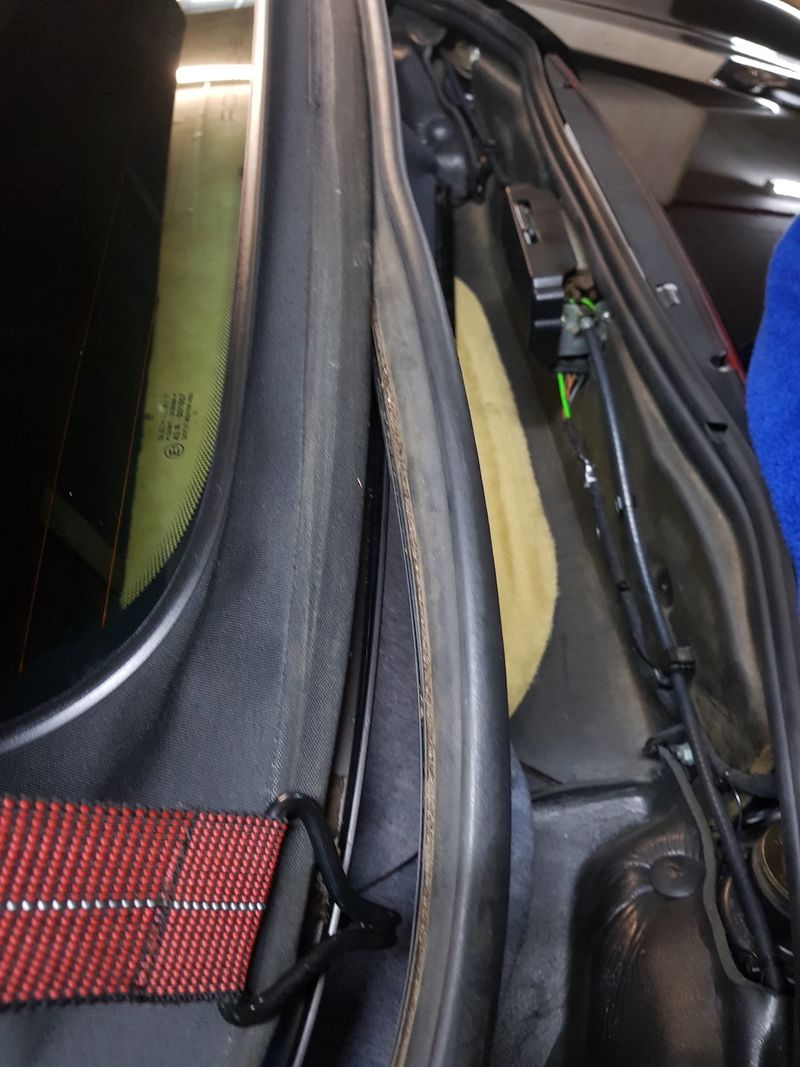
Start with the top in service position by pulling up the rubber strip from one side. Note the inserted part goes further than the visible part. I used a bent pick to get in under the corner and just carefully levered it out.


... once it's started it just pulls out easily by hand. Continue pulling along the length of the rear...


Once it's off, give it a good wash to remove 2 decades of grime, then a nice rubber protector to make it look sexy again...


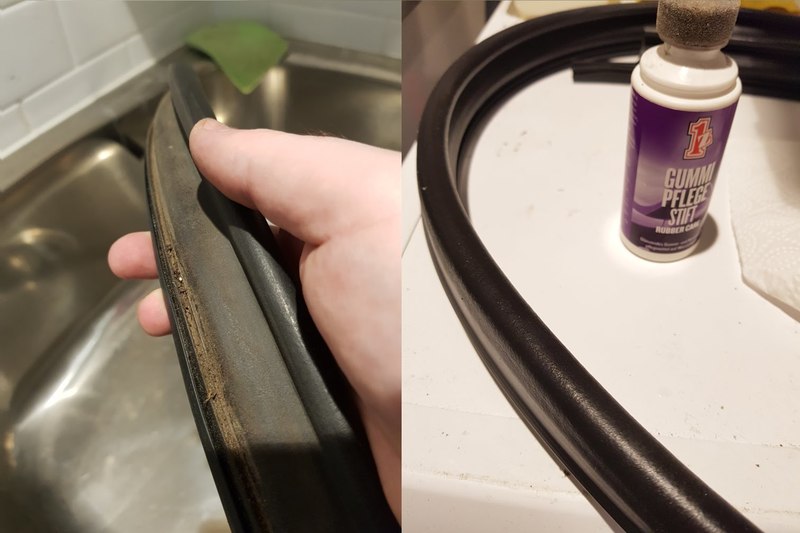
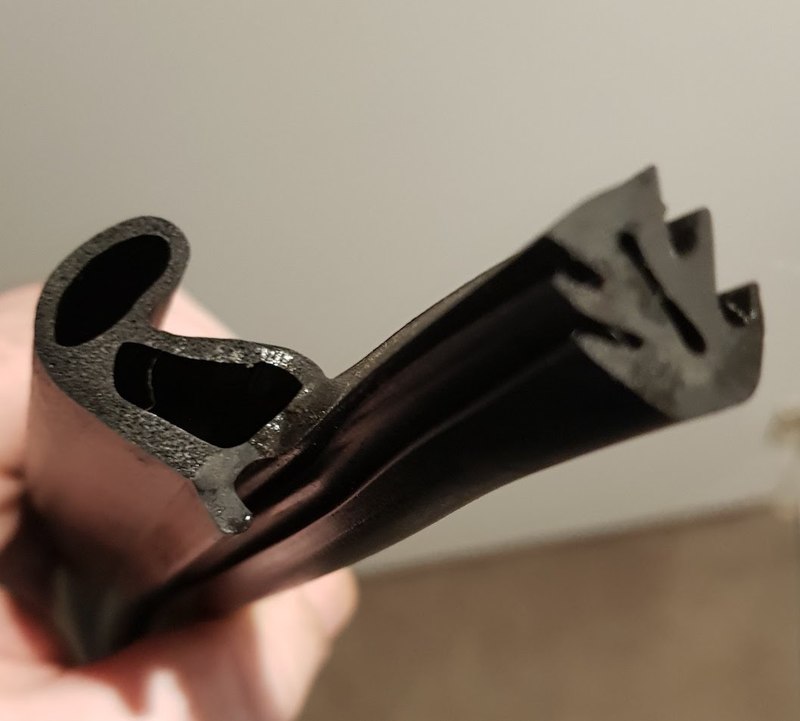
Here you can see the profile of the rubber, and how the inserted strip runs further than the bit you can see against the top. I coated all of the inserted piece with dish soap to make it easier to insert again later.


Last edited by oldskool73; 04-29-2018 at 09:40 AM.
oldskool73 is offline   Reply With Quote
Old 04-29-2018, 09:37 AM   #2
Registered User
 
oldskool73's Avatar
 
Join Date: May 2015
Location: Sydney, Australia
Posts: 335
Continued...


Now we can free the canvas from the old fixings. There's 3 attachments, 1 glued and 2 taped.

The glued section is a small flap of material that's inserted into the rear retainer and glues to the main canvas. Mine was completely unstuck. I'm not sure if this has any mechanical use in holding the top down, my guess is it's more a weather strip than anything else?

The main top is first taped to a flexible piece, then folds over it into the same channel that the rubber we removed runs in, and has another strip of tape holding it in place in there. The original tape seems thinner than the 3M stuff, more like simple sticky tape, but the extra width didn't seem to matter in putting it back together.


Clean all the old tape of as best you can, and clean the whole area with IPA. Then run the 3M tape in the same places you removed the old stuff from. I also put some down to replace the glue, as it's all I had to hand, and there was just enough on the roll to do so...


Now you just need to peel off the red backing tapes and carefully pull and stick the top back into the proper position (I followed the original fold creases as best I could). I did find the glass window to be a bit of a pain here, you might need to manoeuvre it around a bit to get the slack that the top needs to fit correctly. I'd imagine the plastic window would make this step easier.

The re-insert the rubber strip into the channel, making sure it's fully pressed into place. Just work your way back and forward pushing it into place,


...and checking from underneath as well, as there's a small flap on the rubber that should slightly overlap the lower rim.


...And that's it! Only took an hour or two to fix.

I gave it overnight with the top closed but unlatched for the tape to take, just in case. The final result... no more sagging... just needs a good clean now!

oldskool73 is offline   Reply With Quote
Old 04-29-2018, 04:18 PM   #3
Registered User
 
Join Date: Jul 2012
Location: New Hope, PA
Posts: 191
Outstanding post! Let it be example of how all DIY threads should be presented. A lot of the soft top stuff remains a mystery it’s great to see it deconstructed so that the layman can understand. Nothing to be afraid of if you have the knowledge.
__________________
'01 986S
‘07 GT3
'80 911SC Weissach Edition (Sold)
‘11 958 S
https://dergarage.com
CBRacerX is offline   Reply With Quote
Old 04-29-2018, 04:44 PM   #4
2003 Base 5-speed
 
grc0456's Avatar
 
Join Date: Jul 2015
Location: Stoneham, MA
Posts: 949
Garage
Great write up. I have the same problem, and attempted a ham-handed fix with fabric adhesive - basically just putting a bead of glue on the canvas and using a plastic pry tool to jam it back under the rubber. I got improvement, but not the professional type result you did.


Sent from my iPad using Tapatalk
grc0456 is offline   Reply With Quote
Old 04-30-2018, 06:14 AM   #5
Registered User
 
p3230's Avatar
 
Join Date: Oct 2015
Location: Rockland Ontario
Posts: 208
Garage
That's my project for this summer when the weather gets warmer thanks for taking the time to share it with us.
__________________
Frank
p3230 is offline   Reply With Quote
Old 07-17-2018, 03:02 PM   #6
Registered User
 
Join Date: Dec 2006
Location: DC
Posts: 73
Is the tape sticking?

Hello OldSkool73,

Nice write-up!

Is the tape holding? Also, how did you pull the fabric so that it is stretched and tight?

I have the same issue - in my case the car has been baking in the sun from being parked outside during the day and the tape kind of melted.

I was able to successfully do the first part - which was removal and clean up of adhesive tape.

However, the second part was pretty poor outcome for me. Main challenges:
1. Tape doesn't seem to really want to stick to canvas. Did you use any tape primer?
2. The top cover interferes in re-installation of the fabric - did you remove it?
3. When doing myself, it is near impossible to stretch the fabric so the top is misaligned on one side (it's ok where i started, but short by 1" on the side I finished).

It much worse now than before I attempted the fix! Any suggestions / input is appreciated.
__________________
- 2003 Boxster
sdharmani is offline   Reply With Quote
Old 07-17-2018, 03:24 PM   #7
2003 Base 5-speed
 
grc0456's Avatar
 
Join Date: Jul 2015
Location: Stoneham, MA
Posts: 949
Garage
Since my top and headliner had other issues as well (severe crease/wear marks, and headliner front lip separated) I decided to have the whole top replaced. Pretty happy with the result!

grc0456 is offline   Reply With Quote
Old 07-17-2018, 05:04 PM   #8
Registered User
 
oldskool73's Avatar
 
Join Date: May 2015
Location: Sydney, Australia
Posts: 335
hey @sdharmani

Mine's holding up well so far. The only thing I'd do differently maybe is use a proper canvas glue for the flap that's glued originally, as the tape doesn't seem to have worked there very well.

1. No, didn't use anything but the tape, with the top in service position I found there wasn't really any tension on it to pull it free of the tape anyway, and once you have the rubber in there that's gonna hold it in as well. TBH I think the rubber does most of the work, the tape just helps grip it in there.
2. Guess you mean the 'clamshell' part? Can't remember TBH, looking at the photos no, but it's really easy to do, just undo the 6 nuts underneath and lift it off, so if you think it'd help just do it.
3. Again with it in service position I didn't really have any tension on it, so didn't need to 'stretch' it at all. The only thing that made it difficult was the glass window moving around, so had to put a hand in from the back and push it into various positions to get the canvas to move around right.

Maybe you need to try putting the top a bit more 'open' or holding the bow a bit higher when adding the tape or something, to help relieve any tension on the canvas? I didn't have to 'stretch' it at all, it was more just fiddly getting it lined up and stuck neatly into the channel.

On the bright side, it's not too much of a hassle (other than the cost of the tape) to pull it out and try again until you're happy with it.
oldskool73 is offline   Reply With Quote
Old 07-19-2018, 02:47 PM   #9
Registered User
 
Join Date: Sep 2008
Location: Florida
Posts: 2,492
The 3M adhesive works better than the tape IMO. Folks are scared that they’ll make hey mess with the adhesive but if you spray it on a paper plate and then apply it top the top with a foam paintbrush it works pretty well and is easy to control.
dghii is offline   Reply With Quote
Old 07-20-2018, 05:38 AM   #10
Registered User
 
p3230's Avatar
 
Join Date: Oct 2015
Location: Rockland Ontario
Posts: 208
Garage
I used a canvas epoxy that quick dries where the glue is and held it there for one hour with vise clips, and then I put the epoxy the rest of the way across where is say's glue on the top picture and then I pulled the top until it fitted in the bottom grove, then installed the rubber using a tool to install screens to set the rubber in place let it set overnight and the next day it was all good and still is.
__________________
Frank
p3230 is offline   Reply With Quote
Old 09-19-2019, 05:27 PM   #11
Registered User
 
Join Date: May 2019
Location: South Carolina
Posts: 1
Not bad but may need to redo as you instructed

Nice post. I didn't originally understand all your instructions. I taped and glued mine, but didn't remove and re-tape the channel. Turned out well, but as you show in your picture, mine isn't all the way back as it should be. OK, for now, but I plan on redoing it if it sags again (which I expect it will). I now understand the channel re-tape and refit and how to know how far to pull the canvas back. Thanks.

BTW, I cleaned and protected my top with a 303 kit and it worked very well.
constj is offline   Reply With Quote
Old 04-22-2020, 05:28 AM   #12
Registered User
 
Join Date: Dec 2017
Posts: 11
Fix sagging soft-top coming unstuck at rear

Great thread guys! I did use the 3M 06384 tape as suggested by a few, but it did not hold up. I decided to go with a different 3M version that is 7/8" wide instead of 1/2". The tape I used was 3M 03616. Removed all the old tape etc, vacuumed channel, cleaned with Denatured Alcohol, applied the 3M tape to the inside of the channel where the end of the top seats, and also on the top of the frame, where the old tape was installed. Letting it sit for 72 hours in my heated garage at 72 degrees F, top in service mode. Will close top and check for fit. Hopefully it is tight!


Issues were:


1. This is a 2003 top on a 2001 S. Sagging window would not allow clamshell to seat all the way.

2. Inside of top had too much play, and would flap sometimes at highway speeds.


So, looking forward to testing it out after it seals over the next few days.


Here are Flickr pics: https://www.flickr.com/gp/galfano/92R867

Update: Here is finished product. Looks great and is tighter.


Last edited by tomgalfano; 04-23-2020 at 03:52 PM.
tomgalfano is offline   Reply With Quote
Old 04-22-2020, 10:56 PM   #13
Registered User
 
Join Date: Jan 2020
Location: Netherlands
Posts: 23
Excellent posts!

I will try this too as my 2003 Boxster has the same saggy glass window issue (and wrinkly canvas near a lower corner of the glass).
Evan_S is offline   Reply With Quote
Old 05-07-2020, 04:11 AM   #14
Registered User
 
Join Date: Jan 2020
Location: Netherlands
Posts: 23
Done! Thanks to the DIY's in this thread

Before:


After:


------------------------------------

During the process:


The advice of using dish soap worked perfect:
Evan_S is offline   Reply With Quote
Old 06-17-2020, 01:36 PM   #15
Registered User
 
Join Date: Sep 2019
Location: Los Angeles
Posts: 17
Quote:
Originally Posted by Evan_S View Post
Done! Thanks to the DIY's in this thread

The advice of using dish soap worked perfect:
Did you use soap just to wash, or as lubricant too?
Porsche Sugar On Me is offline   Reply With Quote
Old 06-17-2020, 11:45 PM   #16
Registered User
 
Join Date: Jan 2020
Location: Netherlands
Posts: 23
Quote:
Originally Posted by Porsche Sugar On Me View Post
Did you use soap just to wash, or as lubricant too?
Only as lubricant to get the rubber back into the channel.
Evan_S is offline   Reply With Quote
Old 06-18-2020, 07:55 AM   #17
Registered User
 
Join Date: Mar 2017
Location: Los Angeles
Posts: 356
“When the student is ready, the teacher appears”
Once again, this place comes through with the right info at the right time.
Thank you.

robdelorenzo is offline   Reply With Quote
Post Reply


Thread Tools
Display Modes

Posting Rules
You may not post new threads
You may not post replies
You may not post attachments
You may not edit your posts

BB code is On
Smilies are On
[IMG] code is On
HTML code is On
Trackbacks are On
Pingbacks are On
Refbacks are On


All times are GMT -8. The time now is 09:44 AM.


Powered by vBulletin® Version 3.8.7
Copyright ©2000 - 2024, vBulletin Solutions, Inc.
Content Relevant URLs by vBSEO 3.6.0
Copyright 2024 Pelican Parts, LLC - Posts may be archived for display on the Pelican Parts Website -    DMCA Registered Agent Contact Page