Hi All
So I put this job off for a while because so many posts on the internet said it was a pain of a job.
Actually it is very easy and quick if you know the tricks.
(Gathered here for you from various sources on the old interweb.)
This is the easy way, with no need to cut the old tank in pieces with a Dremel. (I had it ready)
It took me about an hour and a half in total. (And half that time is taking the carpets out and putting them back and taking the hatch off the engine bay). But I had everything to hand.)
Before you start:
1. buy a replacement tank. (I started by buying an exspensive one , then returned it because one of the inlet pipes was slightly bigger. I then bought the cheapest I could find - about £75 - which was fine (and is still is fine 9 months later) except that I had to drill out the hole for the oil dipstick - it was moulded in but hadnt been drilled out - so very easy.
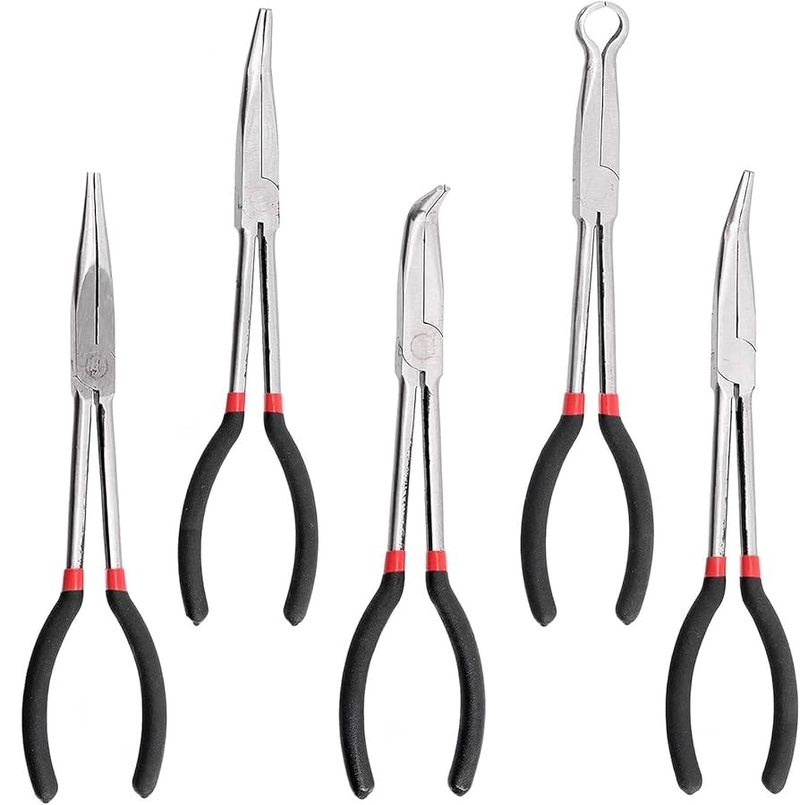
2. Buy a set of Long handled pliers - see pic below - £12 on ebay. You may also want 3 small jublilee clips if you, like me, prefer them.
3. Strip all the carpets out of the way and flip the hood up and remove the engine bay cover.
4. Syphon the fluid out of the tank with a bit of pipe.
4. Remove the oil cap, water cap and oil dipstick. (and disconnect the dipstick tube and push it down through the tray)
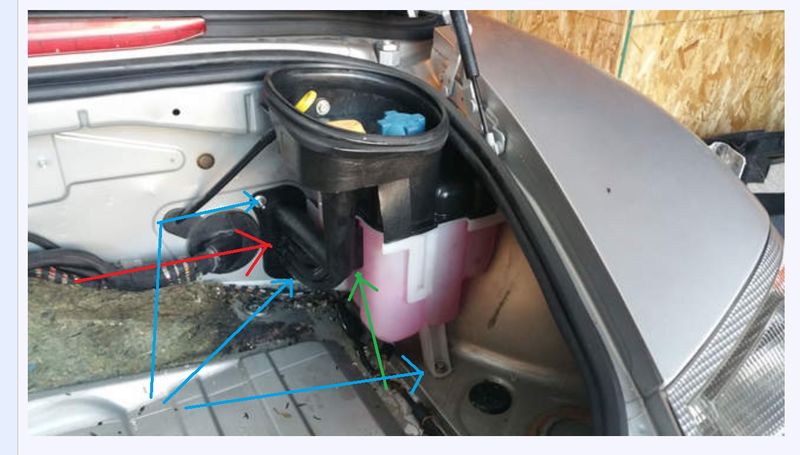
5. Disconnect the three visable hoses from the tank (location shown by green arrow) not from the black plastic bulkhead moulding. (object labled with Red arrow)
6. Remove the bolt(s) holding the tank in and the nuts attaching the bulkhead moulding to the bulkhead. (blue arrows)
So far, very easy.
7. Next, reach inside the engine bay and locate the fourth hose that goes straight into the back of the tank. There is another hose clip like the others right up against the bulkhead. To undo this clip you need the long handled pliers. Which pair depends on wether this clip's prongs (the bits you have to squeeze to open the clip) are on the top , bottom or to one side. Mine was on the bottom (of course it was!) and the angled pliers were just right. Just slide it back away from the tank and leave it on the tube. now gently pull the pipe off the tank.
8. Now remove the tank. You will need to pull the black bulkhead moulding towards you because it overlaps the tank's rear mounting flange. (and shares at least one retaining bolt (stud) - the nut of which you removed earlier)
You might need to wrestle with it a little but you only need to pull it forward about a centimeter or so to clear the studs ..... and the three hoses in the engine bay have enough slack for that. Once it is clear of the studs you can pull and slide the tank off /out.
That last bit and getting the 4th clip off was the only tricky bit. (And it really isnt that tricky)
9. Wrestle the new tank back in. (the reverse of step 8.)
10. reconnect the hoses. I threw the old clips away and put three new jublilee clips on. (you have to re-use the spring clip for the one in the engine bay because its a pain to get to. (just give it a squeeze and slid it back in place - this time with the prongs upwards. (and the straight pliers)
11. replace all the nuts and bolts.
12. replace caps and dipstick.
13. replace carpets.
14. replace cover.
And Voila!
F U Porsche ... there are so many ways you could have made that easier.
But hey ... modern cars ..... designed to skin knuckles.
Regards
Dom

