 09-22-2016, 09:05 PM
|
#261
|
|
Registered User
Join Date: Jul 2012
Location: Scottsdale, AZ
Posts: 174
|
Got mine today looks great! Sorry about the violin symbol. Have no ideal how that got on there. I got to figure out if I want a metal color or going to do red.
Last edited by madmodz; 09-22-2016 at 09:07 PM.
|

|

|
|
09-24-2016, 07:46 PM
|
#262
|
|
Registered User
Join Date: Jul 2012
Location: Scottsdale, AZ
Posts: 174
|
Getting ready for paint:
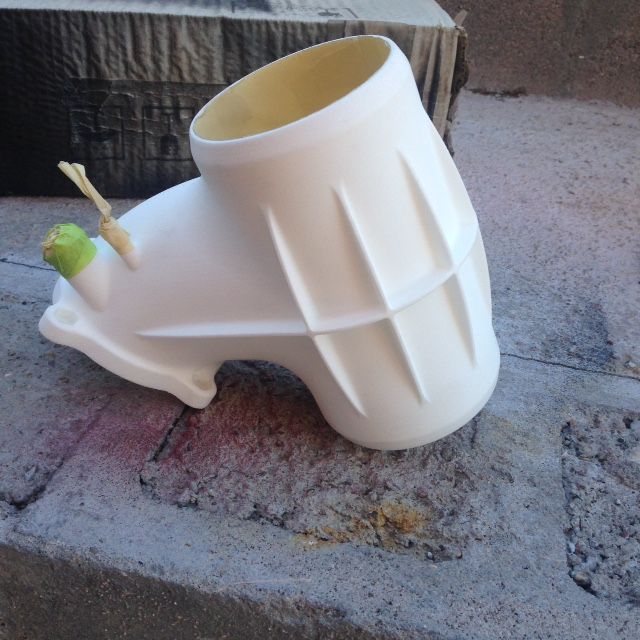
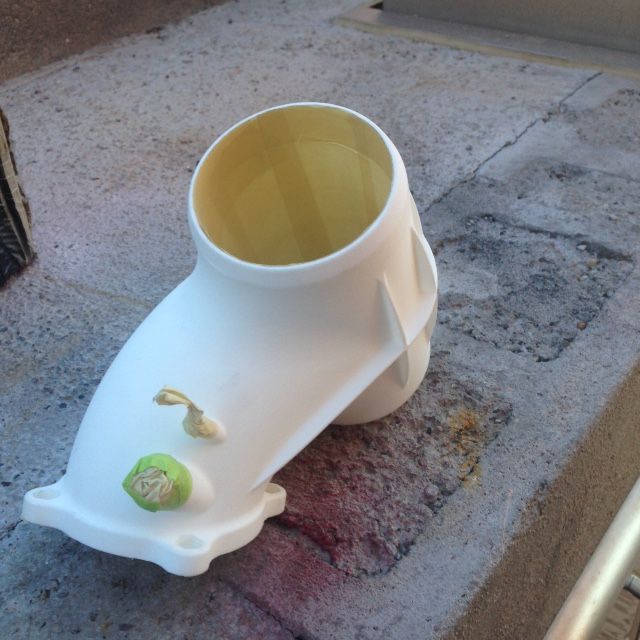
painted:
 ,
Im hoping to pull 25 hp by this mod, plus doing the secondary delete pipe, and I made a custom airbox.
Last edited by madmodz; 09-24-2016 at 07:59 PM.
|
|
|
|
|
09-24-2016, 07:48 PM
|
#263
|
|
Registered User
Join Date: May 2013
Location: North Alabama
Posts: 2,079
|
Pretty dang amazing
|
|
|
|
|
09-24-2016, 08:13 PM
|
#264
|
|
Ben-Auto-Design
Join Date: Oct 2014
Location: French Riviera
Posts: 827
|
Nice 
Did you smooth it before painting it?
__________________
ASE certified Automotive Master Technician.
Porsche Tech in France.
www.benautodesign.fr
Ben-Auto-Design : Performance parts for 9X6 / 9X7
1982 928 S Euro
|
|
|
|
|
09-25-2016, 07:32 AM
|
#265
|
|
Registered User
Join Date: Apr 2016
Location: Tannersville PA
Posts: 471
|
Are you still testing or are they for sale?
|
|
|
|
|
09-25-2016, 08:04 AM
|
#266
|
|
Ben-Auto-Design
Join Date: Oct 2014
Location: French Riviera
Posts: 827
|
I'm waiting for the testers to give me their feedback on the installation, in case I need to modify something to make them easier to fit.
__________________
ASE certified Automotive Master Technician.
Porsche Tech in France.
www.benautodesign.fr
Ben-Auto-Design : Performance parts for 9X6 / 9X7
1982 928 S Euro
|
|
|
|
|
09-28-2016, 06:17 PM
|
#267
|
|
Registered User
Join Date: Jun 2014
Location: Northeast Ohio
Posts: 69
|
Hi Ben,
I was out of town till today. Opened up the package and everything looks great! A very quality piece you've designed and created.
I'll update with pics soon. hope to install in the next week or so.
|
|
|
|
|
09-29-2016, 03:32 PM
|
#268
|
|
Ben-Auto-Design
Join Date: Oct 2014
Location: French Riviera
Posts: 827
|
Glad that you like it
I can't wait to hear from you! Quick quick!
__________________
ASE certified Automotive Master Technician.
Porsche Tech in France.
www.benautodesign.fr
Ben-Auto-Design : Performance parts for 9X6 / 9X7
1982 928 S Euro
Last edited by Ben006; 09-29-2016 at 03:39 PM.
|
|
|
|
|
09-29-2016, 05:29 PM
|
#269
|
|
Registered User
Join Date: Jul 2012
Location: Scottsdale, AZ
Posts: 174
|
I have been building a custom fiberglass airbox. I really don't want to, but I must. I'm also using a evo fresh air intake. Curious if the oem tube fits around the throttle body
|
|
|
|
|
09-29-2016, 07:05 PM
|
#270
|
|
Registered User
Join Date: Jun 2014
Location: Northeast Ohio
Posts: 69
|
baseline dyno 8am eastern monday. hope to get the airbox and plenum in and re dynoed the week after!
Quote:
Originally Posted by Ben006

Glad that you like it
I can't wait to hear from you! Quick quick! |
|
|
|
|
|
09-29-2016, 07:43 PM
|
#271
|
|
Registered User
Join Date: Jul 2012
Location: Scottsdale, AZ
Posts: 174
|
Quote:
Originally Posted by eddy
baseline dyno 8am eastern monday. hope to get the airbox and plenum in and re dynoed the week after!
|
A week might be too soon to let the ECM fully adjust to the plenum. try 3 weeks.
|
|
|
|
|
09-29-2016, 07:53 PM
|
#272
|
|
Registered User
Join Date: Jun 2014
Location: Northeast Ohio
Posts: 69
|
or how much driving? would like to move it along quickly
|
|
|
|
|
09-29-2016, 07:57 PM
|
#273
|
|
Registered User
Join Date: Jul 2012
Location: Scottsdale, AZ
Posts: 174
|
I have read on here it takes a little time to fully let the ecm adjust to the new accessories. You wouldn't get a true reading dynoing the next day.
|
|
|
|
|
10-01-2016, 07:48 AM
|
#274
|
|
Registered User
Join Date: Apr 2014
Location: Leeds UK
Posts: 105
|
Mine arrived today
Go away for 12 days tomorrow but 
|
|
|
|
|
10-01-2016, 08:23 AM
|
#275
|
|
Ben-Auto-Design
Join Date: Oct 2014
Location: French Riviera
Posts: 827
|
Quote:
Originally Posted by madmodz
I have read on here it takes a little time to fully let the ecm adjust to the new accessories. You wouldn't get a true reading dynoing the next day.
|
Yes, it takes at least a week.
You will feel it when driving, the idle will be stable and you should feel an improvement.
__________________
ASE certified Automotive Master Technician.
Porsche Tech in France.
www.benautodesign.fr
Ben-Auto-Design : Performance parts for 9X6 / 9X7
1982 928 S Euro
|
|
|
|
|
10-01-2016, 10:28 PM
|
#276
|
|
Registered User
Join Date: Jul 2012
Location: Scottsdale, AZ
Posts: 174
|
I started the install today and had to re-read all 14 pages here. First mistake I made, is not realize that there is o-ring. No wor.ies, got to get some silicone or gasket maker. 2nd mistake is that I have not purchased the 3" intake tube and silicone elbows.
|
|
|
|
|
10-03-2016, 12:20 AM
|
#277
|
|
Registered User
Join Date: Jul 2012
Location: Scottsdale, AZ
Posts: 174
|
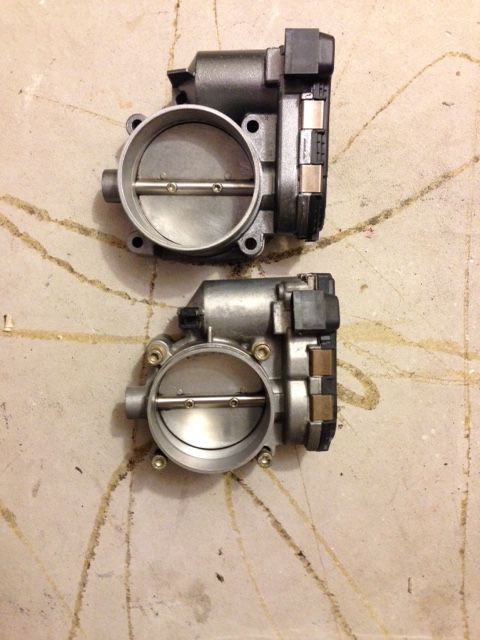
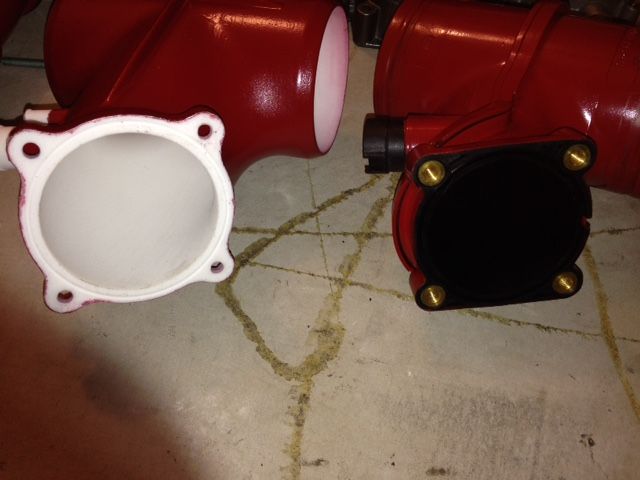
This is why you need this product
Size matters! Though I haven't had a chance to test due to other mods, there is no doubt I'm going to pull at the least 20hp making it the best bang for your buck item.
That's 996 TB vs 986 TB
. 

|
|
|
|
|
10-03-2016, 07:27 AM
|
#278
|
|
Registered User
Join Date: Jun 2014
Location: Northeast Ohio
Posts: 69
|
I did my baseline dyno run today. All stock, desnorkeled. three runs, best hp was 223, best tq was 196. will get started on install later this week/early next and do a follow up dyno once the computer has had a chance to figure it out.
|
|
|
|
|
10-03-2016, 10:03 AM
|
#279
|
|
1999 base
Join Date: Dec 2011
Location: Coral Springs FL
Posts: 1,617
|
keep the good work guys.
cant wait to see some dyno results.
|
|
|
|
|
10-03-2016, 12:36 PM
|
#280
|
|
Registered User
Join Date: Nov 2008
Location: Florida
Posts: 1,111
|
Quote:
Originally Posted by eddy
I did my baseline dyno run today. All stock, desnorkeled. three runs, best hp was 223, best tq was 196. will get started on install later this week/early next and do a follow up dyno once the computer has had a chance to figure it out.
|
We are so curious!!
|
|
|
|
 Posting Rules
|
You may not post new threads
You may not post replies
You may not post attachments
You may not edit your posts
HTML code is On
|
|
|
All times are GMT -8. The time now is 12:13 AM.
| |


 boxster S
 Linear Mode


