 09-16-2019, 10:44 AM
|
#1
|
|
Ben-Auto-Design
Join Date: Oct 2014
Location: French Riviera
Posts: 827
|
__________________
ASE certified Automotive Master Technician.
Porsche Tech in France.
www.benautodesign.fr
Ben-Auto-Design : Performance parts for 9X6 / 9X7
1982 928 S Euro
|

|

|
|
10-04-2019, 09:05 PM
|
#2
|
|
Registered User
Join Date: Jun 2014
Location: LB, Germany
Posts: 1,520
|
Quote:
Originally Posted by Ben006

|
The file is no longer available. Maybe you can put it on mega.nz or something else.

__________________
My Porsche keyfob, instrument cluster and alarm ecu repair service: https://sportwagendoktor.de
|

|
|
|
10-04-2019, 09:45 PM
|
#3
|
|
Registered User
Join Date: Jan 2017
Location: Manchester UK
Posts: 51
|
I haven't got near this yet, I may wait now until I go home as I have a large garage I keep it in for the winter. In the summer it is parked outside where I live while working in UK.
|
|
|
|
|
01-23-2020, 01:10 PM
|
#4
|
|
Who's askin'?
Join Date: Mar 2018
Location: Utah
Posts: 2,448
|
Quote:
Originally Posted by Smallblock454
The file is no longer available. Maybe you can put it on mega.nz or something else.
|
Does anyone have these instructions they could post, or send to me?
Sent from my SM-G970U using Tapatalk
|
|
|
|
|
01-23-2020, 05:55 PM
|
#5
|
|
98 Arctic silver 986
Join Date: Jul 2011
Location: Upstate, NY
Posts: 1,452
|
Quote:
Originally Posted by maytag
Does anyone have these instructions they could post, or send to me?
Sent from my SM-G970U using Tapatalk
|
I have the PDF. PM me your email and I'll send it to you.
|
|
|
|
|
01-23-2020, 07:07 PM
|
#6
|
|
Who's askin'?
Join Date: Mar 2018
Location: Utah
Posts: 2,448
|
Quote:
Originally Posted by tommy583
I have the PDF. PM me your email and I'll send it to you.
|
Thanks. Chris sent it to me this afternoon.
Sent from my SM-G970U using Tapatalk
|
|
|
|
|
09-18-2019, 10:15 AM
|
#7
|
|
Ben-Auto-Design
Join Date: Oct 2014
Location: French Riviera
Posts: 827
|
Hi guys, have you been able to download the instructions from Wetransfer ?
Yes, the hole is already 10mm with two flat spots. You have to remove the flat spots, then drill further at 10mm to make room for the long bolt.
It's how I intended to work, but it might be just fine if you drill it at 12mm and let the bolt go through !
The problem I see with that is that the nut won't be tight, and if you try to tighten it too much it will bend or break the plastic base.
Drilled at 10mm
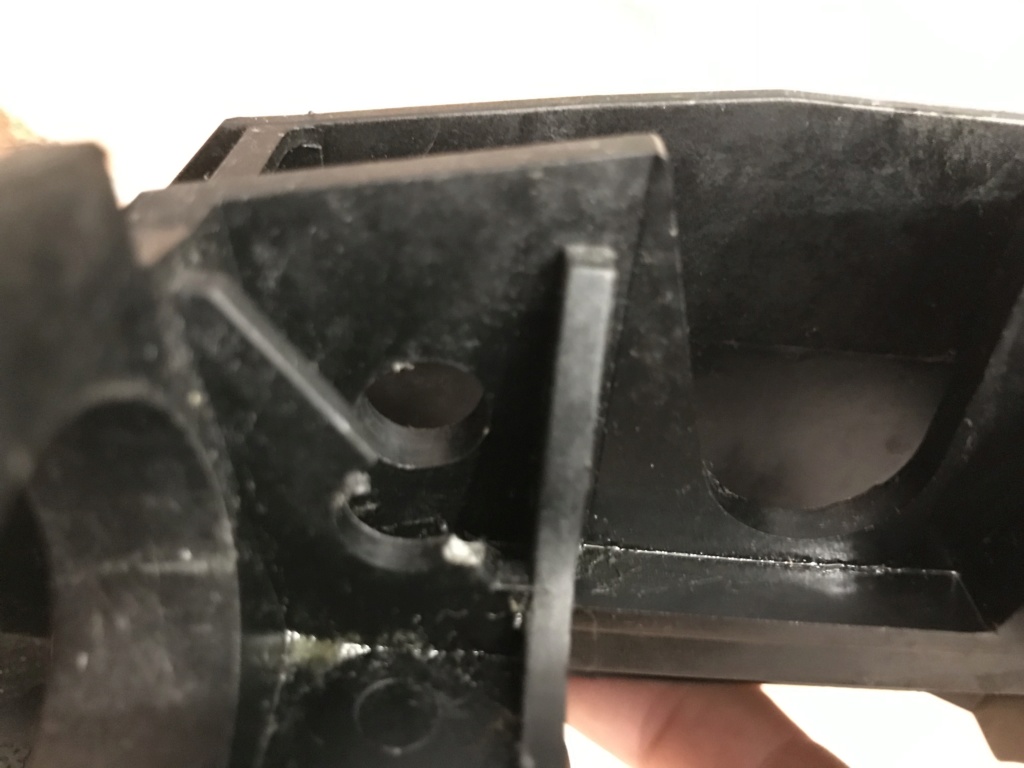
Bolt goes through but stops on the first plastic wall :
Nut is tight against the wall that is against the bolt' shoulder, there is no play.

I hope it's clearer now 
__________________
ASE certified Automotive Master Technician.
Porsche Tech in France.
www.benautodesign.fr
Ben-Auto-Design : Performance parts for 9X6 / 9X7
1982 928 S Euro
|
|
|
|
|
10-04-2019, 01:51 PM
|
#8
|
|
01 Basalt Metallic 986
Join Date: Aug 2018
Location: Austin, TX
Posts: 176
|
Whats the feedback on this?
|
|
|
|
|
10-04-2019, 03:09 PM
|
#9
|
|
2003 Base 5-speed
Join Date: Jul 2015
Location: Stoneham, MA
Posts: 949
|
Quote:
Originally Posted by JimmyBad
Whats the feedback on this?
|
My install of the side lever has tightened up the side to side play in the shifter when in gear. Im using in conjunction with Bens ball bearing SS, and I am very satisfied.
Sent from my iPhone using Tapatalk
|
|
|
|
|
10-05-2019, 01:03 PM
|
#10
|
|
Registered User
Join Date: Mar 2018
Location: Buffalo, NY
Posts: 9
|
Last edited by uniWerks Design; 10-05-2019 at 01:06 PM.
|
|
|
|
|
10-07-2019, 10:21 AM
|
#11
|
|
Ben-Auto-Design
Join Date: Oct 2014
Location: French Riviera
Posts: 827
|
Thanks guys for the feedbacks 
I'm sure you'll like it Tommy !
Thanks SmallBlock454 for the reminder, I'll fix that !
Ben
__________________
ASE certified Automotive Master Technician.
Porsche Tech in France.
www.benautodesign.fr
Ben-Auto-Design : Performance parts for 9X6 / 9X7
1982 928 S Euro
|
|
|
|
|
10-10-2019, 05:29 PM
|
#12
|
|
98 Arctic silver 986
Join Date: Jul 2011
Location: Upstate, NY
Posts: 1,452
|
Well put the part in today. Took me about an hour to remove the shifter and put the part in. I already had Ben's short shifter. I took the whole kit out of the cradle. Shifter, bearing cups and old parts. Pro tip, when putting everything back together put the new part and shifter in together. DO NOT bolt the new piece in until the shift lever and new piece are mated together. You can not get the shift lever into the cradle if you bolt the new piece in first.
Anyways it went pretty smooth. Chris sent me a PDF email of the directions. The new part really cleaned the side to side slop of the factory part. There is still a little play but, it is easy to see it's coming thru the cables. Probably caused by some slop on the transmission connections. I'll have to take a look at that at some point. I'm happy overall, I just hope it stays this way for a while before I have to change the insert. It looks like it will be a complete teardown to change the insert.
|
|
|
|
|
01-13-2020, 11:50 AM
|
#13
|
|
Ben-Auto-Design
Join Date: Oct 2014
Location: French Riviera
Posts: 827
|
Thank you for your feedback !
It is a bit more involved than just the shifter, yes !
How long did it take you ?

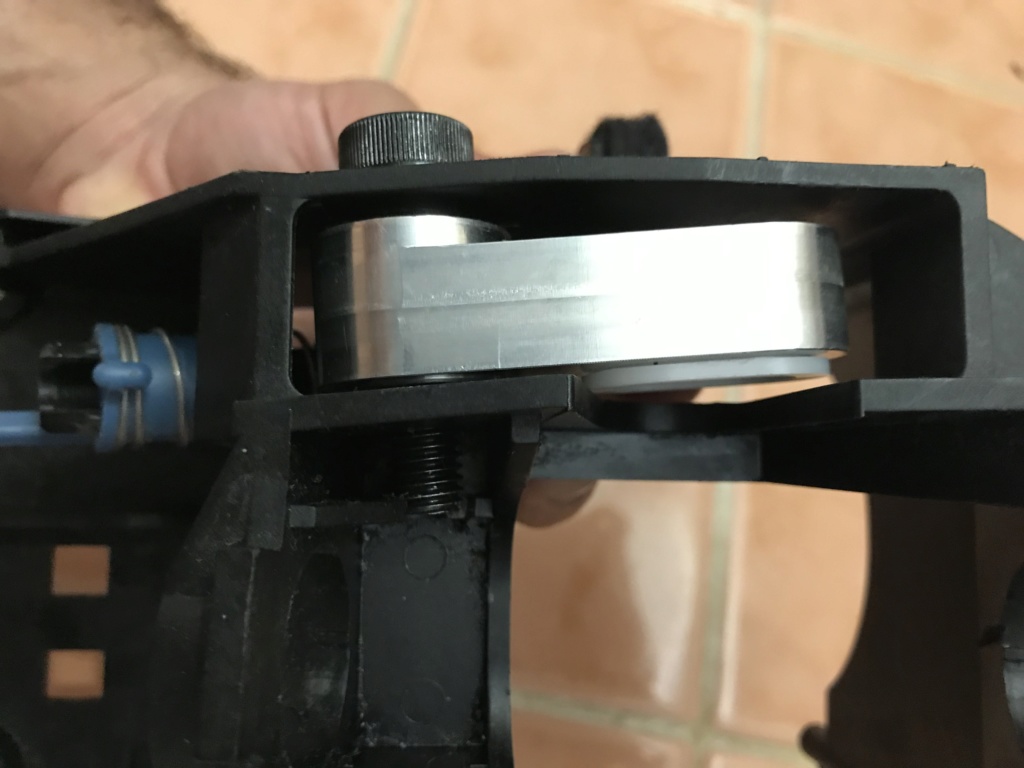
I'm working on a new prototype shifter, it will not use the Porsche shift knob but will fit any aftermarket shift knob !
Here is the first piece of the puzzle :

Ben
__________________
ASE certified Automotive Master Technician.
Porsche Tech in France.
www.benautodesign.fr
Ben-Auto-Design : Performance parts for 9X6 / 9X7
1982 928 S Euro
|
|
|
|
|
01-21-2020, 10:04 PM
|
#14
|
|
Shapeshifting Lizard-Man
Join Date: Nov 2018
Location: East Coast
Posts: 134
|
Hey Ben,
If you need anyone to thoroughly test your new shifter in a racecar setting, let me know! :P
|
|
|
|
|
01-22-2020, 05:47 AM
|
#15
|
|
Who's askin'?
Join Date: Mar 2018
Location: Utah
Posts: 2,448
|
Quote:
Originally Posted by tommy583
Well put the part in today. Took me about an hour to remove the shifter and put the part in. I already had Ben's short shifter. I took the whole kit out of the cradle. Shifter, bearing cups and old parts. Pro tip, when putting everything back together put the new part and shifter in together. DO NOT bolt the new piece in until the shift lever and new piece are mated together. You can not get the shift lever into the cradle if you bolt the new piece in first.
Anyways it went pretty smooth. Chris sent me a PDF email of the directions. The new part really cleaned the side to side slop of the factory part. There is still a little play but, it is easy to see it's coming thru the cables. Probably caused by some slop on the transmission connections. I'll have to take a look at that at some point. I'm happy overall, I just hope it stays this way for a while before I have to change the insert. It looks like it will be a complete teardown to change the insert.
|
Are there no instructions included with the part? Mine arrived yesterday, but I haven't opened the package yet. I currently have the shifter exposed because I just replaced cables. Do I need to remove the "cradle" from the car to install this side peice?
Sent from my SM-G970U using Tapatalk
|
|
|
|
|
01-23-2020, 02:23 PM
|
#16
|
|
Registered User
Join Date: Jan 2019
Location: Southern Oregon
Posts: 8
|
Here's a link to the install instructions for the side lever.
9X6-9X7-SHIFTER-SIDE-LEVER-1
|
|
|
|
|
03-07-2021, 08:33 PM
|
#17
|
|
Registered User
Join Date: May 2014
Location: S.California
Posts: 2,029
|
Quote:
Originally Posted by loflyingz
Here's a link to the install instructions for the side lever.
9X6-9X7-SHIFTER-SIDE-LEVER-1
|
I just installed the side shifter to the original short shifter. I was one of the early adopters so mine has had lots of use. Both products are excellent. There are a few things to be careful about with the install that I haven't seen mentioned. So I emailed Chris a list for him to consider.
One example - it is really important to check your adjustment of the two big set screws after some use. The assembly may 'settle' and require subsequent minor adjustment. In my case the adjustment was significant. With the console off you could see fore/aft movement - just watch the "E" clips move away from the housing at one end or the other. That lost motion was sufficient to create grinding during the 1 to 2 shift when the gearbox was cold. Hopefully this comment helps others.
So with that correction made(no fault of Ben's product) and the side shifter installed it was a big improvement.
The difference between a good install and a great one may be some of the issues I sent to Chris. Someone needs to do a nerdy detail install video because when you get these two parts perfectly dialed in ,the result is outstanding. Well done Ben !
|
|
|
|
|
05-18-2021, 02:24 PM
|
#18
|
|
Registered User
Join Date: Nov 2015
Location: ontario
Posts: 377
|
Just thought I'd update this thread on my experience with this shifter (thanks 10/10ths).
I've been using a 997 shifter in my car for the past 5 years. For anyone curious, in terms of feel and throw length, I would say the difference between the 997 unit and Ben's is comparable to the jump I noticed between my stock shifter and the 997 one (i.e the 997 unit is about 15% shorter than stock, and this to me feels 15% shorter yet again). It's also tighter feeling and has less side to side play. Overall a nice upgrade!
I can only imagine if you went from a stock unit straight to Ben's you would be very pleased.
|
|
|
|
|
01-24-2020, 05:09 AM
|
#19
|
|
2003 Base 5-speed
Join Date: Jul 2015
Location: Stoneham, MA
Posts: 949
|
Chris said on FB today that he put the side lever install instructions up on the UniWerks site. I also have them if anybody needs.
Sent from my iPhone using Tapatalk
|
|
|
|
|
04-15-2020, 12:05 PM
|
#20
|
|
Registered User
Join Date: Sep 2019
Posts: 64
|
Just wanted to say I installed the Ben/ UniWerks make it easy shift bundle- solid rifle bolt shifting and it totally eliminated side to side play! Very easy install for a first timer under the center console and A+ customer service.
Are you planning on making aluminum shifter cable adapter similar to agency part or evoms?
|
|
|
|
| Thread Tools |
|
|
| Display Modes |
 Hybrid Mode Hybrid Mode
|
 Posting Rules
|
You may not post new threads
You may not post replies
You may not post attachments
You may not edit your posts
HTML code is On
|
|
|
All times are GMT -8. The time now is 12:19 AM.
| |


 1998 Porsche 986
 Blue Box


