 10-23-2014, 07:45 AM
|
#41
|
|
Registered User
Join Date: Sep 2008
Location: Agoura Hills (LA) So.Cal.
Posts: 1,574
|
Quote:
Originally Posted by flaps10

So I'm going to proceed with the complete tear down..
|
Out of a purely selfish position, great. I didn't want to see this thread end.
I can change my oil and do my brakes. Anything over that & I am pushing it. I marvel and respect folks like you. I look forward to you progress.
Regarding Mr. Rady's comments, I can understand where he is coming from. I am guessing he fixes a lot of mistakes that folks like me make. Then we blame it on LNs products. And the fact that he is blunt is part of his beauty. You always know where he stands.
__________________
1995 Porsche C4 Cab
2016 BMW M2, 6 Speed LBB - ED 7/2016
1997 993 Cab - Sold; 1997 993 Turbo - Sold
2001 Boxster S - Original Owner - 30K Miles -SOLD
|

|

|
|
10-23-2014, 10:31 AM
|
#42
|
|
Registered User
Join Date: Jul 2014
Location: Tacoma
Posts: 429
|
Chuck,
While I realize that some people would blame a product line for their own lack of understanding I would not have been in the crowd to blame an LN product because it didn't perform a miracle. I do respect the request however.
Bfeller,
When I was hoping for a quick turn so I could drive the car I was also thinking that I would start collecting parts and a donor engine (with any luck a 996) so that I could take the time to rebuild that and be ready. Were I to go that route I would now probably, ironically, seek out a single row donor so I could implement the plain bearing solution.
Doing it this way I can go "one and done" and enjoy my car for a few years. Until a '89 Carrera and my wallet come in to alignment that is...
|
|
|
|
|
10-23-2014, 01:09 PM
|
#43
|
|
Registered User
Join Date: Aug 2005
Location: Sanford NC
Posts: 2,601
|
BFeller:
Dual row cars are older, less desirable, worth less and have a ~8x lower failure rate. Where is the market considering that LN already offers an upgraded bearing?
The dual row LN plus splash and vapor oiling have proven in thousands of cars to be good for well beyond the LN initial cautious estimates.
Put in a dual row LN and it will probably last you 'till the cars are 20-22 years old.
|

|
|
|
10-23-2014, 02:05 PM
|
#44
|
|
Registered User
Join Date: Mar 2014
Location: Eastern NC
Posts: 701
|
Quote:
Originally Posted by mikefocke
BFeller:
Dual row cars are older, less desirable, worth less and have a ~8x lower failure rate. Where is the market considering that LN already offers an upgraded bearing?
The dual row LN plus splash and vapor oiling have proven in thousands of cars to be good for well beyond the LN initial cautious estimates.
Put in a dual row LN and it will probably last you 'till the cars are 20-22 years old.
|
I apologize if my post appeared to be negative. I understood the market dynamics involved and intended it to be a supportive post.
|
|
|
|
|
10-23-2014, 03:19 PM
|
#45
|
|
Registered User
Join Date: Oct 2008
Location: O.C. CA
Posts: 3,709
|
Quote:
Originally Posted by flaps10
It has taken me a few days of pacing about, soul searching and even laying awake at night trying to plan my next move. I really wanted to believe that I had dodged the big one and that I might be able to install a new IMS and do some oil changes.
I also wanted to believe that Santa was real. I had a number of "what if's" going on in my head.
I miss driving the car but I can't allow that to cloud my judgement and then end up with a smoking boat anchor.
When I shared my thoughts with my woman she said "You should tear it apart. You know how, you enjoy working on it and you bought the car as a hobby".
I had also recently queried Mr Raby to see if he had plans to do a plain bearing for those of us who own two row cars. He sent a quick reply telling me that the market isn't large enough to justify it, and also to please not install any LN products in my engine. That was a pretty direct statement. I'm guessing he doesn't carefully peel bandaids off either.
Damn that Santa Claus anyway.
So I'm going to proceed with the complete tear down. I will hold every part of this engine in my hands before long. I will get down to a bare crankshaft which I will need to have polished and checked for straightness. Jake also urged me to have everything cleaned ultrasonically to make sure every bit of debris is out.
That decision made, Chapter 2 begins this week with removal of the engine and the beginning of the tear down.
|
While the IMS is out you can send it to LN for their Triple bearing upgrade.
Early bicycle chain style IMS w/ triple ceramic bearings & pinning inc. core charge. LN Engineering
__________________
OE engine rebuilt,3.6 litre LN Engineering billet sleeves,triple row IMSB,LN rods. Deep sump oil pan with DT40 oil.
|
|
|
|
|
10-23-2014, 04:08 PM
|
#46
|
|
Registered User
Join Date: Jul 2014
Location: Tacoma
Posts: 429
|
Why have I not seen that before? I'd only glanced at the IMS assemblies on the LN page without taking the time to understand what the offering is.
Is it just my browser or is the LN page devoid of much in the way of product descriptions? More importantly, is this shaft drop in compatible with my two row engine, or do I need different chains, cam sprockets, etc?
I grasp welding or pinning the gear to the shaft of course. This assembly appears to have that operation taken care of and includes a triple row bearing I can't even buy separately.
I might have to knock off a few more convenience stores.
|
|
|
|
|
10-24-2014, 12:03 PM
|
#47
|
|
Beginner
Join Date: Mar 2013
Location: Houston
Posts: 1,659
|
When you tear the engine down you should check your oil pump housing. The metal chips in your filter passed though your oil pump on the way to the filter and may have opened up the clearances. Ultrasonic cleaning is the way to go. I rebuilt an engine with a failed IMS bearing (single row) and spent a lot of time cleaning with solvents and still found some chips in the pan after the rebuild. I went back with a sealed greased steel bearing (partially due to bearing contamination concerns) and modified my IMS to keep the grease in the bearing. I've put about 2000 miles on the rebuild, with plenty of redline, heck, almost always redline, and the bearing has held so far. The bearing will be pulled after 15k miles, and if the engine has no sign of metal in the oil an open bearing will be a possible replacement. If there is any metal in the oil it's likely to tear up an open oiled bearing. I looked at using a roller bearing but was concerned about shaft alignment with the rollers after reading bearing manufacturers data. Roller bearings require close alignment, something the designers of the M96 were not designing to as they used a deep groove ball bearing which is relatively insensitive to shaft alignment. I posted my rebuild on this forum, though not as good a job as you are doing. 
__________________
2003 S manual
|
|
|
|
|
10-24-2014, 12:27 PM
|
#48
|
|
Registered User
Join Date: Oct 2008
Location: O.C. CA
Posts: 3,709
|
Quote:
Originally Posted by flaps10
Why have I not seen that before? I'd only glanced at the IMS assemblies on the LN page without taking the time to understand what the offering is.
Is it just my browser or is the LN page devoid of much in the way of product descriptions? More importantly, is this shaft drop in compatible with my two row engine, or do I need different chains, cam sprockets, etc?
I grasp welding or pinning the gear to the shaft of course. This assembly appears to have that operation taken care of and includes a triple row bearing I can't even buy separately.
I might have to knock off a few more convenience stores.
|
I guess LN has removed thier original website to minimize competitors using the info there. I believe the triple row upgrade was the 1st IMSB service/upgrade available & has always require installation @ LN. Just send your IMS to LN & allow about a month for shipping & upgrade service. I do this for all the engines I build & consider it a once & done for life operation.
__________________
OE engine rebuilt,3.6 litre LN Engineering billet sleeves,triple row IMSB,LN rods. Deep sump oil pan with DT40 oil.
|
|
|
|
|
10-27-2014, 08:19 AM
|
#49
|
|
Registered User
Join Date: Jul 2014
Location: Tacoma
Posts: 429
|
Got it out this weekend.

Getting organized. To minimize the amount of greasy hand prints on my books, to eliminate steps already performed by removing engine, and to take care of model specific things (e.g. my car doesn't have a throttle cable) I made a check list. On it I documented the page of the Bentley manual and/or Wayne's book which had the best description and pictures.
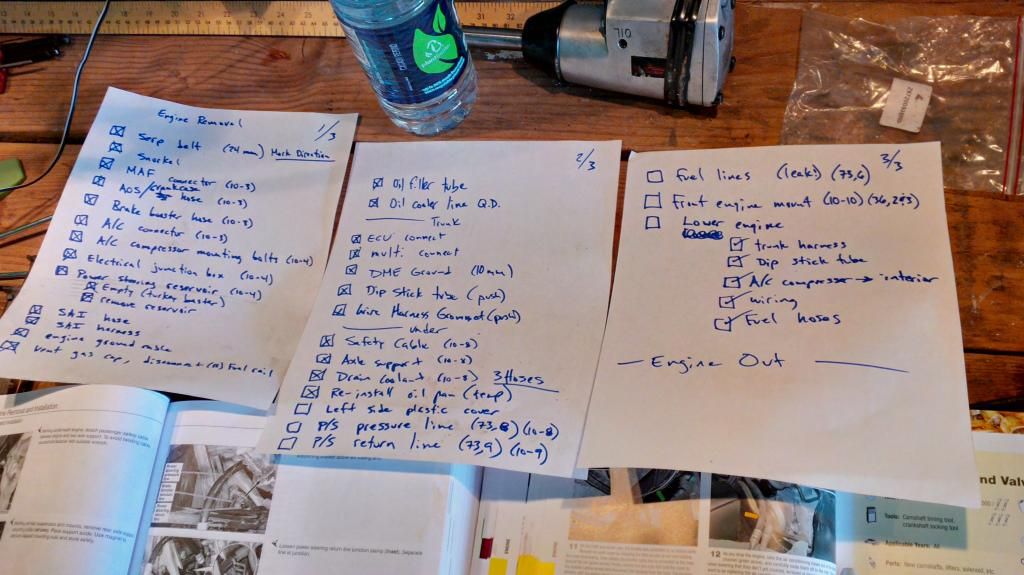
Another, while in work. Oh, and there are four hoses not three...
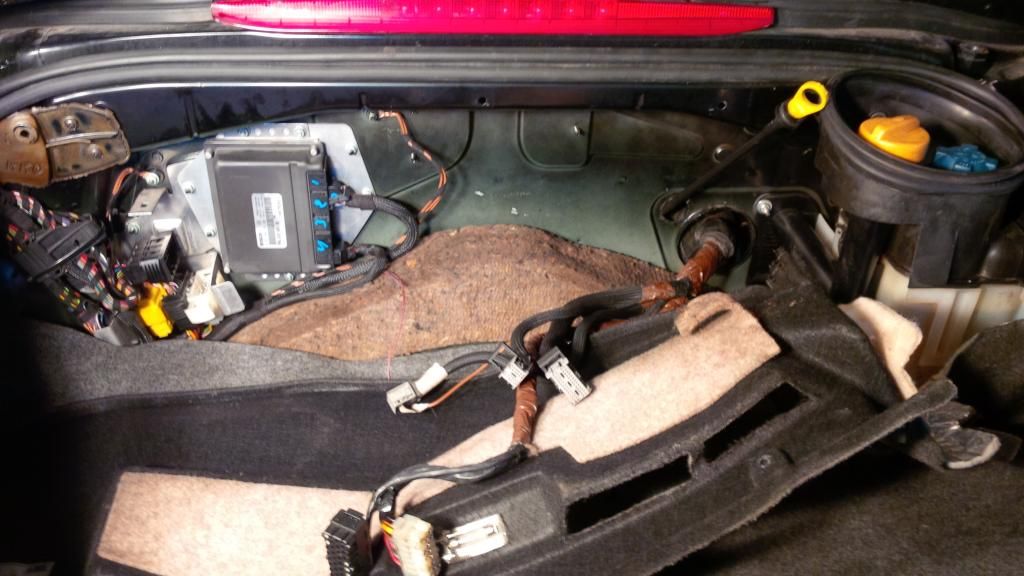
Trunk shot. This is one of those steps that when I read it, it wasn't clear. I mean, if I'm going to remove a bunch of connections on the engine, wouldn't I just leave this part of the harness hooked up? Well, no as it turns out. There are a ton of sensors still plugged in when you drop the engine and the least amount of them to pull are when you disconnect the harness in the trunk.
Regarding the steps in the book I'd like to expand on one or two. For example when you split the power steering pressure line it tells you to be prepared to catch some fluid. We're not talking "have a rag handy" fluid. I guessed this was going to happen and had a mostly empty container of discarded brake fluid handy to catch this stream which lasted several minutes.
Another point or two.
When it has you disconnect the big electrical cable at the top front of the compartment, do not assume that just because the cable is black and that the housing is black that it is a ground cable and therefore inert. It's not.  Disconnect your battery ground in the frunk before doing that step.
Speaking of the cable junction. The steps have you remove the three A/C compressor bolts, but the top one is sort of blocked off by the power steering reservoir. Since it has to come off anyway it makes sense to remove it first. But. Reaching the twist ring at the base is easier if the ground cable is out of the way. Not just the ground cable but the junction it is mounted to. So it's: cable, reservoir, A/C bolts.
The A/C removal was cake by the way. All three easily reachable from the top with a long extension.
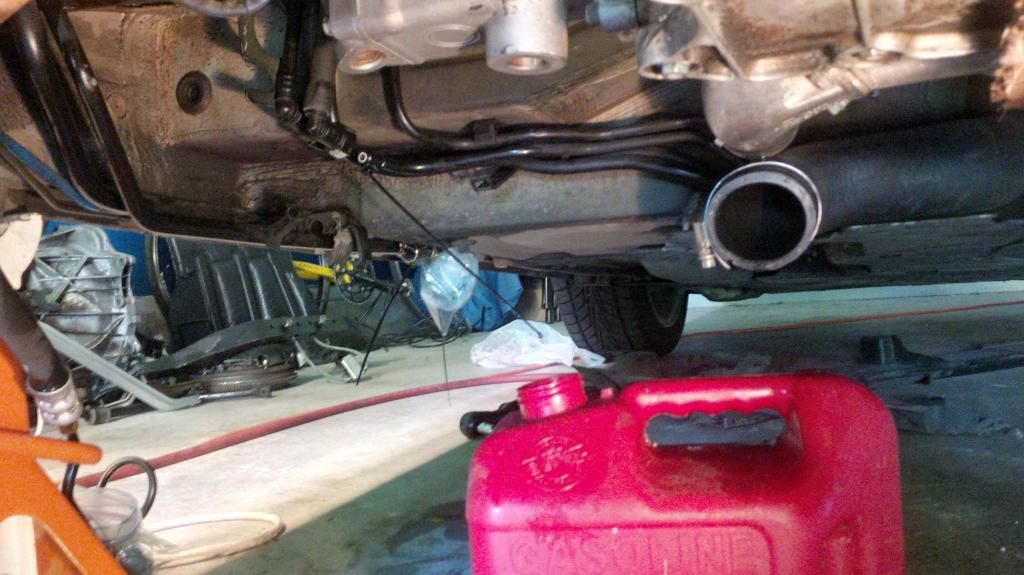
Okay, goofy MacGiver trick. When you pull the fuel line connections the books also mention to be prepared for some gas, so I had an old lawn mower jug available. Gas continued to drip from the hard line (mounted to the car) and wasn't that good about dripping precisely into my container. So I put a small zip tie around the end which would serve as the low point and path of least resistance. At first I just pointed it down into the gas can but then decided that if I rotated it at an angle I could see at a glance when it was done dripping.
After an hour I got annoyed and created a plug out a piece of fuel line and a bolt.
Front mount disconnected and I was out of excuses. Time to get my #3 son to help me lower it down. I didn't know how smoothly it would go so I ran him through the various jobs I might be yelling at him to do on short notice. Like the A/C compressor, or going back up a 1/2" in case anything was hung up.
I had done a pretty careful job of tending to the various hoses and connections that might get hung up. An obvious one is the power steering return line, which looked like it would just love to get hung up on the left suspension. So I zip tied it to the pressure line, tucking it nicely out of the way.
After lowering the engine about 5" I was able to rearrange the various items that had been intertwined and push the main harness in and get it situated. Likewise the A/C compressor was moved to behind the driver's seat at about this point.
Then it was on down, eventually working it off the jack and onto a long piece of wood that will allow me to slide it like a pizza.
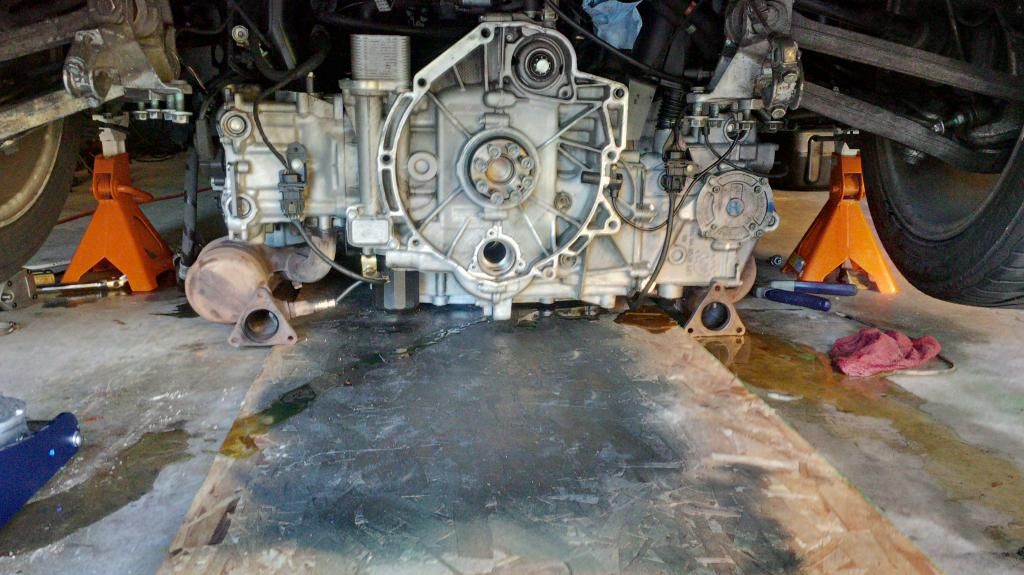
Done. On the ground and bleeding its last. I had to quit for the day and didn't check how much clearance I needed to create before twisting the engine 90 degrees and sliding it out the back. Quite sure it's too tall, just not sure how much.
Last edited by flaps10; 10-27-2014 at 11:28 AM.
|
|
|
|
|
10-28-2014, 05:54 PM
|
#50
|
|
Registered User
Join Date: Jul 2014
Location: Tacoma
Posts: 429
|
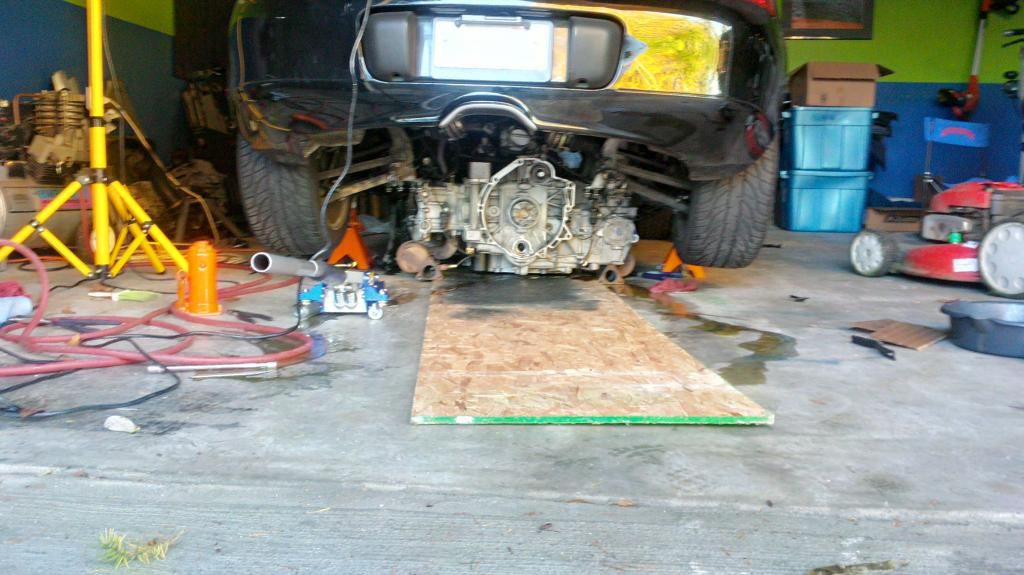
Last night I was able to get the engine rotated 90 degrees on my pizza board and turned sideways inside the engine compartment. That has to be done to slide it out the back of the car. There is really no room to spare while rotating it and it takes as much care as when you lower the engine to not have anything hang up on something. Just take your time and you'll see what needs to be adjusted.
When I finally got the board to slide to the very back of the car I was about 3" too short. I read up on removing the bumper and decided on just jacking the car up higher. I gave up for the night and decided to just get on it today.
Today I was able to get home from work a little early and get on it. Jacking up the car in stages I got it just high enough to clear and slide the engine out where I could begin working on it.
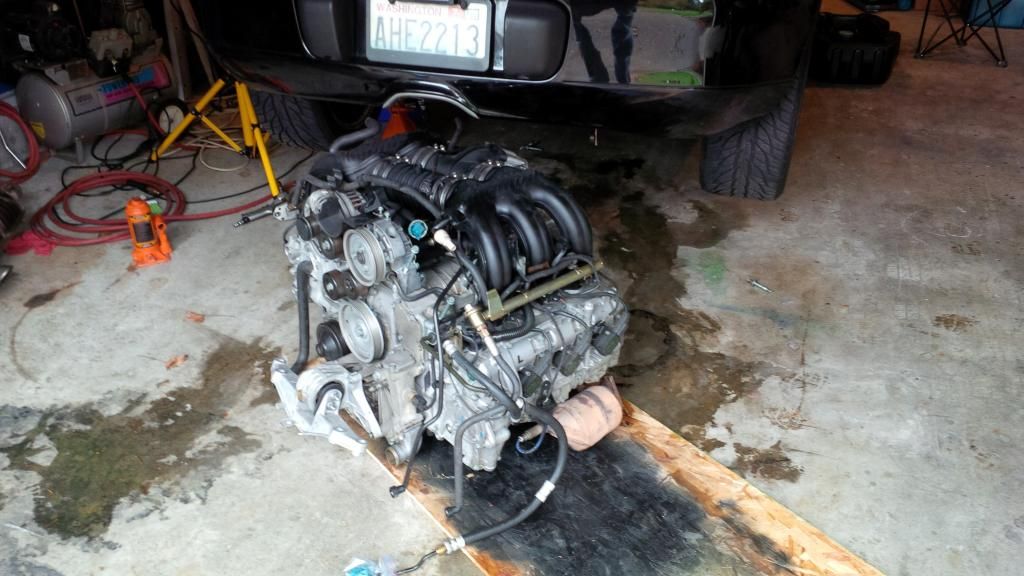
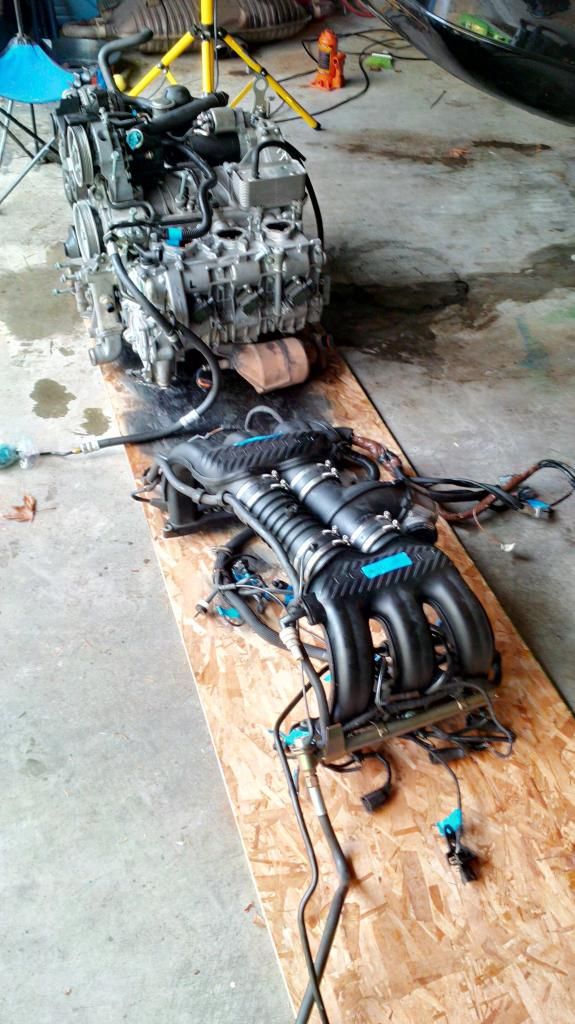
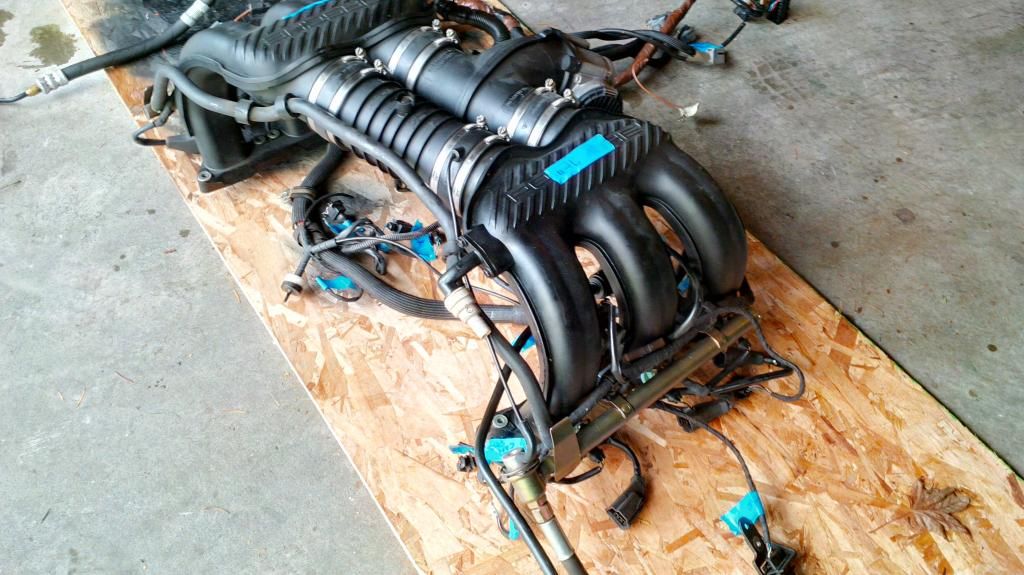
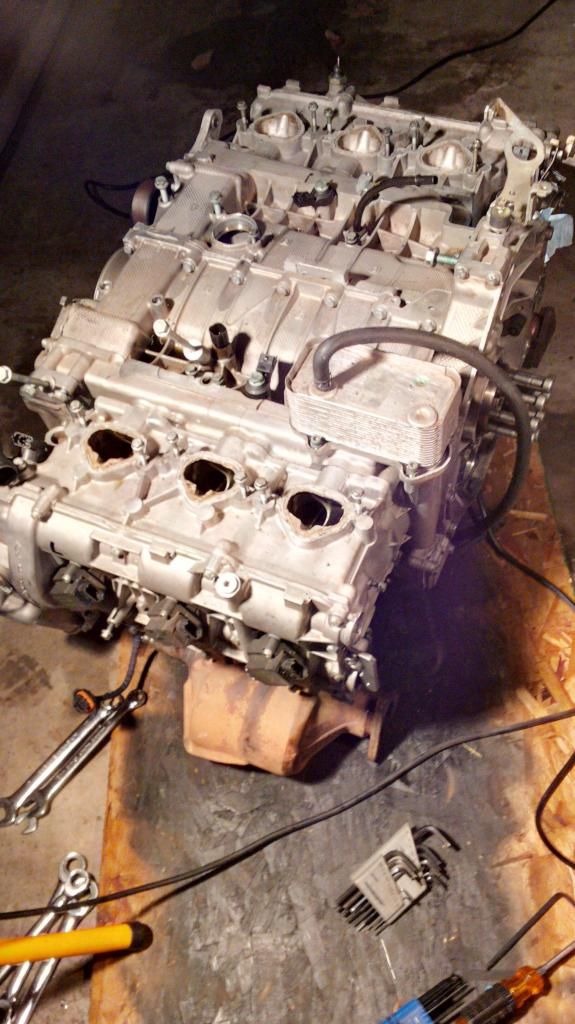
It's actually a pretty sizable chunk of machinery.
The intake manifold comes off in a fairly large unit, and with it comes the wiring harness, plug wires, fuel rails and fuel injectors, and some random bits. After examining it for a few minutes I could see the places where it all had to come apart and it looked pretty easy.
I started by grabbing a roll of blue tape and a sharpie pen and labeling all the wire connections. Truth be told most of them are one of a kind in their given neighborhoods so there aren't a lot of places to screw up. However it is good to take the time to grasp every connector and figure out what it does. It will certainly help on assembly and if nothing else I now know for certain where every one of them is in case one goes TU.
The knock sensors are a little hard to reach until the manifold is pulled part way off. You also need to tend to a crankcase hose, alternator connections, a vacuum line and the plastic tube for the AOS. I took several pictures to help un furball things later.
Then off it came.
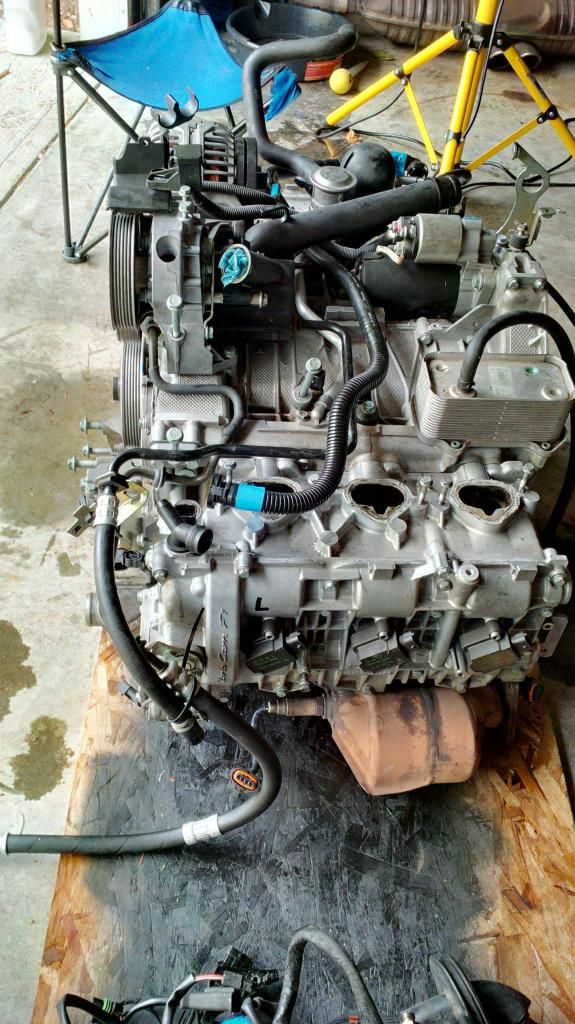
Next up will be removing the starter, alternator, power steering pump, oil cooler, oil filler tube, EGR and it should start looking like a big metal suitcase.
Then it will be time to get oily.
|
|
|
|
|
10-28-2014, 06:17 PM
|
#51
|
|
On the slippery slope
Join Date: Mar 2014
Location: Austin and Palm Springs
Posts: 3,802
|
Flaps,
A stellar job of documenting your steps!
You should write a book, "DIY Boxster motor rebuild"
I have a feeling this thread is going to be one of the top ones on the forum by the time you are all done. Already almost 2500 views
__________________
2004 Boxster S 6 speed - DRL relay hack, Polaris AutoTop DIY
2004 996 Targa Tip
Instructor - San Diego region
2014 Porsche Performance Driving School
2020 BMW X3, 2013 Ram 1500, 2016 Cmax, 2004 F-150 "Big Red"
|
|
|
|
|
10-29-2014, 12:17 PM
|
#52
|
|
Registered User
Join Date: Jul 2014
Location: Tacoma
Posts: 429
|
I appreciate the thought Jay but I don't feel like I'm breaking new ground. Hell if I worked in a Porsche shop I would have been fired already for taking too long. Or smiling too much.
Besides, Wayne already wrote the book which I've found to be super helpful. The Bentley manual does cover engine removal and it was really great to have another reference. Past cylinder head removal though, the Bentley manual goes dark.
I'm mostly writing to add to the database of "how to" and things I learned along the way.
I guess now would be a good time to confess a couple of mistakes I've made. A sort of "confessions of an idiot with tools" section. In no particular order...
1) The dip stick tube is not flexible. The book says to guide the tube down as you lower the engine, and I'll swear on a stack of "Excellence" magazines that somewhere it says to push the dip stick tube and wiring harness into the engine compartment.
That is one brittle piece of plastic, so DO NOT push it. That tidbit will save you about $57 on your next Pelican order. Last night I noticed that there is a disconnect on the tube, so either no one noticed that in time, or it's not accessible until after you get the engine out. I saw reference in another thread today about someone else who broke his but was going to fabricate a new one. That would be tricky to do and still get an accurate oil level reading, so I hope that poster has all the pieces and can measure carefully. Certainly not an impossible feat, you would just have to think it through.
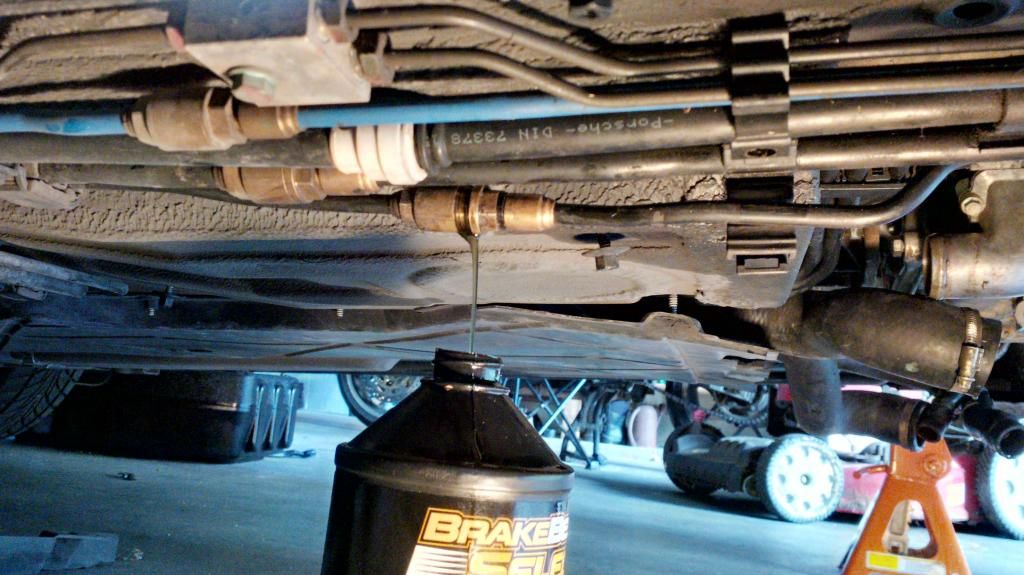
2) There is an instruction that tells you to drain the coolant using the coolant drain plug and the picture is a bit vague. I still don't know where the coolant drain plug is, but I do know where the oil pressure relief valve is. It's right were a coolant drain plug should be.
In my case I had it scoped out, and shoved a big metal tub under the car to catch the coolant, blocking off much of the light from my drop light. My typical trick when draining fluid is to crack it loose before shoving the catch pan under it and then spin it quickly and let it fall in the tub to be fished out later.
I remember thinking it was odd that not a whole bunch came out. Later I thought it was also odd that I was getting so damn much coolant out of every hose connection I broke even though I had already drained the coolant.
Imagine my surprise when I pulled the tub of clean coolant out with some oil floating in it, and WTF was a spring and piston doing in my coolant drain?
No harm done really, but like I said "uh. you're fired". Other than that, it has been smooth sailing.
|
|
|
|
|
10-29-2014, 02:57 PM
|
#53
|
|
On the slippery slope
Join Date: Mar 2014
Location: Austin and Palm Springs
Posts: 3,802
|
its precisely the little things that you are figuring out that would be very useful to someone rebuilding their engine.
That stuff is not documented elsewhere
__________________
2004 Boxster S 6 speed - DRL relay hack, Polaris AutoTop DIY
2004 996 Targa Tip
Instructor - San Diego region
2014 Porsche Performance Driving School
2020 BMW X3, 2013 Ram 1500, 2016 Cmax, 2004 F-150 "Big Red"
|
|
|
|
|
10-30-2014, 04:23 PM
|
#54
|
|
Registered User
Join Date: Apr 2011
Location: DFW
Posts: 713
|
Might be a stupid question but about how much does the engine weigh?
__________________
What we're dealing with here is a complete lack of respect for the law.
|
|
|
|
|
10-31-2014, 03:27 AM
|
#55
|
|
Registered User
Join Date: Aug 2013
Location: Bay Area
Posts: 700
|
How many miles are on your car? I checked your first post but didn't see. Everything is so clean on the engine so it can't have that many miles. It doesn't even look like it has the typical browning from heat cycles and age
|
|
|
|
|
10-31-2014, 12:40 PM
|
#56
|
|
Registered User
Join Date: Jul 2014
Location: Tacoma
Posts: 429
|
Quote:
|
Might be a stupid question but about how much does the engine weigh?
|
Way too heavy to be mounted in the back of a sports car, I'll tell you that. It's a beast. Back in my young and stupid days I used to drop a type 1 VW engine, strip the heater boxes off and carry it in the house. I recall reading that the VW engine would be in the neighborhood of 185 pounds in that trim but I never had one on a scale.
The M96? No idea, but I'm much older, a little bit smarter now and sporting a ruptured disc from about four years ago. I could tell just sliding it out on my makeshift pizza board that there would be a lot of stuff removed, and an assistant before it was going to move to my bench.
Quote:
Originally Posted by epapp
How many miles are on your car? I checked your first post but didn't see. Everything is so clean on the engine so it can't have that many miles. It doesn't even look like it has the typical browning from heat cycles and age
|
My car just turned 120K miles. I agree the engine is way too clean. It would appear that it had a cylinder head recently. The valve covers are both marked and the oil scavenge pumps in the heads are also marked so it may have been torn down even more.
This car was what guys older and more southern than me might refer to as a "pig in a poke". I don't know the history of the car and I didn't get a PPI. That of course goes in the face of everything you read about buying a Porsche. You're supposed to walk away from cars like mine. And if you pay someone to work on your 'exotic' car then that's no doubt a smart recommendation.
However I also got my car for about 2/3 of the going rate for an S model, and I also bought the car as a hobby. Maybe I'm an odd one, but I bought a Porsche so I could enjoy ownership, including working on it. I don't enjoy writing big checks as much as some people I guess. In the end if I have to put $5k in parts and machine shop work then I'm still at a break even, and I'll have a car I know I can trust.
Enough blathering.
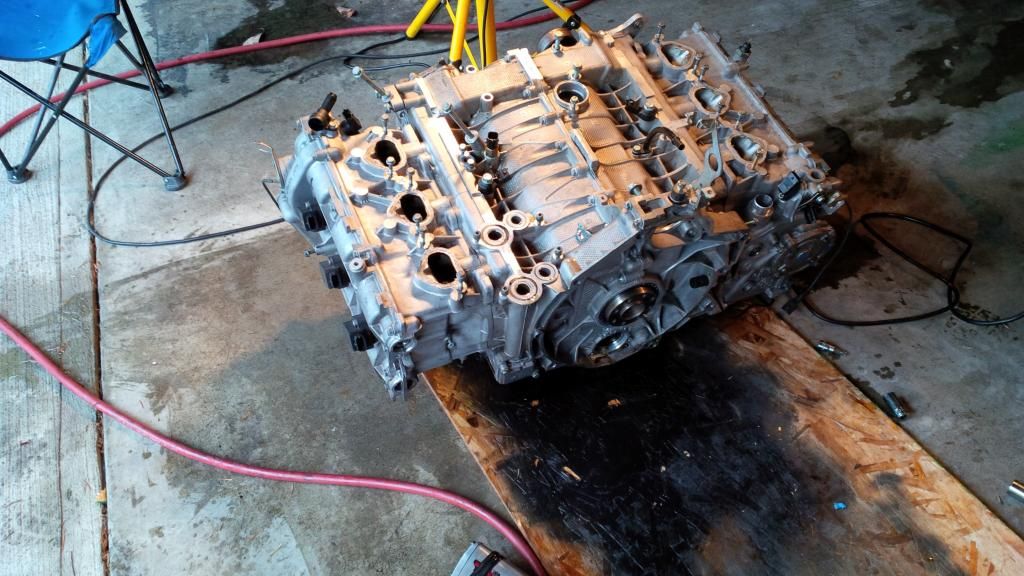
This morning it was time to clear the decks. I started by clearing my work bench because I hope to have the crank case sitting on it prior to tearing it apart.
Yet another lousy phone pic. You'd think Katherine Hepburn took these. Anyway this is part way through "making a hole".
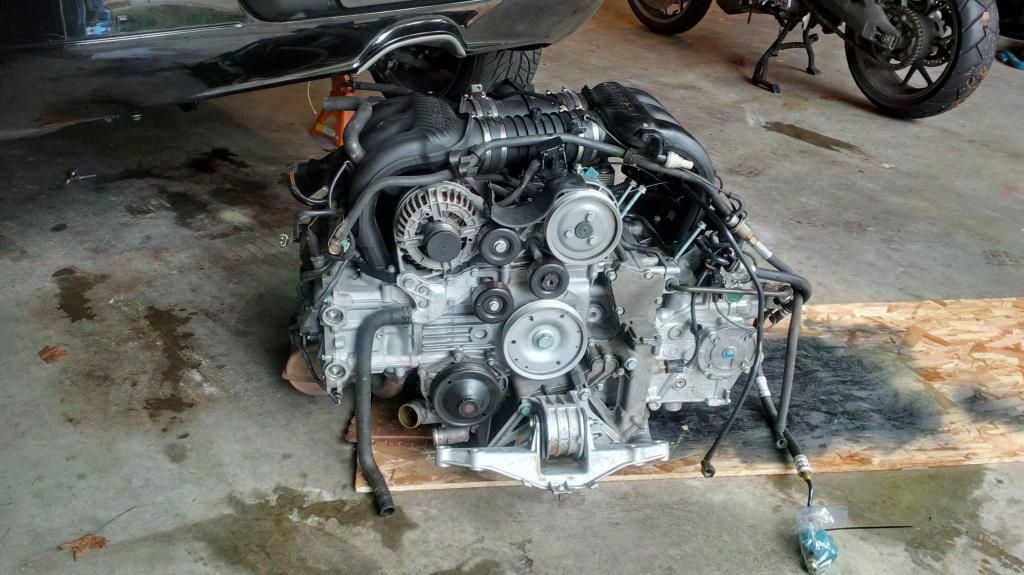
And then it was time to clear the top and bottom of the engine of anything that moves.
Top side clear. The starter, oil cooler, alternator and crankcase breather apparatus all come off easily. The power steering pump though - what a scream. It's mounted to a pedestal which you would really like to remove in one piece and take the power steering pump still attached to it. But there is one base bolt that is pinned down by a lug on the power steering pump. You can't just remove the power steering pump because first you have to remove the pump pulley and then you'll discover that one of the hard lines is in the way. It's like one of those puzzles with one missing square. I found I could leave the hard line attached and remove the pulley and the four bolts (three from the front and one from behind) that hold the PS pump to the pedestal. By doing that you could get just enough room to sneak a box wrench in and inch the remaining base bolt out. Tedious but it gets you there.
Then you're looking at a pile like this:
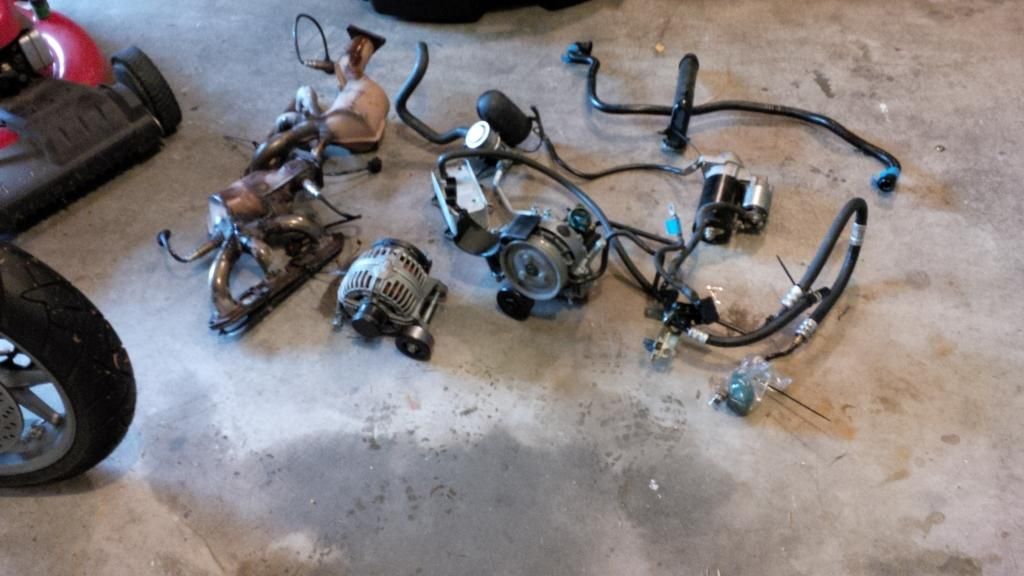
Next I carefully tipped the engine up on end and removed the exhaust manifolds. Pretty easy with the help of an air impact wrench. It managed to come up with quite a puddle of oil and coolant it was hiding while I did the work. Then back down to a stable position.
Before anyone asks, the hideous black area on the board is from being used to host some things I spray painted for my woman recently. So far (other than the oil filter and the IMS bearing/shaft) I have only seen clean oil and clean coolant.
Last edited by flaps10; 10-31-2014 at 12:45 PM.
|
|
|
|
|
10-31-2014, 04:05 PM
|
#57
|
|
Registered User
Join Date: Dec 2007
Location: SoCal
Posts: 26
|
Quote:
Originally Posted by flaps10
Way too heavy to be mounted in the back of a sports car, I'll tell you that. It's a beast. Back in my young and stupid days I used to drop a type 1 VW engine, strip the heater boxes off and carry it in the house. I recall reading that the VW engine would be in the neighborhood of 185 pounds in that trim but I never had one on a scale.
.
|
Too heavy to be in a sports car? You might want to educate yourself a bit on engine weights before making such a statement. The m96 weighs significantly less than the old air cooled 911 motors. And comparing it to a type I vw...really? The m96S makes 5 times the horsepower lol. FYI The 3.5 liter cosworth dfv f1 engine only weighs ~30 pounds less than a m96 even with m96 heavy street flywheel. The dfv was not too heavy for Jim Clark.
Last edited by kodabear; 10-31-2014 at 04:14 PM.
|
|
|
|
|
10-31-2014, 05:43 PM
|
#58
|
|
Registered User
Join Date: Jul 2014
Location: Tacoma
Posts: 429
|
I was mostly poking fun at rear engine cars as opposed to mid engine cars not trying to roast the M96 as an oversize boat anchor. I'll try to stay on topic.
|
|
|
|
|
10-31-2014, 09:06 PM
|
#59
|
|
Registered User
Join Date: Apr 2011
Location: DFW
Posts: 713
|
Quote:
Originally Posted by flaps10
I was mostly poking fun at rear engine cars as opposed to mid engine cars not trying to roast the M96 as an oversize boat anchor. I'll try to stay on topic.
|
Humor is good. Thanks for the pointers so far. Damnit need more popcorn.
__________________
What we're dealing with here is a complete lack of respect for the law.
|
|
|
|
|
11-01-2014, 04:40 AM
|
#60
|
|
Registered User
Join Date: Oct 2012
Location: Wake Forest, NC
Posts: 867
|
Quote:
Originally Posted by flaps10
I was mostly poking fun at rear engine cars as opposed to mid engine cars not trying to roast the M96 as an oversize boat anchor. I'll try to stay on topic.
|
I took it as humorous. Great thread; keep it up.
__________________
2000 Boxster S, 6 speed, Sport Package, Litronics, LED tail lights, LNE IMS-B, OBC, Skybreaker wind deflector, Arctic Silver/Graphite Grey
|
|
|
|
 Posting Rules
|
You may not post new threads
You may not post replies
You may not post attachments
You may not edit your posts
HTML code is On
|
|
|
All times are GMT -8. The time now is 01:49 AM.
| |


 Mean Motor Scooter
 2004 Porsche Boxster S
 2004 Porsche 996 Targa
 Growly Grannis/Sex stallion
 Boxster S
 Genesis 3.8
 Linear Mode


