Go Back   986 Forum - The Community for Porsche Boxster & Cayman Owners > Porsche Boxster & Cayman Forums > DIY Project Guides

Post Reply
 
LinkBack Thread Tools Display Modes
Old 04-25-2014, 05:11 PM   #1
Registered User
 
Benjamin's Avatar
 
Join Date: May 2012
Location: Kalamazoo, MI
Posts: 149
Garage
Footwell Subwoofer Enclosure DIY

I recently made a custom 10" subwoofer enclosure for the passenger footwell of my Boxster and thought I would share the plans.

I thought about and even purchased the materials to make a fiberglass enclosure, but I wanted to get started over the winter and thought I would have a tough time getting the resin to cure. I ended up going with MDF as it was more inexpensive and if it didn't work out, I wouldn't be out much.

The volume of the enclosure is about .4 cubic feet, which would be perfect for the Rockford Fosgate 10" Punch Shallow sub.

First, download the plans. Note - all of my measurements are to two or three decimal points and you do NOT need to be that accurate. I calculated all this stuff out in AutoCad and that's just how the numbers come out. Edit: All numbers are in inches. Converstion to metric would be very easy. Mirroring everything would produce one for the left footwell if your car is RHD.

I made templates for the end pieces and the face. The top, bottom, and back are easy cuts on a table saw. The templates don't fit on a standard piece of printer paper, so they are in several pieces and will need to be taped together. When you print the .pdf, you need to print in "Actual Size":


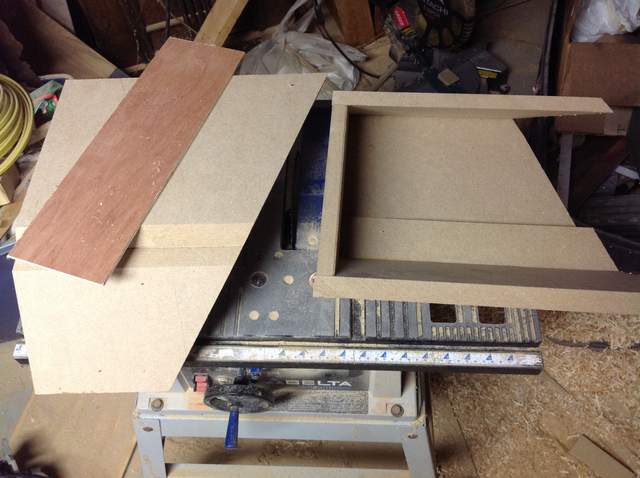
The first pieces to cut out are the end pieces. I cut mine out with my CNC router, but you could also do it with a circular saw. One will end up being used in the final box and the other will end up being cut away.

Next, rip the top, back, and bottom on the table saw, to a length of at least 20 inches. I happened to have 24" wide MDF, so that's what I used. Glue and nail/screw the 5 pieces together (I used a pneumatic brad nailer) so that it looks like this:


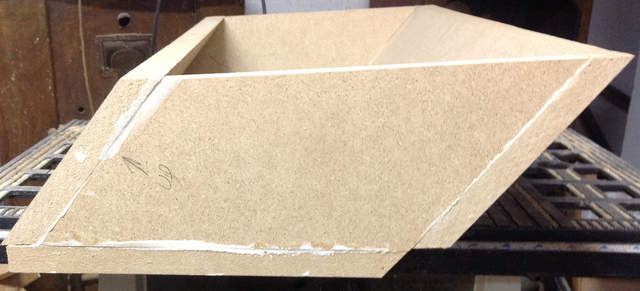
The odd looking joint between the back and bottom are for clearance, otherwise the box wouldn't push all the way against the back of the footwell.

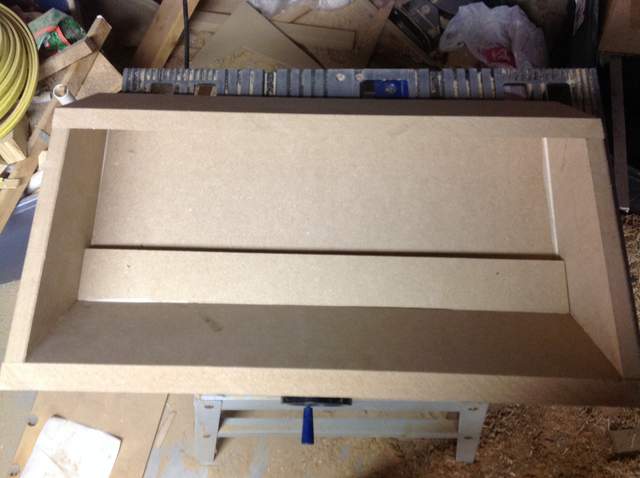
Next you want to use a piece of left over MDF on the inside or the box as reinforcement for the odd joint.


Let that dry at least a few hours, but preferably over night.

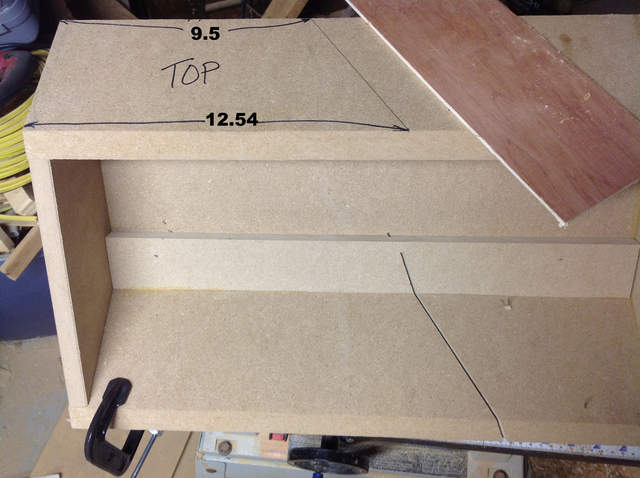
The next thing to do is to slice the newly created box at an angle to fit around the wheel well. Here are the measurements:


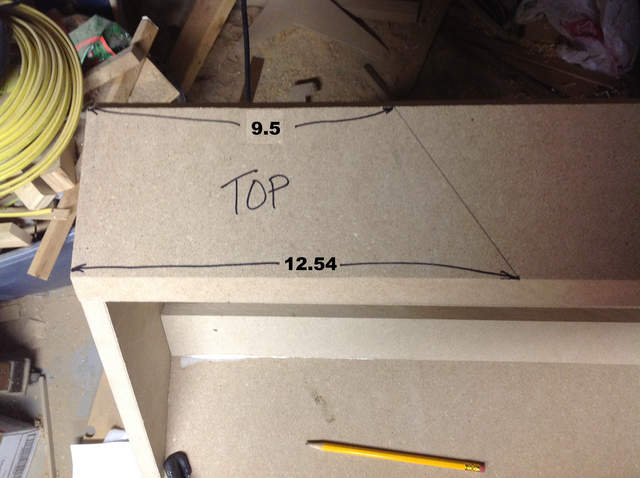
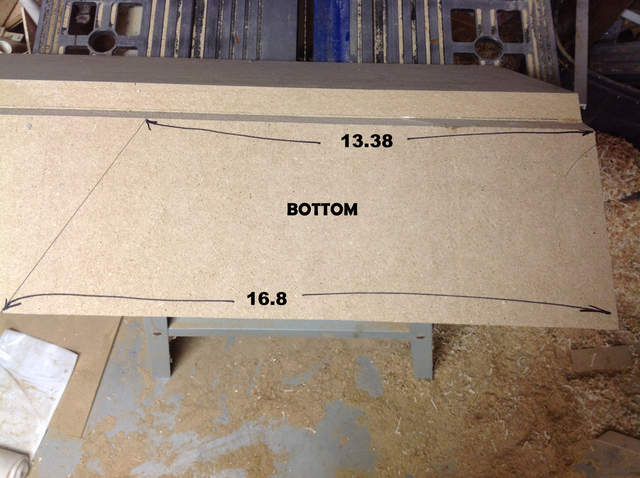
(I had to Photoshop the numbers in because I initially wrote them incorrectly with the Sharpie)

Cut both of those lines with a circular saw set at 90 degrees and as deep as it will go. I tacked a piece of scrap for a straight edge to the waste side of the box for each cut:


Loosen up the base to the circ saw and set it on the back of the box, into one of the cuts to get the same angle:


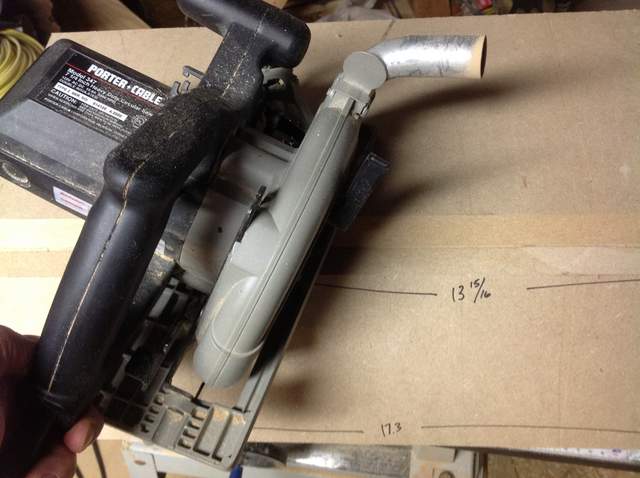
Tack another piece of scrap the appropriate distance away for your saw to use as a fence and finish the cut.


__________________
2000 986 S - "The Black Widow"

Last edited by Benjamin; 04-26-2014 at 11:16 AM. Reason: Clarification on units of measure.
Benjamin is offline   Reply With Quote
Old 04-25-2014, 05:39 PM   #2
Registered User
 
Benjamin's Avatar
 
Join Date: May 2012
Location: Kalamazoo, MI
Posts: 149
Garage
Next you want to set the new cut angle of the box up on to the table saw and set the blade to the same angle:


Rip another piece of MDF that is large enough to become the new angled end piece, with the newly set angle to match the front edge. Then place the box on the MDF with the bevel cut flush with the front edges of the box, and trace around the top, bottom, and back:


Cut that out with your choice of saw and glue & nail/screw it to the angled end of the box. It should look like this:


Once it is dry, you can shape the other three edges of the new end to they are flush with the back, top, and bottom. Next apply a bead of caulk to all joints for extra assurance that the box will be sealed. (as seen in the above picture)

Cut out the front face, but take note that the speaker hole is sized for the Rockford Fosgate sub and you may need to adjust it if you choose something else. You can adjust the hole up a bit and to the left quite a bit, but not really much further to the right and not down at all. I actually needed to sand out a small divot for the magnet to clear on the bottom piece.


With the face and the box still separate, now is the time to test fit it in the car. It should fit just fine, but if not now is the time to find out and make adjustments. If all is good, mark the location of the face on the box and remove both pieces.


Glue and nail/screw the face to the box using the marks you made while in the car and let it dry. Caulk all joints for the face on the inside and outside of the box.

I didn't take pictures, but I installed one of these in the top of the left end piece. I believe I used a 2" hole saw, or maybe 2-1/8".


I found a black rug at Menards that was something like 6x8 feet for $15 and a piece of it worked perfectly for covering the face. I didn't cover any other sides. Before cutting the carpet, put the box back into the car and make note of any places (like the bottom edge) that you want to run the carpet long. Once you have done that, glue a piece of the carpet on with 3M spray glue. Cut out the hole. Don't install the driver yet.

I attached the box to the floor by drilling a hole through the angled part of the floorboard and using a 4" bolt:


You need to take off the front belly pan to get to this area. You want to drill from the bottom, up into the footwell and not from the inside of the car outward. You risk hitting the coolant pipe that way. Put a nut on the bolt on the inside of the box with some thread locker so it doesn't come loose.

Install the driver, piss off the neighbors.

__________________
2000 986 S - "The Black Widow"

Last edited by Benjamin; 04-26-2014 at 04:52 PM.
Benjamin is offline   Reply With Quote
Old 04-25-2014, 05:40 PM   #3
Registered User
 
Benjamin's Avatar
 
Join Date: May 2012
Location: Kalamazoo, MI
Posts: 149
Garage
I can supply .dxf files to anyone that has access to a CNC router or mill and wants to cut out the pieces that way. If anyone has any questions or some part isn't clear, just ask.
__________________
2000 986 S - "The Black Widow"
Benjamin is offline   Reply With Quote
Old 04-26-2014, 10:28 AM   #4
Registered User
 
Nine8Six's Avatar
 
Join Date: Sep 2013
Location: Montreal, QC. (currently expat to Shanghai)
Posts: 3,249
Just saw that for some weird reason.... I always come to the diy section. Browser's default homepage lol

Getting even better. Nice work and contribution mate
__________________
______________________________
'97 Boxster base model 2.5L, Guards Red/Tan leather, with a new but old Alpine am/fm radio.
Nine8Six is offline   Reply With Quote
Old 04-26-2014, 10:33 AM   #5
Registered User
 
Nine8Six's Avatar
 
Join Date: Sep 2013
Location: Montreal, QC. (currently expat to Shanghai)
Posts: 3,249
Just read it all, noowhere you mention about how this mod range on the "incredible" scale of incredible things you can do with a 986.

10/10?

How's is the beat? Sound-wise quality does it work?
__________________
______________________________
'97 Boxster base model 2.5L, Guards Red/Tan leather, with a new but old Alpine am/fm radio.
Nine8Six is offline   Reply With Quote
Old 04-26-2014, 11:10 AM   #6
Registered User
 
Benjamin's Avatar
 
Join Date: May 2012
Location: Kalamazoo, MI
Posts: 149
Garage
It works quite well and sounds really good. I still have some EQ'ing and level adjustment to do so that all speakers play well together, but so far, so good. I think the only thing that would make it sound better is a ported enclosure, but that would double the required volume and there isn't room for that. It's a bit of an adjustment because I am used to the bass coming from the rear of the car because that's usually where the sub is located, but now it comes from a different angle.

A nice sound system also seems to emphasize the difference in mp3 quality of my music library. Some were encoded poorly and seem flat, while others shine brightly.

For me, since I built it myself and everything (less the driver) cost about $50, I think it's a 10/10. I am curious to see if anyone else builds one and what they think.
__________________
2000 986 S - "The Black Widow"
Benjamin is offline   Reply With Quote
Old 04-26-2014, 11:13 AM   #7
Registered User
 
Benjamin's Avatar
 
Join Date: May 2012
Location: Kalamazoo, MI
Posts: 149
Garage
Also, someone asked me through PM if it would stay in place without drilling a hole in the floor and using a bolt. Honestly, I don't know. I happened to already have the car up on jack stands for other work, so it was a no-brainer to drill.
__________________
2000 986 S - "The Black Widow"
Benjamin is offline   Reply With Quote
Old 04-26-2014, 03:54 PM   #8
Registered User
 
Dlirium's Avatar
 
Join Date: Oct 2013
Location: San Jose, CA
Posts: 583
Garage
Off the chart! When you said you would post plans, i was thinking some measurements on the back of a napkin :-)

One question - the face doesn't seem to have any measurements listed. Not being familiar with "registration lines", are these a standard distance? I could probably guess, but thought I'd ask...

Thanks again for this great work!!


__________________
2000 S - Borla Exhaust, TS Cat Deletes, RSS UDP, B&M Short Shift, T96 Steering Wheel, Potenza RE-71R's,
Mantis 2.0L Deep Sump, de-snorkeled, Bilstein PSS9 Coil-Overs, Rennline lug studs, and auto crossed regularly
.
Dlirium is offline   Reply With Quote
Old 04-26-2014, 04:23 PM   #9
Registered User
 
Benjamin's Avatar
 
Join Date: May 2012
Location: Kalamazoo, MI
Posts: 149
Garage
Quote:
Originally Posted by Dlirium View Post
Off the chart! When you said you would post plans, i was thinking some measurements on the back of a napkin :-)

One question - the face doesn't seem to have any measurements listed. Not being familiar with "registration lines", are these a standard distance? I could probably guess, but thought I'd ask...

Thanks again for this great work!!

Thanks. I work on CAD a little bit for work and it's just easier for me to draw out plans using a mouse instead of a pencil. It's a lot easier to figure out angles and distances that way and you can easily rescale everything.

The registration marks are not a standard distance apart, they are just there so that when you print out all 6 panels, you have several lines to use to line up adjacent pages. If you hold those pages up to the light, several lines should overlap perfectly. It's just a way to know that each page isn't twisted, or too close/far from the next one. The lines from each page don't abruptly end, they run long and overlap the same lines on the adjacent page.

(I just read the above paragraph to my girlfriend and she looks puzzled).
__________________
2000 986 S - "The Black Widow"
Benjamin is offline   Reply With Quote
Old 04-26-2014, 04:50 PM   #10
Registered User
 
Benjamin's Avatar
 
Join Date: May 2012
Location: Kalamazoo, MI
Posts: 149
Garage
I'll update the .pdf on Monday, but here are at least some basic dimensions for the face:


I know the outside lines didn't change, and am 99% sure the hole is in the same place in this drawing as in the final.
__________________
2000 986 S - "The Black Widow"
Benjamin is offline   Reply With Quote
Old 04-27-2014, 11:27 AM   #11
Registered User
 
Dlirium's Avatar
 
Join Date: Oct 2013
Location: San Jose, CA
Posts: 583
Garage
Quote:
Originally Posted by Benjamin View Post
I'll update the .pdf on Monday, but here are at least some basic dimensions for the face:


I know the outside lines didn't change, and am 99% sure the hole is in the same place in this drawing as in the final.
Ah, got it! I didn't realize it was meant to be printed out and used as a template!! that makes it even easier!!

Thanks again, will be building this soon...awesome design...
__________________
2000 S - Borla Exhaust, TS Cat Deletes, RSS UDP, B&M Short Shift, T96 Steering Wheel, Potenza RE-71R's,
Mantis 2.0L Deep Sump, de-snorkeled, Bilstein PSS9 Coil-Overs, Rennline lug studs, and auto crossed regularly
.
Dlirium is offline   Reply With Quote
Old 05-01-2014, 09:15 AM   #12
Registered User
 
Dlirium's Avatar
 
Join Date: Oct 2013
Location: San Jose, CA
Posts: 583
Garage
Reminds me of a school project or something! Have the cut out done and will be transferring to cardboard for a test fit later this week!


__________________
2000 S - Borla Exhaust, TS Cat Deletes, RSS UDP, B&M Short Shift, T96 Steering Wheel, Potenza RE-71R's,
Mantis 2.0L Deep Sump, de-snorkeled, Bilstein PSS9 Coil-Overs, Rennline lug studs, and auto crossed regularly
.
Dlirium is offline   Reply With Quote
Old 01-30-2015, 12:09 PM   #13
Registered User
 
Benjamin's Avatar
 
Join Date: May 2012
Location: Kalamazoo, MI
Posts: 149
Garage
Just wondering if anyone has built an enclosure from the plans and how it went. The one I built and subsequently made the plans from has been installed a full driving season and I absolutely love it. The bass is very tight and it runs laps around my Cobalt winter driver with stock subwoofer that I used to think was pretty good.
__________________
2000 986 S - "The Black Widow"
Benjamin is offline   Reply With Quote
Old 01-31-2015, 05:52 AM   #14
Registered User
 
Nine8Six's Avatar
 
Join Date: Sep 2013
Location: Montreal, QC. (currently expat to Shanghai)
Posts: 3,249
Quote:
Originally Posted by Benjamin View Post
You have to admit this got to be the best factory looking sub system on the internet. Must be slapping. And you can't really see it when the door is closed, dark there, sure won't bother you.

I dropped the idea eventually because my tan interior is too, too bright maybe. Scared of round black looking anything lol. But I say this one definitely works for a black interior car

Your thread was nice to read same as it was a few months back lolll cool work!!!!
__________________
______________________________
'97 Boxster base model 2.5L, Guards Red/Tan leather, with a new but old Alpine am/fm radio.
Nine8Six is offline   Reply With Quote
Old 01-31-2015, 07:13 AM   #15
Registered User
 
Benjamin's Avatar
 
Join Date: May 2012
Location: Kalamazoo, MI
Posts: 149
Garage
Thank you for your kind words. There must be some ways to "stealth" it out a little bit. Maybe build the same cabinet (sans black carpeting) and then build out the front with some 3/4" MDF (to the height of the speaker grille) and then cover over that (grille and all) with tan carpeting. You would only lose about another 3/4" of foot space, still have the protection of the grille in case of an overly enthusiastic passenger, and wouldn't lose much at all in the way of bass. It would look like a flat piece of carpet to the uninitiated. There just aren't very many places to hide a sub in a Boxster.
__________________
2000 986 S - "The Black Widow"
Benjamin is offline   Reply With Quote
Old 01-31-2015, 08:22 AM   #16
Registered User
 
Nine8Six's Avatar
 
Join Date: Sep 2013
Location: Montreal, QC. (currently expat to Shanghai)
Posts: 3,249
Quote:
Originally Posted by Benjamin View Post
There just aren't very many places to hide a sub in a Boxster.
Nope, and the way you did it is possibly the only way. Looks okay mate

PS'ed some visuals at the time and that didn't convinced me, tan box, honeycomb grille painted silver.....tried a few combo. Beside I'd hate to fabricate something I not even half good at and ending having doubt in :/

Man, if only I had a black interior I wouldn't be here typing these I promise, I'd be sub and carpet shopping. Sure more than a few chap picked up your free plans already LOL kool share

Luck with hunting pix, I'd like to see more if anymore care to post also
__________________
______________________________
'97 Boxster base model 2.5L, Guards Red/Tan leather, with a new but old Alpine am/fm radio.
Nine8Six is offline   Reply With Quote
Old 01-31-2015, 08:24 AM   #17
Registered User
 
Nine8Six's Avatar
 
Join Date: Sep 2013
Location: Montreal, QC. (currently expat to Shanghai)
Posts: 3,249
All its missing in that car is a sub, a half decent one at least lol

Leaving this mod to the braver - subscribed
__________________
______________________________
'97 Boxster base model 2.5L, Guards Red/Tan leather, with a new but old Alpine am/fm radio.
Nine8Six is offline   Reply With Quote
Old 08-07-2017, 11:33 AM   #18
Registered User
 
Join Date: Aug 2017
Location: NC
Posts: 4
Benjamin!

Hey Benjamin, Are you still working any with the floor sub box? Let me know if you are. I know its been 2 years since the last post, but thought I would try and see.
MinionInNC is offline   Reply With Quote
Old 08-07-2017, 03:21 PM   #19
Registered User
 
Benjamin's Avatar
 
Join Date: May 2012
Location: Kalamazoo, MI
Posts: 149
Garage
Quote:
Originally Posted by MinionInNC View Post
Hey Benjamin, Are you still working any with the floor sub box? Let me know if you are. I know its been 2 years since the last post, but thought I would try and see.
That depends on what you mean by working with it. I still have one installed in my Boxster and really like it, but I haven't developed the plans any further or decided I needed a v2.0.

Are you thinking about building one?
Benjamin is offline   Reply With Quote
Old 08-10-2017, 09:17 PM   #20
Registered User
 
Join Date: Oct 2016
Location: Leonberg
Posts: 9
I made a similar one but with a glass fiber enclosure and a JL T1W10.

sppdev is offline   Reply With Quote
Post Reply


Thread Tools
Display Modes

Posting Rules
You may not post new threads
You may not post replies
You may not post attachments
You may not edit your posts

BB code is On
Smilies are On
[IMG] code is On
HTML code is On
Trackbacks are On
Pingbacks are On
Refbacks are On


All times are GMT -8. The time now is 06:10 AM.


Powered by vBulletin® Version 3.8.7
Copyright ©2000 - 2024, vBulletin Solutions, Inc.
Content Relevant URLs by vBSEO 3.6.0
Copyright 2024 Pelican Parts, LLC - Posts may be archived for display on the Pelican Parts Website -    DMCA Registered Agent Contact Page