 06-08-2014, 01:49 PM
|
#41
|
|
Registered User
Join Date: Apr 2013
Location: Springfield, Oregon
Posts: 62
|
Got the Arduino Nanos on Friday. I ordered the nanos that don't have the on-board USB to serial to save space and complexity. The only problem is I can't for the life of me find my "ftdi friend" usb to TTL converter to program them. I just ordered a replacement, I'll update when it gets here and I can program the nano. It'll undoubtedly be at least a week for it to get here.
|

|

|
|
06-08-2014, 01:56 PM
|
#42
|
|
Registered User
Join Date: May 2013
Location: North Alabama
Posts: 2,079
|
Could you give us a pinout (EBC) on the transistors...the voltage regulator is pretty self explanatory.
|
|
|
|
|
06-08-2014, 03:47 PM
|
#43
|
|
On the slippery slope
Join Date: Mar 2014
Location: Austin and Palm Springs
Posts: 3,803
|
the transistor is acting like a switch and switching ground. It doesn't matter which way they are connected as long as the base is connected via the resistor to pin 2 or 3 as applicable. The middle pin is the base.
Polaris,
Can you email the actual Arduino sketch file? I would like to try what you got working before.
__________________
2004 Boxster S 6 speed - DRL relay hack, Polaris AutoTop DIY
2004 996 Targa Tip
Instructor - San Diego region
2014 Porsche Performance Driving School
2020 BMW X3, 2013 Ram 1500, 2016 Cmax, 2004 F-150 "Big Red"
|
|
|
|
|
06-11-2014, 01:10 PM
|
#44
|
|
Registered User
Join Date: Apr 2012
Location: Riverside, CA
Posts: 1,666
|
JayG I took a look at the code and it seems fine and compiles, however I am using the Arduino v1.1 software on a Win7 PC.
With this and other projects I have worked on it seems that the newer versions of the Arduino software has more bugs.
Try Arduino version 1.1.x
Also, the transistor orientation is important since a transistor can act as a diode and only allow current to flow in 1 direction.
If the transistors are backwards you may only be able to raise , lower or do neither.
Does anyone see any benefit to making the Arduino boards any smaller?
If so I may try to implement this on a TI EZ430-F2012 which is smaller literally than your thumbnail.
__________________
"It broke because it wants to be Upgraded  "
2012 Porsche Performance Driving School - SanDiego region
2001 Boxster S, Top Speed muffler, (Fred's) Mini Morimotto Projectors, Tarret UDP,
Short Shifter, Touch Screen Dual Din Radio, 03 4 Bow glass Top (DD & Auto-X since May 17,2012)
Last edited by jb92563; 06-11-2014 at 01:17 PM.
|
|
|
|
|
06-11-2014, 02:17 PM
|
#45
|
|
On the slippery slope
Join Date: Mar 2014
Location: Austin and Palm Springs
Posts: 3,803
|
Quote:
Originally Posted by jb92563

JayG I took a look at the code and it seems fine and compiles, however I am using the Arduino v1.1 software on a Win7 PC.
With this and other projects I have worked on it seems that the newer versions of the Arduino software has more bugs.
Try Arduino version 1.1.x
Also, the transistor orientation is important since a transistor can act as a diode and only allow current to flow in 1 direction.
If the transistors are backwards you may only be able to raise , lower or do neither.
Does anyone see any benefit to making the Arduino boards any smaller?
If so I may try to implement this on a TI EZ430-F2012 which is smaller literally than your thumbnail.
|
I can compile and load perfectly, its just it does not seem to work properly
Good catch on the transistor. Like I said, it been a very long time since I played around with electronic components
I don't see where I can download 1.1, but I have tried 1.5.6 and 1.0.5
Hopefully Polaris will be able to shed some light on this when he is able to try a NANO
__________________
2004 Boxster S 6 speed - DRL relay hack, Polaris AutoTop DIY
2004 996 Targa Tip
Instructor - San Diego region
2014 Porsche Performance Driving School
2020 BMW X3, 2013 Ram 1500, 2016 Cmax, 2004 F-150 "Big Red"
Last edited by JayG; 06-11-2014 at 07:46 PM.
|
|
|
|
|
06-11-2014, 08:56 PM
|
#46
|
|
Registered User
Join Date: Apr 2012
Location: Riverside, CA
Posts: 1,666
|
__________________
"It broke because it wants to be Upgraded "
2012 Porsche Performance Driving School - SanDiego region
2001 Boxster S, Top Speed muffler, (Fred's) Mini Morimotto Projectors, Tarret UDP,
Short Shifter, Touch Screen Dual Din Radio, 03 4 Bow glass Top (DD & Auto-X since May 17,2012)
|
|
|
|
|
06-11-2014, 09:22 PM
|
#47
|
|
On the slippery slope
Join Date: Mar 2014
Location: Austin and Palm Springs
Posts: 3,803
|
Quote:
Originally Posted by jb92563
|
That's what I have been using. I tried 1.5.6 today as well
The problem I have is not compiling or loading the code, its that it doesn't work properly
The top motor only runs as long as I have the switch pushed, just like stock. A momentary push does not keep the top moving
__________________
2004 Boxster S 6 speed - DRL relay hack, Polaris AutoTop DIY
2004 996 Targa Tip
Instructor - San Diego region
2014 Porsche Performance Driving School
2020 BMW X3, 2013 Ram 1500, 2016 Cmax, 2004 F-150 "Big Red"
|
|
|
|
|
06-12-2014, 11:48 AM
|
#48
|
|
Registered User
Join Date: Apr 2013
Location: Springfield, Oregon
Posts: 62
|
Can you post a nice high res, close up picture of your arduino?
The code works, I've been using my setup for over a year and 2-8 times a day (when the weather is good) without a single issue.
|
|
|
|
|
06-20-2014, 10:18 AM
|
#49
|
|
Registered User
Join Date: Apr 2013
Location: Springfield, Oregon
Posts: 62
|
JayG, any update on getting a picture of your setup?
I'm still waiting on the usb to serial programmer to get here.
|
|
|
|
|
06-20-2014, 10:34 PM
|
#50
|
|
On the slippery slope
Join Date: Mar 2014
Location: Austin and Palm Springs
Posts: 3,803
|
Quote:
Originally Posted by Polaris
JayG, any update on getting a picture of your setup?
I'm still waiting on the usb to serial programmer to get here.
|
I'm traveling currently and will be back on Monday. I'll take some pics then
__________________
2004 Boxster S 6 speed - DRL relay hack, Polaris AutoTop DIY
2004 996 Targa Tip
Instructor - San Diego region
2014 Porsche Performance Driving School
2020 BMW X3, 2013 Ram 1500, 2016 Cmax, 2004 F-150 "Big Red"
|
|
|
|
|
06-21-2014, 08:32 PM
|
#51
|
|
Registered User
Join Date: Jun 2013
Location: Melville NY
Posts: 80
|
Polaris please send me a note if you can make me an auto-top . I would like to buy one from you. Thanks, Lee NY
|
|
|
|
|
06-26-2014, 10:11 AM
|
#52
|
|
On the slippery slope
Join Date: Mar 2014
Location: Austin and Palm Springs
Posts: 3,803
|
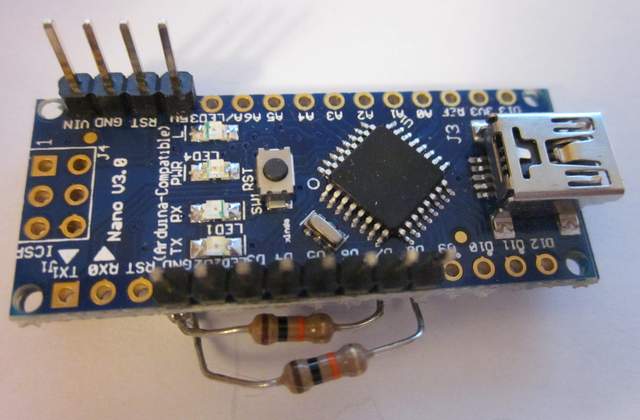
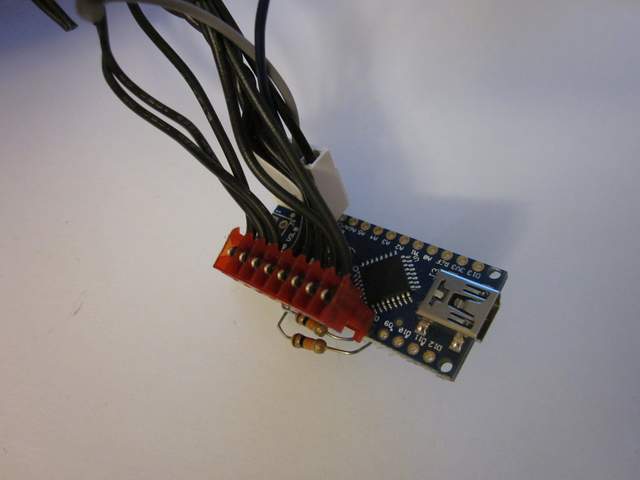
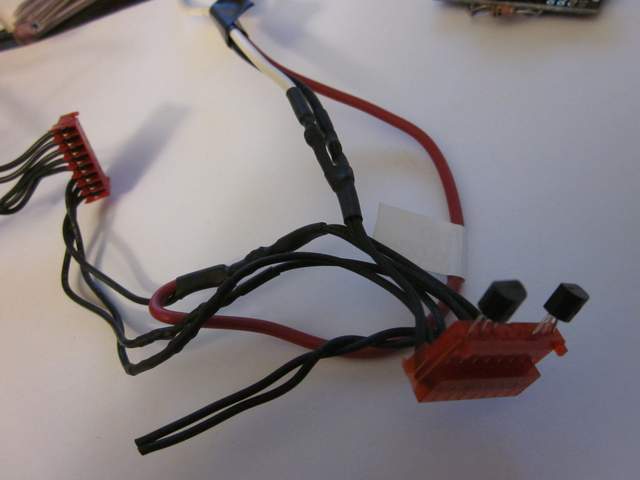
OK, finally got a chance to take a few pics
Polaris,
A few questions
Have you been able to get a NANO to work ?
Do you have any special libraries loaded?
the reason I ask, is that you define some variables and I dont see them referenced anywhere in your posted code
#define openTime 15600;
#define closeTime 16400;
I have double and triple checked my wiring. I did make 1 modification, the pins used for the outputs so I could use the header cable I had. I changed the pins in the code as well
The header cables also make a great transistor socket

__________________
2004 Boxster S 6 speed - DRL relay hack, Polaris AutoTop DIY
2004 996 Targa Tip
Instructor - San Diego region
2014 Porsche Performance Driving School
2020 BMW X3, 2013 Ram 1500, 2016 Cmax, 2004 F-150 "Big Red"
|
|
|
|
|
06-26-2014, 04:52 PM
|
#53
|
|
Registered User
Join Date: Apr 2013
Location: Springfield, Oregon
Posts: 62
|
The MovementCount veritable should definitely be getting set to either openTime or closeTime depending on the button pressing. Maybe I posted the wrong version of the code....like a bone head. I'll have a look through my files when I get home from work.
|
|
|
|
|
06-26-2014, 07:45 PM
|
#54
|
|
On the slippery slope
Join Date: Mar 2014
Location: Austin and Palm Springs
Posts: 3,803
|
Quote:
Originally Posted by Polaris
The MovementCount veritable should definitely be getting set to either openTime or closeTime depending on the button pressing. Maybe I posted the wrong version of the code....like a bone head. I'll have a look through my files when I get home from work.
|
Thanks
I have brain farts all the time 
__________________
2004 Boxster S 6 speed - DRL relay hack, Polaris AutoTop DIY
2004 996 Targa Tip
Instructor - San Diego region
2014 Porsche Performance Driving School
2020 BMW X3, 2013 Ram 1500, 2016 Cmax, 2004 F-150 "Big Red"
|
|
|
|
|
06-27-2014, 08:26 AM
|
#55
|
|
Registered User
Join Date: Apr 2013
Location: Springfield, Oregon
Posts: 62
|
well craptastic. Looks like the final version got overwritten with the second to last version. I'll go over the code and figure it out and let you know.
On a side note, they are sending me "another" ftdi friend as it's now been 20 days since I ordered the previous one. Looks like USPS ate it.
|
|
|
|
|
06-27-2014, 08:28 AM
|
#56
|
|
On the slippery slope
Join Date: Mar 2014
Location: Austin and Palm Springs
Posts: 3,803
|
Thanks, I appreciate it
__________________
2004 Boxster S 6 speed - DRL relay hack, Polaris AutoTop DIY
2004 996 Targa Tip
Instructor - San Diego region
2014 Porsche Performance Driving School
2020 BMW X3, 2013 Ram 1500, 2016 Cmax, 2004 F-150 "Big Red"
|
|
|
|
|
06-27-2014, 08:47 AM
|
#57
|
|
Registered User
Join Date: Apr 2013
Location: Springfield, Oregon
Posts: 62
|
I'm pretty sure the last switch statement should just look like:
default: //no movement currently
if(openBtnCount > 0) {
openMode = 1;
movementCount = openTime;
digitalWrite(closeBtnOut, LOW);
digitalWrite(openBtnOut, HIGH);
} else if(closeBtnCount > 0) {
openMode = 2;
movementCount = closeTime;
digitalWrite(closeBtnOut, HIGH);
digitalWrite(openBtnOut, LOW);
} else {
allStop();
}
I'm also pretty sure the "movementCount -= loopInterval;" lines shouldn't be in the case 3 and case 4 and default switches. They are unnecessary in case 3 and 4, and constantly decremented when there is no motion in the default case.
|
|
|
|
|
06-27-2014, 09:12 AM
|
#58
|
|
On the slippery slope
Join Date: Mar 2014
Location: Austin and Palm Springs
Posts: 3,803
|
Quote:
Originally Posted by Polaris
I'm pretty sure the last switch statement should just look like:
default: //no movement currently
if(openBtnCount > 0) {
openMode = 1;
movementCount = openTime;
digitalWrite(closeBtnOut, LOW);
digitalWrite(openBtnOut, HIGH);
} else if(closeBtnCount > 0) {
openMode = 2;
movementCount = closeTime;
digitalWrite(closeBtnOut, HIGH);
digitalWrite(openBtnOut, LOW);
} else {
allStop();
}
I'm also pretty sure the "movementCount -= loopInterval;" lines shouldn't be in the case 3 and case 4 and default switches. They are unnecessary in case 3 and 4, and constantly decremented when there is no motion in the default case.
|
just tried those changes and the output still does not stay high except for the time when the switch is closed, in other words no auto operation.
I am using the onboard LED (pin 13) as the output for testing as it is easier than uploading the code and installing in the car to test
__________________
2004 Boxster S 6 speed - DRL relay hack, Polaris AutoTop DIY
2004 996 Targa Tip
Instructor - San Diego region
2014 Porsche Performance Driving School
2020 BMW X3, 2013 Ram 1500, 2016 Cmax, 2004 F-150 "Big Red"
|
|
|
|
|
06-27-2014, 10:08 AM
|
#59
|
|
Registered User
Join Date: Apr 2013
Location: Springfield, Oregon
Posts: 62
|
do you still have your delay(50) removed?
|
|
|
|
|
06-27-2014, 10:09 AM
|
#60
|
|
Registered User
Join Date: Apr 2013
Location: Springfield, Oregon
Posts: 62
|
...and delay(50) should be delay(loopInterval)
|
|
|
|
 Posting Rules
|
You may not post new threads
You may not post replies
You may not post attachments
You may not edit your posts
HTML code is On
|
|
|
All times are GMT -8. The time now is 03:09 AM.
| |


 2004 Porsche Boxster S
 2004 Porsche 996 Targa
 Linear Mode


