 06-09-2014, 05:03 AM
|
#501
|
|
Registered User
Join Date: Sep 2013
Location: Montreal, QC. (currently expat to Shanghai)
Posts: 3,249
|
( < Bruce, Dave, Coaster, JayKay, some comments left for you on previous page.)
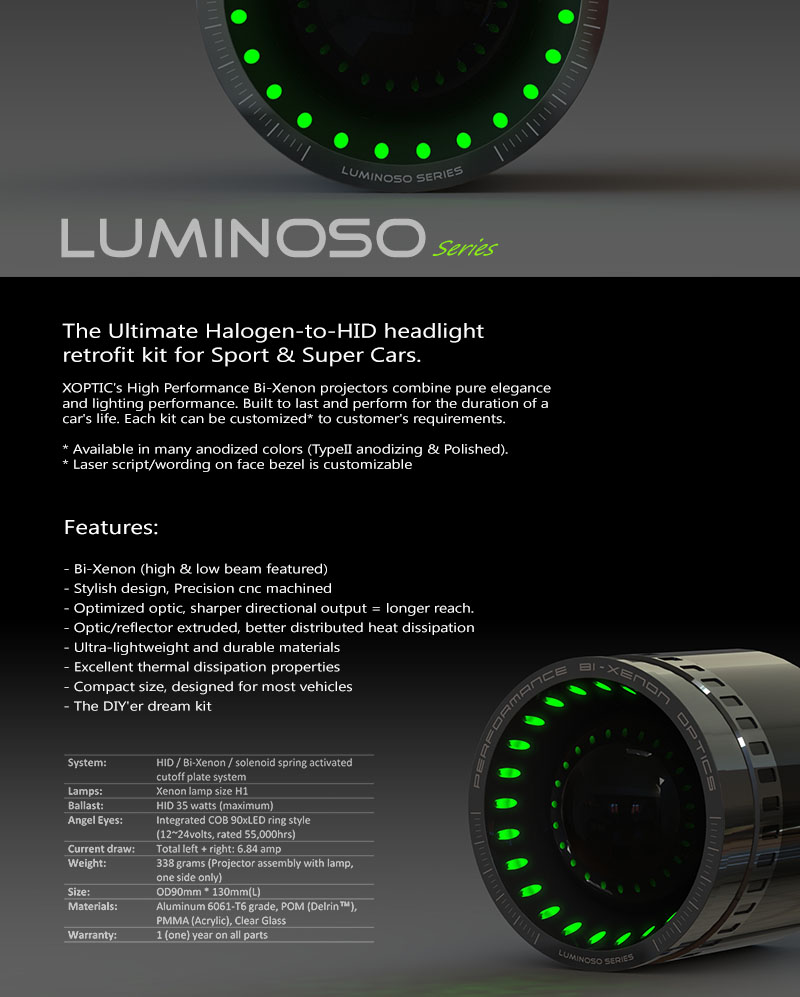
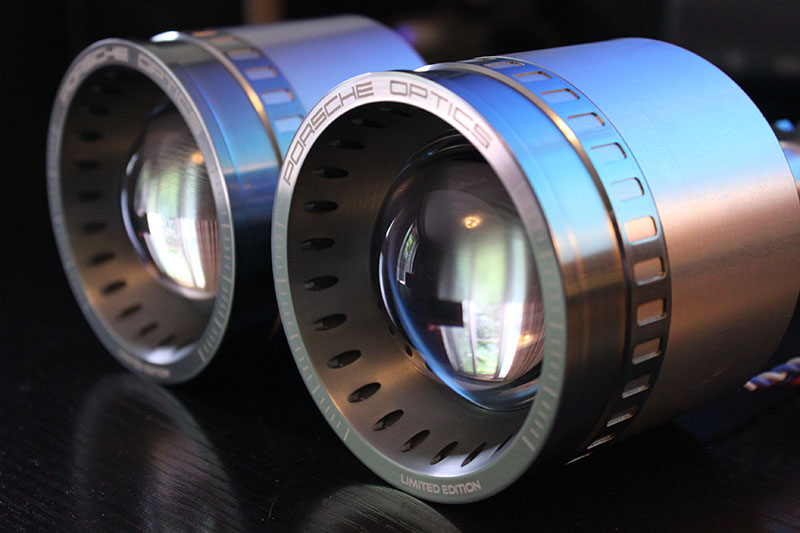
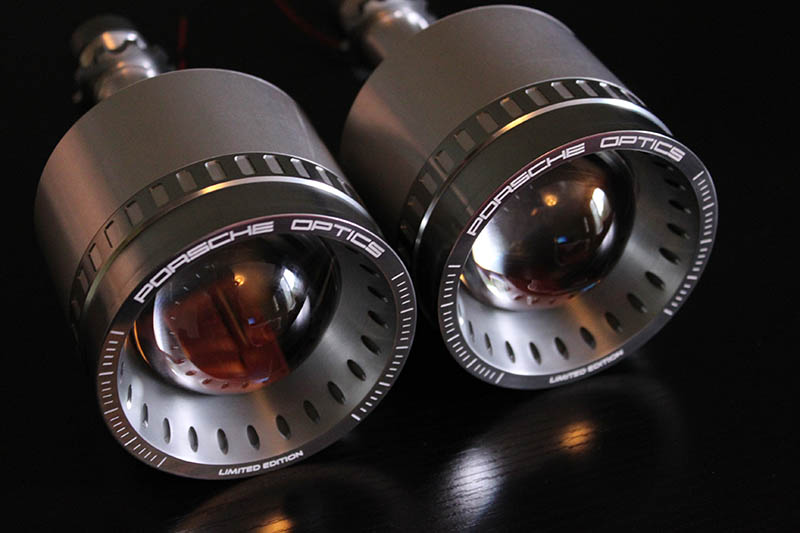
New Projectors Styles - The new family!
This thread and the support from members of 986forum have given me invaluable inspiration throughout the life and development of this projector. The interest, the demand, satisfaction and enthusiasms, have made me realized that there were a demand to bring this product to its next level. So.... I did!
Most importantly and before going any further, I would like to thanks everyone who have shown interest in the kit and to those who've purchased it from Charles or myself (very special thanks to you). Without all of you guys, 986forum, this would NOT have been possible. So thanks x100 again, I'll forever be grateful to all of you here 
Once a personal idea meant to mimic the front-end of a half-million dollar car, some could now call it The Ultimate Halogen-to-HID headlight retrofit kit for sport & super cars series. While keeping up to the theme of this thread, i.e. sharing, and without any further due (apologies to those who've been waiting), here goes some previews of what I am rumbling about.
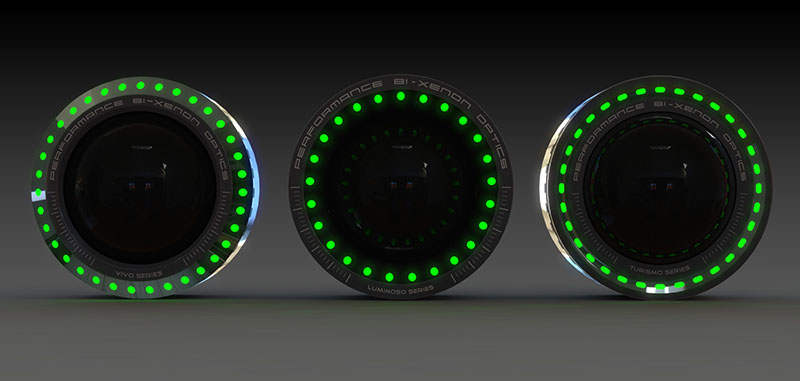 The final High Performance Bi-Xenon Projector Series
 (2014 models lol).
All of the models are sharing the same dotted angel eyes concept and most technical features and performance identical to the classic CGT style projector. With few cosmetic exceptions and design revisions however:
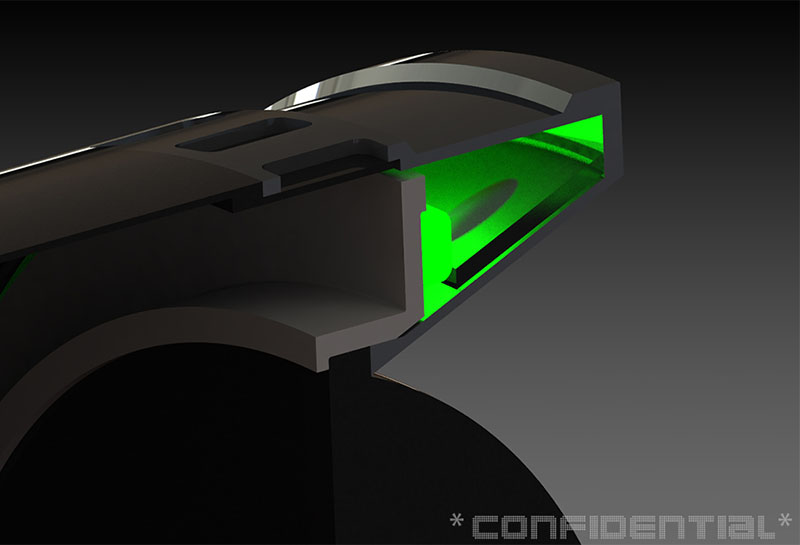
1. The lens is now secured with a retaining ring. Machined in house and made of POM material (Delrin)
2. Angel eyes now mounted on the lens' retaining ring
3. The LED diffuser are also machined in-house using clear PMMA (Acrylic, frosted filter effect)
4. 15% weight reduction using thin wall thickness machining techniques, and less filling chemicals. Total assembly now only weight total 338 grams
5. Transient thermal analysis simulation, R&D and tests have been carried. Thermal management vs material properties (AE hotspots avoidance, heat dissipation tests)
6. And finally, each design have been given a name
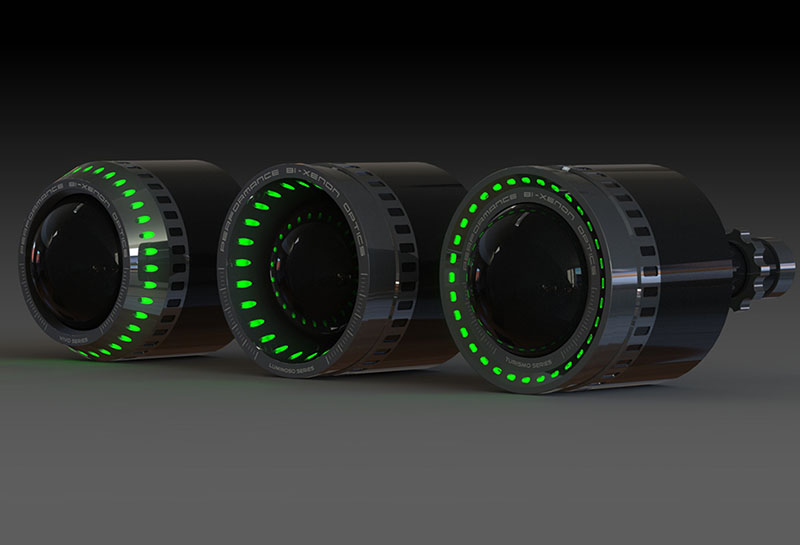
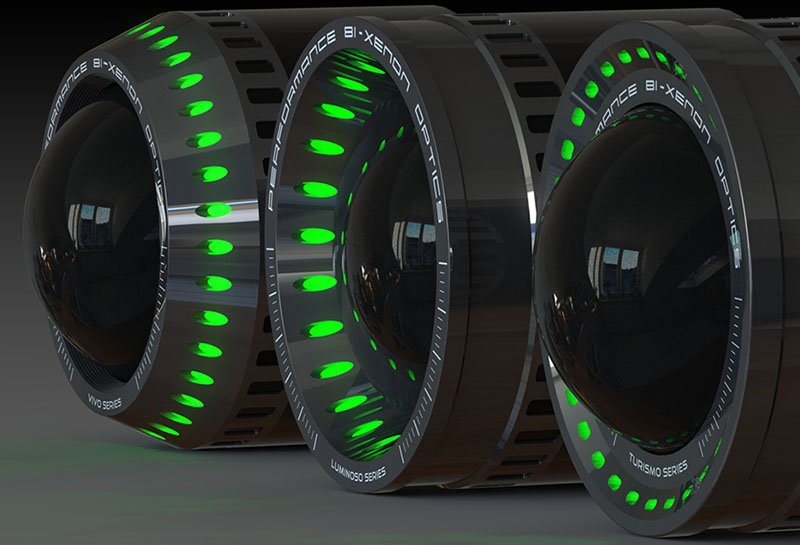


^ Although the kit remains fully customizable (anodizing colors, laser script, etc), that is how they are going to be branded and laser-scripted by default. The Gunmetal is also the default color. Less the chemical green LEDs of course 
ps. this green is what I prefer using for 3D renderings!
__________________
______________________________
'97 Boxster base model 2.5L, Guards Red/Tan leather, with a new but old Alpine am/fm radio.
|

|

|
|
06-09-2014, 05:05 AM
|
#502
|
|
Registered User
Join Date: Sep 2013
Location: Montreal, QC. (currently expat to Shanghai)
Posts: 3,249
|
__________________
______________________________
'97 Boxster base model 2.5L, Guards Red/Tan leather, with a new but old Alpine am/fm radio.
Last edited by Nine8Six; 06-09-2014 at 05:14 AM.
|
|
|
|
|
06-09-2014, 05:18 AM
|
#503
|
|
Registered User
Join Date: Sep 2013
Location: Montreal, QC. (currently expat to Shanghai)
Posts: 3,249
|
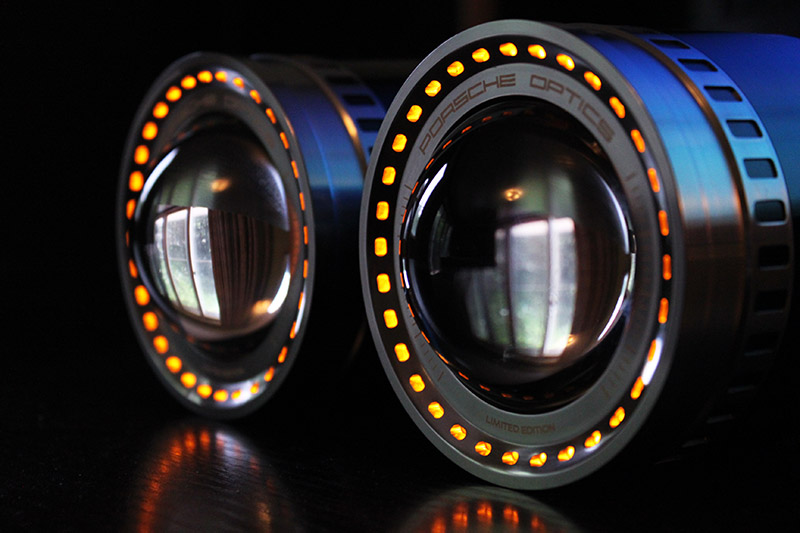
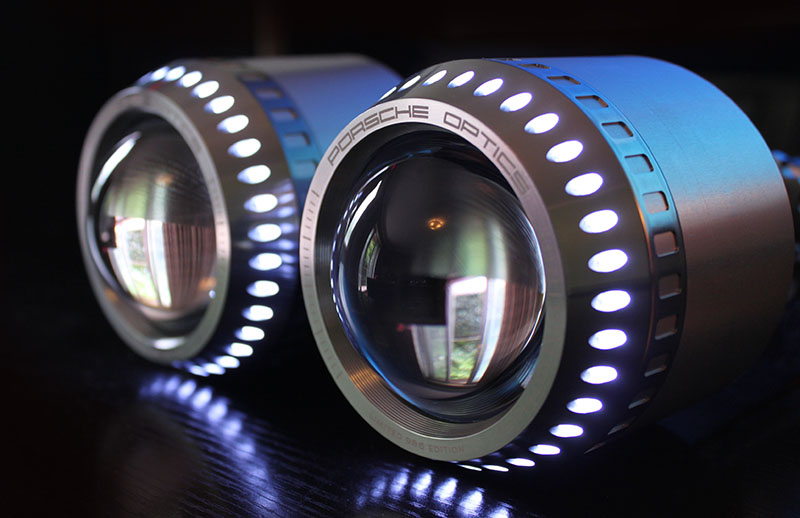
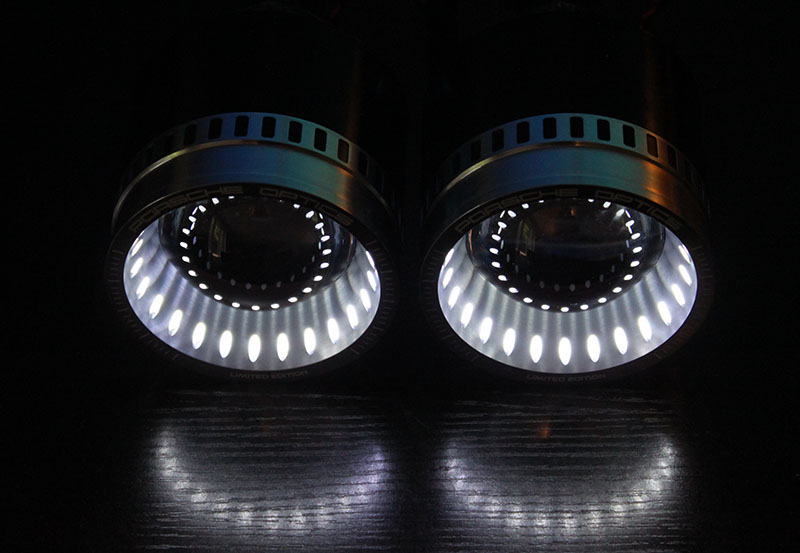
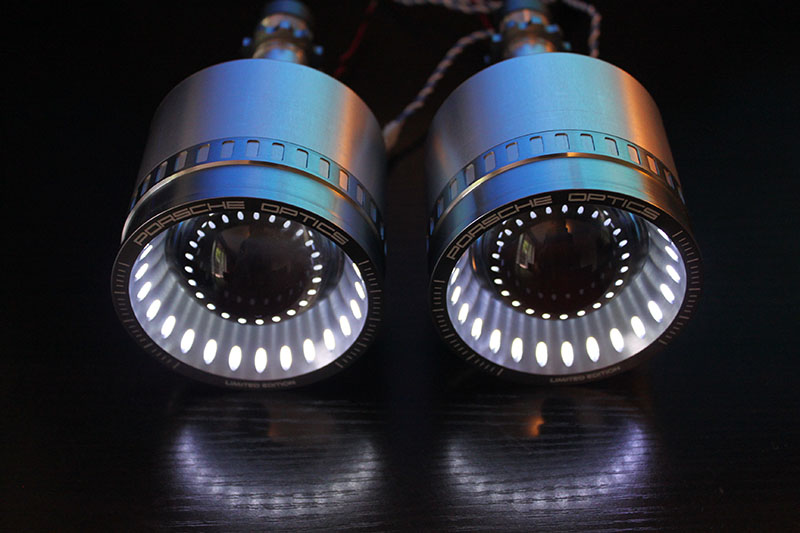
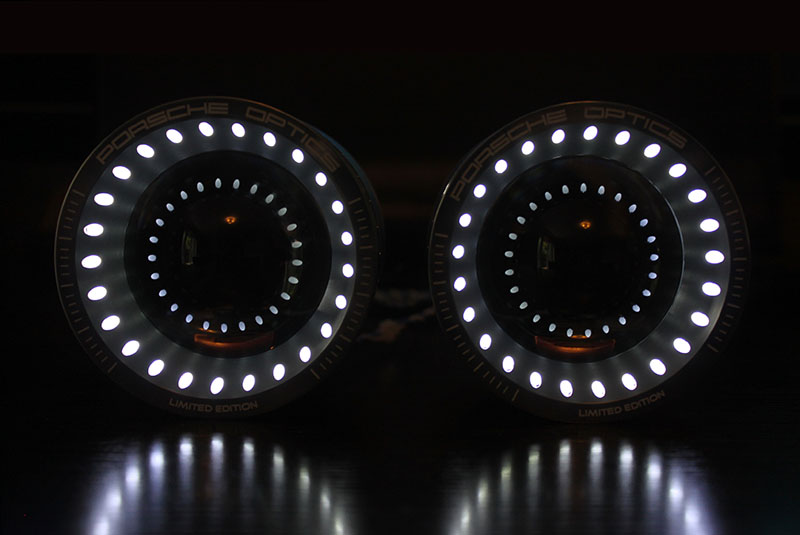
Vivo Series with pics
__________________
______________________________
'97 Boxster base model 2.5L, Guards Red/Tan leather, with a new but old Alpine am/fm radio.
|
|
|
|
|
06-09-2014, 05:29 AM
|
#504
|
|
Registered User
Join Date: Sep 2013
Location: Montreal, QC. (currently expat to Shanghai)
Posts: 3,249
|
Advertisement preps & specs
Lot's of work ahead. Website + Visuals detailing each of the products.
Let you guys know when its finalized. In a meantime, feel free to contact me if you are interested in buying a kit for your Porsche car. They cost $355 (shipped) and take one week to custom-make for you. Just pass over your PayPal addy and I'll email an official PayPal invoice detailing all of what's in the kit (it's a complete kit btw, HID ballasts, xenon lamps, gifts and all!)
Some advert visual (draft) in Frenchglish (apologies to all native English people  )
__________________
______________________________
'97 Boxster base model 2.5L, Guards Red/Tan leather, with a new but old Alpine am/fm radio.
|
|
|
|
|
06-09-2014, 05:40 AM
|
#505
|
|
Registered User
Join Date: Sep 2013
Location: Montreal, QC. (currently expat to Shanghai)
Posts: 3,249
|
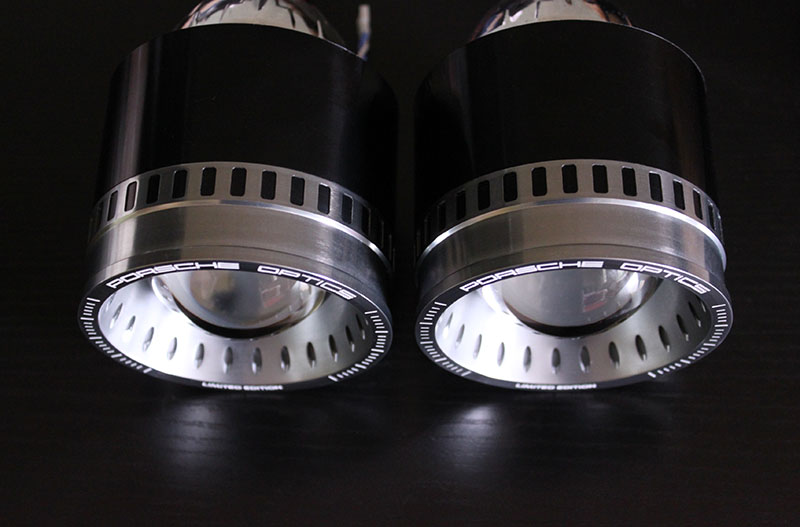
Turismo Series
And how can we forget the Classic CGT style projector! Re-branded the Turismo Series

__________________
______________________________
'97 Boxster base model 2.5L, Guards Red/Tan leather, with a new but old Alpine am/fm radio.
|
|
|
|
|
06-09-2014, 09:11 AM
|
#506
|
|
Registered User
Join Date: May 2013
Location: North Alabama
Posts: 2,079
|
I want a pair of these in Red so bad....have to wait until I find new employment though.
|
|
|
|
|
06-09-2014, 11:04 AM
|
#507
|
|
Registered User
Join Date: Mar 2014
Location: Eastern NC
Posts: 701
|
The no paint option does look nice on the Seal Grey and Arctic Silver
|
|
|
|
|
06-09-2014, 11:31 AM
|
#508
|
|
Registered User
Join Date: Sep 2013
Location: Montreal, QC. (currently expat to Shanghai)
Posts: 3,249
|
Quote:
Originally Posted by BFeller

The no paint option does look nice on the Seal Grey and Arctic Silver
|
Pricey sense of humor you got there Good eye as well
Talk to Charles (user Particlewave) if you want it to happen like magic
(Edit: Charles offers all kind of retrofit services. Incl professionally installing those projectors, dash color leds, and other interior mods)
__________________
______________________________
'97 Boxster base model 2.5L, Guards Red/Tan leather, with a new but old Alpine am/fm radio.
Last edited by Nine8Six; 06-09-2014 at 11:35 AM.
|
|
|
|
|
06-09-2014, 01:25 PM
|
#509
|
|
Registered User
Join Date: Mar 2014
Location: Austin
Posts: 315
|
Those are some sweet lights! Choices, choices.
__________________
2003 S, 6 Speed, PCM, PSM, Bose, Litronics with washers, on its' second LN IMSB, comfort top, UDP, 987 engine mount, 997 RMS, Koni Sport Shocks, H&R springs, Techno brace, comfort blinkers, nin8six windscreen, particlewave light up cubby
|
|
|
|
|
06-09-2014, 01:47 PM
|
#510
|
|
Custom User Title Here
Join Date: Mar 2012
Location: Ft. Leonard Wood
Posts: 6,169
|
These are my babies 
I have something different in mind for this set...stay tuned
__________________
https://youtube.com/@UnwindTimeVintageWatchMuseum
|
|
|
|
|
06-09-2014, 02:50 PM
|
#511
|
|
Registered User
Join Date: Mar 2014
Location: Eastern NC
Posts: 701
|
Quote:
Originally Posted by particlewave
These are my babies
I have something different in mind for this set...stay tuned
|
Those are also the style I would like to install. Can't wait to see someone get the first set installed.
|
|
|
|
|
06-09-2014, 07:15 PM
|
#512
|
|
Custom User Title Here
Join Date: Mar 2012
Location: Ft. Leonard Wood
Posts: 6,169
|
Quote:
Originally Posted by BFeller
Those are also the style I would like to install. Can't wait to see someone get the first set installed.
|
I hope to have them installed in 2-3 weeks and will post results
I also plan to finally do a full write up with pictures and videos of the retrofit process for the die-hard DIYers like myself
It's not rocket science, but there are many opportunities to damage things.
__________________
https://youtube.com/@UnwindTimeVintageWatchMuseum
Last edited by particlewave; 06-09-2014 at 07:34 PM.
|
|
|
|
|
06-09-2014, 10:07 PM
|
#513
|
|
Registered User
Join Date: May 2013
Location: North Alabama
Posts: 2,079
|
Diy
I would like to see a complete start to finish on this project. I plan on doing this when funds become available for my kit
|
|
|
|
|
06-10-2014, 03:03 PM
|
#514
|
|
Registered User
Join Date: Dec 2013
Location: Dahlonega , Georgia
Posts: 1,364
|
I haven't installed mine yet as I'm waiting for the new seals to be built but my lights are already old news  I guess you can't stop progress 
__________________
2002 Boxster S Arctic Silver with black top with glass window and black leather interior. Jake Raby 3.6 SS ( the beast ) with IMS Solution. 996 GT3 front bumper , GT3 rocker covers and GT3TEK rear diffuser and Joe Toth composites rear ducktail spoiler .
|
|
|
|
|
06-10-2014, 04:12 PM
|
#515
|
|
Custom User Title Here
Join Date: Mar 2012
Location: Ft. Leonard Wood
Posts: 6,169
|
Quote:
Originally Posted by rfuerst911sc
I haven't installed mine yet as I'm waiting for the new seals to be built but my lights are already old news I guess you can't stop progress |
The Turismo model is still very stunning and now yours may be more rare
__________________
https://youtube.com/@UnwindTimeVintageWatchMuseum
|
|
|
|
|
06-10-2014, 07:51 PM
|
#516
|
|
Registered User
Join Date: May 2013
Location: North Alabama
Posts: 2,079
|
Quote:
Originally Posted by rfuerst911sc
I haven't installed mine yet as I'm waiting for the new seals to be built but my lights are already old news I guess you can't stop progress |
New seals to be built ??
|
|
|
|
|
06-10-2014, 09:03 PM
|
#517
|
|
Registered User
Join Date: Sep 2009
Location: toronto
Posts: 2,668
|
Quote:
Originally Posted by rfuerst911sc
I haven't installed mine yet as I'm waiting for the new seals to be built but my lights are already old news I guess you can't stop progress |
I would say that you have the best looking ones!
__________________
986 00S
|
|
|
|
|
06-13-2014, 08:49 PM
|
#518
|
|
Registered User
Join Date: Mar 2014
Location: Eastern NC
Posts: 701
|
Quote:
Originally Posted by particlewave
I hope to have them installed in 2-3 weeks and will post results
I also plan to finally do a full write up with pictures and videos of the retrofit process for the die-hard DIYers like myself
It's not rocket science, but there are many opportunities to damage things. |
I purchased a used set of headlights. I opened the backs of the lights because they were rattling and found that each light had an HID kit installed. The rattling came from ballasts which were lose inside cover that seals the access to the bulbs. It looked like the weight of the ballasts had knocked the light buckets off the pivot ball. Also the seal on one light was mush. Thursday was spent polishing the yellowed and gunk-ed up lenses. They now are looking like brand new.
Today I used Particlewave's video to open both headlights. I baked the first one for 15 minutes with no give on the silicone. It went back into the oven for another 10 minutes since it had cooled a bit. It came apart easy enough the after the second bake. The second one went in for 20 minutes and came apart quickly. It was then easy to pop both of the headlight bucket assemblies back onto their pivot balls. The internal lens covers came off with only one plastic tab having broken. Once the internal light covers were off there was dust or dirt around the reflectors. It looked like residue from a bulb burning off moisture.
Next step have to be ordering the new projector lights.
Last edited by BFeller; 06-14-2014 at 06:00 AM.
|
|
|
|
|
06-14-2014, 08:50 AM
|
#519
|
|
Registered User
Join Date: Apr 2006
Location: Tejas/NorCal
Posts: 201
|
Make sure to spray a permanent protective UV coating on the newly polished lenses, or they will be cloudy again in no time!
__________________
2001 Lapis Blue Boxster S Tip (stock), 2001 Guards Red Boxster 5-speed (not very stock)
|
|
|
|
|
06-14-2014, 02:05 PM
|
#520
|
|
Living in the desert.
Join Date: Jun 2013
Location: Tombstone, AZ
Posts: 82
|
I've read this thread many times and really love the look of these latest projectors. I like the one above with the angled edge.
I think this modification is a little out of my league
|
|
|
|
 Posting Rules
|
You may not post new threads
You may not post replies
You may not post attachments
You may not edit your posts
HTML code is On
|
|
|
All times are GMT -8. The time now is 11:12 AM.
| |


 Linear Mode


