 05-30-2014, 09:51 AM
|
#461
|
|
Registered User
Join Date: Sep 2013
Location: Montreal, QC. (currently expat to Shanghai)
Posts: 3,249
|
Quote:
Originally Posted by rfuerst911sc

Quick update: The manufacturer has received the sample seal I sent and he is studying several ways to manufacture, it sounds like he will be able to make these but that's far from being official. Sounded like he may have a more precise reply in about a weeks time. I'm just trying to keep everyone in the loop as this progresses.
|
Thanks to both of you for giving this a go
__________________
______________________________
'97 Boxster base model 2.5L, Guards Red/Tan leather, with a new but old Alpine am/fm radio.
|

|

|
|
05-30-2014, 10:22 PM
|
#462
|
|
Registered User
Join Date: Nov 2010
Location: Long Island, NY
Posts: 296
|
Still interested in new head light seals. Mush is too weak to describe my currents seals.
|
|
|
|
|
05-31-2014, 04:30 AM
|
#463
|
|
Registered User
Join Date: Dec 2013
Location: Dahlonega , Georgia
Posts: 1,361
|
I've asked this question before and received an answer but I want to ask it again. The OEM seals have two different part numbers, I'm assuming to designate left/right even though you can't buy them. But are the seals interchangeable ? A left will fit the right and right will fit the left ? The last time I asked the answer was yes they will fit either side. I just want to clarify that point as we move a little closer. At this point I don't know how exact/precise the new seals will be or will they be a little more " generic " and will easily fit either side ? Really just thinking out loud.
__________________
2002 Boxster S Arctic Silver with black top with glass window and black leather interior. Jake Raby 3.6 SS ( the beast ) with IMS Solution. 996 GT3 front bumper , GT3 rocker covers and GT3TEK rear diffuser and Joe Toth composites rear ducktail spoiler .
|

|
|
|
05-31-2014, 07:17 AM
|
#464
|
|
Registered User
Join Date: Sep 2013
Location: Montreal, QC. (currently expat to Shanghai)
Posts: 3,249
|
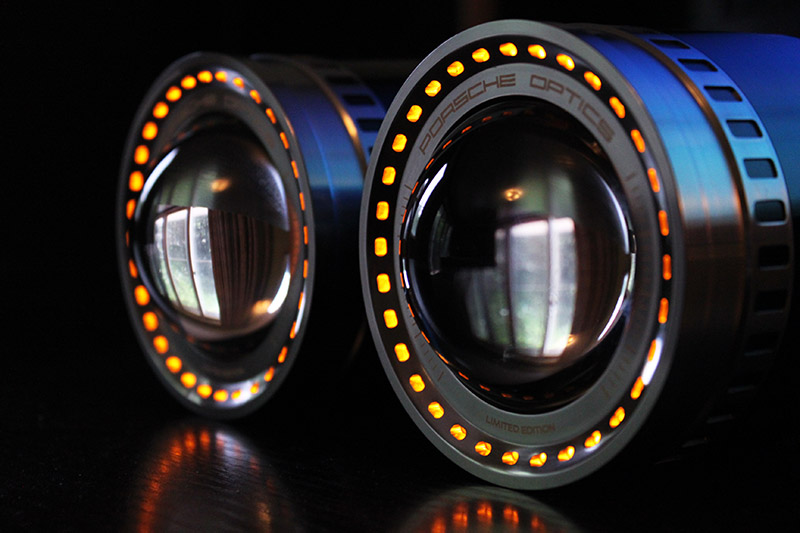
Amber color angel eyes pics
If the part# is different then this confirms the seals are L + R :/
While holding the seal stretched in your hands and flipping it 180 degree, if both sides radiuses are identical then they should be good to go on either left or right. Can't really recall or needed to tried. Surely someone who already have a seal in hand could confirm this quick
Meanwhile some "amber" angel eyes lit up with a half-full 9v batt. For those of you who wants to carry on the stock Porsche amber theme to the front-end 
Those look nicer at full 12 volts. Same color, just brighter a tad. Impossible to have a good close-up shot with LEDs at full brightness. 9v & low camera exposure does it! my photographyskills s*x lol


__________________
______________________________
'97 Boxster base model 2.5L, Guards Red/Tan leather, with a new but old Alpine am/fm radio.
|
|
|
|
|
05-31-2014, 07:19 AM
|
#465
|
|
Registered User
Join Date: Sep 2013
Location: Montreal, QC. (currently expat to Shanghai)
Posts: 3,249
|
^ entertainment. In the express delivery jet already and off to you Charles
__________________
______________________________
'97 Boxster base model 2.5L, Guards Red/Tan leather, with a new but old Alpine am/fm radio.
|
|
|
|
|
05-31-2014, 10:35 AM
|
#466
|
|
WALDMEISTER
Join Date: Sep 2013
Location: Germany
Posts: 1,380
|
me = amber nut
you = awesome 
Without our TÜV I would instantly order those ")
__________________
Original Owner | PORSCHE Boxster 2.7L (MY01) | Seal Gray
|
|
|
|
|
05-31-2014, 10:42 AM
|
#467
|
|
Registered User
Join Date: Sep 2013
Location: Montreal, QC. (currently expat to Shanghai)
Posts: 3,249
|
Quote:
Originally Posted by BRAN
me = amber nut
you = awesome
Without our TÜV I would instantly order those |
I've shipped a projector kit to one of your mate in Bankfurt (Frankfurt?) a few weeks ago. He got himself a spare headlight set locally for 150euro just for his retrofit. He puts back his stock shiners for the TUV checks
an idea for you if you can find those... which I've been told are everywhere in Germany
__________________
______________________________
'97 Boxster base model 2.5L, Guards Red/Tan leather, with a new but old Alpine am/fm radio.
|
|
|
|
|
05-31-2014, 12:06 PM
|
#468
|
|
Custom User Title Here
Join Date: Mar 2012
Location: Ft. Leonard Wood
Posts: 6,169
|
Quote:
Originally Posted by rfuerst911sc
I've asked this question before and received an answer but I want to ask it again. The OEM seals have two different part numbers, I'm assuming to designate left/right even though you can't buy them. But are the seals interchangeable ? A left will fit the right and right will fit the left ? The last time I asked the answer was yes they will fit either side. I just want to clarify that point as we move a little closer. At this point I don't know how exact/precise the new seals will be or will they be a little more " generic " and will easily fit either side ? Really just thinking out loud.
|
The seals are mirror images of each other and are not interchangeable in OEM form.
However, this is due to the embedded plastic mount tabs that I mentioned to you before. If your guy cannot embed these plastic mount tabs (which I'm sure he can't) then they should be reversible or universal.
__________________
https://youtube.com/@UnwindTimeVintageWatchMuseum
|
|
|
|
|
05-31-2014, 12:08 PM
|
#469
|
|
Custom User Title Here
Join Date: Mar 2012
Location: Ft. Leonard Wood
Posts: 6,169
|
Quote:
Originally Posted by Nine8Six
|
Whoa!!!
That's hot 
__________________
https://youtube.com/@UnwindTimeVintageWatchMuseum
|
|
|
|
|
05-31-2014, 07:39 PM
|
#470
|
|
Registered User
Join Date: May 2013
Location: Cali
Posts: 72
|
Ok thats Niiice!! - Just sold Clear Lights to Tightbox- Good Luck these look awesome!
|
|
|
|
|
06-01-2014, 05:48 AM
|
#471
|
|
Registered User
Join Date: Dec 2013
Location: Dahlonega , Georgia
Posts: 1,361
|
Had some email dialog last night with the supplier, he's thinking of using satoprene from what I gather it is a plasticised rubber compound ? I may have to send him both of my garbage seals so he has a left/right to model. We're one tiny step closer !
__________________
2002 Boxster S Arctic Silver with black top with glass window and black leather interior. Jake Raby 3.6 SS ( the beast ) with IMS Solution. 996 GT3 front bumper , GT3 rocker covers and GT3TEK rear diffuser and Joe Toth composites rear ducktail spoiler .
|
|
|
|
|
06-02-2014, 03:27 AM
|
#472
|
|
Registered User
Join Date: Dec 2013
Location: Dahlonega , Georgia
Posts: 1,361
|
OK last night I had the first phone conversation with the potential manufacturer of the headlight seals. First off I learned that he makes all his own molds/tooling in house so that drastically decreases the price ( good thing ). Second in his opinion the reason the OEM seals turn to mush is he believes whoever is making the seals only partially cures the rubber because after partial cure the insertion of the plastic pieces takes place. In his opinion the partial cure is the problem and the heat from being in the sun turns the rubber to mush. Third and most interesting to me is the cost of the seals we talked about. I'm not ready to disclose yet but we talked " loose numbers " and if he can hit these numbers I think everyone will be very happy . Sorry for the tease but I don't want to put the cart before the horse. Also talking group buy , volume wholesale pricing etc. so we are moving forward slowly. Not sure when the next update will be but as soon as I hear something you all will know. And just for clarification I have no financial interest in this and I won't be running a group buy, I'm solely interested just to get a set of seals for my own car ! The way I " think " this will go down is once the seals are available I'll discuss with the manufacturer a group buy using his website. Maybe a special code or something so 986forum owners get a discount. I would provide the website link and everyone would be on their own after that. That's pretty much it for now. 
__________________
2002 Boxster S Arctic Silver with black top with glass window and black leather interior. Jake Raby 3.6 SS ( the beast ) with IMS Solution. 996 GT3 front bumper , GT3 rocker covers and GT3TEK rear diffuser and Joe Toth composites rear ducktail spoiler .
|
|
|
|
|
06-02-2014, 04:16 PM
|
#473
|
|
Registered User
Join Date: Mar 2014
Location: DC
Posts: 22
|
Thanks for following up!
__________________
Martin
2002 Boxster S
2006 Cayman S
|
|
|
|
|
06-03-2014, 01:26 PM
|
#474
|
|
Registered User
Join Date: Mar 2014
Location: Austin
Posts: 314
|
Just read all the pages, this is going on my wish list. I like the ones Clickman got, with blue LEDs. I have a 2003 Seal Grey with factory Lits. Think these would be an upgrade and could sell the originals to pay for the upgrade. I assume the factory washers would work?
__________________
2003 S, 6 Speed, PCM, PSM, Bose, Litronics with washers, on its' second LN IMSB, comfort top, UDP, 987 engine mount, 997 RMS, Koni Sport Shocks, H&R springs, Techno brace, comfort blinkers, nin8six windscreen, particlewave light up cubby
|
|
|
|
|
06-03-2014, 02:30 PM
|
#475
|
|
Registered User
Join Date: Sep 2009
Location: toronto
Posts: 2,668
|
Nice work here all!
If one has factory Litronics would this modification be suitable; do these projectors out perform the stocks? What are the specs.?
I would imagine the aim/levelling feature would be toast along with the link to the suspension; is this feature addressed or needed by this new projector arrangement?
What the performance differences between old and new? Which are better?
Is it feasible to perform the cosmetic changes only, on stock Litronics?
__________________
986 00S
|
|
|
|
|
06-03-2014, 03:12 PM
|
#476
|
|
Registered User
Join Date: Sep 2013
Location: Montreal, QC. (currently expat to Shanghai)
Posts: 3,249
|
Quote:
Originally Posted by Coaster
Just read all the pages, this is going on my wish list. I like the ones Clickman got, with blue LEDs. I have a 2003 Seal Grey with factory Lits. Think these would be an upgrade and could sell the originals to pay for the upgrade. I assume the factory washers would work?
|
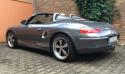
Clickman's the 911 'round' look many have been looking for!
yes for the factory washer. Those are external and does not interfere with any of the install
Quote:
Originally Posted by jaykay
Nice work here all!
If one has factory Litronics would this modification be suitable; do these projectors out perform the stocks? What are the specs.?
I would imagine the aim/levelling feature would be toast along with the link to the suspension; is this feature addressed or needed by this new projector arrangement?
What the performance differences between old and new? Which are better?
Is it feasible to perform the cosmetic changes only, on stock Litronics?
|
Litronic is just a fancy marketing term created by Porsche. It's the same thing as a xenon or more accurately HID lighting systems.
Bi-xenon means the low and high beams are both HID lights. Where the Porsche Litronic only uses HID for low beam and halogen for high beam. Some who've compared both the CGT kit with the Lits have notice a major difference in sharpness of the beams. The bi-xenon CGT kit being by far better (of course!). As for intensity/brightness they are pretty similar (low-beam wise). One cost thousands (DOT approved), where the aftermarket performance bi-xenon projector kit cost $355. A sexy flavor of the CGT style theme is a bonus.
Specs: amazing, affordable, functional, performing well, stylish, easy-diy (you didn't need data I hope!?)
Leveling: oem leveling features remains the same after retrofit (using same allen/hex porsche tool)
Performance: Day & night difference. Not comparable to the old halogen system to be more precise lol
Lit cosmetic chg: never seen yet
Let me know if you have any Qs mate. Not a pro of-the-lights but getting there slowly
__________________
______________________________
'97 Boxster base model 2.5L, Guards Red/Tan leather, with a new but old Alpine am/fm radio.
|
|
|
|
|
06-03-2014, 04:47 PM
|
#477
|
|
Registered User
Join Date: Mar 2014
Location: Austin
Posts: 314
|
Quote:
Originally Posted by Nine8Six
Leveling: oem leveling features remains the same after retrofit (using same allen/hex porsche tool)
|
I think the leveling he is talking about is the auto level feature, they adjust to the load of the vehicle when they are turned on.
__________________
2003 S, 6 Speed, PCM, PSM, Bose, Litronics with washers, on its' second LN IMSB, comfort top, UDP, 987 engine mount, 997 RMS, Koni Sport Shocks, H&R springs, Techno brace, comfort blinkers, nin8six windscreen, particlewave light up cubby
|
|
|
|
|
06-03-2014, 05:25 PM
|
#478
|
|
Registered User
Join Date: Sep 2013
Location: Montreal, QC. (currently expat to Shanghai)
Posts: 3,249
|
Quote:
Originally Posted by Coaster
I think the leveling he is talking about is the auto level feature, they adjust to the load of the vehicle when they are turned on.
|
Sorry, that was a pre-programmed answer. Might be promotional as well I'm currently on a mission to exterminate old halogen systems on Porsche 9X6 cars by offering an affordable solution.
Bottom line is... Lits are fine as they are, great lighting and don't need any modifications. Getting a set of halogen in good condition and retrofitting those with a CGT kit is a better idea - as you plan doing. That's also what I'd recommend JayKay doing
__________________
______________________________
'97 Boxster base model 2.5L, Guards Red/Tan leather, with a new but old Alpine am/fm radio.
|
|
|
|
|
06-03-2014, 07:01 PM
|
#479
|
|
Registered User
Join Date: Mar 2014
Location: Austin
Posts: 314
|
Quote:
Originally Posted by Nine8Six
Sorry, that was a pre-programmed answer. Might be promotional as well I'm currently on a mission to exterminate old halogen systems on Porsche 9X6 cars by offering an affordable solution.
Bottom line is... Lits are fine as they are, great lighting and don't need any modifications. Getting a set of halogen in good condition and retrofitting those with a CGT kit is a better idea - as you plan doing. That's also what I'd recommend JayKay doing |
Could you retrofit the CGT kit into the Lit light?
__________________
2003 S, 6 Speed, PCM, PSM, Bose, Litronics with washers, on its' second LN IMSB, comfort top, UDP, 987 engine mount, 997 RMS, Koni Sport Shocks, H&R springs, Techno brace, comfort blinkers, nin8six windscreen, particlewave light up cubby
|
|
|
|
|
06-03-2014, 08:05 PM
|
#480
|
|
Registered User
Join Date: Sep 2013
Location: Montreal, QC. (currently expat to Shanghai)
Posts: 3,249
|
Quote:
Originally Posted by Coaster
Could you retrofit the CGT kit into the Lit light?
|
Yes. Requires removal of the litronic projector and lens assembly. 3 screws and the whole thing falls off. That assembly is then replaced with a custom 1.5mm thick back plate meant to accommodate the CGT kit. You get to keep the lit auto leveling thing and all.
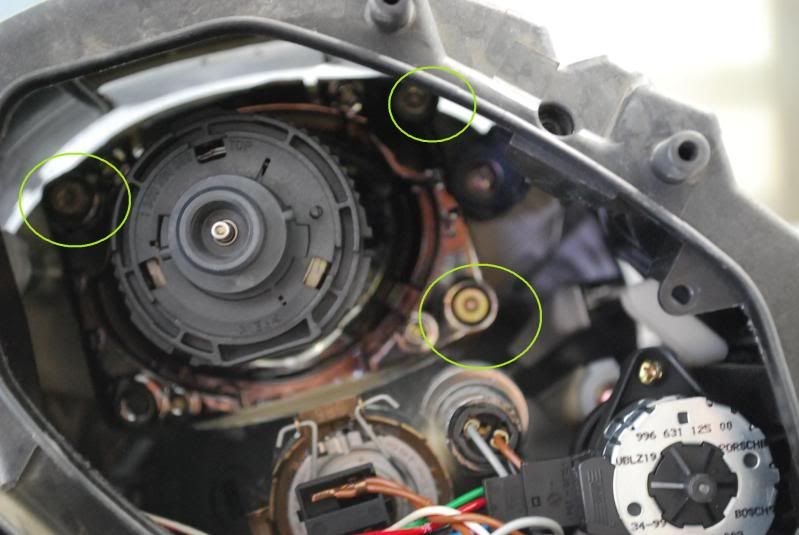
^ This is what the whole Lit low beam projector assembly sits on. Only 3 screws.
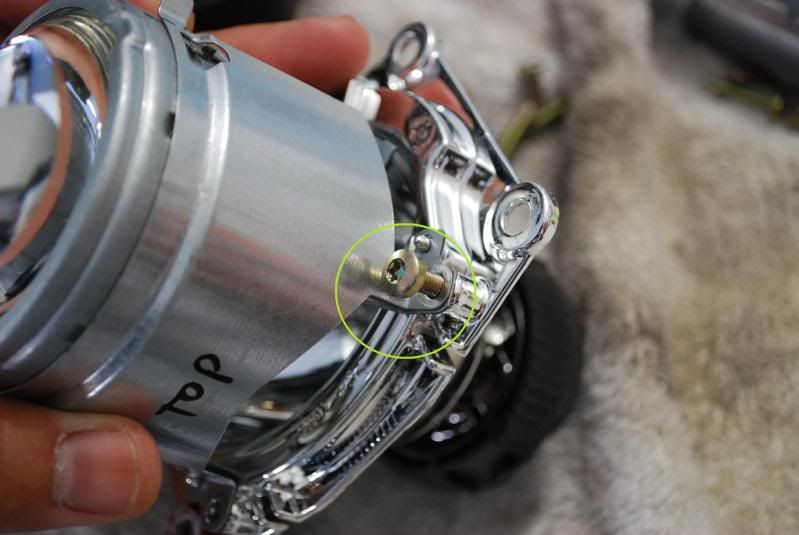
^ custom back plate with same 3 screws bolt-pattern replaces what you see there. CGT kit mate on that same back plate, and off you go.
Easy to do but then how many would do this to their beloved $2k litronics kit!
(ps. photos have been stolen from another site. Sorry!).
(Source: HOW TO: Make your Litronic Xenon [ Cut Off Line ] SHARPER !!! PICTURES !!! - 6speedonline.com Forums)
__________________
______________________________
'97 Boxster base model 2.5L, Guards Red/Tan leather, with a new but old Alpine am/fm radio.
|
|
|
|
 Posting Rules
|
You may not post new threads
You may not post replies
You may not post attachments
You may not edit your posts
HTML code is On
|
|
|
All times are GMT -8. The time now is 02:42 PM.
| |


 "GRAY"
 Linear Mode


