 03-05-2013, 08:41 AM
|
#1
|
|
Texas-T
Join Date: Mar 2012
Location: charlotte, nc
Posts: 65
|
Replacing Boots (Intake Manifold to Resonance Tube)
My 2004 S gave me codes p0171 (P 360,) p0174 (P 361,) & p0507 (P 32) which i found to be a vacuum leak. Somehow, one of the boots got pinched by the metal strapping and is leaking air. i ordered replacement boots, but it is very tight, and i was looking for advice on how remove and replace the boots without removing more parts that i have to. can anyone please share advice if you've had a similiar experience?
Terry 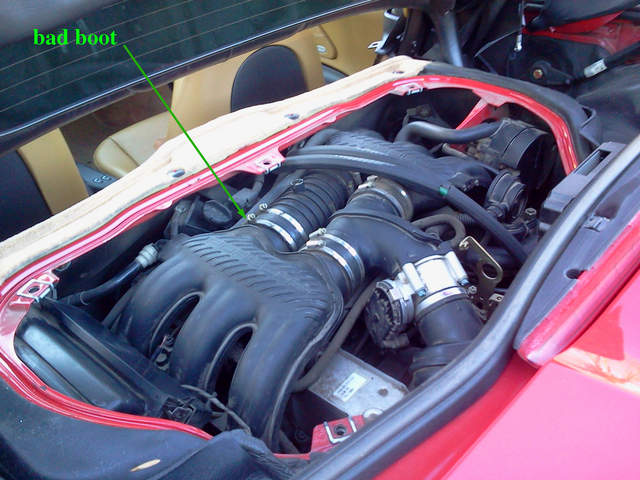
|

|

|
|
03-05-2013, 09:03 AM
|
#2
|
|
Registered User
Join Date: Mar 2010
Location: canada
Posts: 445
|
I replaced the same part last year. Your best bet is to remove the "T" plenum first because if you don't it will take you longer and just be harder to do in general, especially plugging the hard plastic hose back into the rubber hole in the sleeve. I hope that makes sense. It's not a hard thing to do but you need to pay attention to what you disconnect and where it was otherwise you may get a little confused when putting it all back together.
|
|
|
|
|
03-05-2013, 09:24 AM
|
#3
|
|
Texas-T
Join Date: Mar 2012
Location: charlotte, nc
Posts: 65
|
Thank you Cool Breeze! That doesn't sound too bad. I was worried that i may have to remove the whole intake manifold. I ordered a spare throttle body gasket when i ordered the boots just in case. glad i got it now! i will replace that as well. I will also make sure to take lots of photos in order to remember how it all goes together
|
|
|
|
|
03-13-2013, 09:38 AM
|
#4
|
|
Texas-T
Join Date: Mar 2012
Location: charlotte, nc
Posts: 65
|
Ok, i was able to remove the Resonance Tube and replace the boots by loosening the clamps, and sliding the boots both inward. However, i think that i may have pulled part #29 out of something in the process... my codes came back on and also random misfires and specific cylinder misfire codes as well as the original p0171 & p0174 What does part # 29 attach to? 
|
|
|
|
|
03-13-2013, 12:24 PM
|
#5
|
|
Registered User
Join Date: Sep 2009
Location: toronto
Posts: 2,668
|
I think you have pulled the vacum hose off the resonance flap actuator. If you follow the schematic line from 29 it should take you to vacum diaphragm of the actuator. As I recall this is on the underside of the resonance tube you removed.
It's really tight in there and you might have pull the tube back out to get the vacum line back on.
I would imagine some of the codes you listed are from your resonance flap not actuating.
__________________
986 00S
|
|
|
|
|
03-13-2013, 08:27 PM
|
#6
|
|
Texas-T
Join Date: Mar 2012
Location: charlotte, nc
Posts: 65
|
|
|
|
|
|
04-01-2013, 10:23 AM
|
#7
|
|
Texas-T
Join Date: Mar 2012
Location: charlotte, nc
Posts: 65
|
Mission Complete!
I was finally able to keep my P0171 & P0174 Trouble Codes away after replacing the Air Oil Separator! (Smoke testing revealed no leaks after replacing the Boots, hose clamps, and reattaching the Vaccum hose below!) The AOS took about 4 hours to replace. It was difficult to reach the spring clamp, with the special tool from below, so i had my fiance hold it from above while i aligned it below. But even harder to remove was the lower plastic "Pinch and pull" type plastic hose attachment that is on the lower side of the AOS. (facing the passenger side air vent) I tried for 90 minutes or so from all different angles above and below, and could not get a good enough grip to release it. Eventually i found that the best angle was to climb over the engine from the drivers side, and stick my hand in behind the AOS, pulling it towards me,which allowed me to get my fingers in there and unclip it. i also put a new O ring on that connection, while i had it open. Putting it all back together was only about a 30 minute job. the removal was the tricky part. The intake was full of oil, so i cleaned it again, and the TB while in there. She really purrs now! Good luck!
Now on to the next project. Replacing the CV Boots that i noticed were torn when underneath the car. 
|
|
|
|
|
08-04-2015, 02:18 PM
|
#8
|
|
Registered User
Join Date: Aug 2015
Location: St.Maarten
Posts: 2
|
Resonance tube hose
Hi there,
I have the same problem you had. Cant seem to locate where the hose has to go.
Can you please help me out.
Hose is connected to the resonance tube but don't know where to plug it in.
Thank you
|
|
|
|
|
08-06-2015, 07:47 PM
|
#9
|
|
Registered User
Join Date: May 2013
Location: Orange County, California
Posts: 266
|
Quote:
Originally Posted by tconnarn

Mission Complete!
I was finally able to keep my P0171 & P0174 Trouble Codes away after replacing the Air Oil Separator! (Smoke testing revealed no leaks after replacing the Boots, hose clamps, and reattaching the Vaccum hose below!) The AOS took about 4 hours to replace. It was difficult to reach the spring clamp, with the special tool from below, so i had my fiance hold it from above while i aligned it below. But even harder to remove was the lower plastic "Pinch and pull" type plastic hose attachment that is on the lower side of the AOS. (facing the passenger side air vent) I tried for 90 minutes or so from all different angles above and below, and could not get a good enough grip to release it. Eventually i found that the best angle was to climb over the engine from the drivers side, and stick my hand in behind the AOS, pulling it towards me,which allowed me to get my fingers in there and unclip it. i also put a new O ring on that connection, while i had it open. Putting it all back together was only about a 30 minute job. the removal was the tricky part. The intake was full of oil, so i cleaned it again, and the TB while in there. She really purrs now! Good luck!
Now on to the next project. Replacing the CV Boots that i noticed were torn when underneath the car. |
Nice work! I did all those within the first year that I got my Boxster. Pedro's Garage has some great instructions on how to replace the CV boots without removing the axle nut if you haven't seen that already.
|
|
|
|
|
12-29-2015, 11:21 AM
|
#10
|
|
Registered User
Join Date: Dec 2015
Location: Växjö, Sweden
Posts: 1
|
Hi,
I need to remove the resonance tube.
And therefore i need to remove the hose (no 29 above pic).
Shall I remove it from the resonance flap actuator (26/27) or the other part of the tube , going to some sort of electrical sensor.
|
|
|
|
 Posting Rules
|
You may not post new threads
You may not post replies
You may not post attachments
You may not edit your posts
HTML code is On
|
|
|
All times are GMT -8. The time now is 12:37 AM.
| |


 Red Devil
 Silver Shadow


 Linear Mode


