 01-15-2013, 11:39 AM
|
#41
|
|
Registered User
Join Date: Jan 2013
Location: Scotland
Posts: 2
|
Thanks MaxD and Jittsl
I will remove the bay fan.
Max - I have decided to park it for such times as engine is out or manifold is off too. So you have just blocked the hose off that runs under the manifold? I was thinking a breather but if you have blocked it off I will do this.
|

|

|
|
01-17-2013, 04:52 PM
|
#42
|
|
SPB racer
Join Date: Feb 2011
Location: San Antonio TX
Posts: 252
|
I did try to wake up Brad but I guess he's busy.
|
|
|
|
|
08-29-2014, 10:32 PM
|
#43
|
|
Registered User
Join Date: Apr 2009
Location: Perth, Australia
Posts: 165
|
To revive an old thread, I would just like to share my results from removing the charcoal canister.
I was getting a LOT of vacuum in the fuel tank, it would take 5 or 6 seconds after opening the gas cap when refuelling to equalise the pressure to that of the atmosphere. I was also experiencing the car revving itself at idle, particularly when warm.
Anyway, I removed the canister more or less as described in this thread. No more vacuum in the tank, the car still revs itself a little, although it is definitely at least 80% better than it was. Best of all, no CEL! I did leave the valve at the top of the fuel-filler tube in-situ, although none of the tubes are plugged into it.
|
|
|
|
|
11-18-2020, 06:46 PM
|
#44
|
|
Registered User
Join Date: Jul 2016
Location: Charlotte, NC
Posts: 4
|
I know this is a terribly old thread, but I'm hoping somebody who was in this conversation back in the day may be able to shed a little light on my version of the same question. 2000 Boxster S race car. As were others in this thread, I'm also trying to get rid of as many of these EVAP parts as possible, but mine look a little different than those shown here, AND I don't see any mention of whether or not we need to keep the fuel vapor purge valve.
Here's my whole system:
https://live.staticflickr.com/65535/50618552528_4108b2dbc3_b.jpg

Here is a close-up of the purge valve:
https://live.staticflickr.com/65535/50619291511_a72a2052e7_b.jpg

And here's a close-up of the charcoal canister:
https://live.staticflickr.com/65535/50619399242_e360dc3cd8_b.jpg

The letters on colored backgrounds show the various hoses and wires and are the same on all the photos for easy reference.
Here's what I think I know...
1. A, B, and E all go down toward the gas tank.
2. B seems to go INTO the gas tank (I can hear bubbling if I use compressed air in it).
3. C seems to come from the purge valve to the charcoal canister.
4. D comes from the gas filler "cup" in the fender, and down into the purge valve.
5. E goes between the purge valve and...? Maybe the gas tank. I can't tell where it ends up, nor which way the flow may be.
6. F and G are electrical connections on the purge valve.
My questions:
1. Do I have to keep the purge valve, or can it be removed, too?
2. Either way, which of these parts do I need to keep (and/or connect to one another) and which can I remove?
I've tried blowing air down all these hoses and, so far at least, I haven't been able to hear anything at the back of the car...but I may need to have an assistant help me with that.
Any help you may be able to provide will be greatly appreciated. Thanks in advance!
Last edited by JSG1901; 11-18-2020 at 06:53 PM.
|
|
|
|
|
01-21-2021, 04:28 PM
|
#45
|
|
Registered User
Join Date: Oct 2020
Location: KY
Posts: 1,213
|
Quote:
Originally Posted by JSG1901

I know this is a terribly old thread, but I'm hoping somebody who was in this conversation back in the day may be able to shed a little light on my version of the same question. 2000 Boxster S race car. As were others in this thread, I'm also trying to get rid of as many of these EVAP parts as possible, but mine look a little different than those shown here, AND I don't see any mention of whether or not we need to keep the fuel vapor purge valve.
Here's my whole system:
https://live.staticflickr.com/65535/50618552528_4108b2dbc3_b.jpg
Here is a close-up of the purge valve:
https://live.staticflickr.com/65535/50619291511_a72a2052e7_b.jpg
And here's a close-up of the charcoal canister:
https://live.staticflickr.com/65535/50619399242_e360dc3cd8_b.jpg
The letters on colored backgrounds show the various hoses and wires and are the same on all the photos for easy reference.
Here's what I think I know...
1. A, B, and E all go down toward the gas tank.
2. B seems to go INTO the gas tank (I can hear bubbling if I use compressed air in it).
3. C seems to come from the purge valve to the charcoal canister.
4. D comes from the gas filler "cup" in the fender, and down into the purge valve.
5. E goes between the purge valve and...? Maybe the gas tank. I can't tell where it ends up, nor which way the flow may be.
6. F and G are electrical connections on the purge valve.
My questions:
1. Do I have to keep the purge valve, or can it be removed, too?
2. Either way, which of these parts do I need to keep (and/or connect to one another) and which can I remove?
I've tried blowing air down all these hoses and, so far at least, I haven't been able to hear anything at the back of the car...but I may need to have an assistant help me with that.
Any help you may be able to provide will be greatly appreciated. Thanks in advance! |
Hey J, any progress with this project? This is coming up on my to do list and I was hoping you figured these out. I have no idea what goes where, but there should be at least one hose that runs from the evap canister back to the intake manifold and one that will vent to atmosphere somewhere near the rear. I have a feeling that the third line from the evap canister feeds back to the purge valve, which maybe serves to be a central "hub" for collecting fumes and feeding them to the evap canister. That last part is purely a guess though.
Sent from my POCOPHONE F1 using Tapatalk
__________________
2000 Box Base, Renegade Stage 1 performance mods complete, more to come
When the owners manual says that the laws of physics can't be broken by this car, I took it as a challenge...
|
|
|
|
|
03-27-2021, 09:13 AM
|
#46
|
|
Registered User
Join Date: Oct 2020
Location: California
Posts: 76
|
Hey guys, were you able to figure this out? I am looking to do the same on my 2000 S race car and have this exact same setup as shown in the pics with the labeled letters. Trying to figure out the best way to do this....
|
|
|
|
|
03-29-2021, 05:32 PM
|
#47
|
|
Registered User
Join Date: Oct 2020
Location: KY
Posts: 1,213
|
My place got leveled by a tornado 2 weeks ago so sadly my work toward this project has been put on hold. I'll keep you updated though when I'm able to pick it back up
Sent from my POCOPHONE F1 using Tapatalk
__________________
2000 Box Base, Renegade Stage 1 performance mods complete, more to come
When the owners manual says that the laws of physics can't be broken by this car, I took it as a challenge...
|
|
|
|
|
03-29-2021, 08:56 PM
|
#48
|
|
Registered User
Join Date: Oct 2020
Location: California
Posts: 76
|
Quote:
Originally Posted by ike84
My place got leveled by a tornado 2 weeks ago so sadly my work toward this project has been put on hold. I'll keep you updated though when I'm able to pick it back up
Sent from my POCOPHONE F1 using Tapatalk
|
Oh no, sorry to hear that 
I removed all the wiring to the EVAP system, but all the components are still there. So as far as I can tell, I'm just trapping vapor in the charcoal canister but never purging it, so eventually the activated carbon in there will just get saturated. I'm really worried about venting gas fumes in my garage, so trying to figure out the safest solution here. I'm considering a pressure valve with a fairly low threshold that would stay closed when the car is just sitting there, but would open to allow vapor flow as soon as any pressure builds up. The other thing I'm worried about is what would happen in the (hopefully never) case of a roll over. I wouldn't want gasoline running out through the open line and all over the ground.
So ideally, I'm thinking a small pressure valve between the line coming off the tank and before I connect it to the line going out the back of the car. Then cap off the other line (goes to the intake manifold I think) and remove everything else.
|
|
|
|
|
03-29-2021, 09:06 PM
|
#49
|
|
Registered User
Join Date: Oct 2020
Location: KY
Posts: 1,213
|
This is something I posted a while ago, same OP, same pic as above...
Robert, the line from the filter neck is a vent that allows fuel to flow freely when fueling. Don't mess with this, it is the source of agony for those whose have gone awry.
B should be your tank vent. Don't block that off or you will have problems. A should be the filler neck vent line, see if you can trace it to the valve housing at the top of the fill neck
E should run back to the intake manifold and insert where the AOS connection is located. Pop off your inner panels and connect the dots. You may just be able to tell by the hose diameter.
This would mean that the system is set up as follows - 2 vents come into the canister, and when the purge valve opens the vapors flow into the purge valve via C to mix with neck overflow from D and then onto the intake via E.
I think the most important thing here is to confirm that the lines running into the canister are vent lines and to not block them off. I would just Y them back into the purge valve via C. Theoretically you could remove the purge valve assembly and Y everything together but I'm not sure what that would do in terms of unmetered fuel entering the system and it worked likely throw a CEL if you disconnect the wiring harness for those two solenoids.
I should say that I have no idea if any of this is correct, I'm guessing based on my (limited) knowledge of what should be there. This project is on my build list but I probably won't get there soon, but when I do I'll let you know.
Sent from my POCOPHONE F1 using Tapatalk
Sent from my POCOPHONE F1 using Tapatalk
__________________
2000 Box Base, Renegade Stage 1 performance mods complete, more to come
When the owners manual says that the laws of physics can't be broken by this car, I took it as a challenge...
|
|
|
|
|
03-29-2021, 09:34 PM
|
#50
|
|
Registered User
Join Date: Oct 2020
Location: California
Posts: 76
|
Quote:
Originally Posted by ike84
This is something I posted a while ago, same OP, same pic as above...
Robert, the line from the filter neck is a vent that allows fuel to flow freely when fueling. Don't mess with this, it is the source of agony for those whose have gone awry.
B should be your tank vent. Don't block that off or you will have problems. A should be the filler neck vent line, see if you can trace it to the valve housing at the top of the fill neck
E should run back to the intake manifold and insert where the AOS connection is located. Pop off your inner panels and connect the dots. You may just be able to tell by the hose diameter.
This would mean that the system is set up as follows - 2 vents come into the canister, and when the purge valve opens the vapors flow into the purge valve via C to mix with neck overflow from D and then onto the intake via E.
I think the most important thing here is to confirm that the lines running into the canister are vent lines and to not block them off. I would just Y them back into the purge valve via C. Theoretically you could remove the purge valve assembly and Y everything together but I'm not sure what that would do in terms of unmetered fuel entering the system and it worked likely throw a CEL if you disconnect the wiring harness for those two solenoids.
I should say that I have no idea if any of this is correct, I'm guessing based on my (limited) knowledge of what should be there. This project is on my build list but I probably won't get there soon, but when I do I'll let you know.
Sent from my POCOPHONE F1 using Tapatalk
Sent from my POCOPHONE F1 using Tapatalk
|
So if I'm understanding that correctly, you're saying that you'd route the vent directly to the intake side, bypassing both canister & purge valve. What happens when the car is just sitting in the garage for a long time without running? Do the vapors just build up and pressurize in the intake? What about when you are burning fuel and it needs to suck air back in to equalize pressure? I guess it can pull it from the intake in that case, which should be fine.
I was initially thinking of creating a Y from the filler neck hose & the fuel vent hose and then running it through a valve like this ( https://www.pegasusautoracing.com/productdetails.asp?RecID=24924, different size but that general idea) and out through the back of the car somewhere
|
|
|
|
|
03-29-2021, 09:45 PM
|
#51
|
|
Registered User
Join Date: Oct 2020
Location: KY
Posts: 1,213
|
No, don't delete the purge valve. I don't know this for for sure but i think it will be far too much trouble to do so than what it's worth. just delete the canister and route the vent lines directly to the purge valve.
Sent from my POCOPHONE F1 using Tapatalk
__________________
2000 Box Base, Renegade Stage 1 performance mods complete, more to come
When the owners manual says that the laws of physics can't be broken by this car, I took it as a challenge...
|
|
|
|
|
03-29-2021, 09:50 PM
|
#52
|
|
Registered User
Join Date: Oct 2020
Location: California
Posts: 76
|
Quote:
Originally Posted by ike84
No, don't delete the purge valve. I don't know this for for sure but i think it will be far too much trouble to do so than what it's worth. just delete the canister and route the vent lines directly to the purge valve.
Sent from my POCOPHONE F1 using Tapatalk
|
Hmm, ok. I'll need to splice back in some of that wiring (I had cut out all the wiring related to EVAP) to get the purge valve to work again. I'm assuming that the default state of the valve if no power on it is closed?
I guess what I still don't understand is when the purge valve is closed, how does air get in or out (ie, what prevents it from being a closed loop system?).
|
|
|
|
|
03-30-2021, 05:03 AM
|
#53
|
|
Registered User
Join Date: Oct 2020
Location: KY
Posts: 1,213
|
Quote:
Originally Posted by rezanourai
Hmm, ok. I'll need to splice back in some of that wiring (I had cut out all the wiring related to EVAP) to get the purge valve to work again. I'm assuming that the default state of the valve if no power on it is closed?
I guess what I still don't understand is when the purge valve is closed, how does air get in or out (ie, what prevents it from being a closed loop system?).
|
I just saw your build thread. I didn't realize your building a racer.
You can probably get away with removing the whole thing but you will likely get a CEL. A lot of racers will though, just check your codes prerace. If it's that big of a deal you may be able to delete it with piwis but I don't know for sure. Also, your garage will probably smell a bit like gasoline. As long as your garage isn't too hot it probably won't be horrendous but that's hard to say.
Don't block off the tank vent or filter neck vent lines, you'll regret that. If you delete the purge valve, I would block off the tube going back to the intake or else you'll likely have a vacuum leak.
I don't know the answer to your last question. There may be a valve built into the charcoal canister as a burp valve? It may just act as a resivoir and not actually vent. Not sure about though.
Sent from my POCOPHONE F1 using Tapatalk
__________________
2000 Box Base, Renegade Stage 1 performance mods complete, more to come
When the owners manual says that the laws of physics can't be broken by this car, I took it as a challenge...
|
|
|
|
|
04-23-2021, 08:01 PM
|
#54
|
|
Registered User
Join Date: Oct 2020
Location: KY
Posts: 1,213
|
Quote:
Originally Posted by rezanourai
Hmm, ok. I'll need to splice back in some of that wiring (I had cut out all the wiring related to EVAP) to get the purge valve to work again. I'm assuming that the default state of the valve if no power on it is closed?
I guess what I still don't understand is when the purge valve is closed, how does air get in or out (ie, what prevents it from being a closed loop system?).
|
How is this going for you so far? Any progress?
Sent from my POCOPHONE F1 using Tapatalk
__________________
2000 Box Base, Renegade Stage 1 performance mods complete, more to come
When the owners manual says that the laws of physics can't be broken by this car, I took it as a challenge...
|
|
|
|
|
04-24-2021, 12:13 AM
|
#55
|
|
Registered User
Join Date: Oct 2020
Location: California
Posts: 76
|
Quote:
Originally Posted by ike84
How is this going for you so far? Any progress?
Sent from my POCOPHONE F1 using Tapatalk
|
Unfortunately blew the motor at the track a few weeks ago, so have been focused on sourcing and swapping motor lately, will finish the canister stuff after that. My plan was to use a combination of a rollover check valve and a light pressure opened valve to vent to atmo but not stink up garage, and avoid leaking fuel I'm the event of (hopefully never) rollover
|
|
|
|
|
04-24-2021, 03:37 PM
|
#56
|
|
Registered User
Join Date: Oct 2020
Location: KY
Posts: 1,213
|
Damn, I just realized that was your post about the blown motor. Sorry again to hear about it.
You've got an interesting idea though about those check valves, I never even thought about a rollover check valve.
Sent from my POCOPHONE F1 using Tapatalk
__________________
2000 Box Base, Renegade Stage 1 performance mods complete, more to come
When the owners manual says that the laws of physics can't be broken by this car, I took it as a challenge...
|
|
|
|
|
05-29-2021, 12:13 AM
|
#57
|
|
Registered User
Join Date: May 2021
Location: NSW Australia
Posts: 9
|
This is just forward of the gas tank and has several plastic fuel-line connections running into it. Disconnect those lines using the flathead screwdriver. Unbolt the charcoal canister from the frame using a 3/8-inch ratchet and socket. Slide the canister out of the bracket and remove it from the vehicle.
__________________
Check out our beautiful website if you are interested in cars and <a href="https://cash-cars.sydney/cash-for-old-car-in-sydney/">old car</a>.
|
|
|
|
|
06-03-2021, 07:29 PM
|
#58
|
|
Registered User
Join Date: Oct 2020
Location: KY
Posts: 1,213
|
Quote:
Originally Posted by akbaradeli
This is just forward of the gas tank and has several plastic fuel-line connections running into it. Disconnect those lines using the flathead screwdriver. Unbolt the charcoal canister from the frame using a 3/8-inch ratchet and socket. Slide the canister out of the bracket and remove it from the vehicle.
|
Akbar, have you done this? The real question is what to do with the disconnected hoses.
Sent from my POCOPHONE F1 using Tapatalk
__________________
2000 Box Base, Renegade Stage 1 performance mods complete, more to come
When the owners manual says that the laws of physics can't be broken by this car, I took it as a challenge...
|
|
|
|
|
06-28-2021, 07:37 PM
|
#59
|
|
Registered User
Join Date: Oct 2020
Location: California
Posts: 76
|
Sorry for the big delay guys, I finally got a used motor swapped in for the one I blew. Did the IMS & deep sump kit right out the gate this time so fingers crossed this one lasts longer 
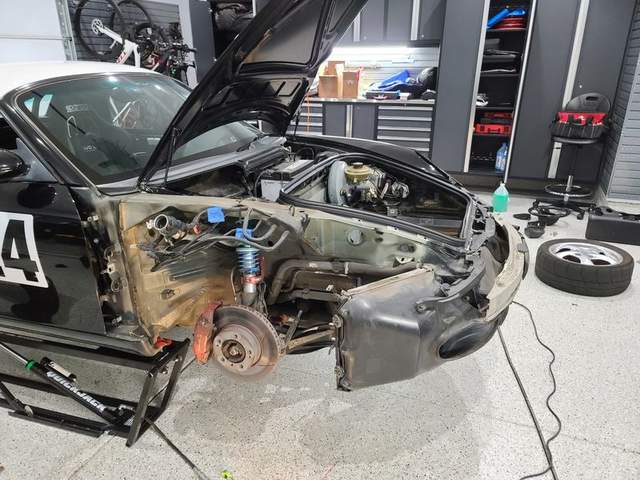
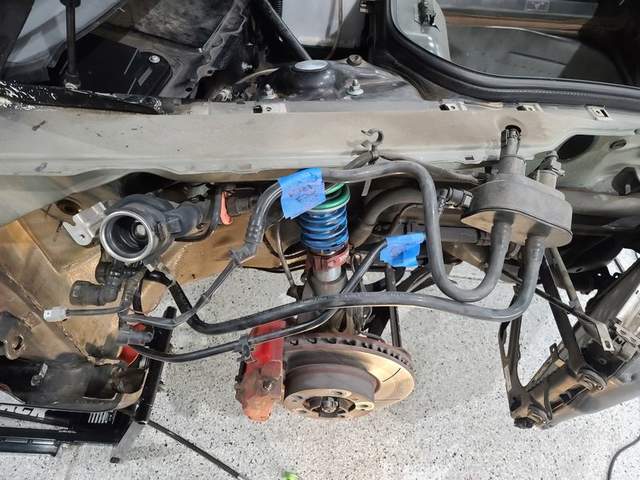
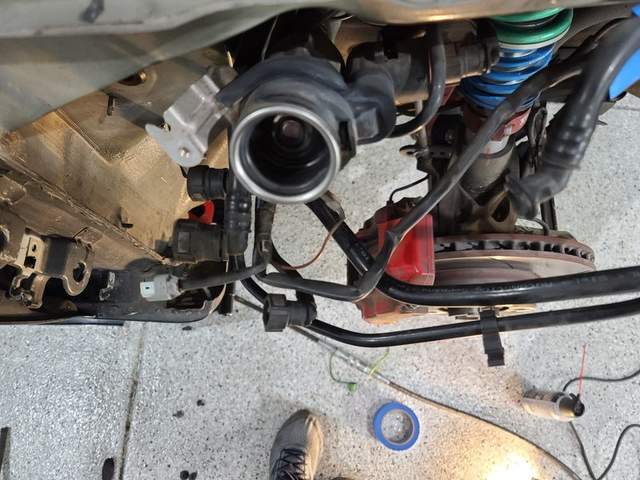
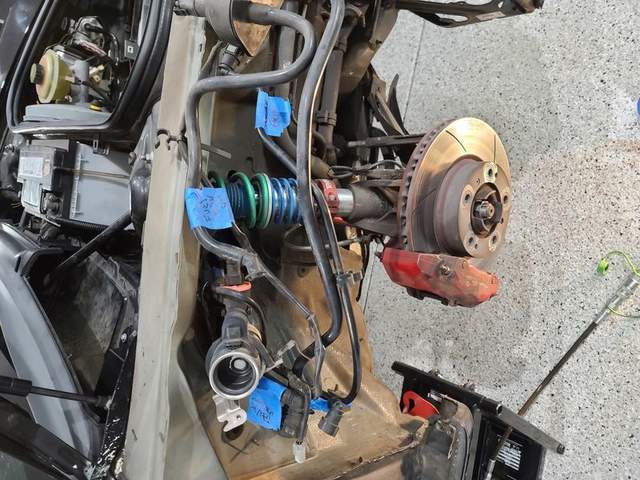
Back to the EVAP now, I took the fender off and did a bit of poking around to come up with a plan, and then will try to sort this out next month. Here's what I think I know so far:
1. There are 3 hoses to the top of my charcoal canister. 2 larger diameter (looks like maybe 1/2" or 5/8"), and one smaller diameter (looks like 3/8").
2. One of the larger ones goes over to the valve housing (the thing that has 2 large tubes coming in the front, and one smaller (3/8"?) coming out the side, with 2 wires connected in the back to control the individual (purge?) valves inside
3. the 3/8" side hose coming out of the valve housing seems to be the one that goes to the rear bumper. I had the rear bumper off and asked my wife to listen & watch as I blew compressed air into this and she confirmed she saw a puff of dust & noise come out when blowing into this tube.
4. the 2 larger hoses in the valve housing are to the canister (as mentioned in #2 above) and to the fuel filler cup (not the neck, but a hole directly into the cup underneath the flip open lid). This leads me to believe that this valve housing is likely both "eject" valves to purge out air to the atomosphere. My guess is that normally the one to the fuel cup is open so any built up fumes there vent out to the rear of the car, and when the canister is full & intake isn't doing it's thing, maybe it closes that one & opens the one from the canister to eject that to rear? Not sure yet on this...
5. This leaves 2 hoses (1 larger and 1 smaller) on the canister. Using the completely not trust-worthy "sniff" test of these two, it appears the thicker one has a light fuel vapor smell coming from it, and the smaller does not. My guess is larger is teh fuel tank vent, and the smaller is the path back to the intake
6. There are also 2 smaller hoses connected to the fuel filler neck itself. I believe these are for venting out air from the tank while filling fuel so that the gas can fit in the tank (displacing air), but I am not certain exactly how these two work. There is also a wire to the fuel filler neck, so this has some electronic control or valve?
Anyways, I'm trying to find a bit more info on the fuel filler neck ones, and verify the other data I have and then going to try to tackle this. Maybe something like: plug the intake hose, use a Y-fitting to connect the fuel tank vent & fuel cup vent to the rear bumper hose, with a simple rollover valve inline of the fuel tank one, and maybe a pressure activated valve on the exit side towards rear bumper end to prevent fumes from just filling up my garage unless enough have built up. But I'm not yet certain on this yet.
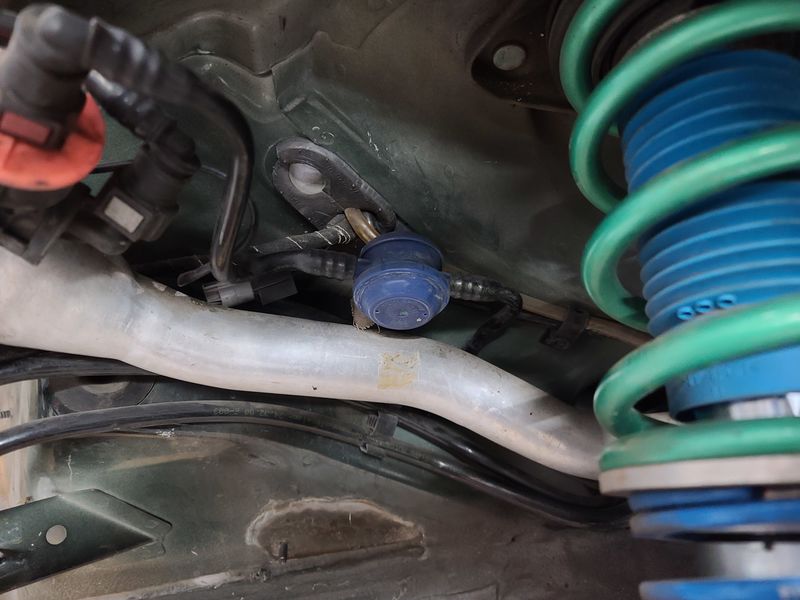
Here are some pictures I took:

|
|
|
|
|
06-28-2021, 07:41 PM
|
#60
|
|
Registered User
Join Date: Oct 2020
Location: California
Posts: 76
|
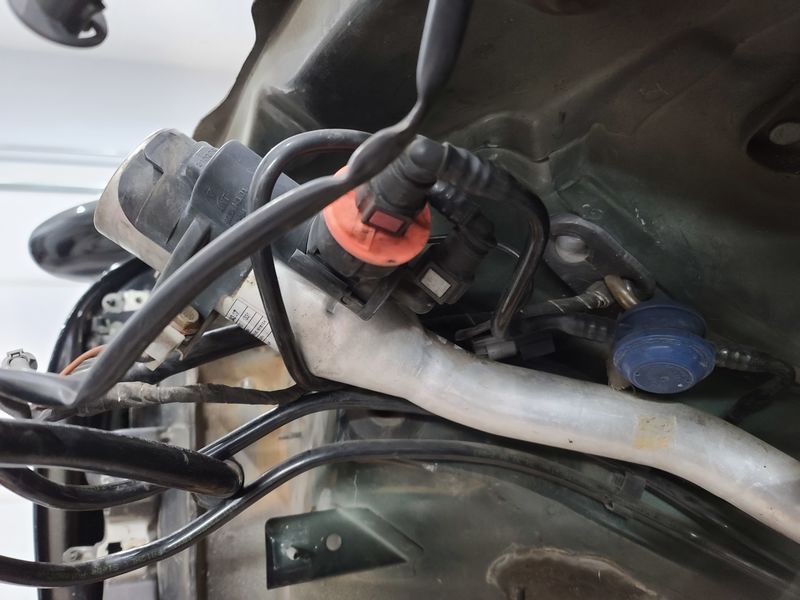
Oh, forgot one more piece of important info which I think supports the rest of the theory. One of the hoses to the filler neck, which has the blue diaphram looking thing on it, just connects back into the main large tube coming from inside car to the evap canister (which I'm suspecting is the tank vent). This means as fumes are venting from the tank, they can either go to the charcoal canister, or if the blue diaphram thingie is open & the valve on the filler neck is open, it can vent into the neck to allow gas to go in.
This video seems to confirm that the valve is activated by just inserting the gas pump nozzle, not electronically controlled. Also seems to confirm the one end (through blue thing) to the tank and the other end goes to charcoal canister (I didn't see that, but maybe it goes further down and connects, will need to recheck)
https://www.youtube.com/watch?v=zulI06TPBVc
And actually, the more I think about it.... if the vent to the gas filler cup while refueling is just there to let air out of the tank when gas is going in, and this is connected to the same hose coming out of the tank as the normal line to the canister, then when I vent that out to atomosphere, won't that "automatically" solve the venting while fueling issue? In other words, can I just get rid of the hoses & fuel filler neck valve altogether? I really wish there was more information on the web about this stuff from people who've done this before. It's like the one area of the boxster that doesn't seem to be heavily covered!
Last edited by rezanourai; 06-28-2021 at 08:00 PM.
|
|
|
|
 Posting Rules
|
You may not post new threads
You may not post replies
You may not post attachments
You may not edit your posts
HTML code is On
|
|
|
All times are GMT -8. The time now is 04:56 AM.
| |


 Linear Mode


