 12-15-2011, 08:32 PM
|
#21
|
|
Registered User
Join Date: Dec 2011
Location: Finland
Posts: 270
|
Then I am very glad I found this forum and for your help.
We lived in Sweden from 2001 until the end of last year when my Finnish wife got home sick. I am originally From Norway, and spent some years living in the UK as well...
I have ordered the covers on the internet, and should have them delivered just after Christmas.
__________________
Kroggers...
"Trying to drive a Boxster S for team CoolCava Racing!"
www.coolcavaracing.com | www.paulkrogdahl.com
|

|

|
|
12-16-2011, 12:50 PM
|
#22
|
|
Registered User
Join Date: Aug 2004
Location: Alta Loma, CA
Posts: 1,334
|
Ahh.. UK! Now I know why your English is "proper"!
My whole family is of Danish decent 
Worst case scenario (my passport is up to date) I fly in to help out!! LOL
B
|
|
|
|
|
12-16-2011, 10:14 PM
|
#23
|
|
Registered User
Join Date: Dec 2011
Location: Finland
Posts: 270
|
Quote:
Originally Posted by Brad Roberts

Worst case scenario (my passport is up to date) I fly in to help out!! LOL
|

Do you speak any Danish then?
__________________
Kroggers...
"Trying to drive a Boxster S for team CoolCava Racing!"
www.coolcavaracing.com | www.paulkrogdahl.com
|
|
|
|
|
12-20-2011, 11:14 AM
|
#24
|
|
Registered User
Join Date: Aug 2004
Location: Alta Loma, CA
Posts: 1,334
|
Ha ha.. NO Here in SoCal (I mean NorMex) we speak Spanish and English.
|
|
|
|
|
12-20-2011, 12:45 PM
|
#25
|
|
Registered User
Join Date: Dec 2011
Location: Finland
Posts: 270
|
So, I removed the smog pump today. All that I have remaining is the rubber tube that disappears under the intake system.
I am wondering if I can just block this tube off for now, or do I have to get to the other end of it and do something???
__________________
Kroggers...
"Trying to drive a Boxster S for team CoolCava Racing!"
www.coolcavaracing.com | www.paulkrogdahl.com
|
|
|
|
|
12-20-2011, 12:49 PM
|
#26
|
|
Registered User
Join Date: Aug 2004
Location: Alta Loma, CA
Posts: 1,334
|
No need to block it off. Just disconnect the plug going to the gray solenoid hanging on the side of the intake plenum. Leave the vacuum lines on the solenoid, but disconnect the electrical connector. This will keep the valve from opening and nothing will come out or go into that black rubber tube. It will come off soon!!
You can easily install those flat plates and remove everything by pulling your IPD piece back out
B
|
|
|
|
|
12-20-2011, 08:43 PM
|
#27
|
|
Registered User
Join Date: Dec 2011
Location: Finland
Posts: 270
|
Quote:
Originally Posted by Brad Roberts
No need to block it off. Just disconnect the plug going to the gray solenoid hanging on the side of the intake plenum. Leave the vacuum lines on the solenoid, but disconnect the electrical connector. This will keep the valve from opening and nothing will come out or go into that black rubber tube. It will come off soon!!
You can easily install those flat plates and remove everything by pulling your IPD piece back out
B |
OK, you got me - what grey solenoid? Do you have a picture to help me out here? If the solenoid is disconnected, can I then also remove it?
Aha, I was going to pull the IPD to one side to see if I got access. Will do that then
Back onto the original subject - the charcoal canister. I am trying to identify where the breather line from the top of the tank goes. On the top of the fuel level sender there is 3 lines:
1. Fuel send
2. Fuel return
3. Breather - where is the other end of this line?
__________________
Kroggers...
"Trying to drive a Boxster S for team CoolCava Racing!"
www.coolcavaracing.com | www.paulkrogdahl.com
|
|
|
|
|
12-21-2011, 12:41 AM
|
#28
|
|
Registered User
Join Date: Dec 2011
Location: Finland
Posts: 270
|
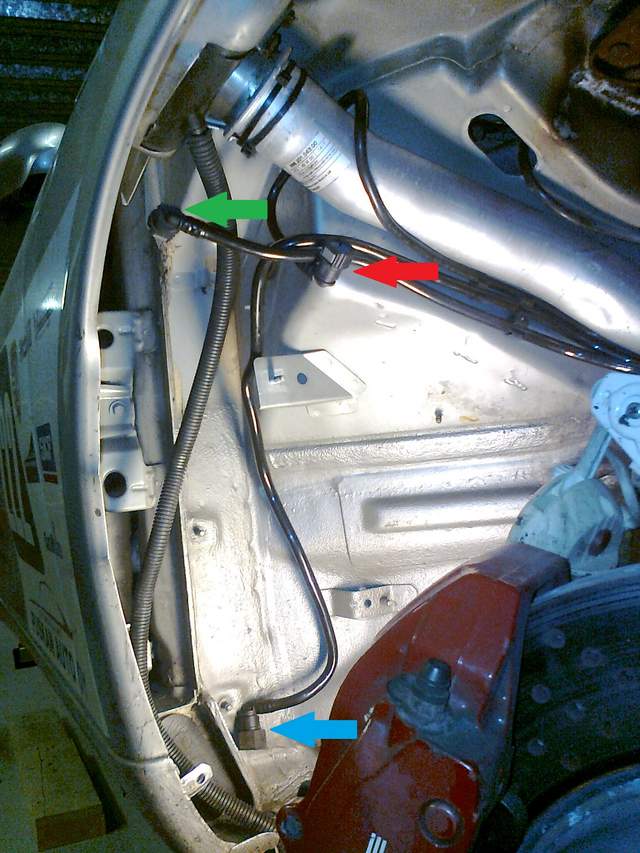
OK Brad, had some more good progress in the garage already today and now I am stuck and have some questions for you regarding the charcoal canister and the related connections
I will start by saying I was surprised as to how heavy the charcoal canister is - glad to have that removed from the car!
But now that the canister is gone, I have two lines I am not sure what to do with.
The one marked with the red arrow I have figured out to be the breather on the top of the fuel level sender stuck in the top of the tank and the one I want to keep unplugged to make sure the tank is venting properly.
But the other two I am not sure about. Where do these go and what do I do with them. Should they be left open or should they be blocked off.
Thank you for your time and assistance
__________________
Kroggers...
"Trying to drive a Boxster S for team CoolCava Racing!"
www.coolcavaracing.com | www.paulkrogdahl.com
|
|
|
|
|
01-02-2012, 04:50 AM
|
#29
|
|
Registered User
Join Date: Dec 2011
Location: Finland
Posts: 270
|
I have been looking a bit closer on the diagrams for the breather system and the charcoal canister, and I am starting to think the two lines (green and blue arrow) should be connected together.
This is based on the fact that they both connect to the canister, and as such are linked together. By removing the canister, I obviously need to connect them directly to each other - anyone see any errors in my logic???
__________________
Kroggers...
"Trying to drive a Boxster S for team CoolCava Racing!"
www.coolcavaracing.com | www.paulkrogdahl.com
|
|
|
|
|
02-11-2012, 06:24 AM
|
#30
|
|
SPB racer
Join Date: Feb 2011
Location: San Antonio TX
Posts: 252
|
Hey Kroggers, I would be interested to know what you finally ended up doing with the pieces that remained. It's the last piece of unused/unneccessary weight left in my car.
|
|
|
|
|
02-11-2012, 11:48 AM
|
#31
|
|
Registered User
Join Date: Apr 2010
Location: Canada
Posts: 3,153
|
i have a copy of an e-book about the bosch motronic system that shows what the various fuel lines do, but it is huge (85M) and won't email. if you have a place i can upload to then i could do that. otherwise, the three lines are (*i think*):
- fuel tank vent (you can vent to lower wheel well)
- atmospheric pressure (delete)
- sai feed (deletes when you remove sai)
i also thought about deleting the canister but, unless it is to be a dedicated track car, apparently your garage is going to stink of gas as your tank vents to atmosphere (ie, won't work for my street/track build).
|
|
|
|
|
02-11-2012, 02:58 PM
|
#32
|
|
Registered User
Join Date: Aug 2004
Location: Alta Loma, CA
Posts: 1,334
|
This will help..

|
|
|
|
|
02-11-2012, 04:51 PM
|
#33
|
|
SPB racer
Join Date: Feb 2011
Location: San Antonio TX
Posts: 252
|
Thank you both. Just what I needed. I think.
|
|
|
|
|
02-11-2012, 08:59 PM
|
#34
|
|
Registered User
Join Date: Dec 2011
Location: Finland
Posts: 270
|
Here is a picture from my completed removal project. In the future, I will probably remove the two blocked vent lines, but kept them in there for now - keep it simple
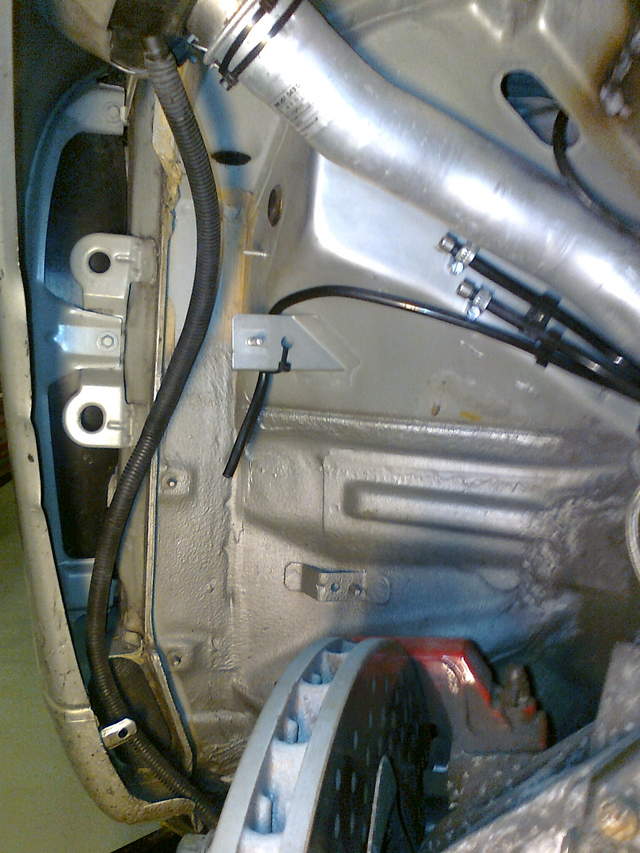
I pulled everything out and just let the tank vent to atmosphere under the liner - you can see the vent line attached to the metal bracket.
As for smell in the garage - my 911 (1978 SC) also vents to atmosphere and I do not get any heavy petrol smell in the garage, but maybe it does not get hot enough over here for me to notice it?
I have not had a chance to test it yet, but I did start the engine and let it idle for some time and I did not get a CEL from having removed it all.
My car was not the same as the diagram that Brad posted. I Think the US cars have more stuff in the system than the cars over here. I for instance did not have item 5.
@The Radium King - I can host the book for download on the CoolCava Racing servers...
__________________
Kroggers...
"Trying to drive a Boxster S for team CoolCava Racing!"
www.coolcavaracing.com | www.paulkrogdahl.com
|
|
|
|
|
03-02-2012, 02:15 PM
|
#35
|
|
SPB racer
Join Date: Feb 2011
Location: San Antonio TX
Posts: 252
|
Kroggers, just thought you would want to know that one of the hoses you have blocked off is actually a vent hose that runs all the way to the rear of the car and exits under the the trunk floor just behind the bumper (maybe behind the foil heat liner in your case. In my case the heat sheild has been removed).
I found the vent pipe by blowing compressed air into both of hoses that are blanked in your case. One of them does not allow any air to move, the other does. With the one that does you will hear the air escaping at the rear. By your photo from earlier the vent pipe will be the green arrowed hose that previously attached to the top of the canister. By the diagram provided by Brad this is the hose that exits out the top of 6 and disappears to the top right of the picture. If you have not upset there original positioning it will be the lower of the two you have locked off.
I simply looped the hose from the tank (red arrow from above) with the one that exits the rear (green). The other is still blanked until I figure out how (or whether) to remove it. From the diagram we know it runs to the "tank vent valve" but I have no idea what that is or where it is
All of this was prompted by the fact that I was getting a smell of fuel in my car (which I had previously set up exactly as you have) whilst on the track. Hopefully this should fix it.
Laurie
|
|
|
|
|
03-02-2012, 05:26 PM
|
#36
|
|
Registered User
Join Date: Nov 2009
Location: Madison, Georgia
Posts: 1,012
|
The CEL is set and triggered like this.
http://www.paladinmicro.com/documents/EVAPMonitor.pdf
Combine this with the drawing and you will get someplace.
Cheers!
__________________
2001 Boxster S 3.6L, Zeintop
"Calling upon my years of experience, I froze at the controls." - Stirling Moss
|
|
|
|
|
03-05-2012, 10:08 AM
|
#37
|
|
Registered User
Join Date: Dec 2011
Location: Finland
Posts: 270
|
Thank you Laurie, that is good stuff to know. I will leave it as is for now, but if I do start to get a fuel smell during racing, then I will do as you have done as well...
That is interesting stuff Landrovered, I will read it in more detail. And see if the CEL does trigger whilst racing - once the season starts...
__________________
Kroggers...
"Trying to drive a Boxster S for team CoolCava Racing!"
www.coolcavaracing.com | www.paulkrogdahl.com
|
|
|
|
|
01-07-2013, 05:06 AM
|
#38
|
|
Registered User
Join Date: Jan 2013
Location: Scotland
Posts: 2
|
Quote:
Originally Posted by Brad Roberts
Yes. Correct on the parts list. The covers typically run $5-7 US and no, you do not need to remove the plenum. You have to be creative |
Sorry to dig this up again I know its an old thread.
I have just purchased a Boxster race car - I noticed it still had the fuel canister, smog pump and fan bay in place.
With the help of this thread I have removed the fuel canister.
I have decided to leave the bay fan in place as it will be useful - especially as the engine is enclosed. Ive put a switch on so that I can turn it on manually.
With the smog pump - I removed it. Purchased the 2 plates and gaskets I need - however looking at it I can't see how this can be done without removing the inlet manifold nearest the smog pump??
I removed both middle parts of the inlet manifold which gives good access under the other inlet manifold but with the inlet manifold nearest the pump there is too much stuff underneath it. And the bolts are on the bottom for the part I need to replace too. 
The oil filler pipe is the main thing. If I could get that removed it might be possible. However reading up on this it has 2 bolts and one you need to remove the alternator to get to.
Anyway....basically can anyone give me any clues/tips to fit the small plates for smog pump removal.
Also - do the plates actually need to be fitted? Could you remove the smog pump and fit a small breather filter in the hose left sticking out the inlet manifold.
|
|
|
|
|
01-07-2013, 05:04 PM
|
#39
|
|
SPB racer
Join Date: Feb 2011
Location: San Antonio TX
Posts: 252
|
Brad Roberts is the guy to know the answer to this but I haven't seen him on the board lately- mine was done before the motor was put back in so I can't help you. If he doesn't respond in the next couple of days I'll email him and wake him up.
PS in my experience (and my car runs in the hottest of conditions) when these cars are used as race cars (ie they are never idling in traffic) they really don't need either the engine fan or for that matter the cooling fans. Weight is weight and if you don't need it is has no place on a race car.
|
|
|
|
|
01-11-2013, 04:44 PM
|
#40
|
|
Registered User
Join Date: Dec 2011
Location: SLC
Posts: 209
|
Daverb,
I have pretty much followed the same course as you with the smog pump. Bought the cover plates, disassembled what I could to install them, then punted to a later time when I might be taking the intake manifold off. I've run with the pump hose blocked for some time. I get an intermittent CEL on starts when its cold (< 50F) and just clear it with the Durametric tool when I get around to it. Shouldn't apply to you since I assume you have the ROW tune.
I will concur with Laurie that you don't need any of the fans. We both live in much hotter climes than the UK (Texas and Utah) and as long as the car is moving you are fine. If you get stuck on grid for an extended period just shut it down.
Max
|
|
|
|
 Posting Rules
|
You may not post new threads
You may not post replies
You may not post attachments
You may not edit your posts
HTML code is On
|
|
|
All times are GMT -8. The time now is 07:21 AM.
| |


 Buttercup
 Brodie - The blue car of awesome!
 Linear Mode


