Go Back   986 Forum - The Community for Porsche Boxster & Cayman Owners > Porsche Boxster & Cayman Forums > Boxster General Discussions

Post Reply
 
LinkBack Thread Tools Display Modes
Old 04-19-2025, 05:42 PM   #461
Motorist & Coffee Drinker
 
78F350's Avatar
 
Join Date: Jul 2014
Location: Oklahoma
Posts: 3,915
Garage


__________________
I am not an attorney, mechanic, or member of the clergy. Following any advice given in my posts is done at your own peril.
78F350 is offline   Reply With Quote
Old 04-19-2025, 06:55 PM   #462
Registered User
 
LoneWolfGal's Avatar
 
Join Date: Apr 2023
Location: Oregon
Posts: 469
Yes, I figured that out, but thank you. Could you point out D3 on the panel itself? That's what I'm scratching my head about.
__________________
2000 986 base
Arctic Silver/black
2.7 liter
5-speed manual
LoneWolfGal is online now   Reply With Quote
Old 04-19-2025, 07:45 PM   #463
Motorist & Coffee Drinker
 
78F350's Avatar
 
Join Date: Jul 2014
Location: Oklahoma
Posts: 3,915
Garage
Quote:
Originally Posted by LoneWolfGal View Post
... Could you point out D3 on the panel itself? ...
__________________
I am not an attorney, mechanic, or member of the clergy. Following any advice given in my posts is done at your own peril.
78F350 is offline   Reply With Quote
Old 04-19-2025, 08:01 PM   #464
Registered User
 
LoneWolfGal's Avatar
 
Join Date: Apr 2023
Location: Oregon
Posts: 469
Much obliged, 78F350! That's exactly what I needed. I'll check that fuse, but it could easily be the relay instead. Relays get corroded. Tapping it on a hard surface like a pack of cigarettes often fixes the problem.
__________________
2000 986 base
Arctic Silver/black
2.7 liter
5-speed manual
LoneWolfGal is online now   Reply With Quote
Old 04-20-2025, 04:15 AM   #465
Registered User
 
piper6909's Avatar
 
Join Date: Jan 2019
Location: PA
Posts: 1,652
Quote:
Originally Posted by LoneWolfGal View Post
Much obliged, 78F350! That's exactly what I needed. I'll check that fuse, but it could easily be the relay instead. Relays get corroded. Tapping it on a hard surface like a pack of cigarettes often fixes the problem.
This may sound stupid, but did you release the latch? I have another convertible with automatic latches, and when try to open the Boxster, I often forget to open the latch. It's a brief "WTF??" moment until I remember I have to unlatch it.

And btw, that sixth row by the spoiler switch is for spare fuses.

Last edited by piper6909; 04-20-2025 at 04:18 AM.
piper6909 is online now   Reply With Quote
Old 04-20-2025, 08:06 AM   #466
Registered User
 
LoneWolfGal's Avatar
 
Join Date: Apr 2023
Location: Oregon
Posts: 469
Quote:
Originally Posted by piper6909 View Post
This may sound stupid, but did you release the latch? I have another convertible with automatic latches, and when try to open the Boxster, I often forget to open the latch. It's a brief "WTF??" moment until I remember I have to unlatch it.

And btw, that sixth row by the spoiler switch is for spare fuses.
Fortunately, I had the presence of mind to release the latch above before I pressed the button. And I removed one of fuses from the sixth row, realized there were no contacts for it in the panel, and concluded they were spares. As for the missing fuses in the panel, mostly in row E, I assume those are for options my car is not equipped with. (BTW, I need to need to make sure all fuses are facing the same way, to keep my OCD at bay.) Thanks for chiming in, Al. That was actually an astute question. Sometimes the most obvious things are easy to overlook.
__________________
2000 986 base
Arctic Silver/black
2.7 liter
5-speed manual

Last edited by LoneWolfGal; 04-20-2025 at 08:09 AM.
LoneWolfGal is online now   Reply With Quote
Old 04-20-2025, 08:42 AM   #467
Registered User
 
Join Date: Apr 2021
Location: Bay Area
Posts: 194
You mentioned engaging the parking brake - is the dash light for the e-brake too?
elav is online now   Reply With Quote
Old 04-20-2025, 04:05 PM   #468
Registered User
 
LoneWolfGal's Avatar
 
Join Date: Apr 2023
Location: Oregon
Posts: 469
Quote:
Originally Posted by elav View Post
You mentioned engaging the parking brake - is the dash light for the e-brake too?
Not sure if this is what you're asking, but the dash light is on when the parking brake is engaged, and off when it's not engaged. Which means the brake's microswitch is functional.
__________________
2000 986 base
Arctic Silver/black
2.7 liter
5-speed manual
LoneWolfGal is online now   Reply With Quote
Old 04-20-2025, 04:30 PM   #469
Registered User
 
LoneWolfGal's Avatar
 
Join Date: Apr 2023
Location: Oregon
Posts: 469
The 30 amp fuse at D3 looks fine. I removed the relay and tapped it on a hard surface to free up corroded internal contacts. Still no go. The total silence when the button is pressed is odd. I would think I'd hear a click, buzz, hum, or something. That's why I suspected a fuse or relay. The relay could still be bad, but I'm not sure how to check it with my multimeter.
__________________
2000 986 base
Arctic Silver/black
2.7 liter
5-speed manual
LoneWolfGal is online now   Reply With Quote
Old 04-20-2025, 05:03 PM   #470
Motorist & Coffee Drinker
 
78F350's Avatar
 
Join Date: Jul 2014
Location: Oklahoma
Posts: 3,915
Garage
Any chance that the motor for the top was disconnected while you were around the engine compartment?
Here's the Pelican Parts DIY for top repair which may or may not be helpful: https://www.pelicanparts.com/techarticles/Boxster_Tech/71-BODY-Convertible_Top_Repair/71-BODY-Convertible_Top_Repair.htm

Somewhere I've got a troubleshooting chart for the relay. It may be hidden in the Bentley Manual somewhere too. Here's a post from 997_986 that looks like it has the same procedure: https://986forum.com/forums/662149-post7.html


Here's a picture of feral cat 'Handsome Dan'. He's very playful for a feral:
__________________
I am not an attorney, mechanic, or member of the clergy. Following any advice given in my posts is done at your own peril.

Last edited by 78F350; 04-20-2025 at 05:07 PM.
78F350 is offline   Reply With Quote
Old 04-20-2025, 10:05 PM   #471
Registered User
 
LoneWolfGal's Avatar
 
Join Date: Apr 2023
Location: Oregon
Posts: 469
Quote:
Originally Posted by 78F350 View Post
Any chance that the motor for the top was disconnected while you were around the engine compartment?
Excellent question. But in the interest of expediency I'm taking another tack: I'll lower the top manually. Just as soon as I find out how to do it.
__________________
2000 986 base
Arctic Silver/black
2.7 liter
5-speed manual
LoneWolfGal is online now   Reply With Quote
Old 04-21-2025, 04:04 AM   #472
Registered User
 
piper6909's Avatar
 
Join Date: Jan 2019
Location: PA
Posts: 1,652
If you have a multimeter (or even a test light), I found this that 997_986 also posted:

I recommend checking these points before you test it with a new relay...

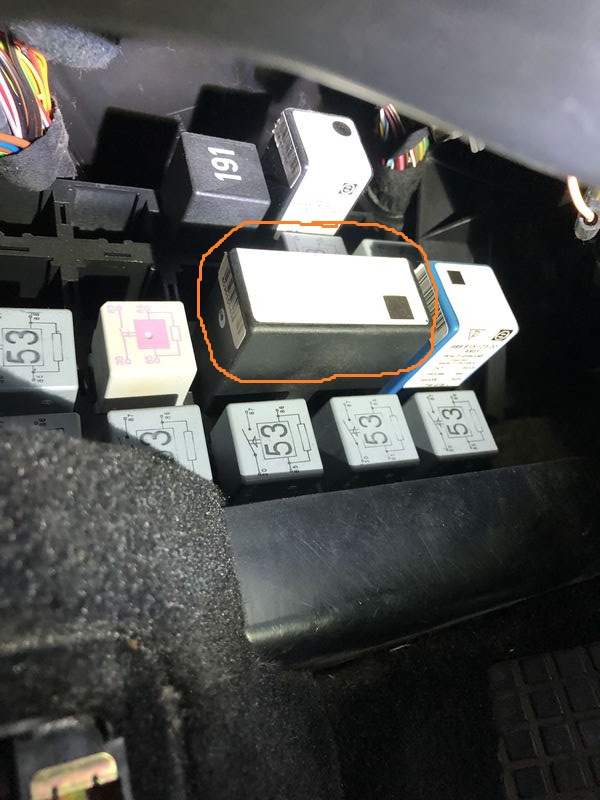
TROUBLESHOOTING ON THE RELAY CONTROLLER
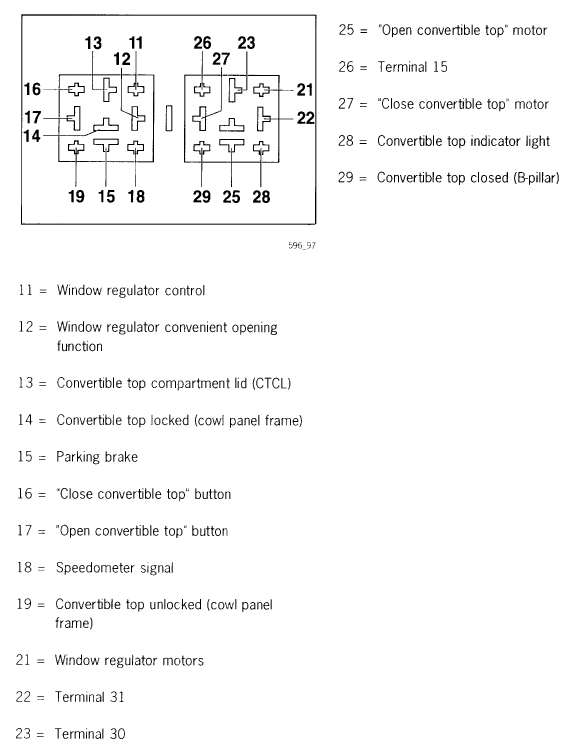
Note: Control relay disconnected. The terminal designation on the relay (Fig. 596_97) is from the underside of the control relay.
1. connect the measuring device (voltmeter) to terminal 22 (earth) and terminal 23 (plus 30) on the relay plate. Display = battery voltage
2. connect the measuring device to terminal 22 (earth) and terminal 26. Switch on the ignition. Display = battery voltage
3. connect the measuring device to terminal 23 (plus) and terminal 15 (handbrake applied). Display = battery voltage
4. connect the measuring device to terminal 23 and terminal 16 (close soft top button). Press close button. Display = battery voltage
5. connect the measuring device to terminals 23 and 17 (open soft top button). Press the open button. Display = battery voltage
6. convertible top locked . Connect measuring device to terminal 23 and terminal 14 (microswitch wind frame). Display = battery voltage
7. convertible top locked . Connect the measuring device to terminals 23 and 29 (microswitch B-pillar). Display = battery voltage
8. top unlocked. Connect the measuring device to terminals 23 and 13 (microswitch closed, soft top compartment lid VDKD open). Display = battery voltage
9. convertible top unlocked . Connect the measuring device to terminal 23 and terminal 19 (microswitch wind frame). Display = battery voltage
Connect control relay to relay carrier. Open the soft top compartment lid and disconnect the electrical plug connection on the drive motor-top drive.
10. connect the positive of measuring device to terminal 1 (black cable) and the negative of measuring device to terminal 4 (green cable). Kl. 2 and Kl.
11. connect the positive of measuring device to terminal 4 (green cable) and the negative of measuring device to terminal 1 (black cable). Bridge terminals 2 and 3 with an auxiliary cable. Switch on the ignition and press the "Close" button. Display = battery voltage

Btw, afaik from 2000 onwards there are only two microswitches, one in the lock and the other in the planetary gearbox. No microswitch on the bracket of the motor.


The above, along with the diagram 78f350 gave you, will help you determine the health of the circuits and hopefully rule out either a mouse chewed out some wires or a bad relay.

For example, if you get no voltage when you test the handbrake circuit (test #3), but you have a handbrake light on the dash then you know the switch is fine, but there's a break in the wire before the relay.

I have to admit, test #10 has me puzzled as I don't know what they mean by "KI. 2 and KI."

But the other tests seem straightforward.
__________________
2002 Boxster Base - Arctic Silver - Tiptronic
2010 Subaru Forester
1980 Ford C-8000 Custom Cab Emergency-One Fire Truck
__________________
"I never lose. I either win or I learn." -Nelson Mandela

Last edited by piper6909; 04-21-2025 at 04:24 AM.
piper6909 is online now   Reply With Quote
Old 04-21-2025, 06:29 AM   #473
Registered User
 
piper6909's Avatar
 
Join Date: Jan 2019
Location: PA
Posts: 1,652
OOPS. Sorry, 78F450. I just saw that you posted a link to the same diagnostic procedure.
__________________
2002 Boxster Base - Arctic Silver - Tiptronic
2010 Subaru Forester
1980 Ford C-8000 Custom Cab Emergency-One Fire Truck
__________________
"I never lose. I either win or I learn." -Nelson Mandela
piper6909 is online now   Reply With Quote
Old 04-21-2025, 04:41 PM   #474
Registered User
 
LoneWolfGal's Avatar
 
Join Date: Apr 2023
Location: Oregon
Posts: 469
I'm shelving the issue with the insubordinate top mechanism for a while, because my cam timing kit arrived today. It's much larger and heavier than the IMS kits. I'm very pleased with the quality of the Chinese parts. Not sure what those long tools are used for, but I don't think I'll be using them during this procedure. Perhaps someone can shed some light on their function. Tomorrow I'm going to press this kit into service. Putting the top in service mode can wait until the new pads are installed and the cams are timed. Lexi, my Jack Russell Terrier, is eyeballing the kit with skepticism in the photo, but I think it's well worth $97.

__________________
2000 986 base
Arctic Silver/black
2.7 liter
5-speed manual
LoneWolfGal is online now   Reply With Quote
Old 04-21-2025, 05:29 PM   #475
Registered User
 
piper6909's Avatar
 
Join Date: Jan 2019
Location: PA
Posts: 1,652
Quote:
Originally Posted by LoneWolfGal View Post
Lexi, my Jack Russell Terrier, is eyeballing the kit with skepticism
Awww Lexi!

Never underestimate a dog's intuition!
__________________
2002 Boxster Base - Arctic Silver - Tiptronic
2010 Subaru Forester
1980 Ford C-8000 Custom Cab Emergency-One Fire Truck
__________________
"I never lose. I either win or I learn." -Nelson Mandela
piper6909 is online now   Reply With Quote
Old 04-21-2025, 05:43 PM   #476
Registered User
 
Join Date: Dec 2009
Location: Orange County, CA
Posts: 1,957
The long white nylon tool is used to insert the pistons circlip during assembly
Gilles is offline   Reply With Quote
Old 04-21-2025, 09:53 PM   #477
Registered User
 
LoneWolfGal's Avatar
 
Join Date: Apr 2023
Location: Oregon
Posts: 469
Quote:
Originally Posted by Gilles View Post
The long white nylon tool is used to insert the pistons circlip during assembly
I'll take your word for it. It's unlikely I'll ever have to try it out. As for the other tool, the black tube is metal.
__________________
2000 986 base
Arctic Silver/black
2.7 liter
5-speed manual
LoneWolfGal is online now   Reply With Quote
Old 04-22-2025, 06:02 AM   #478
Registered User
 
Join Date: Feb 2005
Location: It's a kind of magic.....
Posts: 6,584
Quote:
Originally Posted by Gilles View Post
The long white nylon tool is used to insert the pistons circlip during assembly
The long white nylon tool is used to align the connecting rods with the piston pin openings in the pistons before the black metal tool is used to insert the piston pin retaining clips.
__________________
Anything really new is invented only in one’s youth. Later, one becomes more experienced, more famous – and more stupid.” - Albert Einstein
JFP in PA is online now   Reply With Quote
Old 04-22-2025, 08:56 AM   #479
Registered User
 
LoneWolfGal's Avatar
 
Join Date: Apr 2023
Location: Oregon
Posts: 469
Quote:
Originally Posted by JFP in PA View Post
The long white nylon tool is used to align the connecting rods with the piston pin openings in the pistons before the black metal tool is used to insert the piston pin retaining clips.
Thanks, JFP. They probably won't get any use unless I loan the kit. Here's another question for you: I removed the three chain tensioners during the IMS installation and I haven't put them back. I haven't seen it explicitly stated, but I figured I should hold off reinstalling them until after the new cam chain pads are in place, during the timing procedure. Correct?.
__________________
2000 986 base
Arctic Silver/black
2.7 liter
5-speed manual

Last edited by LoneWolfGal; 04-22-2025 at 08:59 AM.
LoneWolfGal is online now   Reply With Quote
Old 04-22-2025, 09:04 AM   #480
Registered User
 
Join Date: Feb 2005
Location: It's a kind of magic.....
Posts: 6,584
Quote:
Originally Posted by LoneWolfGal View Post
Thanks, JFP. They probably won't get any use unless I loan the kit. Here's another question for you: I removed the three chain tensioners during the IMS installation and I haven't put them back. I haven't seen it explicitly stated, but I figured I should hold off reinstalling them until after the new cam chain pads are in place, during the timing procedure. Correct?.
Leave them out until everything is back together and you are read to do cam allocation.

__________________
Anything really new is invented only in one’s youth. Later, one becomes more experienced, more famous – and more stupid.” - Albert Einstein
JFP in PA is online now   Reply With Quote
Post Reply


Posting Rules
You may not post new threads
You may not post replies
You may not post attachments
You may not edit your posts

BB code is On
Smilies are On
[IMG] code is On
HTML code is On
Trackbacks are On
Pingbacks are On
Refbacks are On


All times are GMT -8. The time now is 08:20 AM.


Powered by vBulletin® Version 3.8.7
Copyright ©2000 - 2025, vBulletin Solutions, Inc.
Content Relevant URLs by vBSEO 3.6.0
Copyright 2025 Pelican Parts, LLC - Posts may be archived for display on the Pelican Parts Website -    DMCA Registered Agent Contact Page