 02-21-2025, 08:42 AM
|
#1
|
|
Registered User
Join Date: Feb 2005
Location: It's a kind of magic.....
Posts: 6,619
|
The reason LN used a Spiralock instead of a snap ring has to do with the original wire ring used in the tube; the Spiralock conforms to the grove machined into the tube better than a flat snap ring would, giving you a superior holding power.
__________________
Anything really new is invented only in ones youth. Later, one becomes more experienced, more famous and more stupid. - Albert Einstein
|

|

|
|
02-21-2025, 09:10 AM
|
#2
|
|
Registered User
Join Date: Apr 2023
Location: Oregon
Posts: 539
|
Quote:
Originally Posted by JFP in PA

The reason LN used a Spiralock instead of a snap ring has to do with the original wire ring used in the tube; the Spiralock conforms to the grove machined into the tube better than a flat snap ring would, giving you a superior holding power.
|
Spiralock! Many thanks, JFP. I've been searching for the official designation. Thanks to you, I found a company with a trick name for theirs, Spirolox, and they have an installation how-to:
https://blog.diamondracing.net/how-to-install-spirolox
__________________
2000 986 base
Arctic Silver/black
2.7 liter
5-speed manual
|

|
|
|
02-21-2025, 04:51 PM
|
#3
|
|
Registered User
Join Date: Apr 2023
Location: Oregon
Posts: 539
|
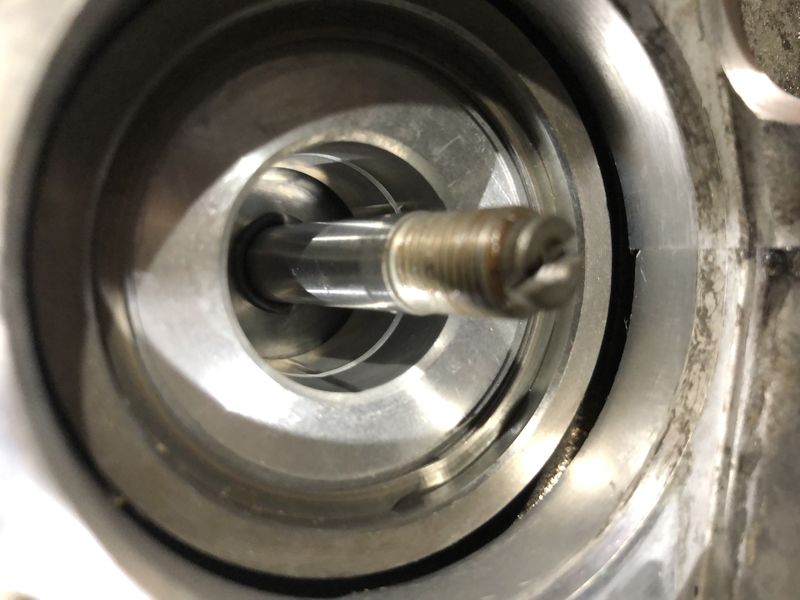
I managed to get the Spiralock installed, with the help of a small flat-blade screwdriver. I think it's fully in the groove, but I didn't have sense enough to measure the width of the lock before I put it in. Consequently, I can't be sure how much is actually in the groove, which is only a millimeter or so deep. A couple millimeters of the shim can be seen behind the lock. It seems secure. I can't easily pop it out of the groove with the screwdriver. I think it's okay. In fact, I'm almost sure it might be.
__________________
2000 986 base
Arctic Silver/black
2.7 liter
5-speed manual
Last edited by LoneWolfGal; 02-21-2025 at 04:59 PM.
|
|
|
|
|
02-21-2025, 06:00 PM
|
#4
|
|
Registered User
Join Date: Jan 2019
Location: PA
Posts: 1,724
|
Quote:
Originally Posted by LoneWolfGal
I managed to get the Spiralock installed, with the help of a small flat-blade screwdriver. I think it's fully in the groove, but I didn't have sense enough to measure the width of the lock before I put it in. Consequently, I can't be sure how much is actually in the groove, which is only a millimeter or so deep. A couple millimeters of the shim can be seen behind the lock. It seems secure. I can't easily pop it out of the groove with the screwdriver. I think it's okay. In fact, I'm almost sure it might be.
|
Looks great! That thing ain't going nowhere!
__________________
2002 Boxster Base - Arctic Silver - Tiptronic
2010 Subaru Forester
1980 Ford C-8000 Custom Cab Emergency-One Fire Truck
__________________
"I never lose. I either win or I learn." -Nelson Mandela
|
|
|
|
|
02-21-2025, 06:51 PM
|
#5
|
|
Registered User
Join Date: Apr 2023
Location: Oregon
Posts: 539
|
Seated, the bearing was less than a millimeter in from the groove, about the thickness of the shim. Which I figured was the objective. But a little voice is whispering, "What if the bearing isn't fully seated, and there wasn't enough clearance for the lock to fully engage in the groove?" I hate that voice. The only way to shut it up is with experience, but this is the only IMS bearing I'm likely to install. At least, I hope it's the only one.
__________________
2000 986 base
Arctic Silver/black
2.7 liter
5-speed manual
|
|
|
|
|
02-21-2025, 05:59 PM
|
#6
|
|
Registered User
Join Date: Jan 2019
Location: PA
Posts: 1,724
|
Quote:
Originally Posted by JFP in PA
The reason LN used a Spiralock instead of a snap ring has to do with the original wire ring used in the tube; the Spiralock conforms to the grove machined into the tube better than a flat snap ring would, giving you a superior holding power.
|
Isn't the Spiralock flat too?
__________________
2002 Boxster Base - Arctic Silver - Tiptronic
2010 Subaru Forester
1980 Ford C-8000 Custom Cab Emergency-One Fire Truck
__________________
"I never lose. I either win or I learn." -Nelson Mandela
|
|
|
|
|
02-22-2025, 06:42 AM
|
#7
|
|
Registered User
Join Date: Feb 2005
Location: It's a kind of magic.....
Posts: 6,619
|
Quote:
Originally Posted by piper6909
Isn't the Spiralock flat too?
|
Yes, but because of its spiral sectional design, it can better conform the bottom of this grove, which is slightly curved, much like a "U" to accept a round wire. A snap ring would not fully seat in this grove.
__________________
Anything really new is invented only in ones youth. Later, one becomes more experienced, more famous and more stupid. - Albert Einstein
|
|
|
|
|
02-22-2025, 03:01 PM
|
#8
|
|
Registered User
Join Date: Jan 2019
Location: PA
Posts: 1,724
|
Quote:
Originally Posted by JFP in PA
Yes, but because of its spiral sectional design, it can better conform the bottom of this grove, which is slightly curved, much like a "U" to accept a round wire. A snap ring would not fully seat in this grove.
|
Got it. thanks.
__________________
2002 Boxster Base - Arctic Silver - Tiptronic
2010 Subaru Forester
1980 Ford C-8000 Custom Cab Emergency-One Fire Truck
__________________
"I never lose. I either win or I learn." -Nelson Mandela
|
|
|
|
|
02-22-2025, 05:27 PM
|
#9
|
|
Registered User
Join Date: Apr 2023
Location: Oregon
Posts: 539
|
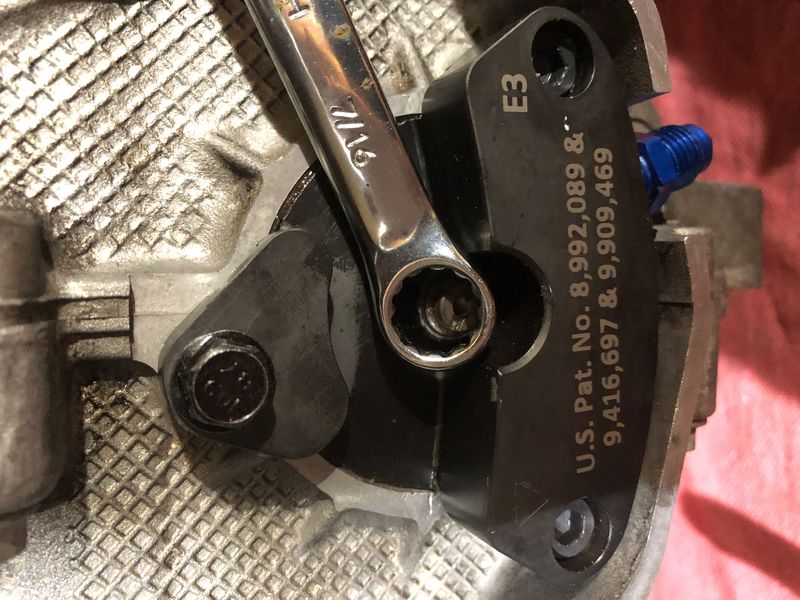
I examined the Spiro-loc (which is how the manual spells it) with a magnifying glass and was satisfied it's in the groove, baby. So I proceeded to install the flange, taking great care to insert it evenly so as not to pinch its triple seal or disturb the stud's o-ring. I'm ready to torque the flange bolts and center stud nut, but I encountered an unforeseen problem. Seems my 7/16" box end won't fit into the flange's notch and allow me to tighten the nut (while holding the stud with a screwdriver) enough to start torquing it. No room to get it on the nut. I'm stymied. A possible solution is to find a wrench that's more svelte than the one I have. Don't ya just love those unexpected work stoppages?
__________________
2000 986 base
Arctic Silver/black
2.7 liter
5-speed manual
Last edited by LoneWolfGal; 02-23-2025 at 04:39 PM.
|
|
|
|
|
02-23-2025, 03:26 AM
|
#10
|
|
Registered User
Join Date: May 2023
Location: CT
Posts: 15
|
You may want to review the Jake Raby procedure on YouTube that you cited as what you are experiencing is shown around 20:54 of the video.
__________________
John
_______________________________________________
'99 Boxster - Arctic Silver - Tiptronic
|
|
|
|
|
02-23-2025, 04:25 AM
|
#11
|
|
Registered User
Join Date: Jan 2019
Location: PA
Posts: 1,724
|
Quote:
Originally Posted by jbar1
You may want to review the Jake Raby procedure on YouTube that you cited as what you are experiencing is shown around 20:54 of the video.
|
I saw that too, unfortunately the video kind of speeds past that. Shows him using a socket and a screwdriver and then cuts away to him using a torque wrench.
Last edited by piper6909; 02-23-2025 at 04:38 AM.
|
|
|
|
|
02-23-2025, 08:40 AM
|
#12
|
|
Registered User
Join Date: Apr 2023
Location: Oregon
Posts: 539
|
Thanks, you guys. I already tried the socket/screwdriver method yesterday, but I can't seem to get the nut tight enough so that the stud doesn't turn. It needs to be fairly tight before it can be torqued. I'm going to try again, turning the socket with vice grips, protecting it with a shop rag. The problem is that only a small screwdriver will fit through the socket, seemingly too small to hold the stud. Nevertheless, after working on it all night in my dreams, I'm going to have another go at it. The hopefully thinner-walled box ends won't be here until later today anyway.
__________________
2000 986 base
Arctic Silver/black
2.7 liter
5-speed manual
|
|
|
|
|
02-23-2025, 08:52 AM
|
#13
|
|
Registered User
Join Date: Jan 2019
Location: PA
Posts: 1,724
|
Quote:
Originally Posted by LoneWolfGal
Thanks, you guys. I already tried the socket/screwdriver method yesterday, but I can't seem to get the nut tight enough so that the stud doesn't turn. It needs to be fairly tight before it can be torqued. I'm going to try again, turning the socket with vice grips, protecting it with a shop rag. The problem is that only a small screwdriver will fit through the socket, seemingly too small to hold the stud. Nevertheless, after working on it all night in my dreams, I'm going to have another go at it. The hopefully thinner-walled box ends won't be here until later today anyway.
|
Were you using a 7/16 with a 1/4" drive or 3/8"? You'd fit a larger screwdriver if you have one with a 3/8" drive. And the passthru sockets from Harbor Freight have an even larger opening.
Hopefully I'm wrong, but I suspect the thinner box wrenches may not me much help in this situation.
|
|
|
|
|
02-23-2025, 08:58 AM
|
#14
|
|
Registered User
Join Date: Apr 2023
Location: Oregon
Posts: 539
|
By the way, the manual states, in Step 38: "Using assembly lube, lubricate IMS Solution bearing and install IMS Solution flange into bearing by hand. Then using a soft face hammer, lightly tap the IMS Solution flange until is is flush with crank case."
Right. But when getting it the last quarter-inch or so to make it flush, I forgot about "lightly tapping." Making it absolutely flush required a couple dozen mighty blows with my 45-oz rubber hammer. After driving in the bearing and now the flange, my right arm is beginning to look like Popeye's.
I did everything I could to facilitate an "interference fit," as my friend the metal fabricator calls it. I kept the flange in the freezer overnight. The place I'm working in is unheated, but I placed a heater to direct heat at the opening for a couple hours, until the crankcase felt warm to the touch. I coated the appropriate surfaces on the flange liberally with assembly grease. I don't know what else I could have done. I think I was bitten by the machining-variance situation.
__________________
2000 986 base
Arctic Silver/black
2.7 liter
5-speed manual
Last edited by LoneWolfGal; 02-23-2025 at 11:45 AM.
|
|
|
|
|
02-23-2025, 04:50 PM
|
#15
|
|
Registered User
Join Date: Jan 2019
Location: PA
Posts: 1,724
|
Sorry to hear that. Have you thought about taking the original 3/8" drive socket, clamping it on a vise, taking a HSS drill bit to it and boring that inside hole out to accommodate a bigger screwdriver?
|
|
|
|
|
02-23-2025, 06:00 PM
|
#16
|
|
Registered User
Join Date: Apr 2023
Location: Oregon
Posts: 539
|
Quote:
Originally Posted by piper6909
Sorry to hear that. Have you thought about taking the original 3/8" drive socket, clamping it on a vise, taking a HSS drill bit to it and boring that inside hole out to accommodate a bigger screwdriver?
|
I would, but the guy whose set it belongs to might object. He's kinda picky about his tools, and I understand that. I'm the same way.
__________________
2000 986 base
Arctic Silver/black
2.7 liter
5-speed manual
Last edited by LoneWolfGal; 02-23-2025 at 06:04 PM.
|
|
|
|
|
02-24-2025, 03:38 AM
|
#17
|
|
Registered User
Join Date: Jan 2019
Location: PA
Posts: 1,724
|
|
|
|
|
|
02-24-2025, 09:54 AM
|
#18
|
|
Registered User
Join Date: Apr 2023
Location: Oregon
Posts: 539
|
Quote:
Originally Posted by piper6909
|
D'OH! Lowe's socket would have been perfect. Nice sleuthing, Al. (By the way, the nut requires a 12-point socket, but the sockets in the set from Harbor Freight have 6 points. Great price, though.)
Seems to me LN Engineering needs to do one of two things: (1) provide in one of their installation kits a box-end wrench (or a 3/8"-drive socket) that will fit in the flange's notch, or (2) enlarge the notch so that standard tools can access the nut on the stud. I plan to pass the suggestion on to LN. That said, after dealing with them I have enormous respect for LN as a company. Their products are first-rate and their service is exceptional.
__________________
2000 986 base
Arctic Silver/black
2.7 liter
5-speed manual
Last edited by LoneWolfGal; 02-24-2025 at 01:36 PM.
|
|
|
|
|
02-24-2025, 02:06 PM
|
#19
|
|
Registered User
Join Date: Jan 2019
Location: PA
Posts: 1,724
|
Quote:
Originally Posted by LoneWolfGal
D'OH! Lowe's socket would have been perfect. Nice sleuthing, Al. (By the way, the set from Harbor Freight has 6-point sockets, but the nut requires a 12 point.)
Seems to me LN Engineering needs to do one of two things: (1) provide in one of their installation kits a box-end wrench (or a 3/8"-drive socket) that will fit in the flange's notch, or (2) enlarge the notch so that standard tools can access the nut on the stud. I plan to pass the suggestion on to LN. That said, after dealing with them I have enormous respect for LN as a company. Their products are first-rate and their service is exceptional.
|
Ohhh, I didn't realize it wasn't a standard hex nut. I was wondering why you were referring to 12-point sockets! LOL. Shame on me for not putting two and two together.
They must do that just to screw with us. It's like my Subaru with those 13mm 12-point head bolts. It's the only damn thing on the car with 12-point bolts. I don't know if they're any better than hex bolts. One time I removed a head on a Subaru and the 12-point rounded out. It was a brand new socket, too. I ended up having to drill that head bolt out.
|
|
|
|
|
02-24-2025, 03:32 PM
|
#20
|
|
Registered User
Join Date: Apr 2023
Location: Oregon
Posts: 539
|
Quote:
Originally Posted by piper6909
Ohhh, I didn't realize it wasn't a standard hex nut. I was wondering why you were referring to 12-point sockets! LOL. Shame on me for not putting two and two together.
They must do that just to screw with us. It's like my Subaru with those 13mm 12-point head bolts. It's the only damn thing on the car with 12-point bolts. I don't know if they're any better than hex bolts. One time I removed a head on a Subaru and the 12-point rounded out. It was a brand new socket, too. I ended up having to drill that head bolt out.
|
A guy I know didn't have an impact socket, which are 6 point, so he said he was going to use a standard 12-point socket instead. I advised against it. He called me back and sheepishly admitted he had rounded off the bolt's head. "I should have listened to you," he said. I don't know everything, but I do know using a 12-point non-hardened socket with an impact wrench is flirting with disaster.
__________________
2000 986 base
Arctic Silver/black
2.7 liter
5-speed manual
|
|
|
|
 Posting Rules
|
You may not post new threads
You may not post replies
You may not post attachments
You may not edit your posts
HTML code is On
|
|
|
All times are GMT -8. The time now is 03:10 AM.
| |


 Hybrid Mode


