 01-03-2023, 06:49 AM
|
#41
|
|
Registered User
Join Date: Sep 2018
Location: Laval QC
Posts: 865
|
Quote:
Originally Posted by nuvolari

... I'm not sure what Connector 3 connects? You say from the harness to the "bracket on the cylinder head" but I'm not sure what you mean exactly. Is it for the cam position sensor?
|
It is for the O2 sensor as I remember it. The wire that I need exits the wiring harness and goes to the bracket that is bolted to the cam cover where it is connected to the wire that comes up from the O2 sensor in the exhaust system.
Quote:
Originally Posted by nuvolari
|
I posted the relevant owner's manual pages to the above thread.
__________________
Grant
Arctic Silver 2000 Boxster S - bought with a broken engine, back on the road with the engine replaced
Green 2000 Boxster 5-speed and 1978 928 auto
1987 924S 5-speed (Sold) - Blue 2000 Boxster 5 spd (Sold)
|

|

|
|
01-04-2023, 12:44 AM
|
#42
|
|
Registered User
Join Date: Jul 2021
Location: Los Angeles & Nashville
Posts: 138
|
Quote:
Originally Posted by elgyqc
It is for the O2 sensor as I remember it. The wire that I need exits the wiring harness and goes to the bracket that is bolted to the cam cover where it is connected to the wire that comes up from the O2 sensor in the exhaust system.
I posted the relevant owner's manual pages to the above thread.
|
Got it. Stand by....
__________________
00 986S
86 944 Turbo
87 VW Scirocco 16v
87 Alfa Romeo Milano
77 Alfa Romeo Alfetta Sedan
|

|
|
|
01-04-2023, 12:48 PM
|
#43
|
|
Registered User
Join Date: Dec 2009
Location: Orange County, CA
Posts: 2,014
|
Quote:
Originally Posted by nuvolari
Ok, it might take a few days as it's been raining here a lot.
Someone else posted how to jump the relay but I would still need some kind of power. I wonder what cheap and easy to carry battery might be available for this purpose. Maybe a rechrargeable power tool battery? Does anyone know? If so, please DM me or post in this Rennlist thread:
|
Not kidding about the rain and it seems that we have a lot more on the way (thankfully as we had been on a draught for many, many years)..
Regarding the battery (or power source), I saw in Costco a small (rechargeable) battery pack that claims to be able to jump start a car a few times it looks very portable (size of a book) and I am very tempted to buy one to take on my junkyard trips as many times you cannot determine the mileage of a car or to check if an electric component works or not before removing it, someone here may have one and hopefully share their comments.
.
|
|
|
|
|
01-04-2023, 02:23 PM
|
#44
|
|
Registered User
Join Date: Oct 2018
Location: North Cali
Posts: 858
|
Quote:
Originally Posted by Gilles
Not kidding about the rain and it seems that we have a lot more on the way (thankfully as we had been on a draught for many, many years)..
Regarding the battery (or power source), I saw in Costco a small (rechargeable) battery pack that claims to be able to jump start a car a few times it looks very portable (size of a book) and I am very tempted to buy one to take on my junkyard trips as many times you cannot determine the mileage of a car or to check if an electric component works or not before removing it, someone here may have one and hopefully share their comments.
.
|
Once I needed to pull a power seat from a car at a Pick ur Part and I asked them if I can bring the battery from my car to power the seat so I can move it to get access to the bolts. They said that`s not allowed bc it`s a fire hazard  I think you can smuggle a small battery in though, or you can assemble a battery pack using 8 AA batteries for instance. Or connect wires to your power tool and use its battery as a power source.
|
|
|
|
|
01-06-2023, 11:31 AM
|
#45
|
|
Registered User
Join Date: Jul 2021
Location: Los Angeles & Nashville
Posts: 138
|
Quote:
Originally Posted by Homeoboxter
Once I needed to pull a power seat from a car at a Pick ur Part and I asked them if I can bring the battery from my car to power the seat so I can move it to get access to the bolts. They said that`s not allowed bc it`s a fire hazard I think you can smuggle a small battery in though, or you can assemble a battery pack using 8 AA batteries for instance. Or connect wires to your power tool and use its battery as a power source. |
I was considering the AA battery pack but wasn't sure if it would be strong enough to run the top motor so I figured a sawzall battery might be better. Plus, it's always fun to have a sawzall in the junkyard.
And the rain has finally lifted so I'm off the junkyard....
__________________
00 986S
86 944 Turbo
87 VW Scirocco 16v
87 Alfa Romeo Milano
77 Alfa Romeo Alfetta Sedan
|
|
|
|
|
01-06-2023, 04:43 PM
|
#46
|
|
Registered User
Join Date: Jul 2021
Location: Los Angeles & Nashville
Posts: 138
|
The only one I got is the O2 connector. Both fan/aux air connectors were broken. It looked like the engine was removed (breaking those connectors) and then put back just to get rid of the car.
__________________
00 986S
86 944 Turbo
87 VW Scirocco 16v
87 Alfa Romeo Milano
77 Alfa Romeo Alfetta Sedan
|
|
|
|
|
01-09-2023, 04:12 AM
|
#47
|
|
Registered User
Join Date: Sep 2018
Location: Laval QC
Posts: 865
|
Quote:
Originally Posted by nuvolari
The only one I got is the O2 connector. Both fan/aux air connectors were broken. It looked like the engine was removed (breaking those connectors) and then put back just to get rid of the car.
|
OK, thanks for the effort. I think I already have an alternative for the O2 censor, so hold off on sending it. I'll get back to you if I need it.
Maybe I should market the procedure I used for verifying that everything was disconnected last time I pulled an engine... passing a string all around the engine to see what it caught on.
__________________
Grant
Arctic Silver 2000 Boxster S - bought with a broken engine, back on the road with the engine replaced
Green 2000 Boxster 5-speed and 1978 928 auto
1987 924S 5-speed (Sold) - Blue 2000 Boxster 5 spd (Sold)
|
|
|
|
|
01-16-2023, 08:10 AM
|
#48
|
|
Registered User
Join Date: Sep 2018
Location: Laval QC
Posts: 865
|
Bank 2 is back together with new tensioner pads.
I reinstalled the spark plug tubes with new o-rings that I bought from oringsandmore (no affiliation). The spark plugs and coils are also installed.
While the engine is on the stand I am testing the vacuum system lines and components.
While doing this I noticed some interesting details about this engine. Despite being from a 2001 Boxster S, the engine serial number indicates that it was built in 2000 but it has the single row IMSB and uses the newer white plastic injectors from later engines. So an example of the mixed up things Porsche did in the change-over year of 2001. As mentioned earlier an LN IMSB has been installed.
__________________
Grant
Arctic Silver 2000 Boxster S - bought with a broken engine, back on the road with the engine replaced
Green 2000 Boxster 5-speed and 1978 928 auto
1987 924S 5-speed (Sold) - Blue 2000 Boxster 5 spd (Sold)
|
|
|
|
|
03-11-2023, 06:50 PM
|
#49
|
|
Registered User
Join Date: Sep 2018
Location: Laval QC
Posts: 865
|
It has been awhile since I posted, mid-winter lethargy.
I replaced all the vacuum lines with bulk lines from Porsche. They kept slipping out of the rubber elbows and "Y"s if I so much as touched them, so I ended up putting spring clips on them.
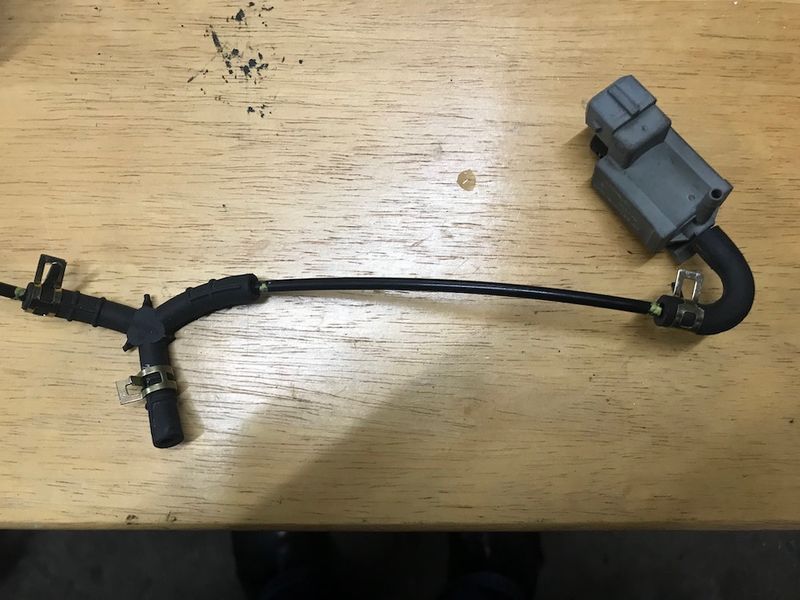
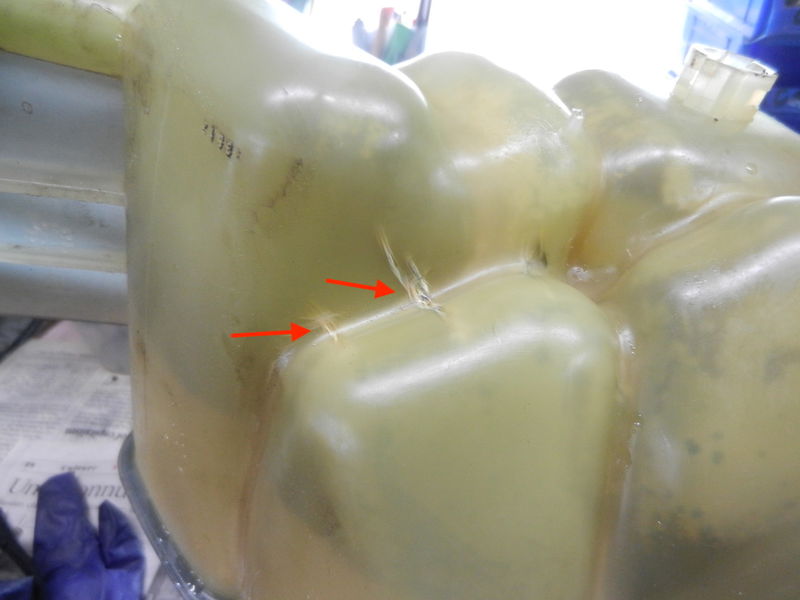
I checked that all the valves and other elements of the system worked but there was still a vacuum leak which I traced to the vacuum reservoir. I used my homemade can of compressed air to test the reservoir after getting it wet and found the leak in the bottom at the edge. The blue arrow indicates the positioning pin that goes in the mount and the red one where the leak is.
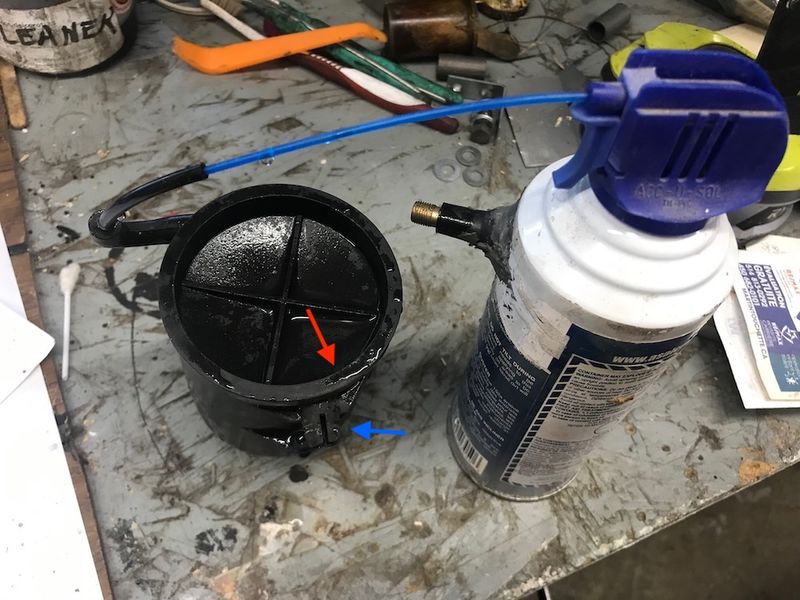
I have a second used reservoir and it had a leak in the same place vis-a-vis the pin.
I wonder if vibration passed through the mount causes it to crack here.
I think I will reseal them instead of buying a new one.
The snow is almost starting to melt so I have been shovelling it from around the Boxsters to be ready to get them mobile when snow tire season ends in less than a week. Yay!
__________________
Grant
Arctic Silver 2000 Boxster S - bought with a broken engine, back on the road with the engine replaced
Green 2000 Boxster 5-speed and 1978 928 auto
1987 924S 5-speed (Sold) - Blue 2000 Boxster 5 spd (Sold)
|
|
|
|
|
03-12-2023, 06:40 PM
|
#50
|
|
Registered User
Join Date: Sep 2018
Location: Laval QC
Posts: 865
|
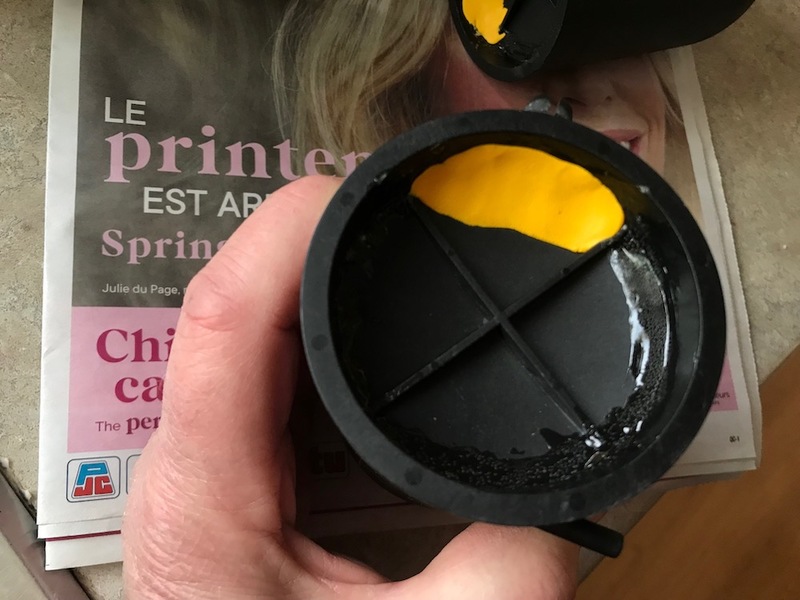
I repaired the reservoirs by putting a bead of Seal-All around the base where the cracks were. Before the sealant set I used a vacuum pump to introduce a vacuum into the reservoir to hopefully pull the sealant into the crack. I then strengthened the sector beside the mounting pin, where the leaks were, with Sugru (I love yellow on a Boxster...). Both reservoirs now hold vacuum and may just be stronger than new ones.
__________________
Grant
Arctic Silver 2000 Boxster S - bought with a broken engine, back on the road with the engine replaced
Green 2000 Boxster 5-speed and 1978 928 auto
1987 924S 5-speed (Sold) - Blue 2000 Boxster 5 spd (Sold)
|
|
|
|
|
03-12-2023, 07:47 PM
|
#51
|
|
Registered User
Join Date: Oct 2018
Location: North Cali
Posts: 858
|
I like that you attempt to fix everything that most of us would just toss and replace. Hope it`s gonna hold 
|
|
|
|
|
03-13-2023, 06:40 AM
|
#52
|
|
Registered User
Join Date: Sep 2018
Location: Laval QC
Posts: 865
|
Quote:
Originally Posted by Homeoboxter
I like that you attempt to fix everything that most of us would just toss and replace. Hope it`s gonna hold |
Thanks, it's half because I don't have money to throw away and half because I don't like to waste things that can be fixed... and an extra half because I enjoy the challenge.
My only worry with the reservoir is that the plastic is so old it will fail somewhere else, like the fitting for the vacuum line that looks a bit fragile. But now that I know what I am doing I could remove the reservoir with the engine in the car, although it would be a big PITA.
__________________
Grant
Arctic Silver 2000 Boxster S - bought with a broken engine, back on the road with the engine replaced
Green 2000 Boxster 5-speed and 1978 928 auto
1987 924S 5-speed (Sold) - Blue 2000 Boxster 5 spd (Sold)
Last edited by elgyqc; 03-15-2023 at 10:54 AM.
Reason: clarification
|
|
|
|
|
03-15-2023, 10:57 AM
|
#53
|
|
Registered User
Join Date: Sep 2018
Location: Laval QC
Posts: 865
|
The new RMS is installed, the old one was leaking, although not a lot.
I took the opportunity of having to remove the engine from the engine stand to test my "Low rise dolly" which is explained here.
Engine swap getting enough clearance with a Quickjack
__________________
Grant
Arctic Silver 2000 Boxster S - bought with a broken engine, back on the road with the engine replaced
Green 2000 Boxster 5-speed and 1978 928 auto
1987 924S 5-speed (Sold) - Blue 2000 Boxster 5 spd (Sold)
|
|
|
|
|
06-11-2023, 02:48 PM
|
#54
|
|
Registered User
Join Date: Sep 2018
Location: Laval QC
Posts: 865
|
It has been awhile since I posted, I haven't been very efficient this spring and some house stuff took me away for a couple of weeks.
The replacement engine was almost ready... then I made a mistake that took awhile to correct, but I am almost back to where I was a month ago.
Meanwhile I started the process of removing the 2.7 engine that has been in the car since last fall. It sure goes a lot easier when the nuts and bolts haven't had time to rust up... and the fact that all the exhaust hardware is stainless steel. I'll be ready to drop the engine this week.
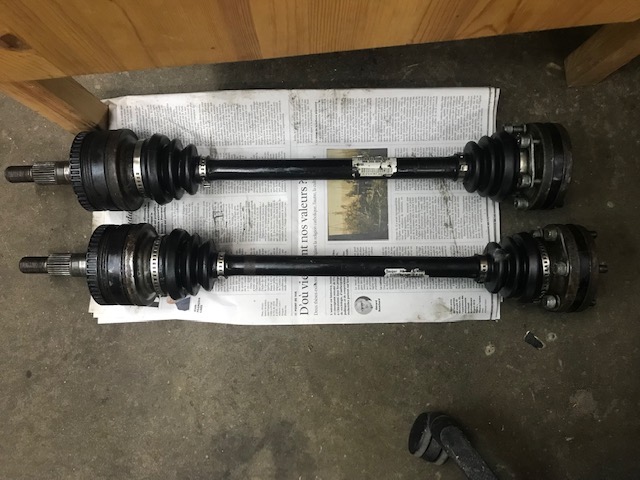
I have to change the outer CV boots, one is ripped and the other is barely hanging on, so I removed the half-shafts. The CV joints feel tight so I will disassemble and grease them while installing the new boots.
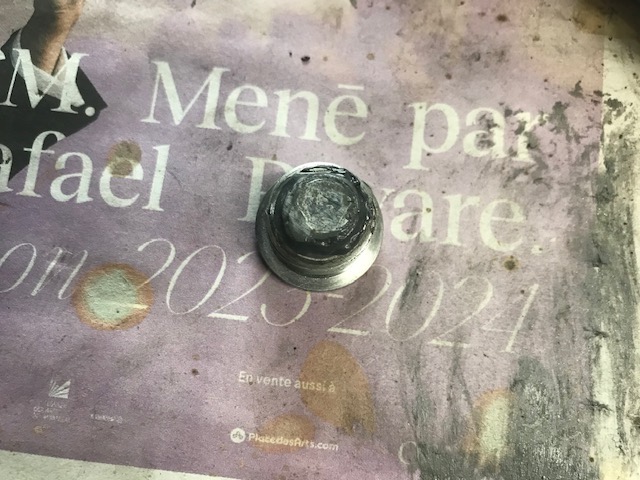
I found two new problems, the parking brake shoes are shot... and when I removed the rear wheels I realized that the wheel bolts are wrong, perhaps dangerously so.
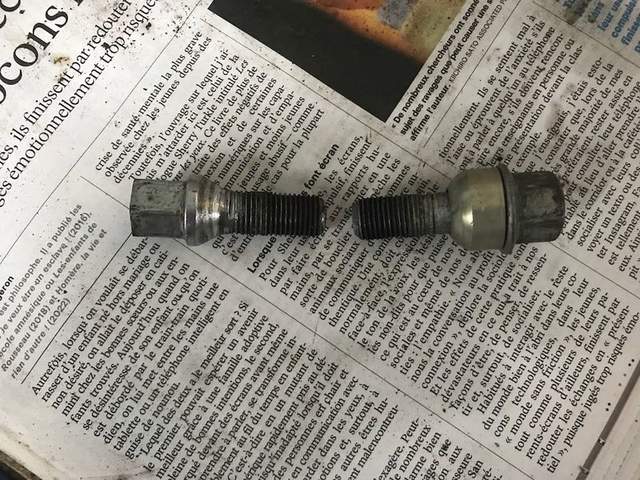
On the left is one of the incorrect bolts, on the right a Porsche bolt. The shoulder of the Porsche bolt provides a lot of contact area between the bolt and the wheel, the other bolt has a contact area of only about a 1/16 of an inch wide. I can imagine the wheel being damaged by tapping a curb or even hard cornering over a bumpy surface. I will have to inspect the wheels. I had a similar problem with my 928, someone had installed non-Porsche wheels and used aluminum Porsche bolts from a 944 - they were all broken at the point where they contacted the wheel.
My buddy Newart came to the rescue with a box of Porsche bolts left over from when he converted to studs.
__________________
Grant
Arctic Silver 2000 Boxster S - bought with a broken engine, back on the road with the engine replaced
Green 2000 Boxster 5-speed and 1978 928 auto
1987 924S 5-speed (Sold) - Blue 2000 Boxster 5 spd (Sold)
|
|
|
|
|
06-19-2023, 03:03 AM
|
#55
|
|
Registered User
Join Date: Sep 2018
Location: Laval QC
Posts: 865
|
The 2.7 engine is out after some complications. I am starting the reassembly process for the car with the new parking brakes and regreasing the half-shafts, with new outer CV boots.
Then I found a new problem, one of the transmission mounts left a puddle of oil on the floor where I left it after removal.
__________________
Grant
Arctic Silver 2000 Boxster S - bought with a broken engine, back on the road with the engine replaced
Green 2000 Boxster 5-speed and 1978 928 auto
1987 924S 5-speed (Sold) - Blue 2000 Boxster 5 spd (Sold)
|
|
|
|
|
07-01-2023, 03:19 PM
|
#56
|
|
Registered User
Join Date: Sep 2018
Location: Laval QC
Posts: 865
|
I ordered transmission mounts from PRG Products, the price is competitive and they should last a long time.
The half shafts are done... a job just as messy as the last time I did it.
I have a magnetic drain plug in the 2.7 engine but didn't feel like switching it over so I made my own with a small magnet and JB Weld.
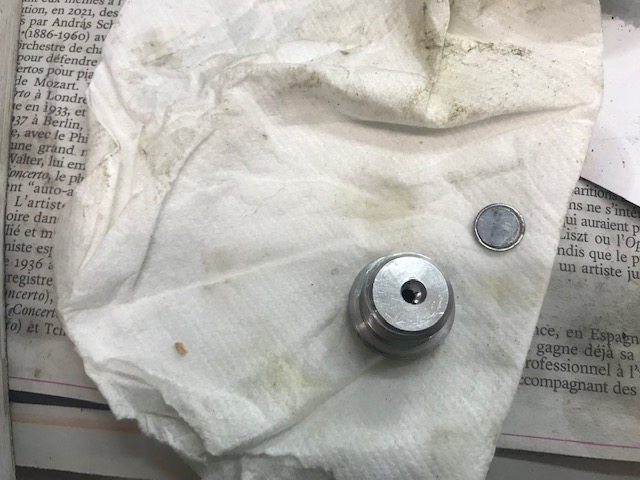
What's the worse that can happen? Other than all the oil leaking out or the magnet separating from the plug and getting sucked into the oil pickup... I'll try it out for awhile and see how it works.
Meanwhile I have been trying to repair my cheap imported engine hoist which isn't able to hold the arm up anymore, even with no load. Couldn't find a proper seal anywhere so I bought this off Amazon.
https://www.amazon.ca/dp/B09CL46ZXC?ref=ppx_yo2ov_dt_b_product_details&th=1
I know nothing about hydraulics and I suspect this will not be up to the pressure in the hoist's cylinder but I am looking at this as a proof of concept. I see seals the same size with much higher load capacities that I will try if this one blows out. Today I installed the seal and I was able to lift the arm and it seems to be hold the pressure so far.
__________________
Grant
Arctic Silver 2000 Boxster S - bought with a broken engine, back on the road with the engine replaced
Green 2000 Boxster 5-speed and 1978 928 auto
1987 924S 5-speed (Sold) - Blue 2000 Boxster 5 spd (Sold)
|
|
|
|
|
07-06-2023, 08:23 PM
|
#57
|
|
Registered User
Join Date: Sep 2018
Location: Laval QC
Posts: 865
|
The seal in the engine hoist seems to be holding up, I was able to lift the engine off the furniture dolly and it works like new.
I did a walk around of the new engine to be sure that everything is installed and that the wiring harness connectors and the vacuum lines are still in place.
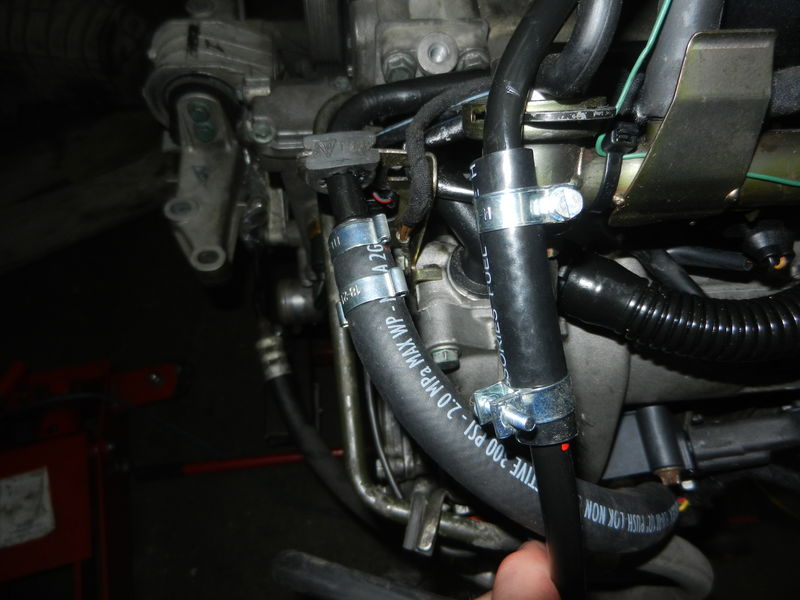
When the recyclers removed the engine they cut some of the lines so I repaired the power steering and fuel return lines.
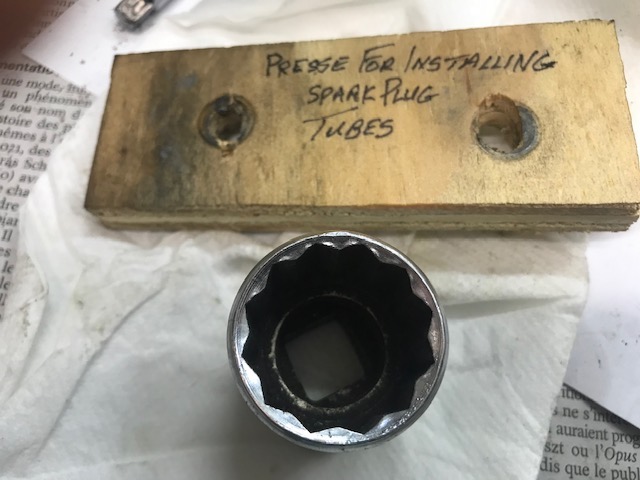
I had difficulty installing the spark plug tubes, perhaps because the o-rings are a bit larger than OEM... I broke one of the tubes while encouraging it to seat with a rubber hammer. So I made a tool to press the tubes in using a socket and the coil bolts. They popped right in with this.
The transmission, clutch and flywheel came off the 2.7 today and they will go on the 3.2 tomorrow. Then I can start installing the new engine.
__________________
Grant
Arctic Silver 2000 Boxster S - bought with a broken engine, back on the road with the engine replaced
Green 2000 Boxster 5-speed and 1978 928 auto
1987 924S 5-speed (Sold) - Blue 2000 Boxster 5 spd (Sold)
Last edited by elgyqc; 10-30-2023 at 07:33 PM.
Reason: spelling
|
|
|
|
|
07-10-2023, 03:06 PM
|
#58
|
|
Registered User
Join Date: Sep 2018
Location: Laval QC
Posts: 865
|
When I was preparing to remove the engine I was unable to disconnect the dipstick tube from the engine, old arthritic fingers don't help, so I cut the tube and repaired it with a piece of rubber fuel line... just the right size.

Today I installed new coolant reservoir, good thing the old one was about to fail...
I can't believe I did this a couple of years ago with the engine in the car, it was a huge PITA even with the engine out.
__________________
Grant
Arctic Silver 2000 Boxster S - bought with a broken engine, back on the road with the engine replaced
Green 2000 Boxster 5-speed and 1978 928 auto
1987 924S 5-speed (Sold) - Blue 2000 Boxster 5 spd (Sold)
|
|
|
|
|
07-15-2023, 08:35 AM
|
#59
|
|
Registered User
Join Date: Sep 2018
Location: Laval QC
Posts: 865
|
The engine is under the car and ready to be installed, I was waiting for the arrival of my new PRG transmission mounts. Here they are ready to go.
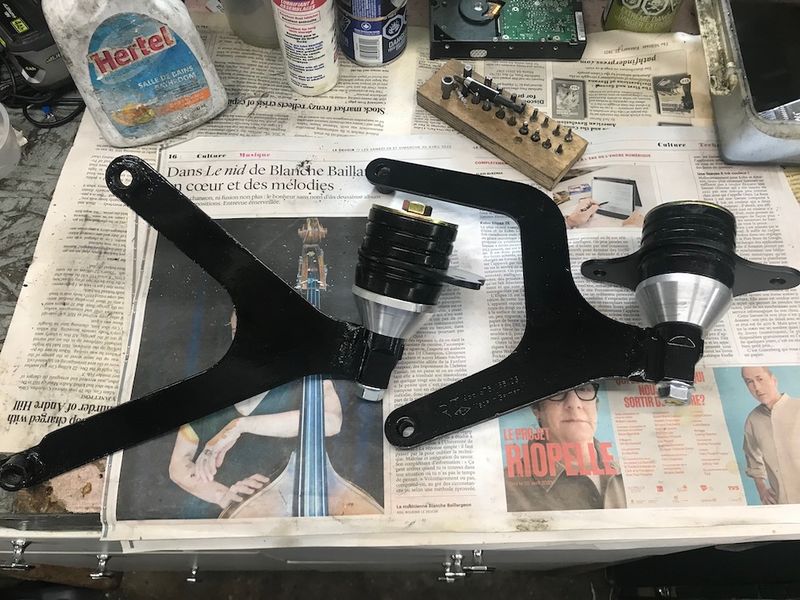
I couldn't find the torque for these mounts so emailed Greg at PRG... 60 ft/lbs. He also mentioned a detail that might interest some of you who have these mounts.
"There is a crush sleeve, get the bolt tight, about 60lbs. The bolt torque has no relevance on the bushing preload. The bushings are set to a predetermined preload by the length of that sleeve. you could machine a longer or shorter crush sleeve if you wanted to try different settings "
__________________
Grant
Arctic Silver 2000 Boxster S - bought with a broken engine, back on the road with the engine replaced
Green 2000 Boxster 5-speed and 1978 928 auto
1987 924S 5-speed (Sold) - Blue 2000 Boxster 5 spd (Sold)
Last edited by elgyqc; 07-16-2023 at 10:15 AM.
Reason: added info
|
|
|
|
|
07-30-2023, 12:26 PM
|
#60
|
|
Registered User
Join Date: Sep 2018
Location: Laval QC
Posts: 865
|
My last problem before trying to start the engine was a leaking power steering return hose... the one I rebuilt, see the picture in post # 57 above, it's the hose on the left of the picture.
When I filled the reservoir it started to leak even without pressure in the system. I had used 1/2" hydraulic hose in place of 12mm and the difference was enough that even with it clamped hard it was leaking. 12mm hose is hard to come by, especially late on a Friday when dealerships that might have it are closed. So yesterday I went to Kenny U Pull and found a P/S hose on a BMW that was long enough. The installation with the engine in the car was a challenge but I got it in, with 2 clamps on each end and so far it is leak free.
Next installment... seeing if it will start...
__________________
Grant
Arctic Silver 2000 Boxster S - bought with a broken engine, back on the road with the engine replaced
Green 2000 Boxster 5-speed and 1978 928 auto
1987 924S 5-speed (Sold) - Blue 2000 Boxster 5 spd (Sold)
Last edited by elgyqc; 07-30-2023 at 12:27 PM.
Reason: added info
|
|
|
|
 Posting Rules
|
You may not post new threads
You may not post replies
You may not post attachments
You may not edit your posts
HTML code is On
|
|
|
All times are GMT -8. The time now is 08:45 PM.
| |


 Boxster
 Boxster
 Linear Mode


