Go Back   986 Forum - The Community for Porsche Boxster & Cayman Owners > Porsche Boxster & Cayman Forums > Boxster General Discussions

Post Reply
 
LinkBack Thread Tools Display Modes
Old 03-04-2017, 05:35 AM   #1
Beginner
 
Jamesp's Avatar
 
Join Date: Mar 2013
Location: Houston
Posts: 1,659
Garage
Hats Off to Meir!

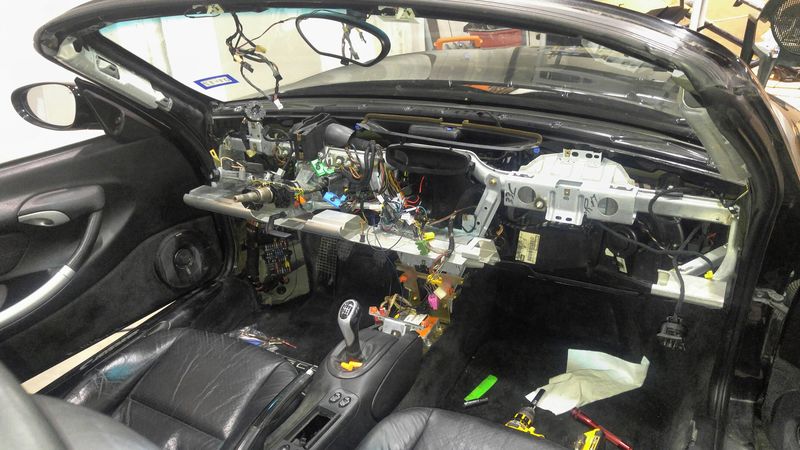
I just used his excellent instructions to remove the dashboard and replace the missing foam in the air box.


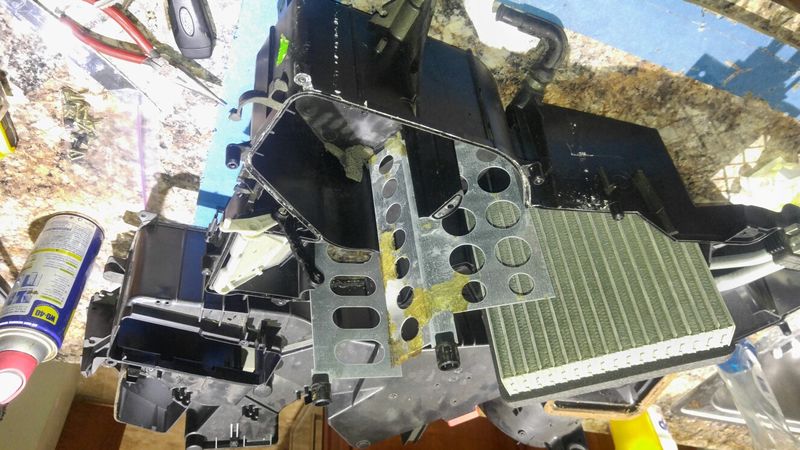
pull apart the air box to replace the foam (yeah, the next picture is upside down)


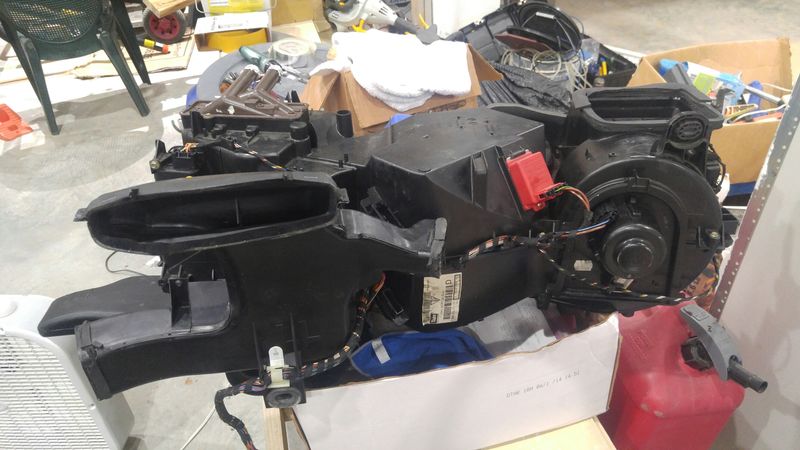
Then re-install the heater box (that's it just below the horizontal silver bar on the passenger side)


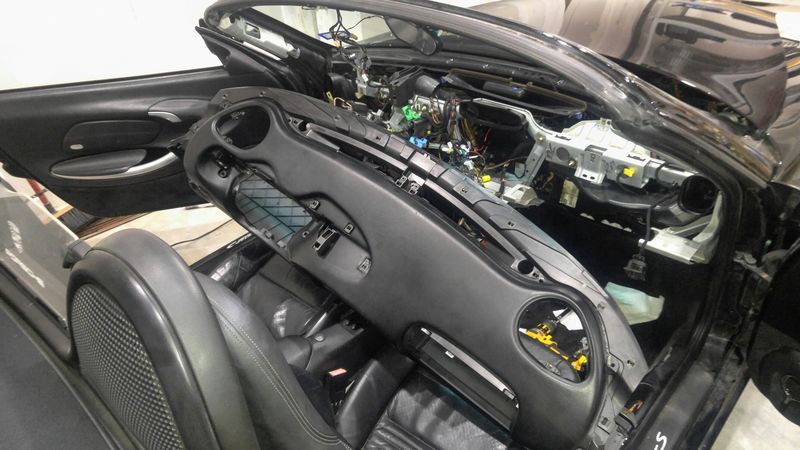
and re install the dash


This project is not for the faint of heart. Without Meir's DIY instructions it would be a real bear with lots of "hidden" fasteners, and lots of fasteners to find period.

The AC system also has to be opened and the seals and R134a replaced. After re-assembling the AC the system is pulled to vacuum. Since the system needs 850 grams of 134a, I decided that to use a kitchen scale to weigh the R134a going into the system. It worked great. I didn't even run the car.

I put in one can using a hair dryer to heat the can, then weighed the empty can. The system takes about 2 1/2 cans. Weighing the second full can showed there were about 6 grams more 134a in the can than the weight on the label.

Doing a little math showed how much the last can should weigh to have 850 grams so I had it on the scale as it was charging the system to watch the weight decline. Voila! 850 grams more or less exactly into the car.

After putting that in the car I went into the house and realized I'd put exactly 100 grams too much in the system. AAACK!

This morning I hooked everything back up, but put the R134a can in an ice bath on the scale. It's cool in a science geeky sort of way to watch the R134a go back into the can. After condensing 100 grams back into the can, I cranked up the engine and for the first time since I''ve owned the car enjoyed frigid AC and blistering heat.

Thanks again Meir!!!

__________________
2003 S manual
Jamesp is offline   Reply With Quote
Old 03-04-2017, 08:58 AM   #2
Registered User
 
Join Date: May 2014
Location: S.California
Posts: 2,027
James, this looks really daunting but just in time for Summer!
Just finding all those hidden fasteners would be worth it's own diy guide.
For those who missed Meir's diy guide, here it is:
dashboard cover removal
& this one:
DIY Dashboard Assembly Instructions
Interior vent debris
I hope this helps others do this job and hopefully share the many gotchas !

Last edited by Gelbster; 03-04-2017 at 09:01 AM.
Gelbster is offline   Reply With Quote
Old 03-04-2017, 09:03 AM   #3
Certified Boxster Addict
 
Join Date: Nov 2010
Location: Los Angeles
Posts: 7,669
James, nicely done!
__________________
1999 996 C2 - sold - bought back - sold for more
1997 Spec Boxster BSR #254
1979 911 SC
POC Licensed DE/TT Instructor
thstone is offline   Reply With Quote
Old 03-04-2017, 10:23 AM   #4
1997 Tip, 2018 Macan
 
rexcramer's Avatar
 
Join Date: Aug 2015
Location: Upland, CA
Posts: 1,338
Garage
Excellent job sir. What was the total elapsed time from start to finish?
rexcramer is offline   Reply With Quote
Old 03-04-2017, 10:55 AM   #5
still plays with cars...
 
BoxsterSteve's Avatar
 
Join Date: May 2011
Location: Baden, ON, Canada
Posts: 1,087
Garage
Wow. Definitely not for the faint of heart, for sure.
Props on the project, and congrats on the working A/C.

That looks like the same level of disassembly I had to reach to replace the heater core in my Fox body Mustang back in the day. That job took me just under 11 hours.
__________________
Six speed 2000 Boxster S
Arctic Silver on Metropol Blue | LN Dual Row IMSR | Arctic Silver console, spoiler frame & bumperettes | Crios mod | Technobrace | RoboTop module & modified convertible top relay for one-touch roof operation
BoxsterSteve is offline   Reply With Quote
Old 03-04-2017, 12:05 PM   #6
Registered User
 
Join Date: May 2015
Location: Greater Seattle, WA
Posts: 534
I'm curious what tool did you use to pull the vacuum - Small vacuum pump?

To repair the flap door holes, did you use the same "armaflex insulation tape" that Meir used?
Interior vent debris

That looks like quite the project!
__________________
2001 Boxster
jakeru is offline   Reply With Quote
Old 03-04-2017, 12:06 PM   #7
Registered User
 
Pdwight's Avatar
 
Join Date: May 2013
Location: North Alabama
Posts: 2,079
Frikin WOW

Job well done....Props to Meir
Pdwight is offline   Reply With Quote
Old 03-04-2017, 02:34 PM   #8
Registered User
 
Mr Flat Six's Avatar
 
Join Date: Jan 2017
Location: Virginia
Posts: 104
I just bought a Boxster and noticed some foam bits in the vent coming out. This effects heating, correct? I guess I might end up having to do this one day but for now my heat works really well.
Mr Flat Six is offline   Reply With Quote
Old 03-04-2017, 03:31 PM   #9
Beginner
 
Jamesp's Avatar
 
Join Date: Mar 2013
Location: Houston
Posts: 1,659
Garage
Total time spent was about 12 hours over about a week. I do clean everything and repaint etc. as needed so it looks new.

I used a standard 120 volt vacuum pump made for AC work. They are inexpensive and effective, pays for itself in one job. I've tried other tools to pull the vacuum and failed miserably.

I did use the exact same foam as Meir, its available at Home Depot in the heating and AC department. It appears to be a higher quality foam than OEM.

If you have foam coming out the vents, it wont be long until the AC starts mixing with the heat, and due to the way the heater box is constructed the air won't be forced through the heater core, a half to a third likely meanders through whether heat or AC is selected.

I think you can do a reasonable job on the bigger of the 2 doors which is the AC/Heat selector by simply taking out the heater core and closing out the holes on the door with foam or aluminum tape. To get to the entire door surface it may need to be moved by selecting heat to tape part of it, then select cool to rotate it to reach the other part. If somebody tries this, please post. I only thought of it after becoming familiar with the heater box geometry.

The door that cannot be reached from the heater core location controls air going to the dash vents so you can just manually close those if you try the simpler fix listed above.
__________________
2003 S manual

Last edited by Jamesp; 03-04-2017 at 03:34 PM.
Jamesp is offline   Reply With Quote
Old 03-04-2017, 03:44 PM   #10
Registered User
 
Join Date: May 2014
Location: S.California
Posts: 2,027
James, While doing this job did you think about some simple hack to just block any hot coolant and then just abandon all the foam ? This would then give a choice of ambient air or a/c. Maybe this is nonsense. I ask because for those of us in warm climates it is sometimes an expedient hack. I have done this on my old Miata and some Brit cars and it works great. Perhaps it is ridiculous for the Boxster ?
Gelbster is offline   Reply With Quote
Old 03-04-2017, 05:13 PM   #11
Beginner
 
Jamesp's Avatar
 
Join Date: Mar 2013
Location: Houston
Posts: 1,659
Garage
Quote:
Originally Posted by Gelbster View Post
James, While doing this job did you think about some simple hack to just block any hot coolant and then just abandon all the foam ? This would then give a choice of ambient air or a/c. Maybe this is nonsense. I ask because for those of us in warm climates it is sometimes an expedient hack. I have done this on my old Miata and some Brit cars and it works great. Perhaps it is ridiculous for the Boxster ?
Never considered it. Houston weather is usually warm, we pretty much missed winter this year. Having said that I was once outside in 7 degree F weather in Houston so it can get cold. If you really didn't need the heat, valving off the heater core would make the AC work. Not sure if it would have an unintended effect on engine cooling though.
__________________
2003 S manual
Jamesp is offline   Reply With Quote
Old 03-06-2017, 12:10 AM   #12
Registered User
 
auBoxster's Avatar
 
Join Date: Aug 2016
Location: Australia
Posts: 29
Any reason you didn't try the hack whereby you remove (drill / grind etc) the top of the heater box to expose the top plug of the flap axis? You can then just reach into the front section of the heater box and remove the flap. Relatively speaking, not much needs to be removed, and you just re-install the flap and cover the plug with tape or a bit of tin metal fastened down etc... works a treat... !!
auBoxster is offline   Reply With Quote
Old 03-06-2017, 02:52 AM   #13
Beginner
 
Jamesp's Avatar
 
Join Date: Mar 2013
Location: Houston
Posts: 1,659
Garage
Quote:
Originally Posted by auBoxster View Post
Any reason you didn't try the hack whereby you remove (drill / grind etc) the top of the heater box to expose the top plug of the flap axis? You can then just reach into the front section of the heater box and remove the flap. Relatively speaking, not much needs to be removed, and you just re-install the flap and cover the plug with tape or a bit of tin metal fastened down etc... works a treat... !!
I did consider it but I don't understand the procedure and didn't want to cut the heater box. I did cut the heater box on a 97 Ford Explorer for a similar issue and it worked great so I can see something like that works. The top of the heater box is not easily accessible. It's under the dash, and from the frunk side, behind the firewall. Even with the dash removed its buried (see the pics below) The only time I saw the top of the heater box was when it was out of the car or from the heater core area in the frunk. A DIY on that with pics on that would be great as another option.
__________________
2003 S manual
Jamesp is offline   Reply With Quote
Old 03-06-2017, 03:42 AM   #14
Multi-Boxer Driver
 
Deserion's Avatar
 
Join Date: Nov 2010
Location: Orange Park, FL
Posts: 1,408
Garage
I may tackle that on mine this summer. Already had plenty of foam come out, and the A/C feels a little weaker than usual. Time to get the condensers cleaned first.
__________________
-Chris
2004 Porsche Boxster 2.7
1991 Porsche 911 C2 Targa 3.6
2017 Subaru Outback 3.6R
Deserion is offline   Reply With Quote
Old 03-06-2017, 10:12 AM   #15
Registered User
 
Mr Flat Six's Avatar
 
Join Date: Jan 2017
Location: Virginia
Posts: 104
Well it looks like this will be going onto my project to do list. I just hope I don't have to do it too soon.
Mr Flat Six is offline   Reply With Quote
Old 03-06-2017, 06:52 PM   #16
Registered User
 
auBoxster's Avatar
 
Join Date: Aug 2016
Location: Australia
Posts: 29
Quote:
Originally Posted by Jamesp View Post
I did consider it but I don't understand the procedure and didn't want to cut the heater box. I did cut the heater box on a 97 Ford Explorer for a similar issue and it worked great so I can see something like that works. The top of the heater box is not easily accessible. It's under the dash, and from the frunk side, behind the firewall. Even with the dash removed its buried (see the pics below) The only time I saw the top of the heater box was when it was out of the car or from the heater core area in the frunk. A DIY on that with pics on that would be great as another option.
It isn't that hard, but yeah, without someone documenting the process, it might seem too risky to do compared to pulling the dash - I kinda thought that pulling the entire dash out is just as risky in terms of breaking / wrecking something than drilling a minor hole in the top of the heater box. I guess it depends on what you're willing to risk and what seems like more or less work.

I'll dig up some photos I took and see if I can pull together a How To so that others can compare. I'll admit there is little information on the other approach to fixing the heater flap!
auBoxster is offline   Reply With Quote
Old 03-07-2017, 05:29 AM   #17
Registered User
 
Join Date: Sep 2015
Location: St. Petersburg, Florida
Posts: 337
I'll be anxiously waiting for a DIY on the simpler method. I'm not that adventurous!

__________________
1998 Porsche Boxster - Ocean Jade Metallic

1985 Porsche Carrera Targa - Guards Red

1978 Porsche 911SC Euro Non-Sunroof - Grand Prix White
Seadweller is offline   Reply With Quote
Post Reply


Posting Rules
You may not post new threads
You may not post replies
You may not post attachments
You may not edit your posts

BB code is On
Smilies are On
[IMG] code is On
HTML code is On
Trackbacks are On
Pingbacks are On
Refbacks are On


All times are GMT -8. The time now is 10:55 AM.


Powered by vBulletin® Version 3.8.7
Copyright ©2000 - 2024, vBulletin Solutions, Inc.
Content Relevant URLs by vBSEO 3.6.0
Copyright 2024 Pelican Parts, LLC - Posts may be archived for display on the Pelican Parts Website -    DMCA Registered Agent Contact Page