 03-27-2016, 10:47 AM
|
#21
|
|
Registered User
Join Date: May 2015
Location: Greater Seattle, WA
Posts: 534
|
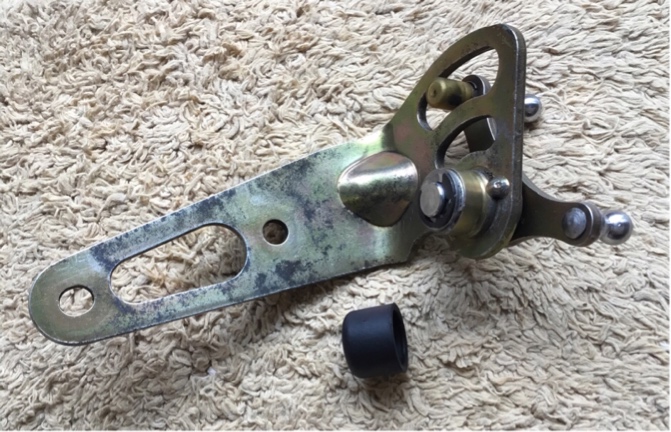
Another view of the "contraption" with its rubber cap removed:
__________________
2001 Boxster
Last edited by jakeru; 03-27-2016 at 10:58 AM.
|

|

|
|
03-27-2016, 10:49 AM
|
#22
|
|
Registered User
Join Date: May 2015
Location: Greater Seattle, WA
Posts: 534
|
So far the two ballsocket pieces I've inspected closely in this area seem to be great shape (except from being dirty and dry and in need of some grease, which I will do). The molded-in rubber vibration isolators do deflect under force, but this is by design, the rubber isn't torn or cracked, and don't look bad.
The plastic ballsocket liners although dirty and dry, seem nice and tight with no slop.
So I will clean them up, grease them with some badly needed DuPont Krytox PFPE grease, and reuse.
__________________
2001 Boxster
Last edited by jakeru; 03-27-2016 at 12:19 PM.
|
|
|
|
|
03-27-2016, 12:22 PM
|
#23
|
|
Registered User
Join Date: Dec 2012
Location: FL
Posts: 4,145
|
Please make a DIY 
Edit: I didn't see the rest of the pictures when I posted this
Last edited by steved0x; 03-27-2016 at 12:27 PM.
|
|
|
|
|
03-27-2016, 06:14 PM
|
#24
|
|
Registered User
Join Date: Mar 2015
Location: Miami, FL
Posts: 584
|
Can't wait to hear how it works once reinstalled!
|
|
|
|
|
03-28-2016, 06:46 AM
|
#25
|
|
Project Addicted
Join Date: Aug 2015
Location: Eastern Shore, MD
Posts: 623
|
What did you do to replace the bushing?? I would like to improve this spot too.
Good work BTW !!
I have 2 cables from Woody and some heim joints on the way to see how hard it would be to replace the cable ends and eliminate some slop as well is the flex that is occurring with the plastic/rubber ends.
EDIT:
Look what showed up in the mail this morning.
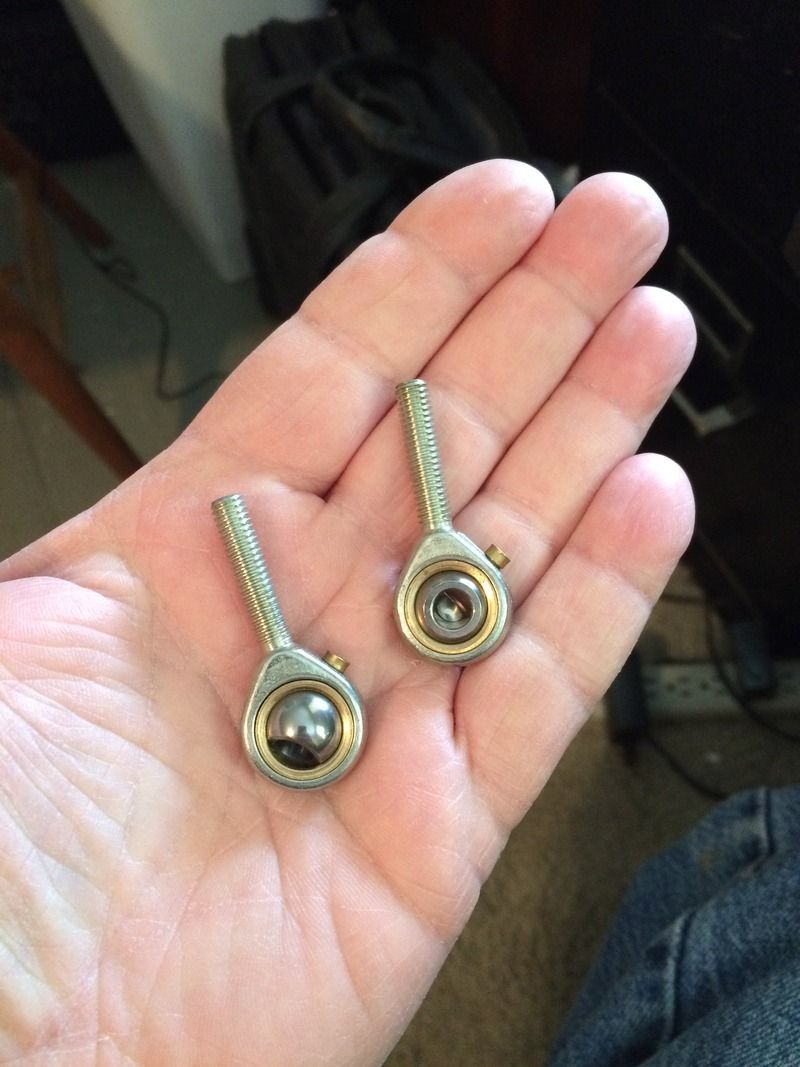
These are 6mm Stainless Steel Heim joints with bronze inserts and a grease fitting (small brass bump on the side) too keep them smooth. I can now begin the cutting and threading now that the Box is out of the shop and on it's way to live in VA with my daughter. I have pushed a new project into the shop tho, I'm addicted to cars and will always have 3-4 projects ongoing....

My car interests know no bounds!!!
__________________
______
Jon
1966 912, 1976 911
1986 944, 2000 Boxster
Last edited by jcslocum; 03-28-2016 at 07:16 AM.
|
|
|
|
|
03-28-2016, 08:24 PM
|
#26
|
|
Registered User
Join Date: May 2015
Location: Greater Seattle, WA
Posts: 534
|
Thanks for the feedback and encouragement, guys!
I took it for a test drive and found an immediately noticeable improvement to shifting, and joy of shifting. Although still not completely perfect, it makes it noticeably more enjoyable to shift, especially on any gear change that involves lateral movement.
I'd say subjectively, this change removed 33% of the lateral movement play at the knob. Another 33% improvement I think I can remove by fixing some remaining play I still know about and haven't fixed yet in the shift console mechanism, and I think the last 33% if it could be removed at all, would be inside the transmission itself (so I will live with that, and not expect to remove that last bit.)
I've already removed quite a bit of play in the original shift console by freshening the shift console to a low-miles, 997 version with basically zero-play gt3 aluminum bushings, so this is definitely all going in the right direction.
I made a video showing the zero "contraption" play:
trim.27F274F5-B282-4608-8093-0279573704D5.MOV - Video - VideoSprout
I bought a couple 10mm all-metal ball socket joints, and tried sticking those on the factory ~10mm ball studs, but found them to relatively sloppy fit (perhaps with 0.005" or play or so) compared to the factory plastic ballsockets which had no noticeable play, it seemed like a step backwards. (check out the video... You can see that the tiniest movement at the shift cable is now being immediately translated through the contraption to rotational movement at the transmission input shaft.)
And also, attached is a different view I took of the contraption. This shows after being cleaned up and reassembled. There was a bit of motor oil (or perhaps tranny fluid) on the transmission input shaft and connecting bracket, which I cleaned up, and which I initially was concerned about possibly could have degraded the rubber around the ballsockets, but after inspecting them all (three of the four by removing them and cleaning them up in the process) I think they are all fine and are not contributing any play on my particular transmission.
As far as I could tell, front-back movement was being translated relatively immediately (through the single, rubber-isolated balljoint fitting) to in-out movement of at the transmission input shaft.
__________________
2001 Boxster
Last edited by jakeru; 03-28-2016 at 09:16 PM.
|
|
|
|
|
03-28-2016, 09:06 PM
|
#27
|
|
Registered User
Join Date: May 2015
Location: Greater Seattle, WA
Posts: 534
|
Quote:
Originally Posted by jcslocum

What did you do to replace the bushing?? I would like to improve this spot too.
|
This is a good question, and kind of hard for me to explain, but I will try. The bronze bushing was at least somewhat malleable, having been formed into a "c"-shape, apparently during manufacturing, from flat stock. It also had one end flattened out into a thrust surface. The way it was undersized (by design or worn, who knows), it was both too large in its inner diameter, and too thin on the thrust surface.
So I tried fixing both of those issues, I think with success. First, I pressed out the bronze bushing using a socket that fit fairly tightly. Tapped it out with a hammer. Then, I basically axially compressed the bushing, carefully, in the vice. This did I think 2 things: 1. It rolled into a "mushroom" shape the thrust surface, making more thickness than it needed to be. 2. It also seemed to have compressed the walls, thereby thickening them.
After I reinstalled the "squashed" bushing (by basically pressing it back into the bore with the vice), initially the pivot shaft was a very tight fit - so tight that I think I had to press it in using the vice also - and I found when doing so, it even shaved off some bronze material on the ID near the thrust bearing end! Eventually after working it for a while, and installing it backwards (it seems to have a slight bit of taper, so this helped) the ID of the bushing wore into what I considered near-ideal tolerances. To fine-tune the thrust surface thickness, I got it very close just by using the vice to press the mushroomed thrust surface flatter (with the pivot shaft while pressing with the vice).
Eventually I managed getting the e-clip in, but was tight. A bit more thrust surface vice-press flattening, I could get the e-clip on and it was only a little bit tight. At that point, I just worked it rotationally to try to break the thrust surface in, by wearing them without any lubrication, to perfection. (The mating pieces were relatively hard stainless steel, so I wasn't worried too much about them wearing down.). Noticing where the bright spots were where the thrust surface was making contact, I did a bit of sanding (400 grit initially) on the bright spots to help the thrust surface to develop the desired flatness and dimension. I believe this operation is called 'hand scraping' a bearing. Eventually I got it such that, although gravity wouldn't move the bellcrank by itself, a very (I thought acceptably) small amount of rotational torque would, and I called it good at this point. At some point I also added grease, of course. I expect it may wear in a bit further and the small amount of friction that is there may decrease or perhaps eventually even completely go away. Luckily, it's not too much friction to impede the shifting process - it works great and the spring that returns the shift knob to the center gate easily enough overcoming all friction during 2-3 and 5-4 shift motions. (The 2-3 gate movement, if it doesn't work correctly, can easily cause a very expensive "money 2-1 shift"! So don't rush getting enough friction out of this critical system before calling it good. But at the same time, don't rush to remove the friction too quickly or you can overshoot, and have the slop back in there that you wanted eliminated.
PS - attached picture shows the heat shield which the "contraption" is behind. Two 10mm nuts removes this heat shield, and you don't even need to jack up the car to do this job. 
Another tip I've learned is to be careful when prying off the ballsockets! Lots of force is required (when dry at least - before getting some grease in there) and if using a pry tool, it's possible to scar up the ball studs if you're not careful. Don't let a metal pry tool touch the ballstuds. And if you scar up the bearing surfaces, sand or file them smooth before reassembling.
__________________
2001 Boxster
Last edited by jakeru; 03-28-2016 at 09:45 PM.
|
|
|
|
|
03-29-2016, 05:32 AM
|
#28
|
|
Project Addicted
Join Date: Aug 2015
Location: Eastern Shore, MD
Posts: 623
|
Did you by chance make a measurement of the hole and pin?? as well as the shoulder?
You don't mention them....
__________________
______
Jon
1966 912, 1976 911
1986 944, 2000 Boxster
|
|
|
|
|
03-29-2016, 09:16 AM
|
#29
|
|
Registered User
Join Date: May 2015
Location: Greater Seattle, WA
Posts: 534
|
Sorry; I didn't get those measurements. My battery powered calipers were out of batteries.
__________________
2001 Boxster
|
|
|
|
|
04-05-2016, 12:11 PM
|
#30
|
|
Registered User
Join Date: May 2015
Location: Greater Seattle, WA
Posts: 534
|
After driving around with the optimized "contraption" for a bit over a week now (with a couple road trips), I've got to say the increased satisfaction of shifts is still there, just like I just did the job yesterday! The wife also immediately noticed and commented on it after her first drive after I did the work - so I highly recommend other manual-transmission boxster owners who want joyful driving have this "contraption slop" tested, and consider eliminating it.
__________________
2001 Boxster
Last edited by jakeru; 04-05-2016 at 12:13 PM.
|
|
|
|
|
04-05-2016, 02:15 PM
|
#31
|
|
Ben-Auto-Design
Join Date: Oct 2014
Location: French Riviera
Posts: 827
|
Interesting!
This is something I need to do!
The heim joints solution looks good too! Just need to protect them, they will wear quite fast if you don't :/
__________________
ASE certified Automotive Master Technician.
Porsche Tech in France.
www.benautodesign.fr
Ben-Auto-Design : Performance parts for 9X6 / 9X7
1982 928 S Euro
|
|
|
|
|
05-24-2021, 06:40 PM
|
#32
|
|
Registered User
Join Date: May 2021
Location: GA
Posts: 3
|
Quote:
Originally Posted by jakeru
I tore into my shift linkage "contraption" yesterday. (It was easily accessible from the rear of the car after removing a heat shield). Although I didn't find the loose-fitting ball stud that jcslocum showed in his video, I did find some "racking" play in the bellcrank pivot bushing. (You can also see this play in jcslocum's video if you look closely.)
I removed the contraption from the car and disassembled it, and found an undersized bronze bushing and/or worn components in the bellcrank pivot were causing the play. (Also, I noticed that any original grease that must have been there was long gone, and all that might have once been grease there was now dry and crumbly.)
After refurbishing the bushing and regreasing it, all of its play has been removed, and it should operate well.
|
*987.1 5-speed*. After alot of unhappiness with shifter play and lack of precision, I too tracked the problem down to this selector-bracket "contraption". The ball joints were fine, so i took it apart and found the inner bushing diameter allowed too much play for the pivot shaft. My solution was to lightly grease then *wrap a small piece of aluminum foil around the pivot shaft*, this eliminated all play between the shaft and bushing. Perfect! I greased everything up with marine grease and put it back together. The selector bracket now works smoothly with no end-play or loosness.
The foil was simply cut to the length of the shaft and cut to one circumference of wrap.
I also cleaned and lubed the cable ends and selector rod ends. 4 ends all together. My shifter is back to original operating crispness and precision.
Next step is to rebuild the shifter console with the Function-First Shift Right kit. At that point the whole thing will be better than new.
Anyone looking to restore precision and crispness their 986/987 shift should start with this bracket first.
Porsche sell an update bracket for over $350. I just updated mine for free.
Last edited by watsongrg; 05-24-2021 at 06:57 PM.
|
|
|
|
|
05-27-2021, 07:53 PM
|
#33
|
|
Registered User
Join Date: Oct 2020
Location: KY
Posts: 1,213
|
Quote:
Originally Posted by watsongrg
Next step is to rebuild the shifter console with the Function-First Shift Right kit. At that point the whole thing will be better than new.
Anyone looking to restore precision and crispness their 986/987 shift should start with this bracket first.
Porsche sell an update bracket for over $350. I just updated mine for free.
|
Before you go and spend$300 on that kit, look at the short shift kits on Amazon. They don't include the new horizontal actuator arm, but the kits are surprisingly high quality and make an unbelievable difference in shifter feel. Buy one labeled prime and just return it off your not happy with it.
Sent from my POCOPHONE F1 using Tapatalk
__________________
2000 Box Base, Renegade Stage 1 performance mods complete, more to come
When the owners manual says that the laws of physics can't be broken by this car, I took it as a challenge...
|
|
|
|
|
06-06-2022, 10:18 AM
|
#34
|
|
Registered User
Join Date: Oct 2020
Location: Wisconsin
Posts: 28
|
So, bumping this because I have the same issue well documented already here. I swapped for a short shifter but it didnt make much of any differenceit seems that most of the side to side slop in my 987 is courtesy of racking movement at the linkage pivot shaft as discussed by jakeru and watsongrg.
I tried the aluminum foil trick and it didnt do that much for me. I think Im going to try thicker stainless shim stock and see if that makes a difference, or pressing out the bearing.
|
|
|
|
 Posting Rules
|
You may not post new threads
You may not post replies
You may not post attachments
You may not edit your posts
HTML code is On
|
|
|
All times are GMT -8. The time now is 07:49 AM.
| |


 Linear Mode


