NOTE: I did this with the AOS out, which I was replacing at the same time. This may have made accessing some of the hoses in the engine bay a little easier.
Materials:
- Porsche OEM coolant tank PN 996-106-147-08
- oil filler tube (middle section) PN 996-107-254-03
- coolant level sensor PN 997-641-503-00
There are cheaper materials than Porsche available. I stayed with Porsche to (hopefully) reduce my chances of having to do this again any time soon, since it's such a pain. I also replaced the oil filler tube and level sensor at the same time. The tube is a well known failure problem. All to minimize my chances of having to do it again.
This job was much easier with an assistant. Most of my access to the engine bay was from between the trunk lid and the clamshell (in the service position, of course). Make sure you have towels or something to protect the paint.
Remote clamp pliers are essential IMHO, as are 45 degree needle nose pliers. Push the cable grommet into the engine compartment to get it out of the way of accessing the clamps on the engine side of the (stupid, cheap, plastic) nipple manifold.
Pull the carpet etc, disconnect the coolant sensor connector, remove the four retaining bolts / nuts, remove the stuff on the top of the tank, pull out the oil dipstick tube (release the 2 little tabs).
Hose #1: the one attaching to the tank itself in the engine compartment. It's the one furthest to the right (passenger side). The tank connects to a hose which in turn connects to hard piping in the engine compartment. Attach the remote clamp pliers to the clamp on the hose to the hard piping. You can see it using the access I describe above. It doesn't hurt to have the assistant work the plier handgrip while you're fiddling with the business end and holding a light.
Now you can pull the tank into the trunk a bit so you can see Hoses 2, 3 and 4 on the left side. Using the 45 pliers release the two clamps on the top (#2) and middle hose (#3).
Disconnect the oil filler tube (Hose #5) at the middle of the engine. It will come out with the tank. Much easier.
Pull Hose 2 - 4 off the manifold from the engine side. Then hang on to the hard piping for Hose 1 as the assistant pulls on tank. The last hose should slide off the hard piping as the tank moves back.
The tank is now out, with the oil filler tube and one short hose section still attached to the engine compartment side.
Drill out the hole in the new tank for the oil dipstick. Carefully remove debris. Transfer the hoses and oil filler / manifold to the new tank.
IMPORTANT: When re-attaching Hose #1 to the tank, if the clamp is to be re-used, make sure the clamp ears are rotated so that they're facing Hose 3. I made the mistake of leaving them facing out; the hole in the wall isn't big enough to let them pass by. I had the tank 95% in and had to pull the whole mess out again just to rotate the clamp. #$&*!
Assembly is just the reverse of taking it out. For the clamps on Hoses 2 and 3, for a person working alone it's probably easier to replace them with the screw-on band style clamp. In my case, with an assistant, she used the 45 pliers to release the pressure of the clamps so I could wiggle the hoses onto the manifold nipples. I used a small mirror to make sure the hoses were up against the manifold and the clamps were in the right place.
If accessing Hoses 2-4 is too difficult from the engine bay, another way I could see of possibly doing it is by using long 45 needle nose thru the wire loom grommet hole. That could possibly be used to pull off / on the hoses.
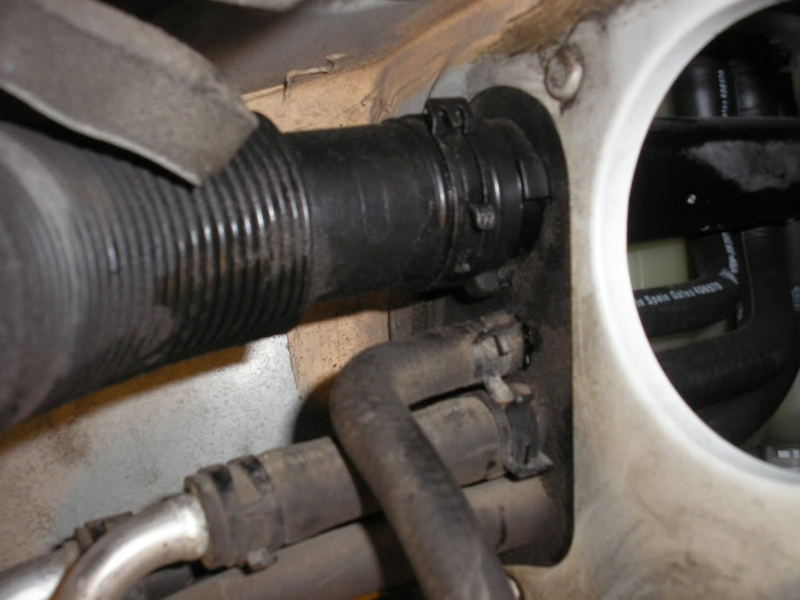
The best reference pic I've come across is below (thanks Paul), where the engine was likely out of the car; the main wire loom and grommet are missing, as the big hole on the right is empty. It shows the hoses on the back side of the nipple manifold. This is looking horizontally to the rear passenger corner. The oil filler tube is on top, Hoses 2, 3, 4 below it. Behind Hoses 2-4 is Hose #1; in the bottom left hand corner of the pic you can see where the hose and hard piping will be pulled apart, once the clamp has been released.