Boy do I do not want to do that again
although with the experience gained I could do it relatively quickly and easily.
Tools I used for the spring clips.
Long reach hose clamp pliers - essential and mentioned in all the videos
Regular hose clamp pliers
I also had long needle nose pliers in straight, 45 degree angle and 90 degree angle versions. I used them all.
As always I relied on posts by others to do this. There are many posts and various ways to do the job. Here are some of the resources that I found helpful.
DavidsBoxster posted this
http://986forum.com/forums/diy-project-guides/56334-diy-coolant-tank-replacement-under-2-hours.html
I dont know about the 2 hours

but this thread shows how to cut the old tank off to get more room for removing the hoses from the trunk side.
This is a very good video which gives you a good visual idea of the parts and operations involved.
https://www.youtube.com/watch?v=4ZtFxmF5YyI&list=RDCMUCCE73pPBUhHcqmgJa-NK4TA&start_radio=1
Vintage Steel Garage in this video left all the hoses on the manifold that bolts to the firewall, disconnecting them at the engine end
which has some advantages because the further you are from the firewall the easier the access is. He also spends half of the video showing how to put the top in the service position and removing the carpeting and covers necessary to get at the engine bay.
https://www.youtube.com/watch?v=GFNlXAs20mU
I have arbitrarily named the various hoses as follows to help understand what I am referring to.
Manifold - the plastic piece that bolts to the firewall that has 3 hoses attached each side as well as the oil filler plumbing.
Oil filler tube - the rigid tube in the trunk that attaches to the reservoir.
Oil filler hose - the large semi-rigid hose in the engine compartment with an accordion bend in it.
Hose A - the top hose on the manifold, this goes to the quick connector in the engine compartment
Hose B - the middle hose on the manifold goes to a metal tube in the engine compartment
Hose C - the bottom hose on the manifold, this is the exit hose for liquid spilled into the top of the reservoir around the oil and coolant fillers.
Hose D - the hose connected to the fitting on the reservoir itself. It passes through the hole in the firewall on the lower right as seen from the trunk goes to a metal tube in the engine compartment
I was originally going to describe how I did the replacement, but am rather going to suggest how I should have done it. I had to go back and repeat several steps when the assembly ran into snags.
-Remove the big oil filler hose in the engine bay end to get a bit of free play and disconnect the quick connector on the hose A just below the oil filler hose.
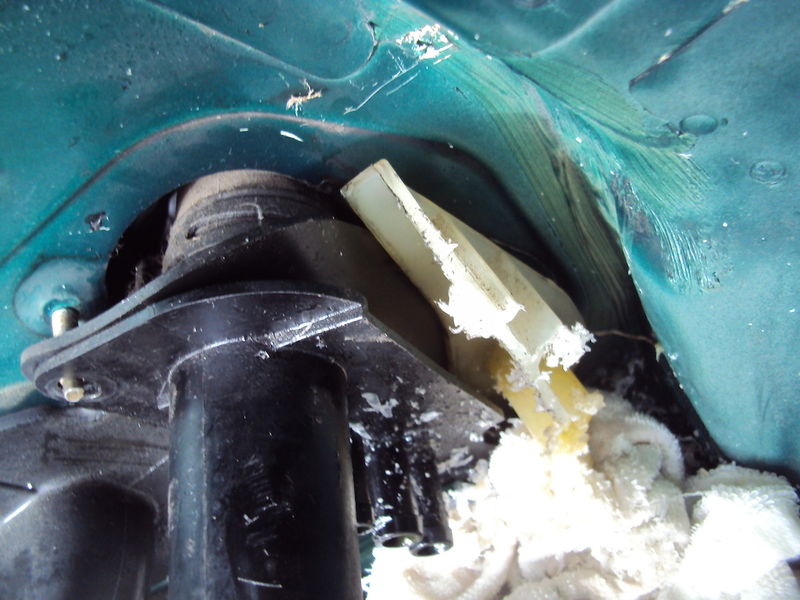
-Saw the old tank as DavidsBoxster suggests. I did this with the oil filler tube still attached to the reservoir but would have had more access if I had removed the tube before. See note below for how to remove the oil filler tube from the reservoir.
- At this point I could pull the manifold out far enough to get at the spring clips for the the oil filler tube and the hoses A and B (the bottom hose is just a slip on fit).
- I had planned to disconnect the hose D that attaches directly to the reservoir (bottom right when viewed from the trunk) in the engine compartment, but the spring clip was installed in a position where it was impossible to get a tool on it. Happily with the tank cut off and removed the spring clip on the firewall end is accessible. With the manifold and the remaining bit of the reservoir removed I was able to access the spring clip on the engine end of that short hose and remove the hose.
So my suggestions for removal
Oil filler hose - remove on the engine end.
Hose A - remove the quick connector in the engine compartment
Hose B - remove from the trunk after pulling the manifold back
Hose C - leave on the manifold
Hose D - disconnect on the engine end if the clamp is accessible, mine wasnt so I removed it from the trunk after pulling the manifold back
Remove the manifold.
Note how the reservoir, the manifold and the gasket are assembled for later. The rubber gasket goes against the firewall, the flange of the reservoir goes between the gasket and the manifold. You can see this in the above photo.
Next transfer the hoses and the oil filler tube from the old reservoir to the new one.
Note - if you have a dipstick make sure the hole is there to clip it into the top of the reservoir. New tanks come with the hole blanked out. A one inch drill is just right.
At this point you can inspect the oil filler hose for cracks. It can be maneuvered out with a bit of imagination.
For the reinstallation
- install hose A on the manifold with the spring clip in place
- install hose B on its pipe in the engine compartment with the spring clip in place. on the trunk end make sure that the spring clip is pushed back with tabs aligned to the left so you have access to them
- install hose C on the manifold
- install hose D on the reservoir fitting the spring clip in place. Place the spring clip for the front end of the tube so you have access once it is slipped onto the pipe in the engine compartment
normal with the taps vertically to on the side away from the oil filler hose.
- place the oil filler hose so it is sticking through the hole into the trunk with the spring clip tabs at the top
- make sure the coolant level sensor is inserted in the bottom of the tank before it is installed, you cant do it later. It has a tendency to fall out so I duct taped it in place with a piece of foam under it to protect the connector.
- feed the hoses through the hole, checking in the engine compartment to be sure they are going to their allotted positions, especially the hose D.
- attach the oil filler hose with its spring clip on the manifold
- attach hose B to the manifold with its spring clip. I had problems getting the tube all the way onto its fitting on the manifold, if you attach the manifold to the firewall with the 2 nuts that should force the tube all the way on
then remove the nuts, pull the manifold forward and install the spring clip.
- in the engine compartment install the spring clip in place on the hose D
- connect the quick connect for hose A and connect the oil filler hose.
Install the 2 nuts and 2 bolts and the wire connector for the coolant level sensor and you should be ready to refill the reservoir.
Some notes to take into account during this operation
I didnt see how to remove the rigid L shaped oil filler tube from the coolant reservoir, but found that there is a black washer-like nut you get to by removing the yellow oil filler cap. Unscrew this and the tube can be pulled down and out of the reservoir. Remove the 2 nuts that hold the manifold end (where the 3 hoses attach) to the firewall to have some wiggle room. Doing this contributes to having better access.
As shown in the Vintage Steel Garage video all the hoses can be disconnected at the engine end and pulled out towards the trunk.
I hope I got all this straight, I am writing it the next day so getting a hose or 2 mixed up is a possibility.


 Boxster


 Threaded Mode


