 10-07-2010, 05:11 AM
|
#1
|
|
Registered User
Join Date: Sep 2004
Location: Atlanta
Posts: 1,820
|
DIY: Setting Cam Timing on M96
this applies to non-variocam plus M96 motors (basically, the early ones)
straightforward & easy; no need for any funky tools.
to do this right, you'll need a couple of spare parts:
(3) green camshaft plugs (996.104.215.54)
(8) microencapsulated bolts (900.385.275.01)
(2) o-rings (996.107.221.51)
(1) tube of green loctite
first, we need to explain some things. top dead center (TDC) occurs when a piston is at its uppermost position within the cylinder. it's the point at which the piston stops travelling up and begins travelling down. the tricky part is that TDC occurs TWICE during an engine's 4 cycles. the first time is on the compression stroke & the second time is on the exhaust stroke.
per the factory shop manual, we want to be at TDC compression when we time bank 1 (cylinders 1-3) and TDC exhaust when we time bank 2 (cylinders 4-6).
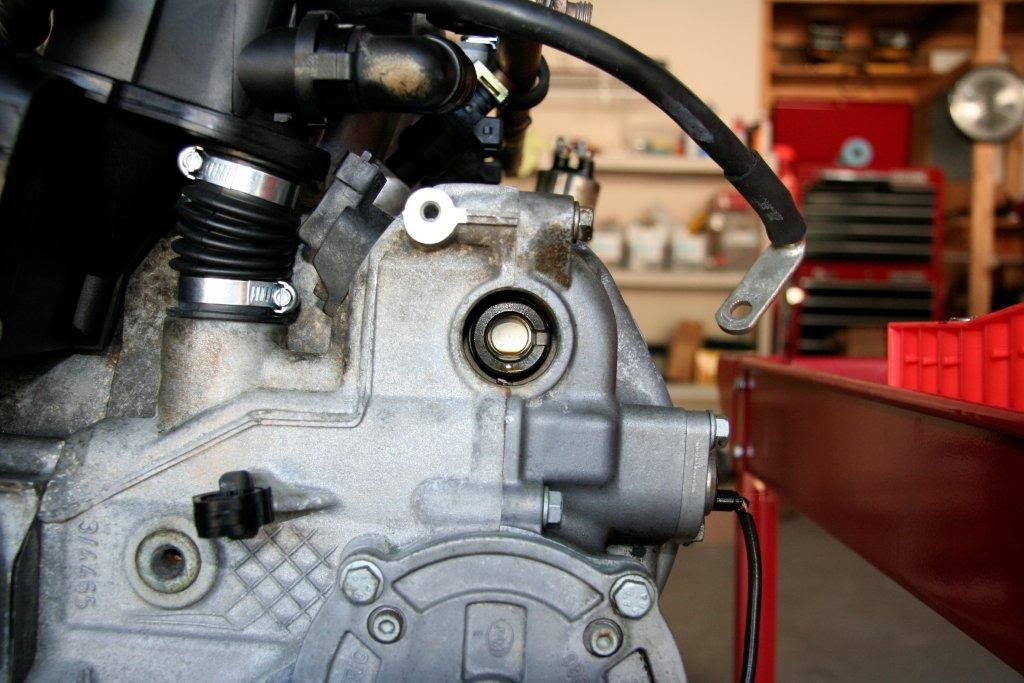
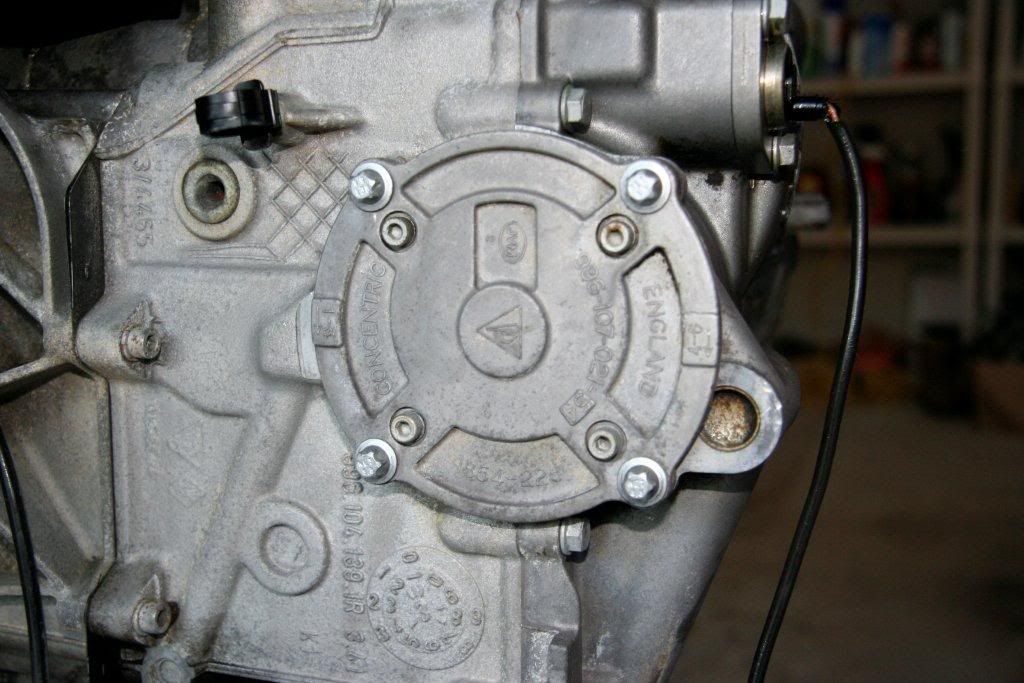
first things first. in the picture below, we're looking at the front of the engine. if the engine were in the car, we'd be looking back through the firewall toward the rear of the vehicle. bank 1 is on the left and bank 2 is on the right.
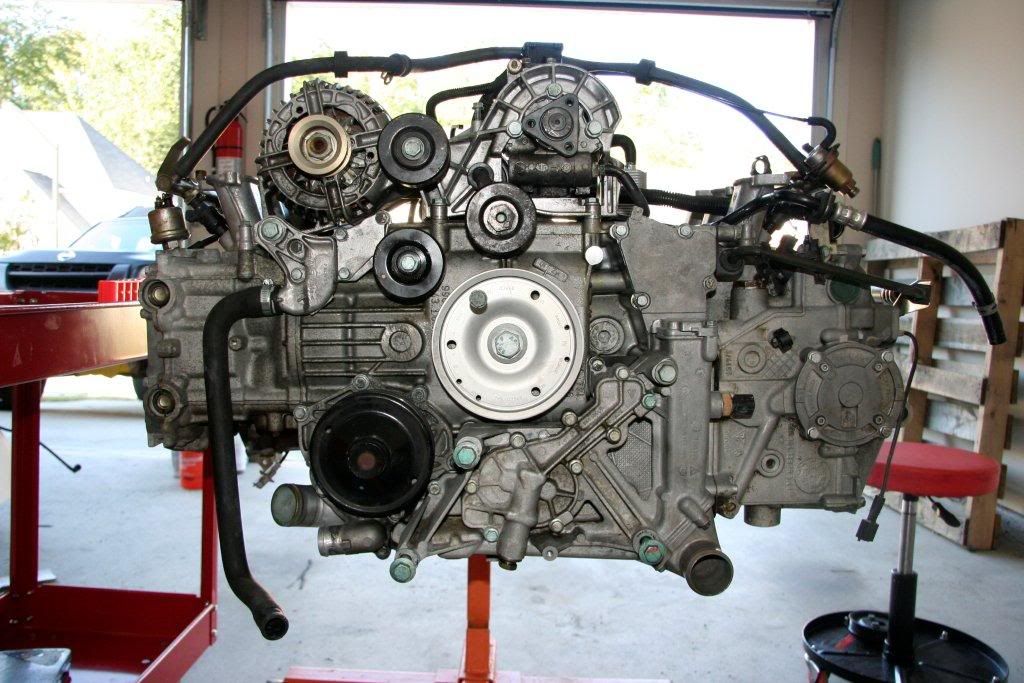
now we need to remove three of the little green camshaft plugs from the motor. there are six total cam plugs in the motor. in the photo above, you would normally see three. there would be three on the other side as well. they're already removed in this photo.
on the left side would be two plugs. remove the bottom one. on the other side of the motor on the other head, remove the bottom one. on the flywheel side of bank 1, there is only one plug. remove it.
what we've done is to remove the cover for the timing side of the exhaust cams and the index side of the intake cams. more on this in a minute.
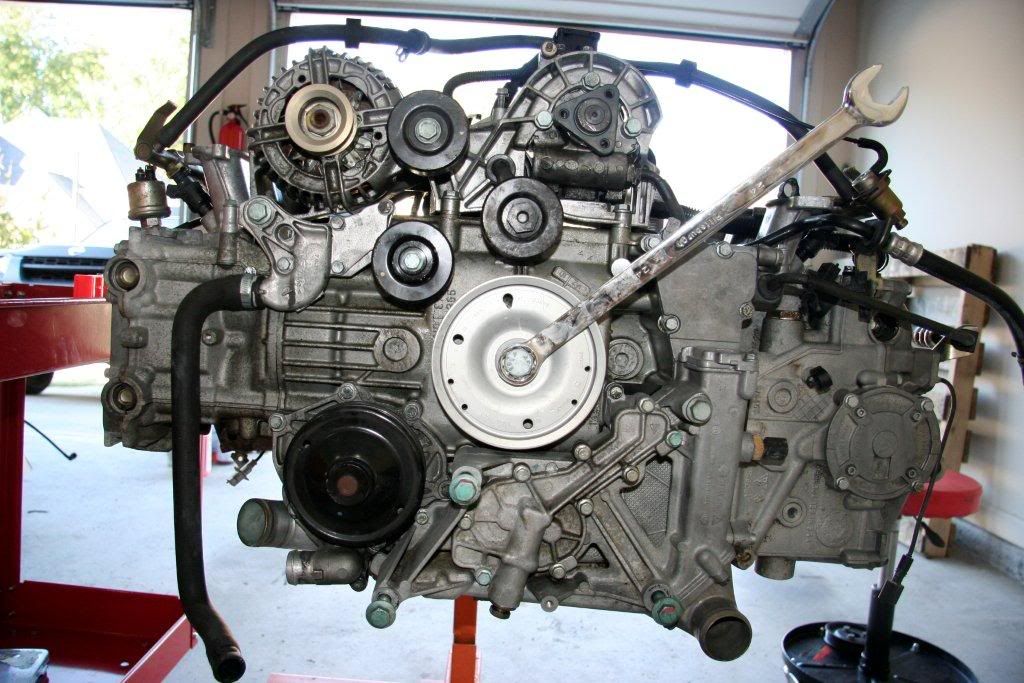
now, put a 24mm wrench on the crank pulley and rotate the engine CLOCKWISE until you get close to TDC.
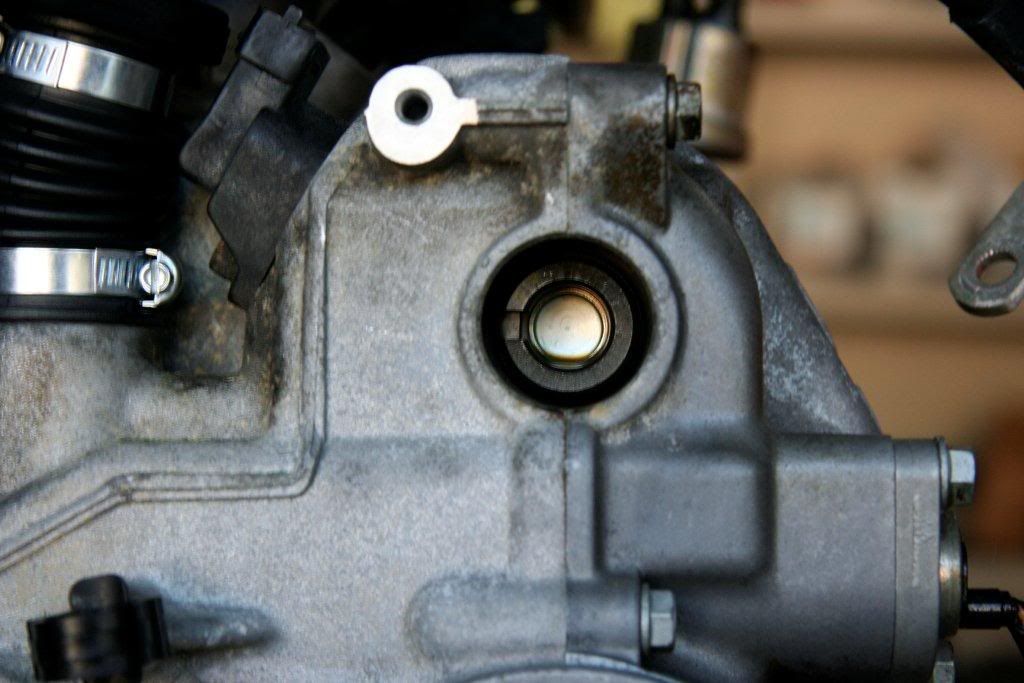
TDC is indicated by a notch on the pully matching a mark on the crankcase as shown in the photo below:
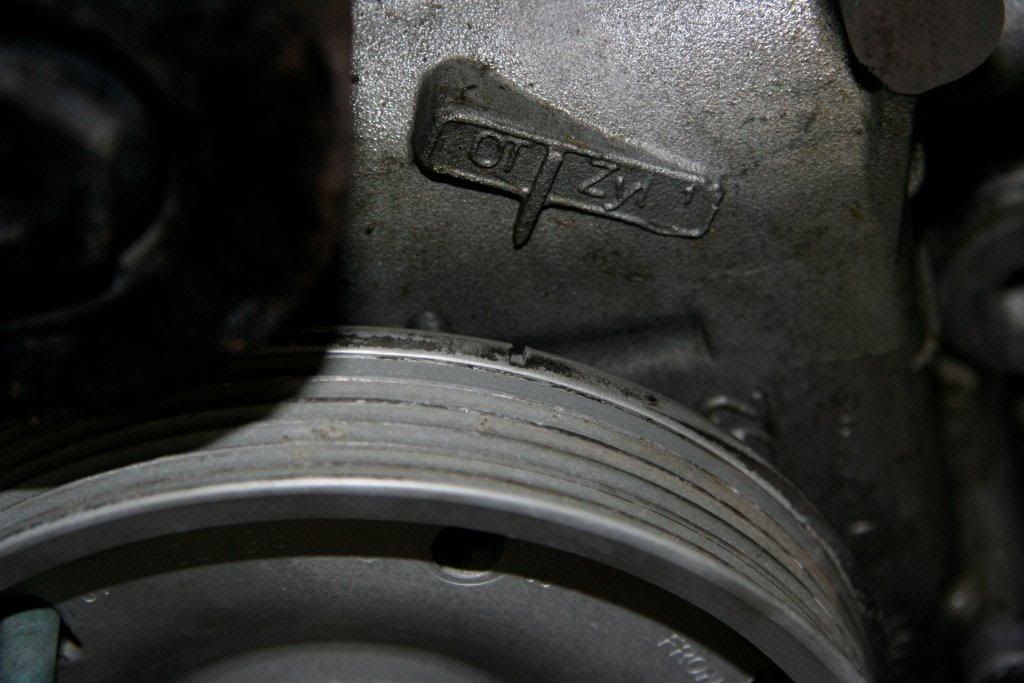
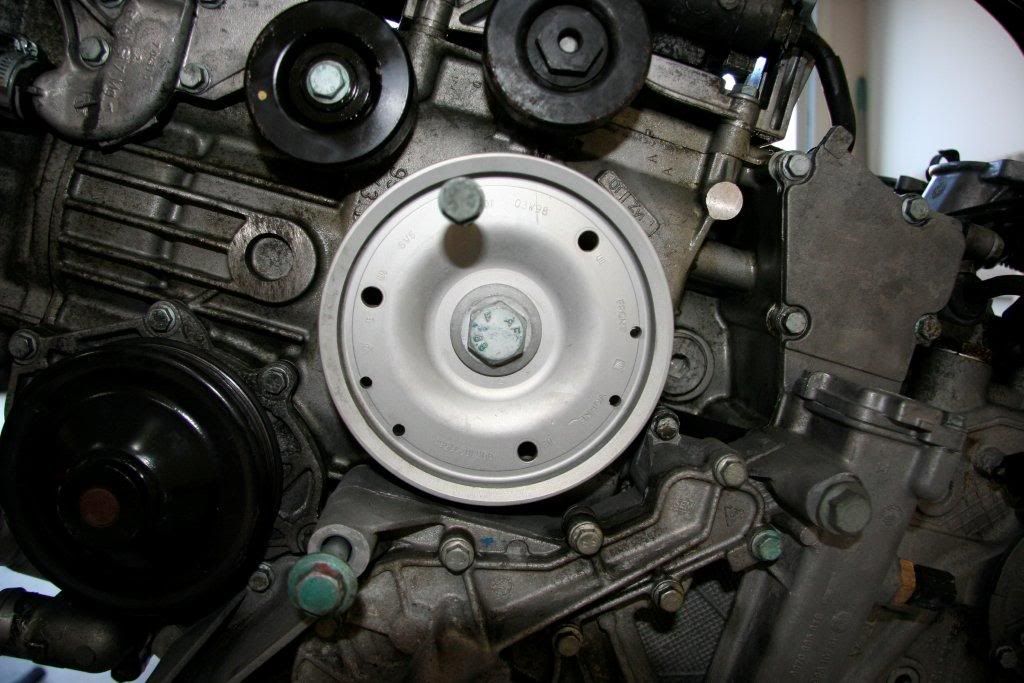
you can 'lock' TDC at the crank by inserting an 8mm bolt through the hole on the pulley marked OT. it will slide into a recepticle on the crankcase as shown in this photo:
now we should have the motor at TDC. we need to make sure we're at TDC compression before we proceed. to do this, look at the notch in the intake cam we uncovered (this will only have ONE notch in it). it should be pointing OUTWARD like this:
if it is pointing inward, rotate the motor 360 degrees to TDC again. now the notch will be pointing outward.
now we will check / set the timing on Bank 1. look at the end of the exhaust cam on bank 1. if the engine is timed properly, the notches will be straight up and down; perfectly parallel to the seam between the head & the valve cover:
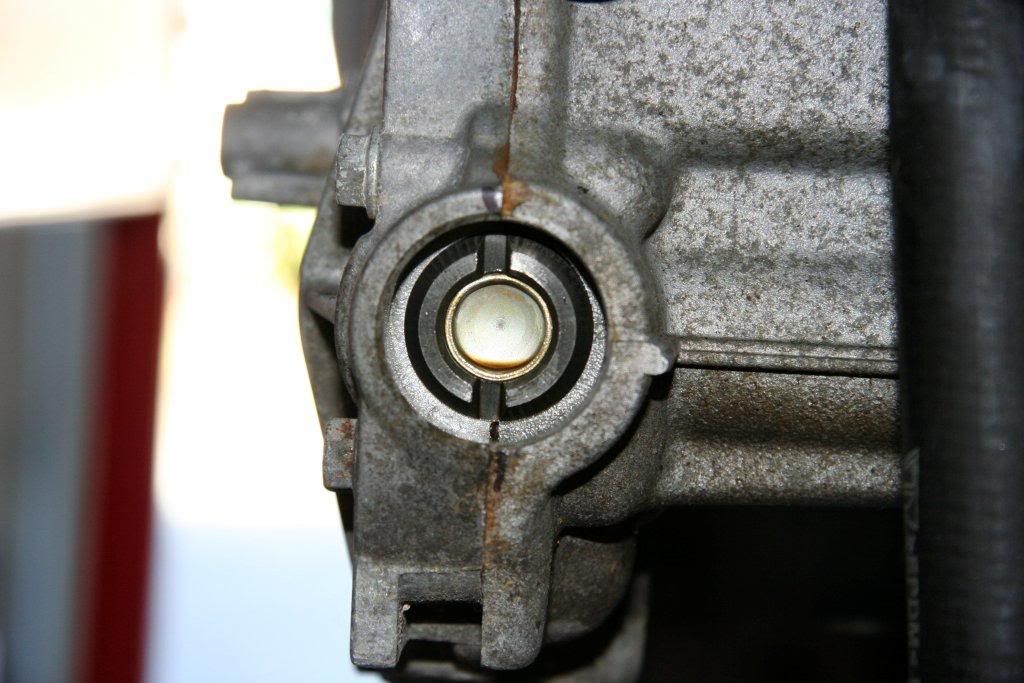
if your timing is off, the notches won't line up; they'll look like this:
|

|

|
|
10-07-2010, 05:21 AM
|
#2
|
|
Registered User
Join Date: Sep 2004
Location: Atlanta
Posts: 1,820
|
if your timing is off, now we need to set it. rotate the engine about 1.5 full rotations. as you approach TDC on the second rotation, check the timing marks. keep rotating the engine until the notches on the bank 1 camshaft are perfectly aligned with the head. once you're there, verify you're at TDC compression by looking at the single notch on the intake cam. it should be pointing OUTWARD.
once your timing marks are lined up & you've verified TDC compression, it's time to change the timing.
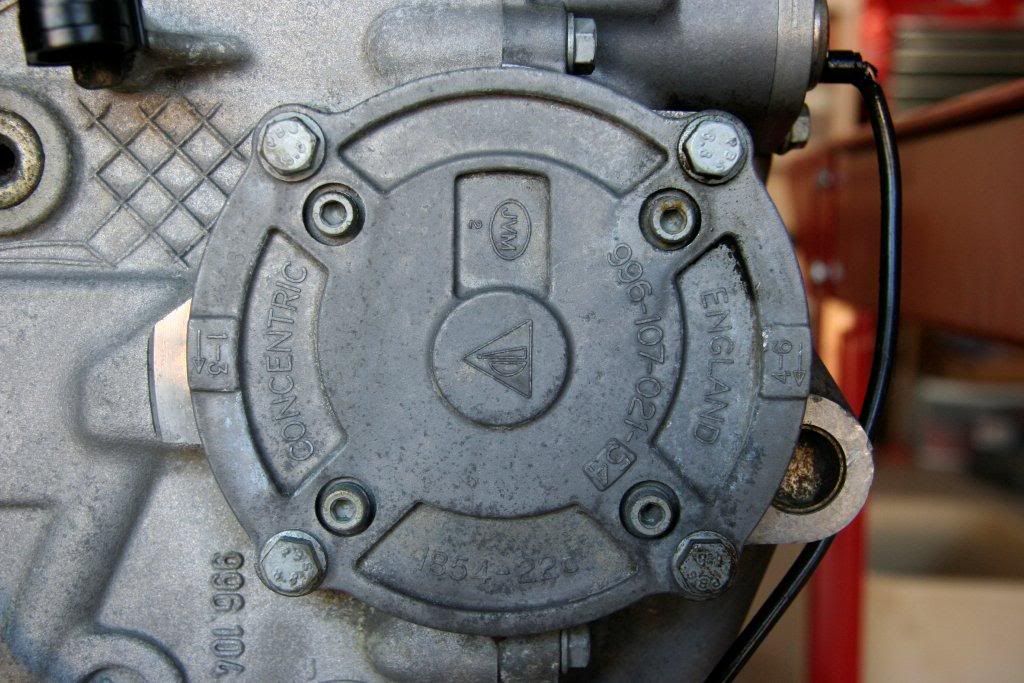
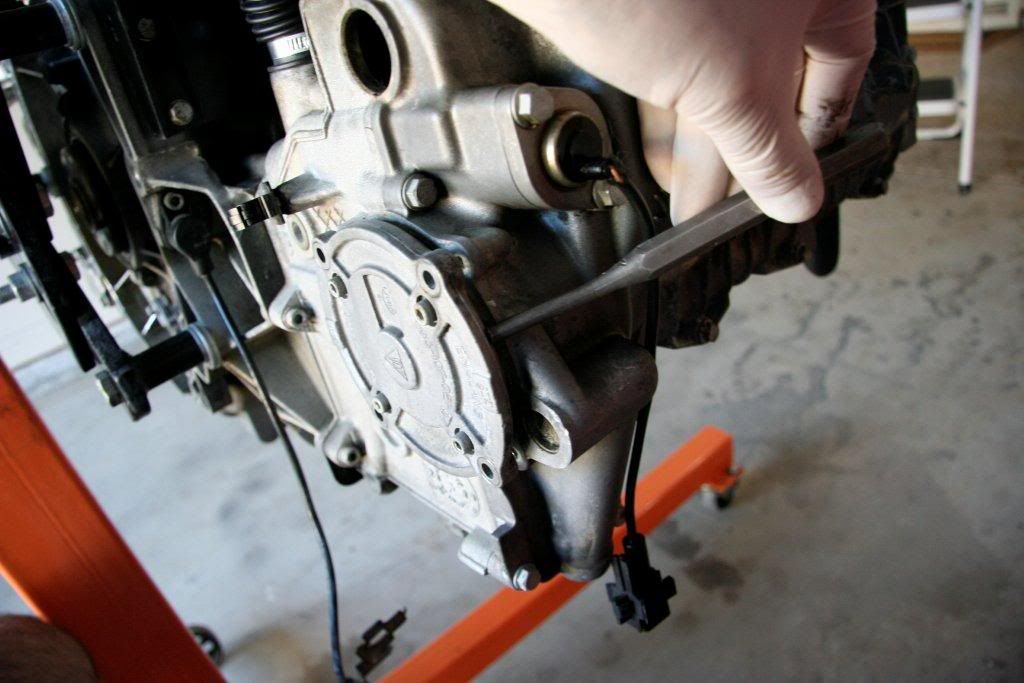
on the back of bank 1, put a match mark onto the oil scavenge pump (THIS IS IMPORTANT). remove the 10mm bolts and gently tap out the scavenge pump.
scavenge pump:
match mark:
tap it out:
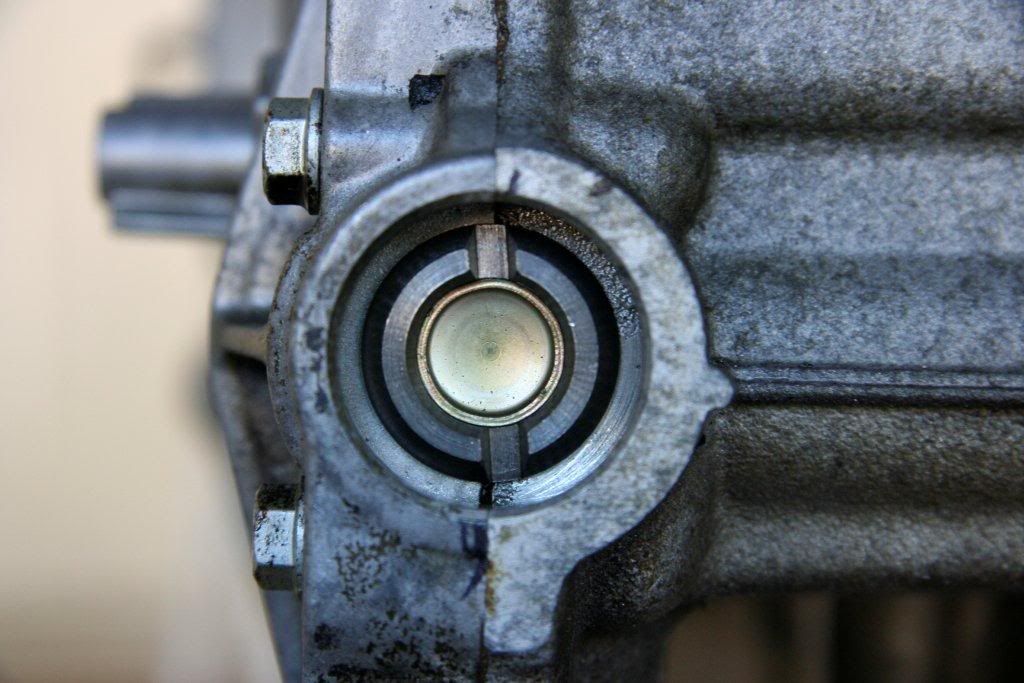
now what you should see is this:
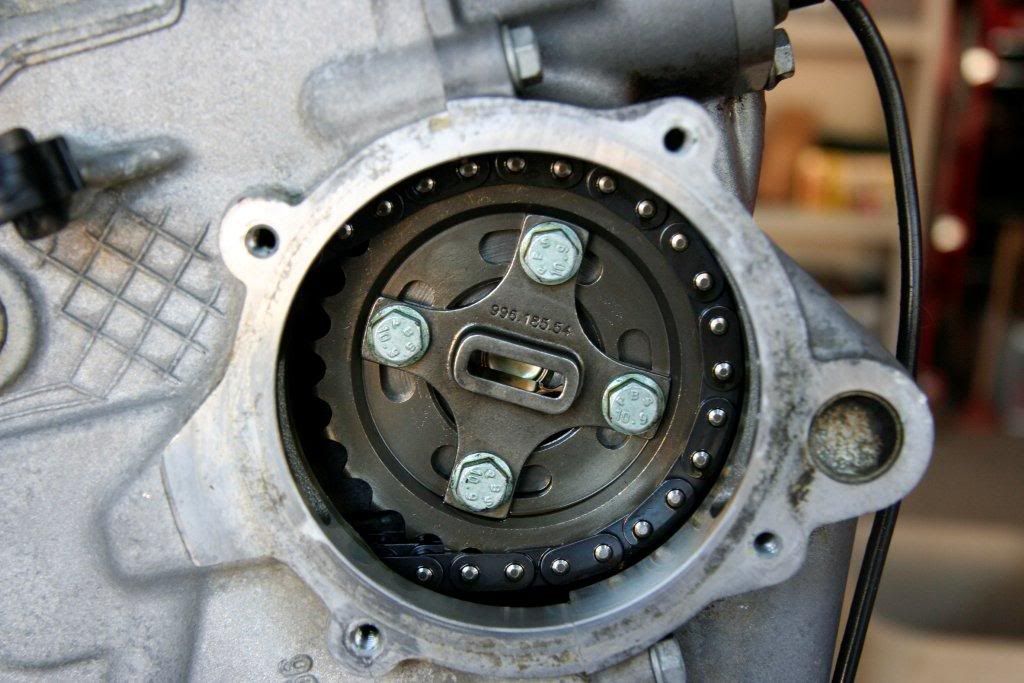
this is the camshaft sprocket. it is adjustable. loosening the four bolts will decouple the camshafts from the crankshaft, allowing you to alter the timing. LOOSEN, but don't remove, the four bolts. rotate the crankshaft to TDC (it's ok if you rotate the motor a tad backward). tighten the four bolts & check the timing notches on the bank 1 camshaft. if you are:
1) at TDC compression (intake cam index notch facing OUTWARD)
2) your bank 1 timing notches are lined up with the head
you have timed bank 1. don't re-install the scavenge pump yet; we'll get there.
now we need to time bank 2. to do this, we need to be at TDC exhaust. rotate the crank ALMOST one full rotation. as you finish the rotation, check the bank 2 timing notches. we want to get them perfectly lined up.
once they're lined up, verify we're near TDC EXHAUST. look at the end of the intake cam, the notch should point INWARD like this:
once you've verified this & bank 2's camshaft is lined up properly, put TWO (this is important) match marks on the bank 2 scavenge pump. we do this because we don't want to get the scavenge pumps mixed up. it's possible to install them upside down & they won't work. by placing two match marks on bank 2's scavenge pump, we can both line it up AND identify which bank it goes into just in case we get confused.....
now, pull the bank 2 scavenge pump and LOOSEN the sprocket bolts. rotate the engine to TDC and tighten the bolts.
now rotate the engine three full rotations to TDC and verify cam timing on bank 1. rotate another 360 degrees and verify cam timing on bank 2.
if all is well, we can begin reassemlby.
first, we are going to remove the cam sprocket bolts ONE AT A TIME, apply loctite, and torque to spec (10.5 ft-lb + 10% to account for loctite = 11.5 ft-lb). BE CAREFUL, DO NOT DROP A BOLT INTO THE ENGINE.
once the cam sprockets are installed, replace the scavenge pumps with new o-rings (lube w/ engine oil first!). install new microencapsulated bolts, and torque to spec (8.5 ft-lb).
tap in new green cam covers with a hammer. no need to add sealant.
you are now done! relax & finish reassembly. drive your car.
|
|
|
|
|
10-07-2010, 06:56 AM
|
#3
|
|
Registered User
Join Date: Feb 2005
Location: It's a kind of magic.....
Posts: 6,683
|
Nice write up..............
__________________
Anything really new is invented only in ones youth. Later, one becomes more experienced, more famous and more stupid. - Albert Einstein
|

|
|
|
10-07-2010, 03:11 PM
|
#4
|
|
Registered User
Join Date: Jul 2010
Location: USA
Posts: 276
|
Thanks for the nice write-up Kenvin ......... this should be the standard for DIY threads!
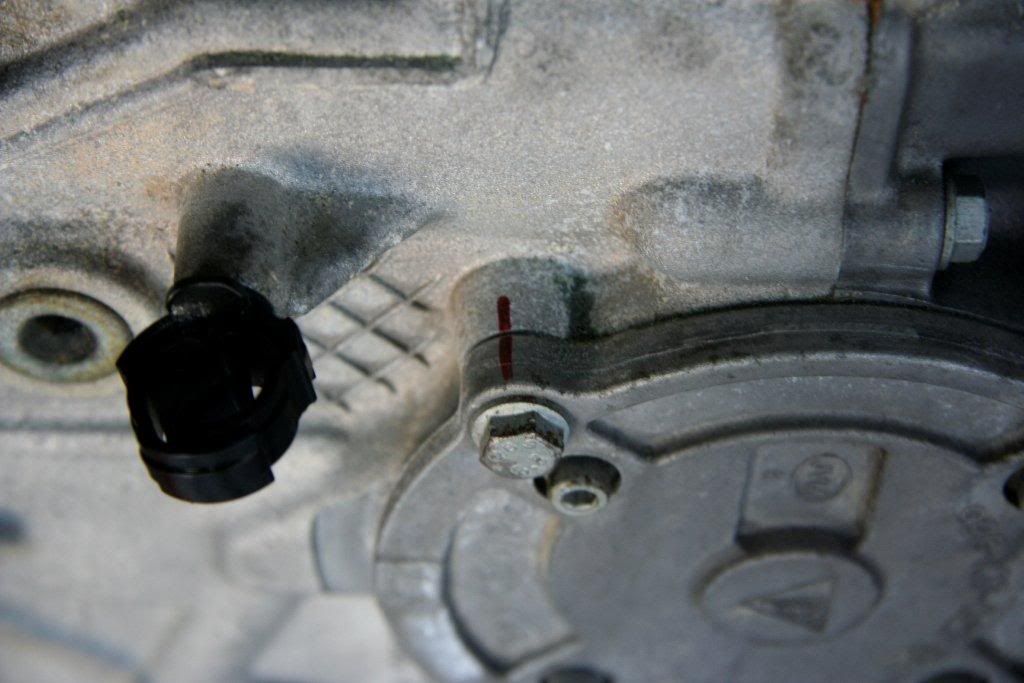
I do have one more question regarding the intake cam notch location.
1.) My pulley is set to top dead center
2.) my exhaust cam notches for bank 1 are lined up parallel to the seam between the head & the valve cover
My question:
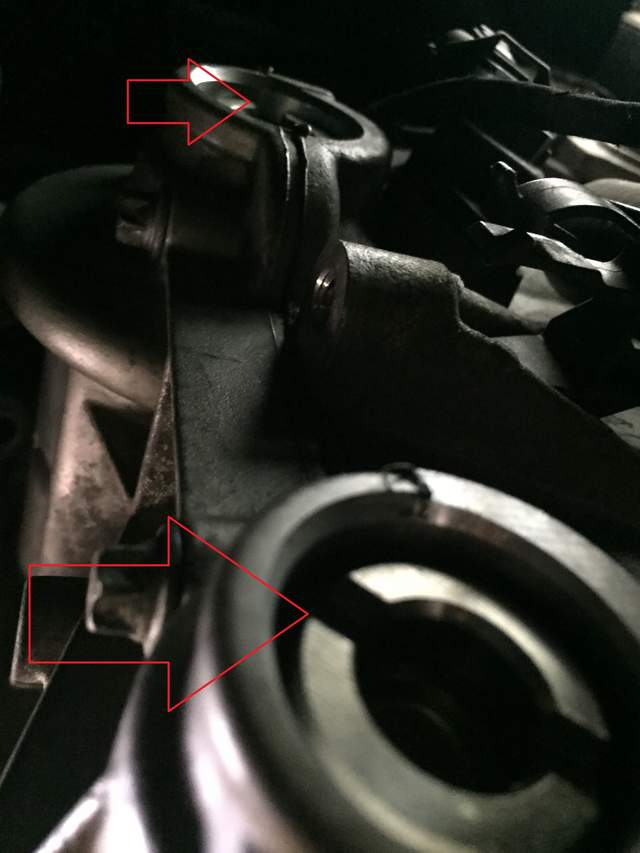
My intake cam notch(one next to air oil separator thing) is pointed too the right but its not perfectly horizontal like to ones in the pics you provided. Mine is sorta at a angle pointed upwards a little. Pic attached of how mine is situated with all other things lined up. Red arrow shows the angle.
Is this normal??
|
|
|
|
|
10-07-2010, 06:09 PM
|
#5
|
|
Registered User
Join Date: Jan 2009
Location: Arvada, CO
Posts: 229
|
Quote:
|
Originally Posted by dirkdiggler
My question:
My intake cam notch(one next to air oil separator thing) is pointed too the right but its not perfectly horizontal like to ones in the pics you provided. Mine is sorta at a angle pointed upwards a little. Pic attached of how mine is situated with all other things lined up. Red arrow shows the angle.
Is this normal??
|
To answer the question as simply as possible, the answer is:
NO!!
If you re-read the write up, you will notice that the most important thing to tell that the timing is correct is to line up that one single notch so that it is perfectly pointing to the right, and then see if the cam-notches are parallel to the engine cases.
That notch is the important one, and you will adjust the other notches to line up with regards to it. When it is pointing perfectly to the right, if everything is fine, then the notches on the cams are lines up. If everything isn't set right, then the two cam notches are not lined up.
Your description means that your cams are out of time.
You need to align them, and honestly, it sounds really, really easy.
BC.
__________________
Its not how fast you go, or how expensive your toys are.
Its all about how big your smile is at the end of the day that truly matters.
'98 Silver Boxster, '08 Ducati 848, '89 Honda Hawk GT, '89 Honda Pacific Coast
Last edited by Bladecutter; 10-07-2010 at 06:12 PM.
|
|
|
|
|
10-07-2010, 06:40 PM
|
#6
|
|
Registered User
Join Date: Jan 2007
Location: Depends on the day of the week....
Posts: 1,400
|
Quote:
|
Originally Posted by Bladecutter
To answer the question as simply as possible, the answer is:
NO!!
If you re-read the write up, you will notice that the most important thing to tell that the timing is correct is to line up that one single notch so that it is perfectly pointing to the right, and then see if the cam-notches are parallel to the engine cases.
That notch is the important one, and you will adjust the other notches to line up with regards to it. When it is pointing perfectly to the right, if everything is fine, then the notches on the cams are lines up. If everything isn't set right, then the two cam notches are not lined up.
Your description means that your cams are out of time.
You need to align them, and honestly, it sounds really, really easy.
BC.
|
Actually, no it's not. The "timing marks" that the factory tools hold are on the NON-driven side of the cam. I'm still not exactly sure how Insite managed to hold the cams EXACTLY parallel to the valve cover/ head seam without the tool.
These engines are actually very tolerant of small timing errors, and I'm sure that Insite is within the allowable limits, but it's not how I'd do it.
__________________
Boxster S
|
|
|
|
|
09-30-2011, 03:01 AM
|
#7
|
|
Registered User
Join Date: Mar 2010
Location: Australia
Posts: 11
|
This is a great write up, thanks insite!!
Just want to confirm, probably stating the obvious but when checking the intake cam guide pointing in or out, you are referring to the intake guide on the SAME bank (1-3 or 4-6) as the exhaust cam, i.e. on opposite ends of the engine.
You talk about the exhaust cams being perfectly vertical (as fitted to car) with the camshaft cover seam on the appropriate TDC. How do the exhaust cams look at the other TDC? Do they almost line up?
Why is bank 1 timed for TDC intake & bank 2 timed for TDC exhaust?
I've started to play around with it with engine fitted in car & it sure hard to get to the relevant parts!
Cheers,
Matt
|
|
|
|
|
09-30-2011, 11:03 AM
|
#8
|
|
Registered User
Join Date: Dec 2009
Location: Orange County, CA
Posts: 2,025
|
Quote:
Originally Posted by mattatk

This is a great write up, thanks insite!!
Cheers, Matt
|
++ 1,
Yes great write up, thank you!
BTW, when are you going to write the procedure for the variocam engines 
Regards, Gilles
|
|
|
|
|
09-11-2012, 07:25 AM
|
#9
|
|
Registered User
Join Date: Feb 2009
Location: SF BayArea
Posts: 7
|
Thanks for this wonderful post insite. I especially liked your prelude mentioning some super basic things like TDC etc..
I have question regarding that:
As mentioned, TDC-compression for bank-1 timing and then a 360 rotation to TDC-exhaust for bank-2 timing - does that mean the timing marks on bank-2 IS NOT/MAY NOT BE exactly vertical at TDC-compression (while bank-1 is) and then vice-versa for TDC-exhaust?
|
|
|
|
|
06-21-2013, 10:27 AM
|
#10
|
|
Registered User
Join Date: Apr 2013
Location: Saratoga, NY
Posts: 172
|
Will the index marks on the intake cams be opposite of each other? Or will they be the same as each other? For example if bank 1-3 exhaust marks are lined up perfectly with the cam cover seam, and the index mark is facing outward will the index mark for bank 4-6 be facing inward, or outward?
__________________
2001 Boxster S 6speed- weekend warrior
2015 Explorer Sport- New DD
2011 Taurus SHO- Sold
2010 CBR1000RR- Sold
|
|
|
|
|
06-25-2013, 12:10 PM
|
#11
|
|
Registered User
Join Date: Sep 2004
Location: Atlanta
Posts: 1,820
|
they will both face outward
|
|
|
|
|
06-25-2013, 12:35 PM
|
#12
|
|
Registered User
Join Date: Apr 2013
Location: Saratoga, NY
Posts: 172
|
Quote:
Originally Posted by insite
they will both face outward
|
Confirming you mean both outward at the same time, not check bank 1-3 its outward, spin 360 check bank 4-6 now its outward correct?
__________________
2001 Boxster S 6speed- weekend warrior
2015 Explorer Sport- New DD
2011 Taurus SHO- Sold
2010 CBR1000RR- Sold
|
|
|
|
|
05-02-2015, 11:12 PM
|
#13
|
|
Registered User
Join Date: Jan 2015
Location: Bulgaria
Posts: 6
|
Hello,
I have problem with the Bank 1
when i turn the Crank to TDC the Bank 1 is not align that means i need to re-timing it . Any advice ,
|
|
|
|
|
05-04-2015, 05:38 AM
|
#14
|
|
Registered User
Join Date: May 2011
Location: weehawken nj
Posts: 240
|
What year is that engine? Also, it doesnt look like youre anywhere near TDC.
|
|
|
|
|
11-12-2016, 04:43 AM
|
#15
|
|
Registered User
Join Date: Mar 2016
Location: Quebec
Posts: 5
|
Insite timing procedure
Hi
When timing is completed on bank 1 1 understand I have to follow same procedure on bank 2. Question..will moving the crank for bank 2 also have bank 1 cams move a bit since they are connected to the crank themselves. Will timing on bank still be good..?
Thank you
|
|
|
|
|
08-01-2021, 02:12 PM
|
#16
|
|
Registered User
Join Date: Mar 2021
Location: SoCal
Posts: 4
|
TDC Cyl 1 and Intake CAM notch position
Hello,
The write up for timing the Camshafts does not seem to match my cars new engine. I have 2.5L VIN A 5th Digit Fits 97-99 PORSCHE BOXSTER 16915409. The engine is on the engine stand.
When I set up TDC cyl 1 ( the closest cylinder to the passenger seat) On the compression stroke I used a compression gauge and watch as the needle moves up and I lock the crank with the 8MM pin at TDC. The notches on the intake cams are pointed "in "not out as the write up suggests. At this point if I look at the Bank 1 exhaust notches they are parallel with the case . The intake notch is almost 90 deg but its pointed in. If I rotate the crank 1 turn the intake cam notch is pointed out at almost 90 deg and the exhaust notches are still parallel. This repeats if I go to bank 2 . Is the write up actually using the exhaust stroke ? Does anyone have the manual from Porsche ? to confirm this , does it matter . The engine was out of a running car. And i was just trying to confirm nothing moved when changed the IMS . I locked the gear behind the IMS flange with treaded screws and everything went smoothly . I just like to verify these things . Being a Porches newbie.
|
|
|
|
|
11-12-2016, 05:57 AM
|
#17
|
|
Artist, 986S tinkerer
Join Date: Aug 2013
Location: Montreal, Canada
Posts: 1,821
|
Yes, you have timed b1 and tightened the bolts so it is locked.
__________________
James now has: 2008 987S 6 speed
Crashed: 2010 987.2 pdk in speed yellow! 
Sold to a cool racer chick: 2004 986 S
YouTube channel: the PORSCHE as seen by NewArt
www.youtube.com/channel/UCohdrH2xHTklM1thxk0KKOQ?
|
|
|
|
|
11-12-2016, 06:06 AM
|
#18
|
|
Registered User
Join Date: Mar 2016
Location: Quebec
Posts: 5
|
Insite timing procedure
Thank you Jesse
|
|
|
|
|
11-22-2016, 09:17 AM
|
#19
|
|
Registered User
Join Date: May 2014
Location: S.California
Posts: 2,029
|
Check your work
When you think you have the settings perfect:
turn the engine over many times by hand- Jake suggested 20 times !
And then re-check the timing.
You may be surprised to observe that the timing marks have now moved slightly out of perfection.
If you think this is excessive worrying, just think about re-timing after it is all back in the car because you got a timing error code ! And that assumes your laziness caused no damage to the valves.
To stop the engine bouncing on the engine stand while I was cranking, I used a simple mechanical floor trans jack+big block of scrap redwood under the sump plate.It would have been smoother before I had put the spark plugs in ! Noob error.
The Inlet Camshaft Notch Angle controversy - The notch is just a rough indication you have the correct TDC position (pin it) when combined with inserting Porsche tool 9624 in the exhaust Cam half(actually 3/8 & 5/8) moon slots.
It is very difficult to eye-ball the exact angle of the Inlet Cam Notch with the engine in the car. Worse the Cam angle is 1/2 the crank angle. So fretting about 3 o'clock or 2.45 (90 degrees +/-) is not very useful
Better to use Durametric to give you an Actual Value. The Durametric value is in Crankshaft degrees. But it 'reads' the reluctor ring at the sprocket end of the cam not the actual Camshaft lobes position. So it is an indirect reading. Very unlikely the relutor ring is damaged/moved.Easy to visually verify with the Cam Cover off.
If you must eyeball the Notch to judge if there is a timing issue, remove 9624. Rotate the crankshaft to the position where the Notch is perfectly 90 degrees.The Exh Cam 1/2 moon will be slightly off perfect. Then measure at the crankshaft pulley how far BTDC the TDC mark is. The only relible "Go/no-Go gauge" is the 9612 tool. If the engine is in the car you'll have to remove the black 'puck' to use it to verify - because there is no direct line of sight for the EX Cam notches. See here for more: https://www.renntech.org/forums/topic/51555-cranks-but-no-start-misfire/
The Porsche FSM diagram of the position & orientation of the Inlet Cam Notch is at page 15-23 & 15-69 for Bank 2, 4-6(faces inward). For 1-3 it is 15-23 & 15-51(faces outward). They all show the Notch slightly off 90 degrees.
If you have perfect Exhaust Cam timing(9612 tool fits) at the correct TDC position but the Inlet Notch is very different from the FSM - you have a problem !
The relationship between the Exh cam and Inlet cam is controlled by the short chain linking the Exh+Inlet sprockets There is NO adjustment.The only adjustment(4 bolts) is on the Exh cam sprocket, none on the Inlet Sprocket..It varies only with the action of the Variocam Actuator+Solenoid aka Tensioning Element. At idle the advance is not active.Above around 2k rpm it starts kicking in .Durametric should show you this on a graph.
What goes wrong?
The Solenoid fails or wiring/DME for it
The Actuator leaks/worn/dirt plug/sticks midway or does not move
The dreaded Deviation greater than +/- 6 degrees
The 4 Exh Camshaft Sprocket bolts became loose and timing slips.
Camshaft Position Sensor fails
You get the Bank 1 and Bank 2 Instructions(notch + half moon - muddled) !
That diagnosis is a separate Thread.
Here are some great photos from Nutrod to replace those lost from Insite/Image Host:
http://www.nutrod.com/Nutrod/Pics/Pages/Install_Head_4-6.html
This may also help"
https://rennlist.com/forums/996-forum/594122-how-to-set-cam-timing-on-996-a-2.html
If you get confused ,use a simple drawing like the one in this link to clarify your question:
https://www.renntech.org/forums/topic/51555-cranks-but-no-start-misfire/
Last edited by Gelbster; 09-25-2017 at 09:18 AM.
|
|
|
|
|
01-24-2018, 03:48 PM
|
#20
|
|
Registered User
Join Date: Jan 2018
Location: WI
Posts: 1
|
Timing procedure
I have a 2003 Porsche Boxster with a 2.7 l a 3 chain setup how do you line up the timing marks and where are they
|
|
|
|
 Posting Rules
|
You may not post new threads
You may not post replies
You may not post attachments
You may not edit your posts
HTML code is On
|
|
|
All times are GMT -8. The time now is 08:15 AM.
| |


 Hybrid Mode


