 08-30-2015, 08:46 PM
|
#1
|
|
Custom User Title Here
Join Date: Mar 2012
Location: Ft. Leonard Wood
Posts: 6,169
|
Quote:
Originally Posted by CHRISP357

The do it yourself guide is really only one step long.
1: send to Particlewave.
|

......
__________________
https://youtube.com/@UnwindTimeVintageWatchMuseum
|

|

|
|
08-30-2015, 07:52 PM
|
#2
|
|
Registered User
Join Date: Nov 2009
Location: San Jose , CA
Posts: 579
|
Just opened the lens, cleaned it with alcohol, put it back together. No sweat. Does the connector for the angel eyes stay inside the reflector? It doesn't seem long enough to exit the reflector bowl.
__________________
Lapis Blue 03 Boxster S
Seal Grey 04 Boxster S (RIP 9-21-14)
|
|
|
|
|
08-30-2015, 08:42 PM
|
#3
|
|
Custom User Title Here
Join Date: Mar 2012
Location: Ft. Leonard Wood
Posts: 6,169
|
It should be just long enough to reach through. If not, untwist the wires. I'm not sure it will fit through the small square hole, though. I always use the larger parking light hole.
__________________
https://youtube.com/@UnwindTimeVintageWatchMuseum
Last edited by particlewave; 08-30-2015 at 08:44 PM.
|
|
|
|
|
08-31-2015, 04:39 PM
|
#4
|
|
Registered User
Join Date: Nov 2009
Location: San Jose , CA
Posts: 579
|
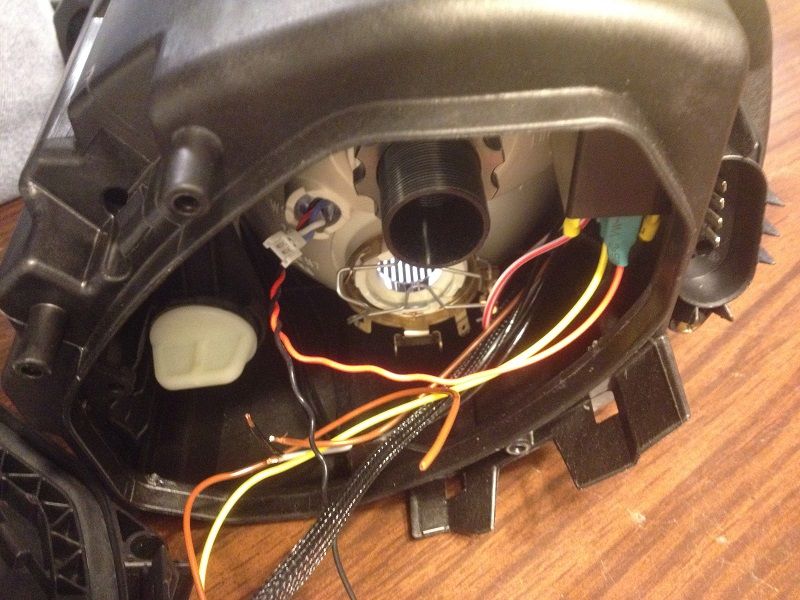
The blue and white wires weren't long enough to exit the through either the parking light hole or the deflector hole. So, what I ended up doing is extending the length of the blue an white wires, removing the plastic plug, feeding them and the black and red wires through the square deflector hole, and putting the plug back on.
Another problem that I have to figure out how to deal with is baked lens debris sticking to the inside of the outer lens. I'm not sure how to get this stuff out without scratching it.
__________________
Lapis Blue 03 Boxster S
Seal Grey 04 Boxster S (RIP 9-21-14)
|
|
|
|
|
08-31-2015, 04:56 PM
|
#5
|
|
Custom User Title Here
Join Date: Mar 2012
Location: Ft. Leonard Wood
Posts: 6,169
|
Wash your hands with hot water for a good 2 minutes to soften the skin. Scrub your fingertips with a scrubber to remove any dead skin.
Lay the lens over the sink (inside up) and fill with warm water and a good 2 tablespoons of dawn dish soap. Add the soap after the water so that it doesn't cause a lot of bubbles. Use your fingertips to lightly wash the inside of the lens and rinse with warm water. Use compressed air to blow all water out. 
This is the method I use with every set that I do and it never causes scratches.
__________________
https://youtube.com/@UnwindTimeVintageWatchMuseum
|
|
|
|
|
09-07-2015, 11:22 PM
|
#6
|
|
Registered User
Join Date: Nov 2009
Location: San Jose , CA
Posts: 579
|
Just finished all the wiring for both headlights. Getting close now. I just have clean and seal the lights.
Tony
Sent from my SM-T800 using Tapatalk
__________________
Lapis Blue 03 Boxster S
Seal Grey 04 Boxster S (RIP 9-21-14)
|
|
|
|
|
09-09-2015, 01:14 PM
|
#7
|
|
Registered User
Join Date: Nov 2009
Location: San Jose , CA
Posts: 579
|
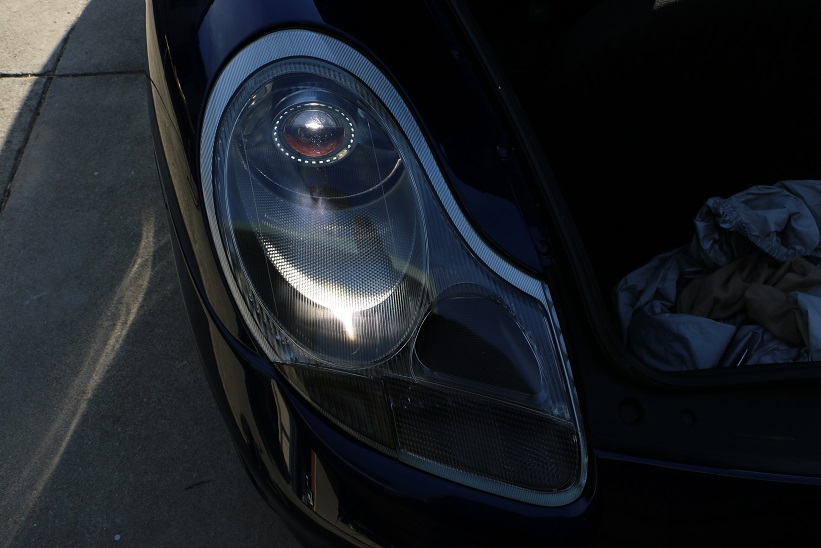
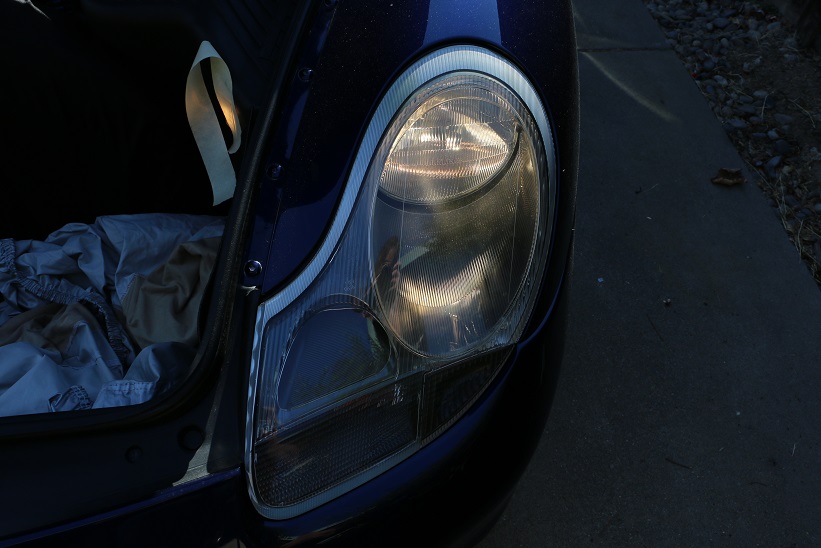
These are the lenses that I started with.
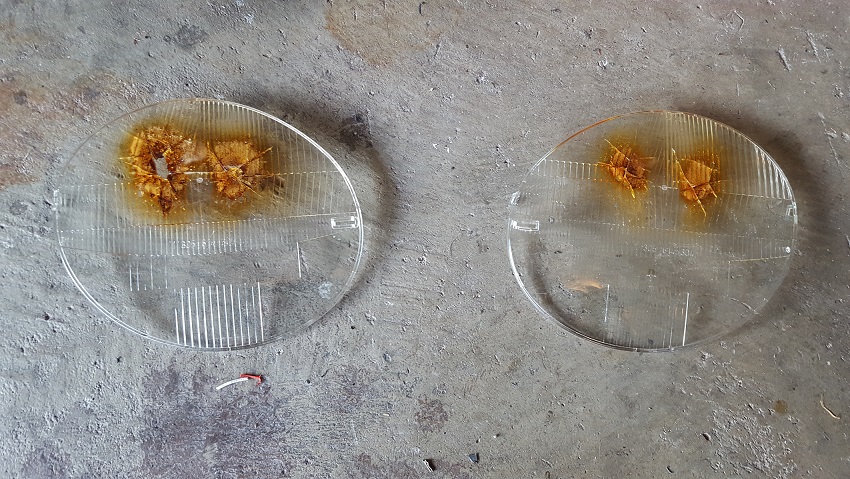
There is actually a hole burned into the passenger lens.
This is where they are now:
The last steps are to clean the inside of the second drive side lens (passenger side done already) , seal the lenses, and polish the out side.
I'm also looking to add CREE LED towers as the high beams and the fogs. any recommendations?
Almost there.
__________________
Lapis Blue 03 Boxster S
Seal Grey 04 Boxster S (RIP 9-21-14)
|
|
|
|
|
09-10-2015, 04:26 AM
|
#8
|
|
Registered User
Join Date: Feb 2013
Location: Cranston RI
Posts: 902
|
that is amazing! Great job!
__________________
99 Porsche Boxster
|
|
|
|
|
09-16-2015, 12:09 PM
|
#9
|
|
Registered User
Join Date: Nov 2009
Location: San Jose , CA
Posts: 579
|
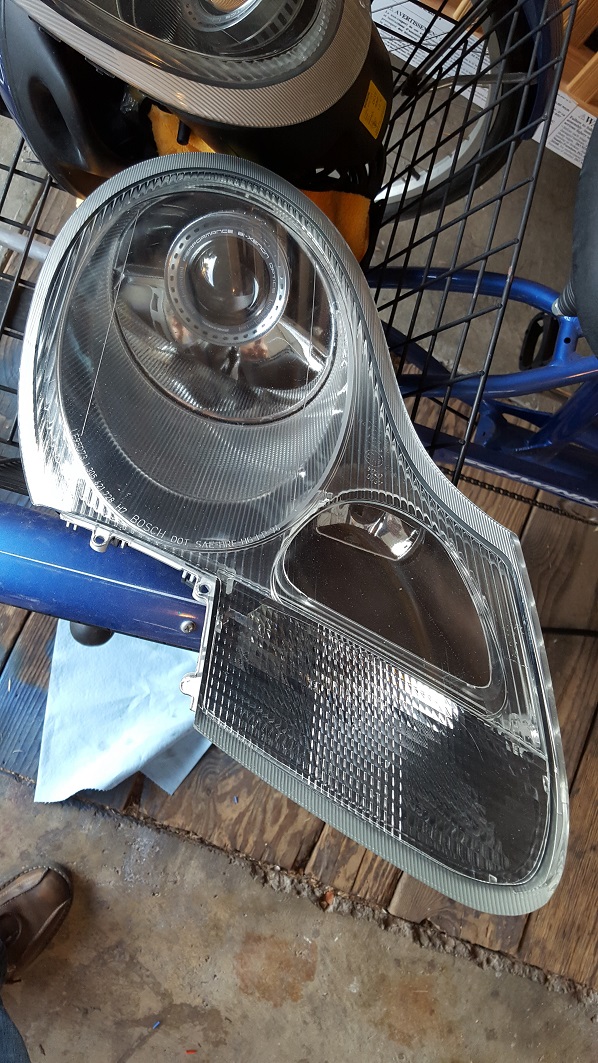
I finally got all of the pieces in place to finish the headlight upgrade (was waiting for the corner pieces and the LED bright and fog lights). Here is what they looked like before:
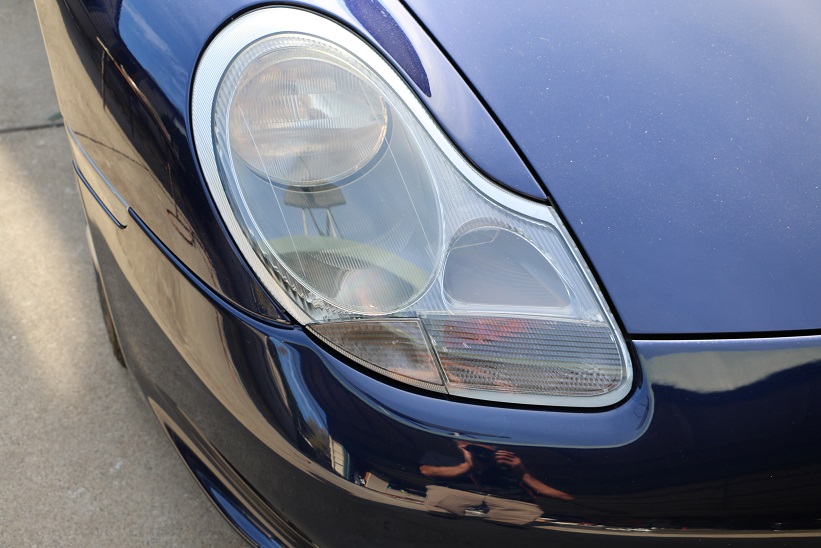
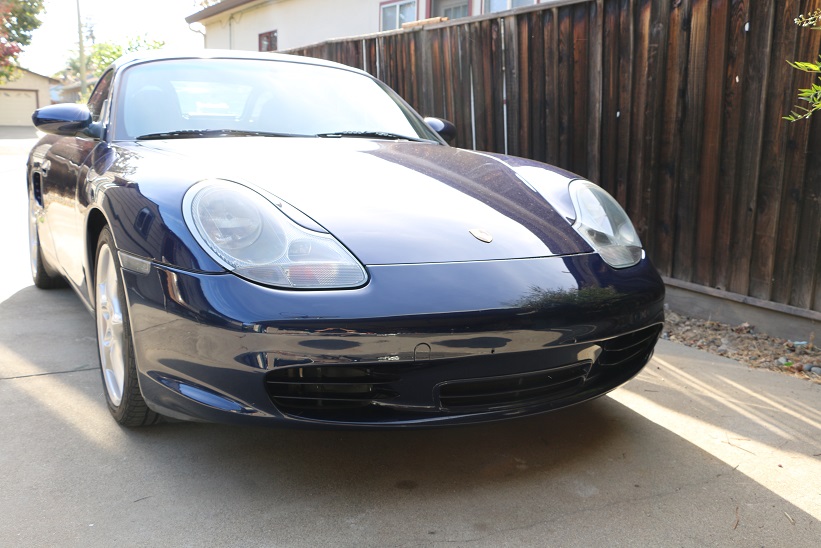
Both headlights are in really good shape. But this looks so much better:
New
vs. Old
There is a notable difference in the headlight housing itself. If you look closely, you can see that there is a sort of diamond pattern on the inner shroud of the new headlight in front of and just below the projector. I mention this because if I had not bought these as a set, it's possible that you could end up with two different housings.
Here is a head on view:

Man, these look so cool.
Tony
__________________
Lapis Blue 03 Boxster S
Seal Grey 04 Boxster S (RIP 9-21-14)
|
|
|
|
|
09-16-2015, 12:55 PM
|
#10
|
|
Registered User
Join Date: Jun 2012
Location: Bedford, TX
Posts: 2,755
|
^^^Very nice, looks great
__________________
______________________________________________
2001 Boxster S Lapis Blue
TS Cat Bypass Pipes and exhaust
iPad Mini Dash Install
DEPO Tail Lights
|
|
|
|
|
09-16-2015, 06:40 PM
|
#11
|
|
Custom User Title Here
Join Date: Mar 2012
Location: Ft. Leonard Wood
Posts: 6,169
|
Nice work, Tony! 
__________________
https://youtube.com/@UnwindTimeVintageWatchMuseum
|
|
|
|
|
10-12-2015, 11:26 AM
|
#12
|
|
Registered User
Join Date: Jul 2014
Location: amsterdam
Posts: 1
|
Hi guys,
I have a set for sale, new in the original box and still wrapped. Sold my car before I had the chance to install these beauties..
Details:
TURISMO SERIES GT PROJECTOR HEADLIGHT RETROFIT KIT (GUNMETAL)
1. Select shroud color (see instructions below)
BLACK (anodized, default)
2. Select angel eye colour
WHITE (LED) (default)
4. Select cutoff asymmetrical beam distribution (RHT or LHT)
RHT (right-hand traffic)
HID Lighting System
HID Ballasts CANBUS with EMC (35watts) (pair)
Xenon bulb type & temperature
XENON BULB TYPE H1 (4,300K) (pair)
I'm based in the Netherlands but can ship throughout Europe.
Will do a good price.
|
|
|
|
|
10-12-2015, 12:10 PM
|
#13
|
|
Registered User
Join Date: Aug 2014
Location: Fort Collins, Colorado
Posts: 345
|
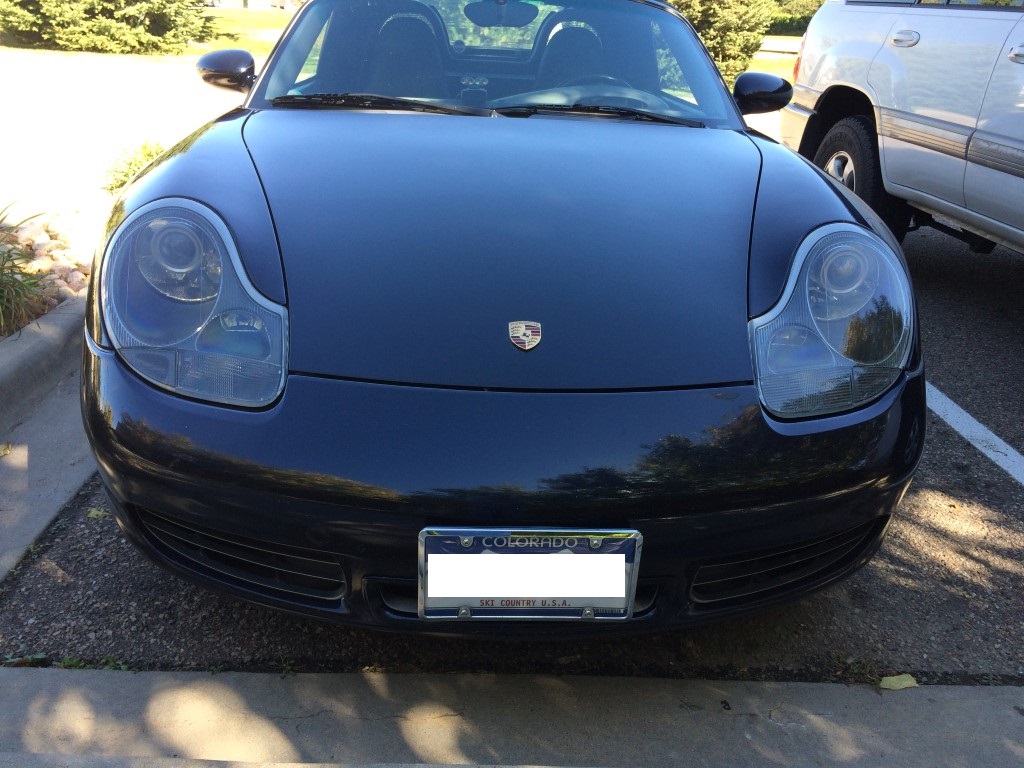
Here is my before and after pics. I picked up a set of Gen 1 lights from another member and installed them in minutes! Gotta love plug and play!
Before
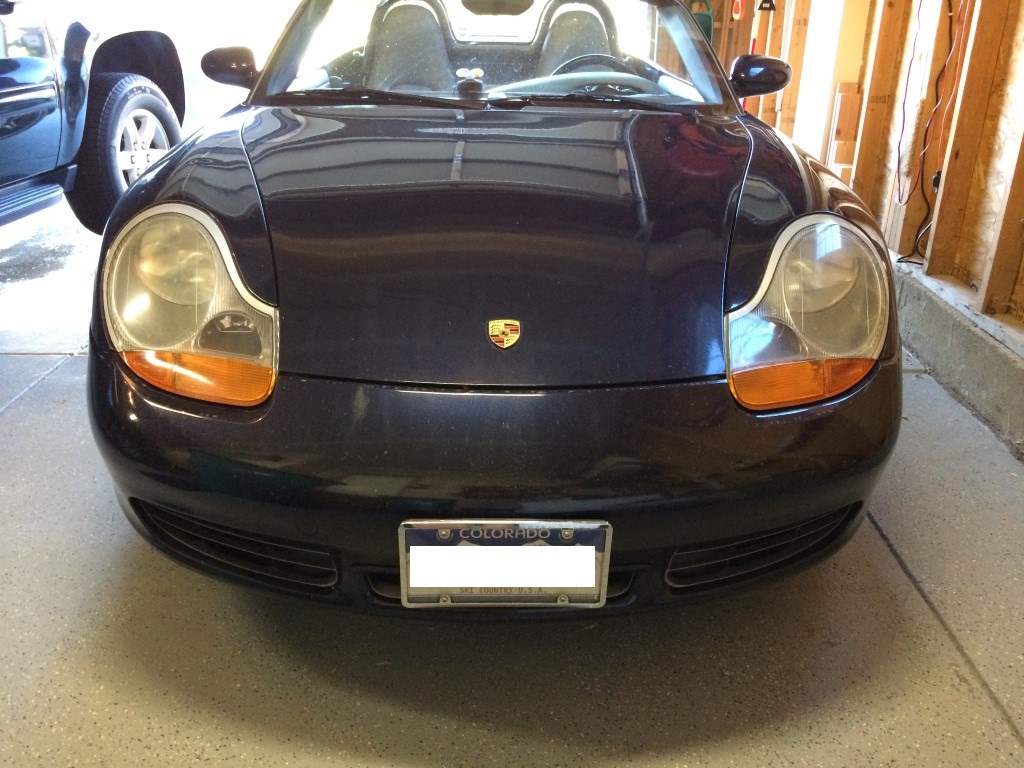 After
After
__________________
2001 Boxster S - Midnight Blue Metalic
|
|
|
|
|
10-12-2015, 07:14 PM
|
#14
|
|
Registered User
Join Date: Jun 2012
Location: Bedford, TX
Posts: 2,755
|
Quote:
Originally Posted by jpc763
Here is my before and after pics. I picked up a set of Gen 1 lights from another member and installed them in minutes! Gotta love plug and play!
|
Instant update! They look great and take years off of the look
__________________
______________________________________________
2001 Boxster S Lapis Blue
TS Cat Bypass Pipes and exhaust
iPad Mini Dash Install
DEPO Tail Lights
|
|
|
|
|
10-13-2015, 04:37 AM
|
#15
|
|
Registered User
Join Date: Sep 2013
Location: KRK, PL, EU
Posts: 255
|
Quote:
Originally Posted by vandera
Hi guys,
I have a set for sale, new in the original box and still wrapped. Sold my car before I had the chance to install these beauties..
I'm based in the Netherlands but can ship throughout Europe.
Will do a good price.
|
Hi! I'm based in Europe and am interested. Private message sent.
__________________
Past: 944 NA white '86
Present: 986 black '98
Future: 959
|
|
|
|
|
01-03-2016, 09:28 AM
|
#16
|
|
Registered User
Join Date: Feb 2013
Location: Cranston RI
Posts: 902
|
I have a question regarding oven baking the headlights. Based on what I have read, I need to remove the lightbulbs, and rubber weather stripping from the housing. What about the wiring harness in the headlight housing? Any other pieces that need to be removed before baking in the oven?
__________________
99 Porsche Boxster
|
|
|
|
|
01-03-2016, 02:47 PM
|
#17
|
|
Registered User
Join Date: May 2015
Location: Indiana
Posts: 8
|
fwiw...I personally would remove everything possible to limit my risk.
Word of caution...If you are unsure about the actual temp of your oven vs the setting...the heatgun/box method nine8six mentioned before is an alternative.
I am wanting to order a set of these...pelican is currently out of stock...what is the preferred method of ordering?
dw
|
|
|
|
|
01-15-2016, 02:42 PM
|
#18
|
|
Registered User
Join Date: Sep 2013
Location: Montreal, QC. (currently expat to Shanghai)
Posts: 3,249
|
Quote:
Originally Posted by tehward
I am wanting to order a set of these...pelican is currently out of stock...what is the preferred method of ordering?
dw
|
Sincere apologies to all
Been on and off since last October and just about to get ahead of a 2 months long backlog at the office. What a mess :/ You guys had xmas holidays and all?!
Dw - Pelican is indeed out of stock. Good news is the (my) new shop is nearly 'operational' so I plan on running a mega batch in February first thing. Hopefully we'll have plenty before spring kicks in.
Others; many of you guys pm'ed or asked for those CGT style center caps so dbl-good news I'll get a batch of those toasted as well. I'll have the lathe warm-and-busy all of February so might as well do a few dozens of those cool lookin center caps as well.
No Skybreaker (some asked). Sorry guys this will have to wait... looking at late spring or early summer but not before for sure -unless of course one of you guys wants to come over Shanghai and help out They are really fun to make... I mean... who wouldn't like to be sniffing pmma/chemical vapor for a few days in a row lolll
I'll update. Be good fellas
Fred
__________________
______________________________
'97 Boxster base model 2.5L, Guards Red/Tan leather, with a new but old Alpine am/fm radio.
|
|
|
|
|
01-15-2016, 02:51 PM
|
#19
|
|
Registered User
Join Date: Sep 2013
Location: Montreal, QC. (currently expat to Shanghai)
Posts: 3,249
|
Arts - some visuals to share in a meantime
__________________
______________________________
'97 Boxster base model 2.5L, Guards Red/Tan leather, with a new but old Alpine am/fm radio.
|
|
|
|
|
01-15-2016, 02:58 PM
|
#20
|
|
Registered User
Join Date: Sep 2013
Location: Montreal, QC. (currently expat to Shanghai)
Posts: 3,249
|
CGT Style center caps for porsche wheels - hot cakes around here :/
Those went pretty viral locally... last year anyway. I did something like 50 kits and they flew off my hands in an instant. Literally had about 20~25x requests on those just between last autumn and now so I'll get those CNC in Feb and ready in March.


__________________
______________________________
'97 Boxster base model 2.5L, Guards Red/Tan leather, with a new but old Alpine am/fm radio.
|
|
|
|
 Posting Rules
|
You may not post new threads
You may not post replies
You may not post attachments
You may not edit your posts
HTML code is On
|
|
|
All times are GMT -8. The time now is 08:56 PM.
| |


 2004 Porsche Boxster
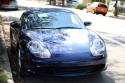 2003 Porsche Boxster S
 Butzi
Butzi 2001 Boxster S
 1998 Porsche Boxster


 Hybrid Mode


