 06-02-2020, 10:08 AM
|
#1
|
|
Registered User
Join Date: Apr 2017
Location: Indiana
Posts: 1,512
|
Found my coolant leak 😐
Took awhile but finally found where my leak was. Seam on coolant tank. Got to temp, drove 3 miles, checked trunk and found a few drops. Looking closer it's the seam on the top of the tank. Could of been a lot worse. This ought to be fun 🙄


|

|

|
|
06-02-2020, 11:54 AM
|
#2
|
|
1998 Boxster Silver/Red
Join Date: Sep 2017
Location: 92262
Posts: 3,110
|
Are you going to repair it or take it to the shop?
__________________
1998 Porsche Boxster
|
|
|
|
|
06-02-2020, 12:27 PM
|
#3
|
|
Registered User
Join Date: Apr 2017
Location: Indiana
Posts: 1,512
|
Quote:
Originally Posted by Starter986

Are you going to repair it or take it to the shop?
|
I'm going to replace it myself unless it's harder than it looks. Watched a few videos. I think, hope, I can do it..
|
|
|
|
|
06-02-2020, 05:28 PM
|
#4
|
|
Registered User
Join Date: Aug 2018
Location: Woodland Wa
Posts: 1,320
|
Quote:
Originally Posted by JBauer
I'm going to replace it myself unless it's harder than it looks. Watched a few videos. I think, hope, I can do it..
|
Not difficult if you approach it right.
I went in from underneath to get most of the hoses loose.
took the aluminum plate off to gain access.
a few of the hoses are easier to get to if you pull them into the trunk with the tank then take them off.
After you do it once and see how you should have done it... I think it can be done in 45 minutes to an hour.
|
|
|
|
|
06-02-2020, 05:40 PM
|
#5
|
|
1997 Tip, 2018 Macan
Join Date: Aug 2015
Location: Upland, CA
Posts: 1,338
|
Disclaimer; I have never tried/done this myself. I remember a thread from somebody who just cut the leaky tank into pieces to remove it. Instead of trying to take it out in one piece. IIRC it makes it easier to access some of the connections/clamps from the top side.
|
|
|
|
|
06-02-2020, 05:50 PM
|
#6
|
|
Registered User
Join Date: Sep 2017
Location: SF Bay Area
Posts: 114
|
If you still have the factory clamps, its worth the money to buy the special tool that removes them. Makes the removal and replacement Of the clamps much easier than channel locks or pliers. While your in there, check and replace the oil filler tube. Mine cracked while I was replacing the coolant tank. Good luck man.
|
|
|
|
|
06-02-2020, 05:53 PM
|
#7
|
|
Registered User
Join Date: Sep 2008
Location: Florida
Posts: 2,497
|
Quote:
Originally Posted by rexcramer
Disclaimer; I have never tried/done this myself. I remember a thread from somebody who just cut the leaky tank into pieces to remove it. Instead of trying to take it out in one piece. IIRC it makes it easier to access some of the connections/clamps from the top side.
|
+1 on this idea...
You can do this. I did mine all from above, except for draining coolant.
take pictures
Taking old tank out doesn't take that long, even less time cutting it up.
Using the remove hose pliers helps helps a lot with install.
|
|
|
|
|
06-03-2020, 03:25 AM
|
#8
|
|
1998 Boxster Silver/Red
Join Date: Sep 2017
Location: 92262
Posts: 3,110
|
OK. Removing clamps... bring the hoses into the trunk... etc.
Couldn't those hoses on the engine side just be cut. In half. And replaced as part of the install of the new tank?
I'll read about guys replacing their AOS... getting all hung up on removing the bellows... the rubber part at the very bottom of the old AOS. It can be a pain to get the clamp off. Me? I just cut mine in half for it was going to be replaced anyhow.
So... along those lines... couldn't those engine-side hoses just be cut close to the tank... remove the tank... toss the tank... replace tank including new hoses?
No? Incorect? Am I missing something?
__________________
1998 Porsche Boxster
|
|
|
|
|
06-03-2020, 05:29 AM
|
#9
|
|
Registered User
Join Date: Apr 2017
Location: Indiana
Posts: 1,512
|
Quote:
Originally Posted by Starter986
OK. Removing clamps... bring the hoses into the trunk... etc.
Couldn't those hoses on the engine side just be cut. In half. And replaced as part of the install of the new tank?
I'll read about guys replacing their AOS... getting all hung up on removing the bellows... the rubber part at the very bottom of the old AOS. It can be a pain to get the clamp off. Me? I just cut mine in half for it was going to be replaced anyhow.
So... along those lines... couldn't those engine-side hoses just be cut close to the tank... remove the tank... toss the tank... replace tank including new hoses?
No? Incorect? Am I missing something?
|
I wondered about this approach. Must be a problem because I'm not finding much on it.
Thanks for all the tips. I'll post my progress.
|
|
|
|
|
06-03-2020, 07:32 AM
|
#10
|
|
Registered User
Join Date: Sep 2012
Location: S. New Jersey
Posts: 1,239
|
Definitely get cable pliers. I found taking old out is not the headache, it's getting all the clamps, oil fill tube on after the new is in place. Those items on the engine side of the trunk wall. Basically laying under the car and using the cable pliers to re-attach and clamp everything. At some point this part can't be avoided. The oil fill tube will be potentially brittle by this time in it's life
__________________
2002 S - old school third pedal
Seal Grey
|
|
|
|
|
06-03-2020, 10:14 AM
|
#11
|
|
Registered User
Join Date: Apr 2017
Location: Indiana
Posts: 1,512
|
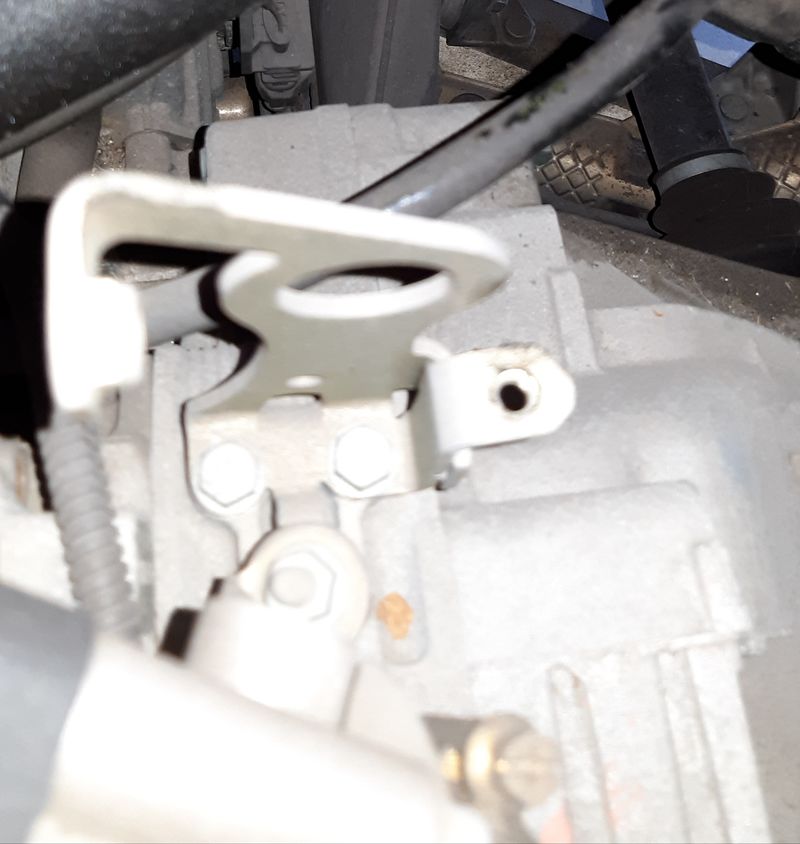
Got me engine uncovered. Thankfully it all fit through will my top in place. After looking at the inside I see what a tight fit this is. Quick question though. What's this bracket? Seems to serve no purpose.
|
|
|
|
|
06-03-2020, 12:07 PM
|
#12
|
|
Registered User
Join Date: Dec 2009
Location: Orange County, CA
Posts: 2,025
|
JBauer,
I believe it is to hang the engine from the top while removing the engine/gearbox mounts on the bottom (at least it is what I use it for on my 987) ")
.
|
|
|
|
|
06-03-2020, 12:16 PM
|
#13
|
|
Registered User
Join Date: May 2018
Location: Seattle
Posts: 54
|
I did this job two summers ago. I posted what I learned here.
http://986forum.com/forums/boxster-general-discussions/72900-coolant-tank-replacement-post-replacement-observations.html
In my case I had no luck pulling the tank into the trunk to disconnect the hoses.
In the engine compartment the tank has rubber hoses that run forward 4-5" and then attach to hard metal lines. Instead of disconnecting the hoses from the tank manifold I disconnected them from the metal lines. They are much easier to reach and you can sort of see what you are doing. See the linked post for more info.
Also get your self a set of the cable actuated clamp pliers. They come in handy.
|
|
|
|
|
06-03-2020, 12:41 PM
|
#14
|
|
still plays with cars...
Join Date: May 2011
Location: Baden, ON, Canada
Posts: 1,088
|
Its not a very difficult job, but it sure makes you wonder about the over-engineering and logic(?) behind the approach that was taken in the coolant tank design.
Way over complicated.
I jacked the back of the car up rather high to avoid air entry into the open lines.
The cut up the old tank with a RotoZip tool and disconnected the lines from the leftover flange after pulling it int the trunk as much as I could.
Remote hose clamp pliers were a godsend. They helped in replacing the oil filler tube which I ordered for this job too.
Its in the damn way and was brittle enough to break apart with a mere sideways glance. Im glad I put it on the parts list.
I also removed the underside diamond plate to reattach a couple of the lines; some were too awkward to connect from above, and yes, stainless steel worm drive clamps were used instead of the originals. Theres a special place in hell for those things.
__________________
Six speed 2000 Boxster S
Arctic Silver on Metropol Blue | LN Dual Row IMSR | Arctic Silver console, spoiler frame & bumperettes | Crios mod | Technobrace | RoboTop module & modified convertible top relay for one-touch roof operation
|
|
|
|
|
06-03-2020, 06:06 PM
|
#15
|
|
Registered User
Join Date: May 2010
Location: Michigan
Posts: 1
|
Did this last year after 20 year old reservoir was cracked and leaking around the back where you couldnt see it. Echo all comments here: wasnt a walk in the park but not overwhelming. One point: spend to get a high quality reservoir. Mine leaked through the bleeder valve assembly/wouldnt hold pressure, and little metal clip snapped off from the cheap plastic. Had to spend more to get Porsche genuine bleeder valve assembly to fix it...all good now.
|
|
|
|
|
06-03-2020, 07:41 PM
|
#16
|
|
Registered User
Join Date: Apr 2017
Location: Indiana
Posts: 1,512
|
Thanks for all the advice. I'll keep this post updated as soon as I get the parts.
|
|
|
|
|
06-04-2020, 02:51 AM
|
#17
|
|
1998 Boxster Silver/Red
Join Date: Sep 2017
Location: 92262
Posts: 3,110
|
Quote:
Originally Posted by Lowski
|
That's the route I'll be taking.
__________________
1998 Porsche Boxster
|
|
|
|
|
06-04-2020, 07:19 AM
|
#18
|
|
Registered User
Join Date: Aug 2010
Location: Severna Park, MD
Posts: 98
|
One thing I found when doing mine was if you remove the main wiring harness into the trunk and pull it back into engine compartment you have a great access hole right next to all the hose connections. I was able to reach through that hole and reconnect the hoses without having to contort myself to do it from the engine compartment. Re-connection was very quick this way. Wish I would have realized it when taking it out. Also +100 for the remote clamp pliers.
|
|
|
|
|
06-04-2020, 09:48 AM
|
#19
|
|
Registered User
Join Date: Apr 2017
Location: Indiana
Posts: 1,512
|
I see where unhooking the wiring idea would give an access hole. Scarey to unhook all those plugs.
Last edited by JBauer; 06-04-2020 at 10:02 AM.
|
|
|
|
|
06-04-2020, 10:20 AM
|
#20
|
|
WALDMEISTER
Join Date: Sep 2013
Location: Germany
Posts: 1,381
|
Hey JB, this might help
https://www.youtube.com/watch?v=GFNlXAs20mU
Is the plastic coolant tank kaputt? I am still wondering, why a possible crack cannot be fixed and sealed properly again?
__________________
Original Owner | PORSCHE Boxster 2.7L (MY01) | Seal Gray
|
|
|
|
 Posting Rules
|
You may not post new threads
You may not post replies
You may not post attachments
You may not edit your posts
HTML code is On
|
|
|
All times are GMT -8. The time now is 07:14 AM.
| |


 1997 Porsche Boxster
 2018 Porsche Macan
 2004 Audi A4
 2001 Porsche Boxster S
 1973 VW Super Beetle
 Name my car - no
 Udo
Udo "GRAY"
 Linear Mode


