 04-22-2019, 04:04 PM
|
#1
|
|
Registered User
Join Date: Sep 2016
Location: Central Ohio
Posts: 415
|
Hood Crest Ornament Gasket Does Not Fit?
I recently had cause to remove my front hood crest ornament, and noted that the black gasket beneath it (both believed to be OEM as installed at the factory) did not fit the emblem well.
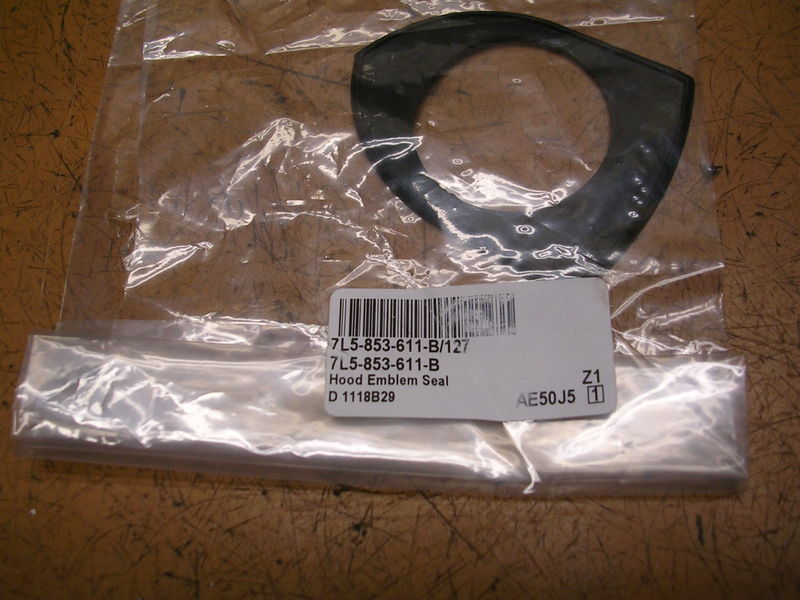
So, searching my PET, I ordered the correct gasket part, 7L5-853-611. And it came in the correct looking Porsche bag, so I believe the part to match the model number.
Trying to fit the crest and the new gasket, I notice that the new gasket shares the same problem issue as my older one - it's frustratingly just a bit too small.
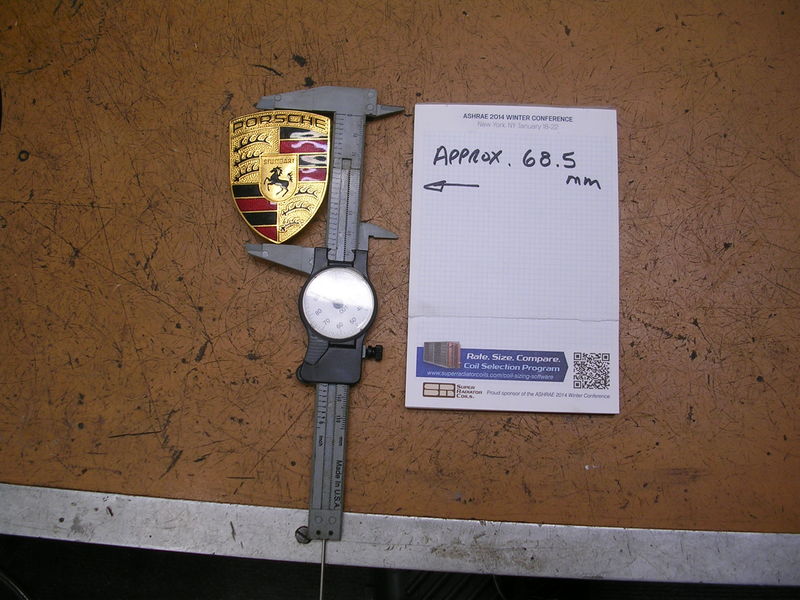
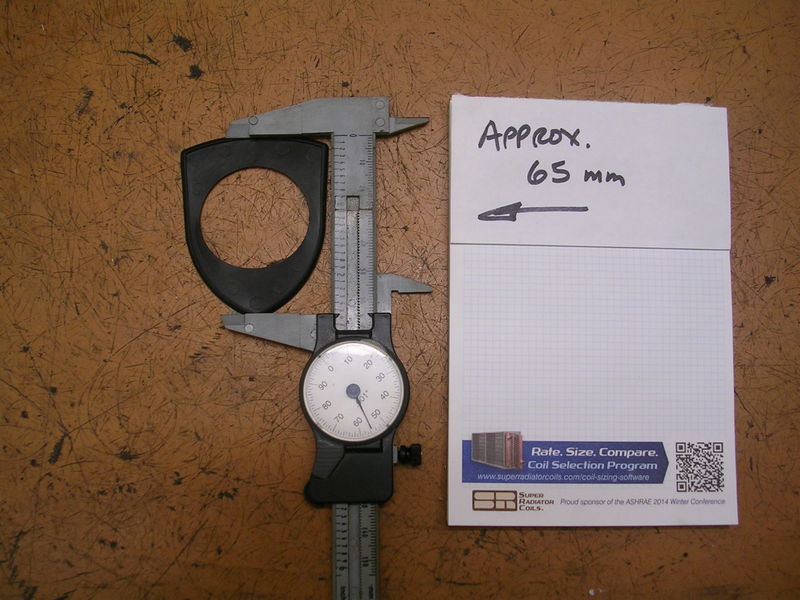
See pictures below, showing that the 68.5 mm emblem can't fit down into the 65 mm recess in the gasket. And no, the gasket cannot stretch - it's a black vinyl material which does not stretch like a neoprene / rubber part might do.
So, my questions: Has anyone ever noted this before?
Might there perhaps be an alternate front emblem which is ever-so-slightly smaller than the one which I have now, and which would properly fit into the gasket as intended?
Thanks - DM
__________________
2000 Ocean Blue Boxster S
1980 Ferrari 308 GTSi
2019 Alfa Romeo Giulia Ti Sport AWD
|

|

|
|
04-22-2019, 04:26 PM
|
#2
|
|
Need For Speed
Join Date: Feb 2013
Location: Funville
Posts: 2,114
|
Looking at Auto Atlanta, that part number does not correspond to a 986 Boxster. Auto Atalanta gives 7L5853611B as the proper part number for the gasket.
I just went out and measured the emblem size on my Boxster and it's the same as yours, 68.5 mm.


__________________
2003 Boxster S
| 987 Air Box | K&N Air Filter | 76mm Intake Pipe| 996 76mm TB | 997 Distribution T | Secondary Cat Delete Pipes | Borla Muffler | NHP 200 Cell Exhaust Headers |
Last edited by KRAM36; 04-22-2019 at 04:40 PM.
|

|
|
|
04-22-2019, 04:53 PM
|
#3
|
|
Registered User
Join Date: Sep 2016
Location: Central Ohio
Posts: 415
|
Quote:
Originally Posted by KRAM36

Looking at Auto Atlanta, that part number does not correspond to a 986 Boxster. Auto Atalanta gives 7L5853611B as the proper part number for the gasket.
I just went out and measured the emblem size on my Boxster and it's the same as yours, 68.5 mm.
|
Oops, sorry, I forgot to list the "-B" which was indeed shown at the end of the part number in the PET, so it does appear that I have the correct part. My package below:
On your emblem, is there a nice even gasket border showing on all sides of the emblem?
__________________
2000 Ocean Blue Boxster S
1980 Ferrari 308 GTSi
2019 Alfa Romeo Giulia Ti Sport AWD
|
|
|
|
|
04-22-2019, 05:08 PM
|
#4
|
|
still plays with cars...
Join Date: May 2011
Location: Baden, ON, Canada
Posts: 1,088
|
Had this problem too...
and soaked the gasket in very warm water for 5 minutes before trying to stretch it around the crest.
The gasket became pliable enough to hold position on the crest while installing on the hood.
__________________
Six speed 2000 Boxster S
Arctic Silver on Metropol Blue | LN Dual Row IMSR | Arctic Silver console, spoiler frame & bumperettes | Crios mod | Technobrace | RoboTop module & modified convertible top relay for one-touch roof operation
|
|
|
|
|
04-22-2019, 05:11 PM
|
#5
|
|
Need For Speed
Join Date: Feb 2013
Location: Funville
Posts: 2,114
|
__________________
2003 Boxster S
| 987 Air Box | K&N Air Filter | 76mm Intake Pipe| 996 76mm TB | 997 Distribution T | Secondary Cat Delete Pipes | Borla Muffler | NHP 200 Cell Exhaust Headers |
|
|
|
|
|
04-22-2019, 05:18 PM
|
#6
|
|
Registered User
Join Date: Jan 2014
Location: New Jersey
Posts: 1,631
|
An interesting and timely post for me. I had my hood replaced 2 years ago and recently noticed the crest isn’t sitting in the gasket on all sides. The warm water should do the trick when I get around to fixing it, so thanks for the info!
|
|
|
|
|
04-22-2019, 05:54 PM
|
#7
|
|
Registered User
Join Date: Apr 2017
Location: Indiana
Posts: 1,512
|
I ordered one of those silver and black hood crests last year and it came with a new gasket. That was too small also 🙄
I had to make one.
|
|
|
|
|
04-22-2019, 06:57 PM
|
#8
|
|
Registered User
Join Date: Sep 2016
Location: Central Ohio
Posts: 415
|
Quote:
Originally Posted by KRAM36
A bit dark, but here are pics of my hood badge.
|
Thanks for the pics! Looks as if yours fits all nice and proper-like.
The hot water idea is a good one! I'll give it a go in the morning, and will report back here accordingly.
Even so, this is such a common part that one would have thought that this problem would have been sorted out long, long ago.
__________________
2000 Ocean Blue Boxster S
1980 Ferrari 308 GTSi
2019 Alfa Romeo Giulia Ti Sport AWD
|
|
|
|
|
04-22-2019, 06:57 PM
|
#9
|
|
Need For Speed
Join Date: Feb 2013
Location: Funville
Posts: 2,114
|
Quote:
Originally Posted by Dave80GTSi
Thanks for the pics! Looks as if yours fits all nice and proper-like.
The hot water idea is a good one! I'll give it a go in the morning, and will report back here accordingly.
Even so, this is such a common part that one would have thought that this problem would have been sorted out long, long ago.
|
Maybe try a heat gun on low setting or even a hair dryer?
Quote:
Originally Posted by JBauer
I ordered one of those silver and black hood crests last year and it came with a new gasket. That was too small also ��
I had to make one.
|
I want to get a silver and black hood crest also.
Why do I have a feeling you actually enjoyed making your own gasket?
__________________
2003 Boxster S
| 987 Air Box | K&N Air Filter | 76mm Intake Pipe| 996 76mm TB | 997 Distribution T | Secondary Cat Delete Pipes | Borla Muffler | NHP 200 Cell Exhaust Headers |
Last edited by KRAM36; 04-22-2019 at 07:00 PM.
|
|
|
|
|
04-22-2019, 10:02 PM
|
#10
|
|
Registered User
Join Date: Feb 2017
Location: CO
Posts: 989
|
Yeah, I actually talked the guys at my dealership, they are designed to be heated and stretched to make a tight fit. A tap with a heat gun works, but can go bad real quick. I did mine with nearly boiling water, fitted the gasket around the badge, let it cool, then put them both on at the same time.
|
|
|
|
|
04-23-2019, 12:42 PM
|
#11
|
|
Registered User
Join Date: Sep 2016
Location: Central Ohio
Posts: 415
|
Update: Sorted it, but Geez Louise, what a pain …
Tried a number of ideas, and here's what worked best for me.
You need about 4 small clamps and a heat gun. Starting at the crest's bottom 'point', clamp it correctly to the gasket. Going around the perimeter, use the heat gun to warm the next little bit of the gasket, and clamp it into place as you go along. Once you make it back to your starting point, you use the heat gun to warm the entire gasket, and then leave it to cool to room temperature. By the time that you've done 3 or 4 heat / cool cycles, you have a short window of time to remove the clamps and to quickly install it to the car, with the clamping force of the crest's nuts to hold it all into place.
All in all, far too much fiddly time and effort than one should expect to install this common part.
After all of this time, I can hardly believe that one is expected to go thru this sort of exercise just to fit a simple gasket!
__________________
2000 Ocean Blue Boxster S
1980 Ferrari 308 GTSi
2019 Alfa Romeo Giulia Ti Sport AWD
Last edited by Dave80GTSi; 04-23-2019 at 01:05 PM.
|
|
|
|
|
04-23-2019, 01:10 PM
|
#12
|
|
Need For Speed
Join Date: Feb 2013
Location: Funville
Posts: 2,114
|
Glad you got it done. That does seem to be a PITA for a hood crest gasket. Guess Porsche wanted to make sure the crest was sealed in the gasket nice and tight to keep crud from getting in there.
__________________
2003 Boxster S
| 987 Air Box | K&N Air Filter | 76mm Intake Pipe| 996 76mm TB | 997 Distribution T | Secondary Cat Delete Pipes | Borla Muffler | NHP 200 Cell Exhaust Headers |
|
|
|
|
|
04-24-2019, 07:29 AM
|
#13
|
|
Registered User
Join Date: Aug 2018
Location: Chicago
Posts: 33
|
Quote:
Originally Posted by Dave80GTSi
Update: Sorted it, but Geez Louise, what a pain
Tried a number of ideas, and here's what worked best for me.
You need about 4 small clamps and a heat gun. Starting at the crest's bottom 'point', clamp it correctly to the gasket. Going around the perimeter, use the heat gun to warm the next little bit of the gasket, and clamp it into place as you go along. Once you make it back to your starting point, you use the heat gun to warm the entire gasket, and then leave it to cool to room temperature. By the time that you've done 3 or 4 heat / cool cycles, you have a short window of time to remove the clamps and to quickly install it to the car, with the clamping force of the crest's nuts to hold it all into place.
All in all, far too much fiddly time and effort than one should expect to install this common part.
After all of this time, I can hardly believe that one is expected to go thru this sort of exercise just to fit a simple gasket!
|
I recently replaced my frunk crest and gasket and had none of those issues. The crest fit well in the gasket with no stretching. So, just as an FYI, they are not all like what you experienced. (Sorry!)
|
|
|
|
 Posting Rules
|
You may not post new threads
You may not post replies
You may not post attachments
You may not edit your posts
HTML code is On
|
|
|
All times are GMT -8. The time now is 12:14 PM.
| |


 My car
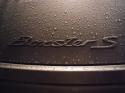 Udo
Udo


 Linear Mode


