 11-14-2017, 08:27 AM
|
#41
|
|
Registered User
Join Date: Apr 2017
Location: Indiana
Posts: 1,514
|
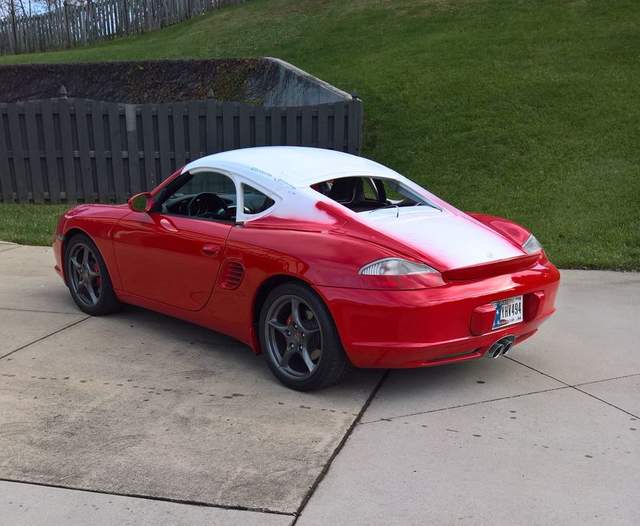
Beauty and the Beast trimming 😐 Got alitte carried away on the first one. Get my new and supposedly correct WS header inserts today that may change those gaps. I hope my bodyshop can fill that. 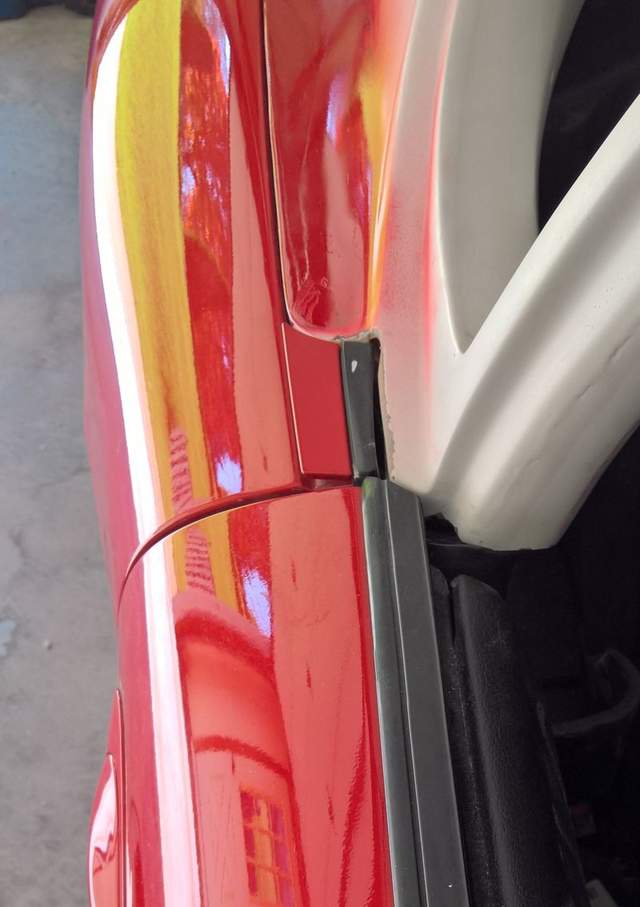
|

|

|
|
11-14-2017, 11:04 AM
|
#42
|
|
Registered User
Join Date: Apr 2017
Location: Indiana
Posts: 1,514
|
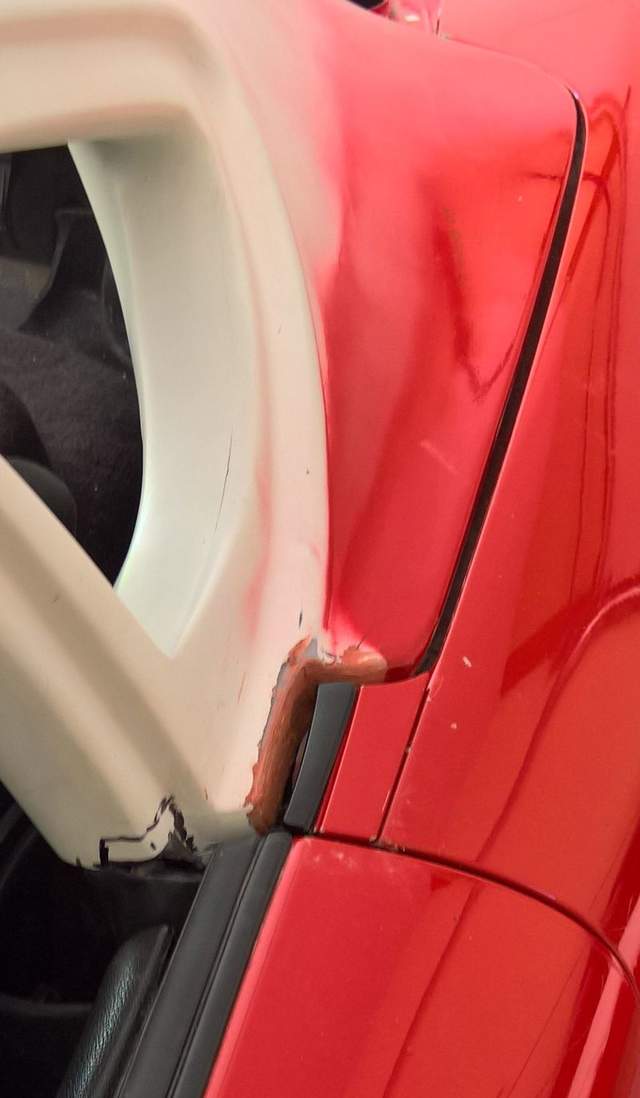
Wow its slow going but I think I'm getting that bow out of there :dance:
Driver side deffinatly better
Passenger side slightly better.

Last edited by JBauer; 11-14-2017 at 11:07 AM.
|
|
|
|
|
11-14-2017, 01:12 PM
|
#43
|
|
Custom User Title Here
Join Date: Mar 2012
Location: Ft. Leonard Wood
Posts: 6,169
|
Nice work 
They really should have just eliminated that trim piece with the top.
|

|
|
|
11-14-2017, 01:20 PM
|
#44
|
|
Registered User
Join Date: May 2016
Location: Northern Indiana
Posts: 410
|
Looking good! I can understand being a perfectionist (as for me, NOTHING is ever perfect), but as you are getting very close, I might make a small suggestion.... With the top and the trunk lid being F/G, an as the trunk will be opened and closed, you might want to (God forgive me here) say "good enough" as I fear the shifting of top due to vehicle movement and the opening and closing of the trunk "might" present some alignment issues later on. I would just hate to see you spend hundreds of hours achieving perfection only to have an issue present next month. I guess my point is that if you accept some panel gap issues now, they won't be as maddening if they happen later on.
BTW, nice job with the rattle-can...has that ever been said before? 
|
|
|
|
|
11-15-2017, 01:57 AM
|
#45
|
|
Registered User
Join Date: Apr 2017
Location: Indiana
Posts: 1,514
|
Quote:
Originally Posted by particlewave

Nice work
They really should have just eliminated that trim piece with the top. |
Agree It would of been easy to make it cover that area.
|
|
|
|
|
11-15-2017, 01:59 AM
|
#46
|
|
Registered User
Join Date: Apr 2017
Location: Indiana
Posts: 1,514
|
Quote:
Originally Posted by MWS
Looking good! I can understand being a perfectionist (as for me, NOTHING is ever perfect), but as you are getting very close, I might make a small suggestion.... With the top and the trunk lid being F/G, an as the trunk will be opened and closed, you might want to (God forgive me here) say "good enough" as I fear the shifting of top due to vehicle movement and the opening and closing of the trunk "might" present some alignment issues later on. I would just hate to see you spend hundreds of hours achieving perfection only to have an issue present next month. I guess my point is that if you accept some panel gap issues now, they won't be as maddening if they happen later on.
BTW, nice job with the rattle-can...has that ever been said before? |
I'm going to give it one more day. I want it a close as possible fit.
|
|
|
|
|
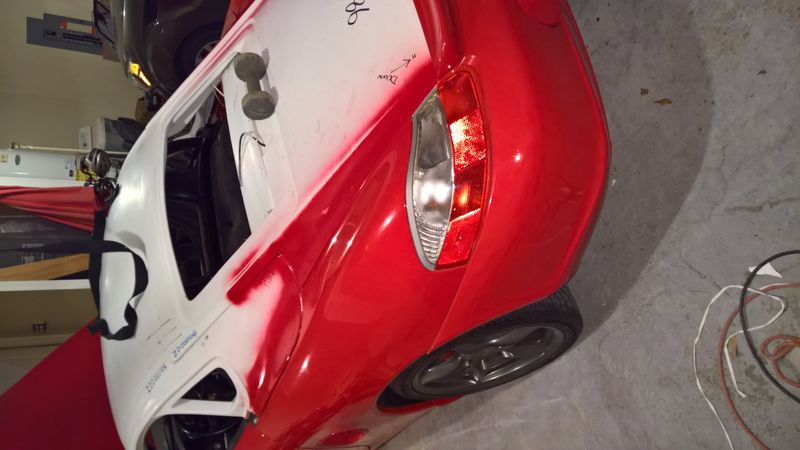
11-15-2017, 08:09 AM
|
#47
|
|
Registered User
Join Date: Apr 2017
Location: Indiana
Posts: 1,514
|
|
|
|
|
|
11-15-2017, 03:32 PM
|
#48
|
|
Registered User
Join Date: May 2016
Location: Northern Indiana
Posts: 410
|
Good thought simulating the weight of the window, however.... Remember that the window weight will be a distributed load, rather than a point load. What I mean by this is that the weight of the window will be equally distributed around the perimeter of the window, and in turn, distributed around the contact points of the hatch (sorry, hard to describe without using vectors). In your test, the weight might be equal to that of the glass but the load is distributed to a focal point rather than the perimeter; therefore even though the physical load is the same, the results may not accurately simulate the finished product.
Back to your hinge question...I would think that given what you have said, hinge adjustments sound like the reasonable course of action. If you are working with a good body shop (and they know that they are getting a check for paint, etc.), I would think that if you drove the car to them that they would be able to offer a suggestion.
Again, good job thus far. To use a football analogy, you've successfully moved the ball 80 yards, maybe just let the body shop punch it in for the score?
|
|
|
|
|
11-15-2017, 04:22 PM
|
#49
|
|
Registered User
Join Date: Apr 2017
Location: Indiana
Posts: 1,514
|
I'm getting it painted by a friend that told me if I got ready, trimmed etc. He'd repair the cuts ive made, seal it, prime it and paint it for 4 to $500. I'm sure he'll help me put the hatch back on. I'm just trying to determine if it is safe to assume if it fits without the hinges bolted on.It can probably be adjusted to fit when bolted on.
Last edited by JBauer; 11-15-2017 at 06:47 PM.
|
|
|
|
|
11-15-2017, 04:56 PM
|
#50
|
|
Registered User
Join Date: Apr 2017
Location: Indiana
Posts: 1,514
|
I'm probably not explaining it right but if the hatch fits this good over the hinges not bolted, is it reasonable to think lt can be made to bolt up as good? I'm afraid to try to bolt it on and adjust it by myself being made of fiberglass. I'd hate to pull out one of the bolts or break it. As soon as I feel it fits well I can take it in for paint. Anyone? 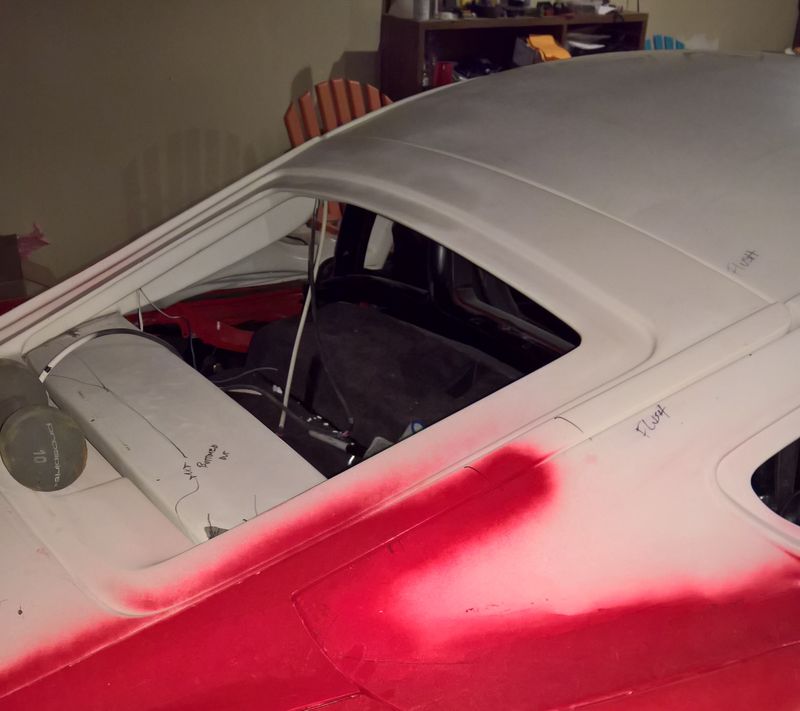
|
|
|
|
|
11-16-2017, 06:34 AM
|
#51
|
|
IronDeadPool
Join Date: Oct 2015
Location: Toronto
Posts: 125
|
Looks amazing......
__________________
P O R S C H E . B O X S T E R
Project IronDeadPool
|
|
|
|
|
11-16-2017, 06:55 AM
|
#52
|
|
Registered User
Join Date: Apr 2017
Location: Indiana
Posts: 1,514
|
Thank you!
Went for first test drive with top. No rattles! Really needing those windows at 33 degrees 😲 
|
|
|
|
|
11-16-2017, 01:11 PM
|
#53
|
|
Registered User
Join Date: May 2016
Location: Northern Indiana
Posts: 410
|
Slightly off topic question... Are you planning on trimming out the interior of the top? If so, would everything need to be custom? Also, I know this top is removable, but once done, do you plan on removing it on a regular basis (like a factory hard top)?
Sorry for the off topic, but following this interesting thread and your progress leads to questions...
|
|
|
|
|
11-16-2017, 02:13 PM
|
#54
|
|
Registered User
Join Date: Apr 2017
Location: Indiana
Posts: 1,514
|
Quote:
Originally Posted by MWS
Slightly off topic question... Are you planning on trimming out the interior of the top? If so, would everything need to be custom? Also, I know this top is removable, but once done, do you plan on removing it on a regular basis (like a factory hard top)?
Sorry for the off topic, but following this interesting thread and your progress leads to questions... |
No problem. They sell a leather headliner for around $250 but I'm probably going to make my own at some point. I plan on using like a factory hardtop. Taking in off next summer. I'm kinda like the hardtop look tho 😀
|
|
|
|
|
11-16-2017, 03:09 PM
|
#55
|
|
Registered User
Join Date: Jun 2012
Location: Bedford, TX
Posts: 2,760
|
The top is looking great, nice work 
__________________
______________________________________________
2001 Boxster S Lapis Blue
TS Cat Bypass Pipes and exhaust
iPad Mini Dash Install
DEPO Tail Lights
|
|
|
|
|
11-17-2017, 04:26 AM
|
#56
|
|
Registered User
Join Date: Dec 2013
Location: Dahlonega , Georgia
Posts: 1,365
|
Very nice work are you tired of the smell/taste of fiberglass yet ?  Have you shared your pics and concerns with your buddy or the body shop that will complete the work ? I would think you should to make sure both parties know the expectations and that they can be met . Don't assume ANYTHING ! Good luck with the completion of the project .
__________________
2002 Boxster S Arctic Silver with black top with glass window and black leather interior. Jake Raby 3.6 SS ( the beast ) with IMS Solution. 996 GT3 front bumper , GT3 rocker covers and GT3TEK rear diffuser and Joe Toth composites rear ducktail spoiler .
|
|
|
|
|
11-17-2017, 06:04 AM
|
#57
|
|
Registered User
Join Date: Apr 2017
Location: Indiana
Posts: 1,514
|
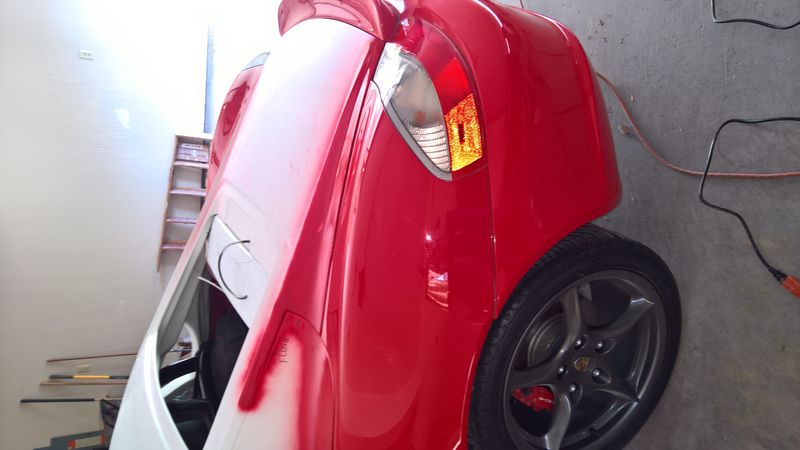
Please disregard the gasket post that was here. The thicker gasket put too much stress on the latch. I'm going to use one supplied, just use trim cement.
Last edited by JBauer; 11-17-2017 at 08:19 AM.
|
|
|
|
|
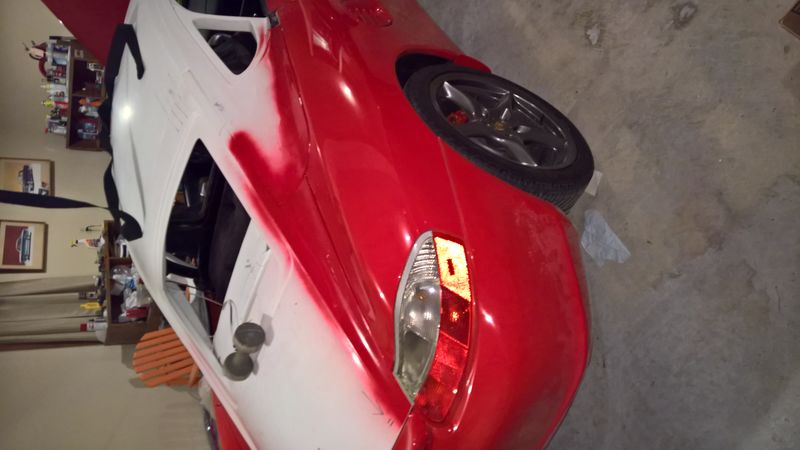
11-18-2017, 06:40 PM
|
#58
|
|
Registered User
Join Date: Apr 2017
Location: Indiana
Posts: 1,514
|
|
|
|
|
|
11-18-2017, 10:16 PM
|
#59
|
|
Registered User
Join Date: May 2015
Location: Greater Seattle, WA
Posts: 534
|
Really nice work! I'll bet when this is done as long as you don't give up on making it gaps, etc meet your expectations, it's going to be very rewarding when it's all looking good to know you caused it to look that way.
__________________
2001 Boxster
|
|
|
|
|
11-19-2017, 06:28 AM
|
#60
|
|
Registered User
Join Date: Apr 2017
Location: Indiana
Posts: 1,514
|
Quote:
Originally Posted by jakeru
Really nice work! I'll bet when this is done as long as you don't give up on making it gaps, etc meet your expectations, it's going to be very rewarding when it's all looking good to know you caused it to look that way. |
Thanks! Did a little more fiddling and got the bind out of it. Now to up to the BS guys tomorrow �� 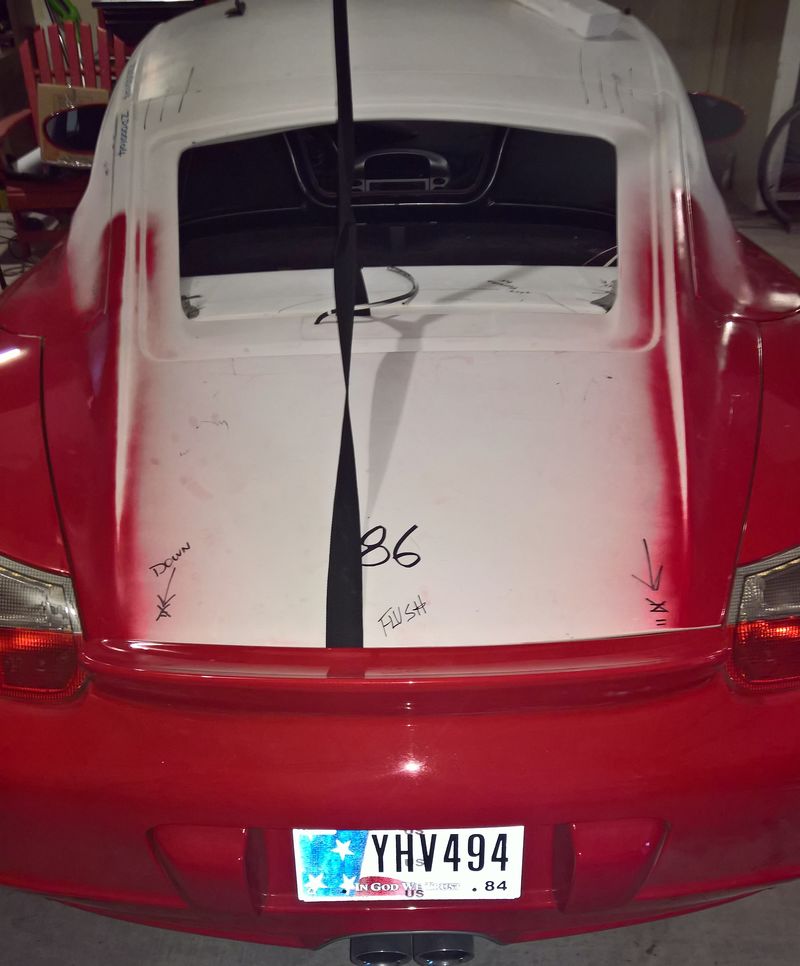
Last edited by JBauer; 11-19-2017 at 06:49 AM.
|
|
|
|
 Posting Rules
|
You may not post new threads
You may not post replies
You may not post attachments
You may not edit your posts
HTML code is On
|
|
|
All times are GMT -8. The time now is 12:02 AM.
| |


 2001 Boxster S
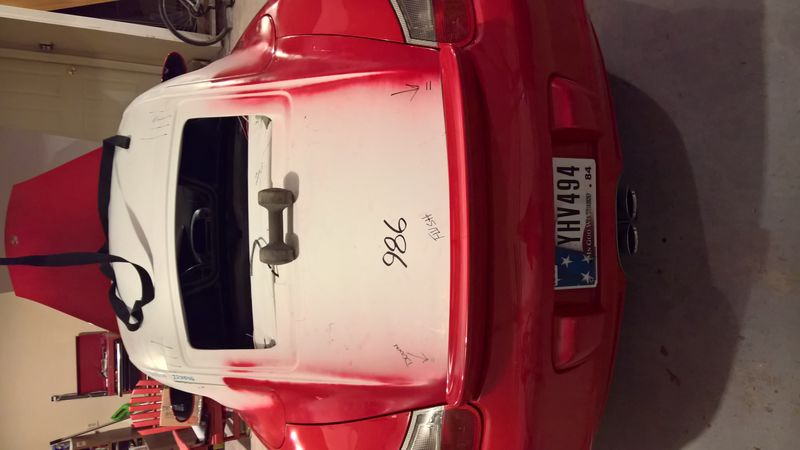

 Linear Mode


