 01-30-2017, 08:37 AM
|
#1
|
|
Registered User
Join Date: Aug 2015
Location: Brandon MB
Posts: 51
|
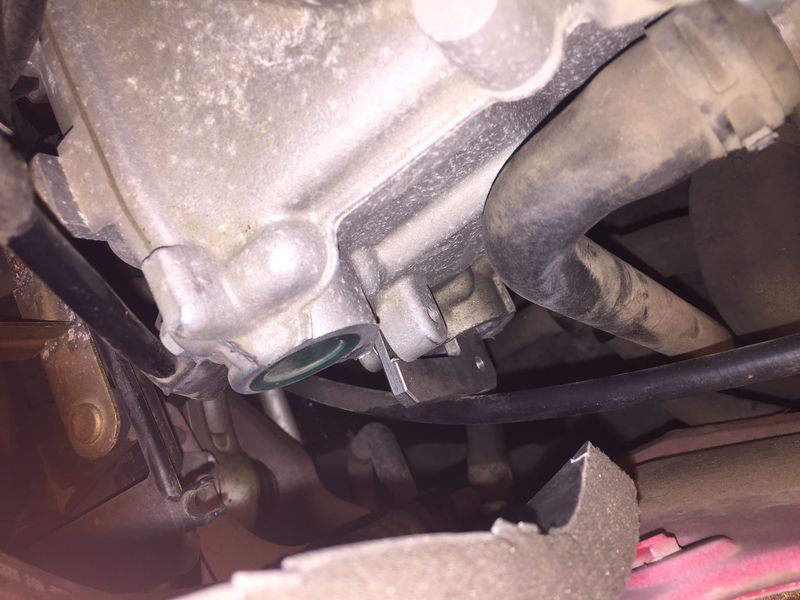
Is it me or should this fit better?
I'm setting up my 01S to replace the IMS bearing and just fitted the cam tool. The end is in the slots of the cam but the part where it's threaded does not want to sit flush - the machined part is smaller that the lug on the head. Am I okay to continue?
|

|

|
|
01-30-2017, 08:55 AM
|
#2
|
|
Registered User
Join Date: Feb 2005
Location: It's a kind of magic.....
Posts: 6,655
|
Quote:
Originally Posted by CdnRD

I'm setting up my 01S to replace the IMS bearing and just fitted the cam tool. The end is in the slots of the cam but the part where it's threaded does not want to sit flush - the machined part is smaller that the lug on the head. Am I okay to continue?
|
Try rotating the engine around to TDC and reinstalling it.
__________________
Anything really new is invented only in ones youth. Later, one becomes more experienced, more famous and more stupid. - Albert Einstein
Last edited by JFP in PA; 01-30-2017 at 09:02 AM.
|

|
|
|
01-31-2017, 07:36 AM
|
#3
|
|
Registered User
Join Date: Sep 2009
Location: New Hampshire
Posts: 39
|
Quote:
Originally Posted by JFP in PA
Try rotating the engine around to TDC and reinstalling it.
|
I had the same problem this week as well. The slot on the cam and the tool lined up perfect but the engine casting interfered with the tool a bit. I tried using a file but the one I had was crap so I just tightened the cam lock down and it deformed the edge of the casting enough to sit flush. It looks like you had a bit more interference than I though.
|
|
|
|
|
01-30-2017, 09:31 AM
|
#4
|
|
Registered User
Join Date: Aug 2016
Location: Sooke, BC
Posts: 18
|
As long as it is locking the cam - as you say it is, it will work fine. Just not as "pretty" sitting lopsided like that is all.
|
|
|
|
|
01-30-2017, 09:32 AM
|
#5
|
|
Registered User
Join Date: Aug 2015
Location: Brandon MB
Posts: 51
|
Thanks for the advice. I gave that a shot and I had a hard time getting the tool to fit in the camshaft slot. I turned it back and could get it to line up nicely with the camshaft but same problem with the lug. I'm assuming that the part of the tool that is machined away is supposed to fit against the lug on the engine. If that is the case, the holes won't ever line up. Could it be that I'm using the wrong tool? It's a 2001 with a two row bearing. Is it possible that it's a three chain? Is there a way to tell by looking at the castings? The engine number is for a 2001S.
|
|
|
|
|
01-30-2017, 09:38 AM
|
#6
|
|
Registered User
Join Date: Aug 2015
Location: Brandon MB
Posts: 51
|
Thanks. It does seem to be holding. It's definitely not a three chain. I pulled the top plug and there's no slot in the cam.
|
|
|
|
|
01-30-2017, 09:40 AM
|
#7
|
|
Registered User
Join Date: Aug 2016
Location: Sooke, BC
Posts: 18
|
Yes it is supposed to clear the casting. You could grind the offending area on the tool to allow clearance and a proper fit. Or the engine casting, but fixing the tool would be preferable IMO.
|
|
|
|
|
01-30-2017, 09:44 AM
|
#8
|
|
Registered User
Join Date: Aug 2015
Location: Fulshear, TX
Posts: 268
|
That is the correct tool. I did my IMS this weekend in my 2001S and the tool was not what I would call a precision fit. I was attempting to line up the shoulder on the tool with the bung but then the screw holes didn't line up. Similar to yours but just a hair off from fitting. I rotated the engine, reinstalled, stared at it repeatedly, got some more light on the subject and looked at it from different angles to be sure its in the slot and holding the cam. It did hold my cams in place once it was locked in. Being super-cautious and following the procedures carefully the project still didn't take to long start to finish.
|
|
|
|
|
01-30-2017, 09:58 AM
|
#9
|
|
Registered User
Join Date: Aug 2015
Location: Brandon MB
Posts: 51
|
I ground away some of the tool and it seems to fit okay now. Next up the tensioners. I'm hoping to have the bearing in today.
|
|
|
|
|
01-30-2017, 10:24 AM
|
#10
|
|
Registered User
Join Date: May 2012
Location: Vancouver Island, Canada
Posts: 211
|
Quote:
Originally Posted by CdnRD
I ground away some of the tool and it seems to fit okay now. Next up the tensioners. I'm hoping to have the bearing in today.
|
Excellent project to keep you busy during a Brandon winter. It seems as though you are being careful with each step in the process and I hope all goes smoothly for you swapping out the bearing.
I've been contemplating this job on my '01 S as well and see that you have the dual row bearing.
Do you know your engine number by chance? I know that the only way to be sure if you have a dual or single row is to look at the IMSB flange but I'm still curious 
Good luck with the remainder of your installation, hope it goes as planned 
__________________
'01 Boxster S (purchased new) triple black, litronics, cruise, heated seats,18's.
|
|
|
|
|
01-30-2017, 10:12 AM
|
#11
|
|
Registered User
Join Date: Aug 2015
Location: Fulshear, TX
Posts: 268
|
The Porsche Gods got me with the tensioners. I had purchased 3 new ones and the one on bank 2 under the air conditioning compressor is 32mm so once I got the A/C out of the way I removed that tensioner. However the new one goes in with a 14mm hex instead of the 32mm socket. And of course I didn't have a 14mm hex.
|
|
|
|
|
01-30-2017, 12:52 PM
|
#12
|
|
Registered User
Join Date: Aug 2015
Location: Brandon MB
Posts: 51
|
I'm probably being overly careful because I'm not confident I won't screw it up! I wanted to finish today but lost my nerve when I tried to take out the flange. It came out a bit and turns pretty easily in the bore but it seems it's taking more effort to pry it out than described. I'll regroup, ask some questions and try another day.
My engine number is M96/2167109581. I haven't got to the bearing yet but based on the shallow flange it's a dual row.
|
|
|
|
|
01-30-2017, 03:14 PM
|
#13
|
|
Registered User
Join Date: May 2012
Location: Vancouver Island, Canada
Posts: 211
|
Quote:
Originally Posted by CdnRD
I'm probably being overly careful because I'm not confident I won't screw it up! I wanted to finish today but lost my nerve when I tried to take out the flange. It came out a bit and turns pretty easily in the bore but it seems it's taking more effort to pry it out than described. I'll regroup, ask some questions and try another day.
My engine number is M96/2167109581. I haven't got to the bearing yet but based on the shallow flange it's a dual row.
|
I think it is wise of you to take your time and ask questions to the Pro's here who will jump in and help if you need it. There have been some horror stories when this procedure either isn't followed or is rushed.
Thank you for your engine number....mine is 67108159....maybe when I open mine up I'll find a dual row in there too.
Have fun with the rest of your project, I have a feeling you'll do just fine
__________________
'01 Boxster S (purchased new) triple black, litronics, cruise, heated seats,18's.
|
|
|
|
 Posting Rules
|
You may not post new threads
You may not post replies
You may not post attachments
You may not edit your posts
HTML code is On
|
|
|
All times are GMT -8. The time now is 09:43 AM.
| |


 2001 Porsche Boxster S
 Hybrid Mode


