 10-08-2015, 08:46 AM
|
#21
|
|
On the slippery slope
Join Date: Mar 2014
Location: Austin and Palm Springs
Posts: 3,803
|
Great story and thanks for the pics and details.
+1 on you choosing whatever IMSB you want
AND LET'S NOT TURN THIS WONDERFUL THREAD INTO AN IMS THREAD!!!!!
BTW, where in DC is your daughter, I grew up there.
__________________
2004 Boxster S 6 speed - DRL relay hack, Polaris AutoTop DIY
2004 996 Targa Tip
Instructor - San Diego region
2014 Porsche Performance Driving School
2020 BMW X3, 2013 Ram 1500, 2016 Cmax, 2004 F-150 "Big Red"
|

|

|
|
10-08-2015, 10:35 AM
|
#22
|
|
Registered User
Join Date: Aug 2015
Location: Callahan, FL
Posts: 462
|
jcslocum,
Where did you get the center console hinge kit at?
__________________
99 Boxster base
1966 912 3 gauge
|

|
|
|
10-08-2015, 01:10 PM
|
#23
|
|
Registered User
Join Date: Dec 2014
Location: Hinsdale, IL
Posts: 76
|
__________________
2001 996 C4 Tip: Sold. Back in a new Mustang - oh well, made in "Merica
|
|
|
|
|
10-08-2015, 01:48 PM
|
#24
|
|
Registered User
Join Date: Jul 2013
Location: Bastrop, Tx
Posts: 2,644
|
Great thread! Thanks for the compliments earlier in the thread. Can we see more pics of your $5 bearing puller?
__________________
Woody
|
|
|
|
|
10-08-2015, 02:14 PM
|
#25
|
|
Registered User
Join Date: Nov 2004
Location: New Jersey
Posts: 8,709
|
Holy cow....
__________________
GT3 Recaro Seats - Boxster Red
GT3 Aero / Carrera 18" 5 spoke / Potenza RE-11
Fabspeed Headers & Noise Maker
BORN: March 2000 - FINLAND
IMS#1 REPLACED: April 2010 - NEW JERSEY -- LNE DUAL ROW
|
|
|
|
|
10-08-2015, 04:39 PM
|
#26
|
|
Project Addicted
Join Date: Aug 2015
Location: Eastern Shore, MD
Posts: 623
|
The console kit is a Porsche kit part number 996.552.960.01 and should be available at any dealer or online for about $32.00. It took about 3 minutes to install. There were no directions but I can help explain if you need it.
__________________
______
Jon
1966 912, 1976 911
1986 944, 2000 Boxster
|
|
|
|
|
10-08-2015, 08:03 PM
|
#27
|
|
Registered User
Join Date: Oct 2014
Location: Portland, OR
Posts: 53
|
Quote:
Originally Posted by jcslocum

Riveted??? I think you have to read more or get out more :-)
|
I have a two-year old...you might be right. 
__________________
2000 Boxster S 6 speed Guards Red
|
|
|
|
|
10-09-2015, 08:04 AM
|
#28
|
|
Project Addicted
Join Date: Aug 2015
Location: Eastern Shore, MD
Posts: 623
|
Quote:
Originally Posted by itsnotanova
Great thread! Thanks for the compliments earlier in the thread. Can we see more pics of your $5 bearing puller?
|
Woody, you get the thanks! You have supplied many needed parts at a great price and fast shipping. Without your support, this would be a much more expensive project and take much longer.
So, now to my cheep Yankee puller. This is not an indictment of anyone else or their products. This is more an indictment of me being cheep and somewhat clever.
For most of us this is a one time use tool. I may need to do another IMS bearing because I'm a serial Porsche owner and project addicted. I have pulled a lot of bearings in the past and didn't see the need to invest a few hundies in a single use tool that to me isn't all that unique. I searched for folks that had made their own puller and cam holders, and found nothing on the interwebs, so I was on my own.
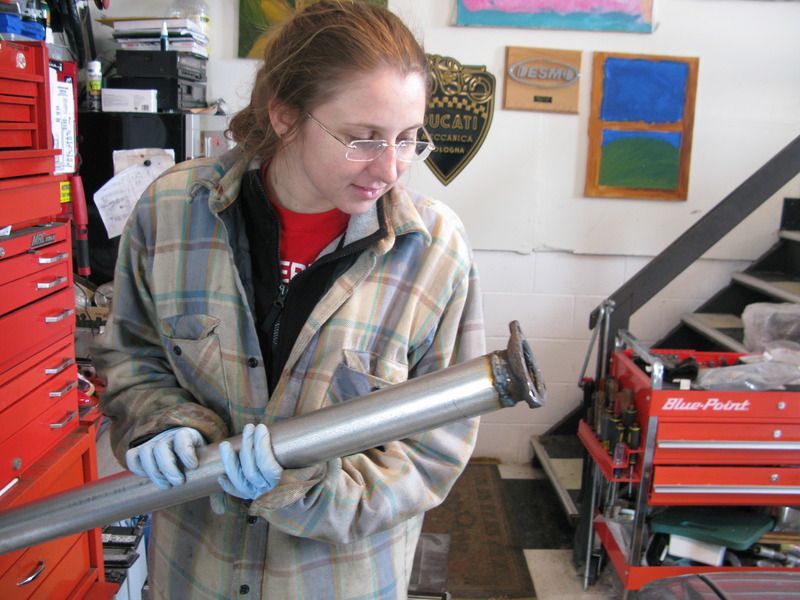
I have lots of junk tucked away in my 2 car garage/shop. I'm always puttering on cars and have a few projects going all the time. I typically over buy small things because I don't want to run out to pick little stuff up when doing a job, and this is where this exhaust pipe part came in. Allie was messing with the 944 exhaust system a few years ago and while out I grabbed a few adaptors that were $2.79 each. She didn't need some so it got thrown into a box of "muffler" stuff for use later or maybe never, but I don't throw good stuff away. Here's Allie after she got done welding up here "test" pipe to replace the cat.
Enough bragging, back to the puller.
The pipe is strong enough for the job to pull the double row with the wire keeper that it has. The OEM bearing stud is 8mm ( #1 in the picture below ) with what we would call a fine thread or a pitch of 1.0, so the standard coupling nut( #2 below ) must be threaded to 8mm 1.0 from the standard 0f 8mm 1.25 pitch. I didn't re-drill it, I just grabbed a 8x1.0 tap and cut the new threads on 1 side or 1/2 deep on the coupling nut #2. The threaded Rod ( #3 in the pic ) is 8mm 1.25 thread pitch so only 1/2 of 1 of the nuts needs to be rethreaded. The pipe is just an off the shelf exhaust pipe that is sold in every auto parts store. The only dimension that matter is the ID (inside diameter) of the end that goes on the end of the IMS pocket. The OD (outside diameter) of the bearing is approx 1-7/8" OD so you need a bit if clearance for the bearing to come into. The pipe I used is a Nickson 548516
Autozone info:
Nickson 2.00" I.D. x 1.75" O.D. Reducer
Part No. 548516 $3.99
I don't pay full price at the local parts store, I paid $2.99
You MUST use a coupling nut as the part that you turn and introduce the load. The standard nut will end up stripping the threaded rod. The normal threaded rod isn't made from the strongest material like a normal bolt. So I used a second coupling nut to wrench on and lube it up with some slippery grease. #5 is just a scrap piece of steel with a hole in it for the threaded rod to some thru and cover the end. I also used some washers becasuse the hole was like 1" so I needed to shrink this down to 8mm. You can grab a piece of plate 1/4" from your local dirt floor weld shop for free, take it home and drill an 8mm hole in it and you are good to go!
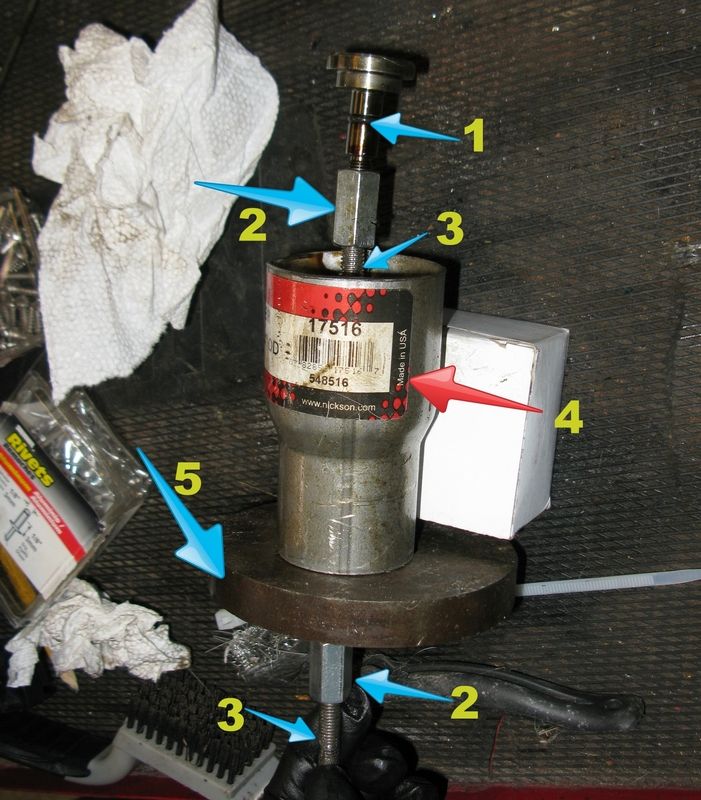
The puller during first fit up. The pipe shown has the wrong ID so I changed it to the 2" ID part. the "normal" height nut will not work.
I hope this helps.
__________________
______
Jon
1966 912, 1976 911
1986 944, 2000 Boxster
Last edited by jcslocum; 10-09-2015 at 09:46 AM.
|
|
|
|
|
10-13-2015, 08:20 AM
|
#29
|
|
Project Addicted
Join Date: Aug 2015
Location: Eastern Shore, MD
Posts: 623
|
Weekend Update:
Not much time this weekend for Boxster work. New tires mounted, 2nd cats cut out for test pipes and new muffler and some little things but reversing the trend is getting things bolted back on now.
Used flywheel showed up and is in much better shape than the original. About 10MM movement and returns nicely to "center". Surface is also much better. If course Porsche uses a much more arcane procedure for tightening the SINGLE use flywheel bolts. So I got my new bolts out, mounted the flywheel after giving it a good cleaning and torqued the bolts to the step 1 of 19Ft. Lbs. Why torque and then use "angle of turn" you ask? Well the low torque value stiffens the joint or takes out any slop, smile or opening between the back of the flywheel or crank face. The reason to use angle of turn, is that the friction between the bolt thread surfaces or the load bearing surface under the head does NOT need to be used in the load calculation. friction plays a big part of the load losses and this makes toque too inaccurate when trying to load a bolt very close to it's yield point.
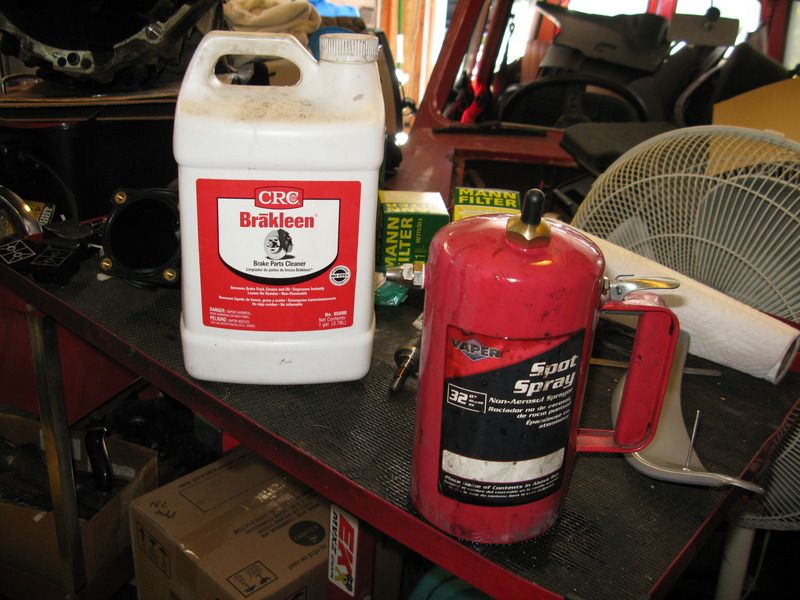
The BEST cleaning tools you can have in your garage. A gallon of BrakeKleen and the Vapor sprayer. I think the sprayer cost me about $25 and if you do any work in your garage you MUST get one.
After torque, I maked the bolts for 120 degrees of movement. This is east by downloading and printing a circle divided into 3 pieces and then cutting out one section:
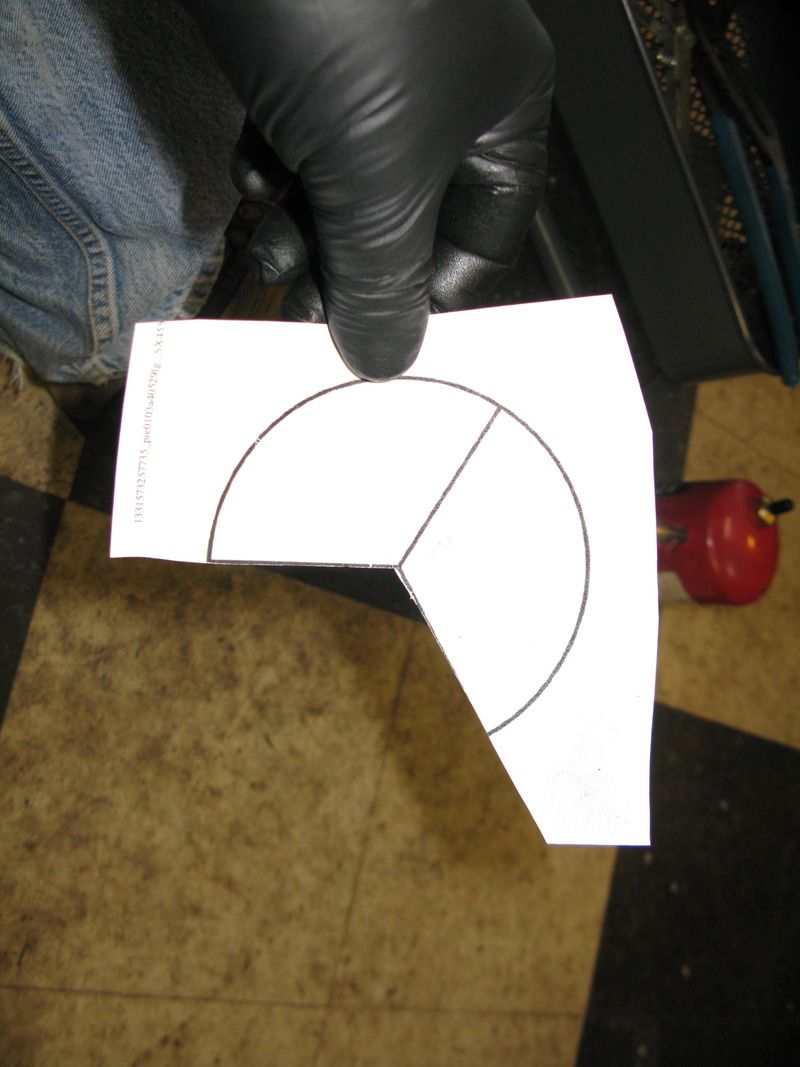
Place this over the bolt and mark the head at 1 point and mark the 2nd point, 120* away on the flywheel.
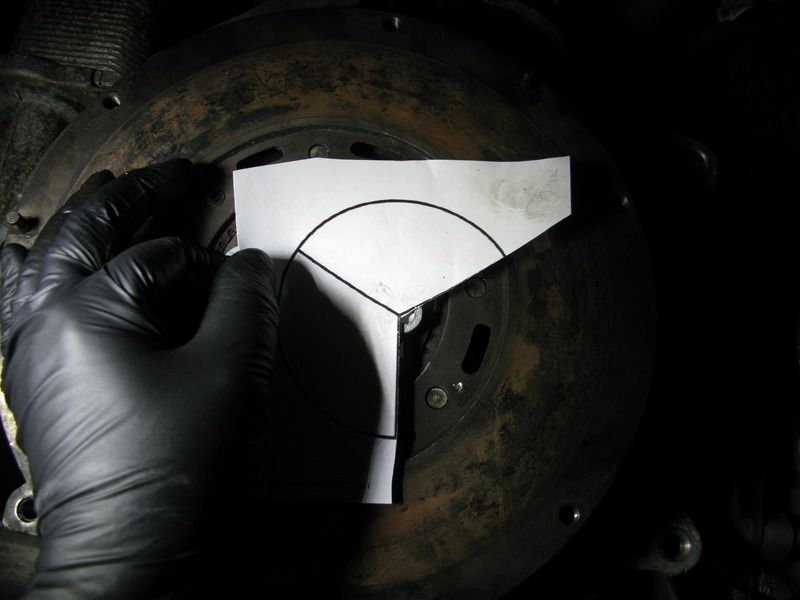
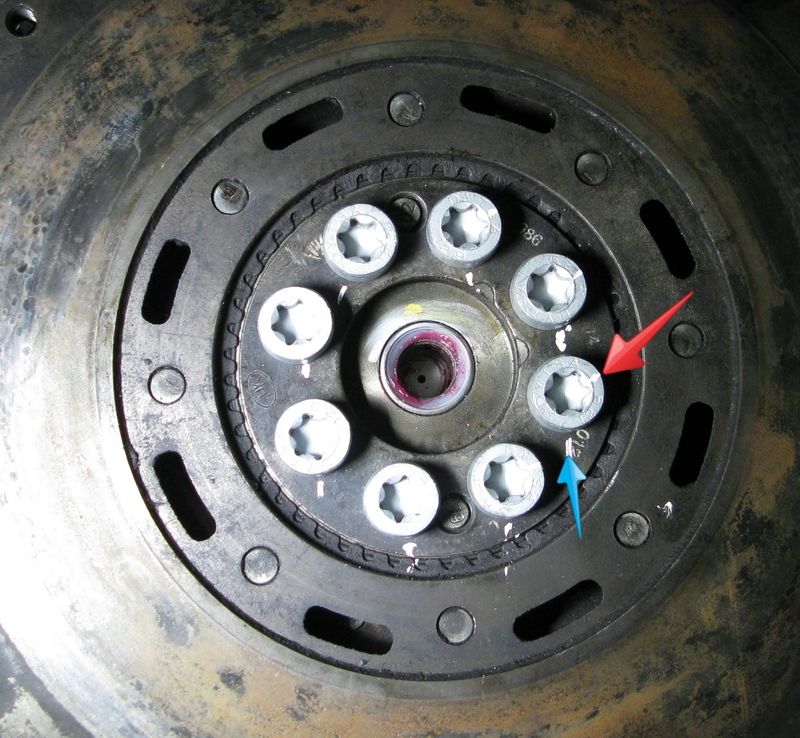
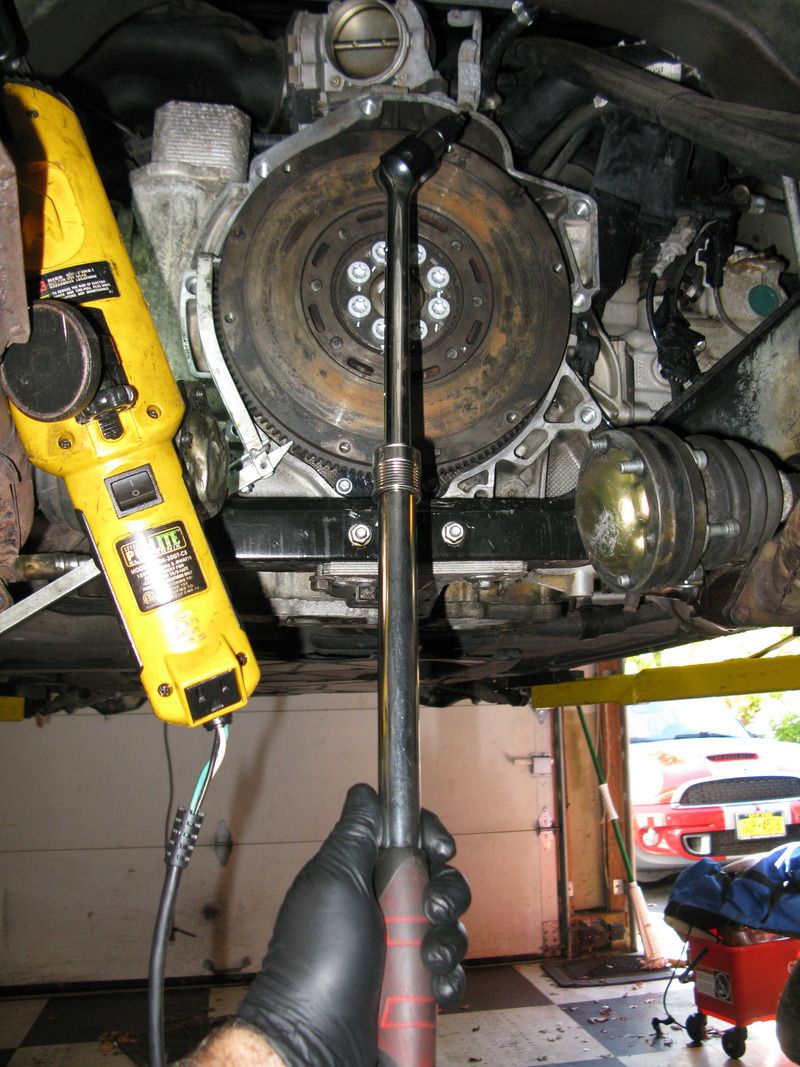
All you do then, is grab your long 1/2" drive breaker bar and move the bolt mark to the next mark on the flywheel. These bolts get tight so the breaker bar is needed!!
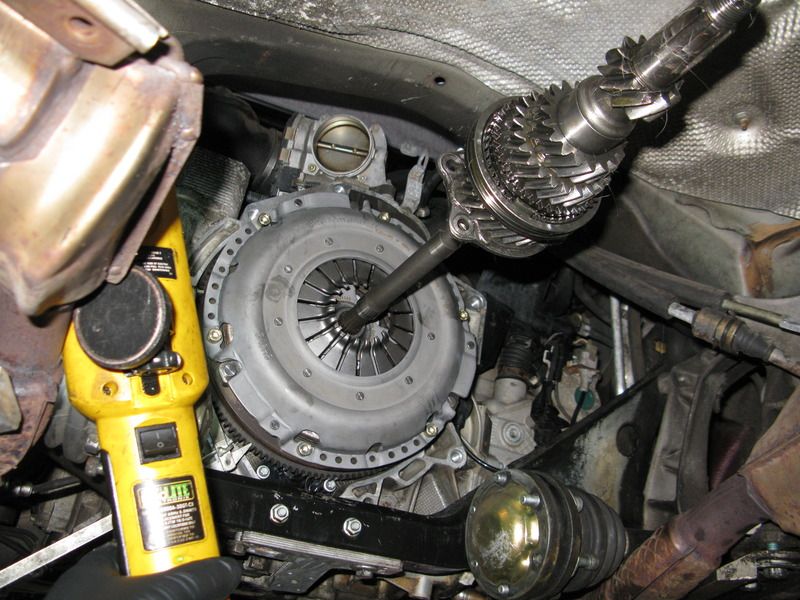
I cleaned the new pressure plate oils off and then mounted it to the flywheel with new bolts. New bolts are not needed for this application but they were cheep, so I got new. The kit I bought didn't come with a plastic friction disc alignment tool so I used an input shaft from a 915 rebuild that we are doing for Allie's 911.
Once that was all bolted up, I moved on to cleaning the grunge off of the trans, yuk. I will share one of my closely held trade secrets with y'all. The BEST way to clean this type of thing is by using wheel cleaner, not just any wheel cleaner but SONAX wheel cleaner. The stuff cuts right thru the $hite like a hot knife thru butter. I put the trans out in the sun for a few hours while I was doing the clutch work. This heats up the gunk and gets those dirt atoms moving and ready to leave the surface of the trans. I then soak it with wheel cleaner and make sure that the trans is now in the shade. You don't want it drying on there. This is where you must have some patience and allow this stuff to sit and do it's job. wait 20 minutes and then give it another coating of cleaner and allow to sit for 20 minutes in the shade. Now get the garden home turned on, use an old paint brush to give it some agitation and spray with the hard direct stream of water. The grunge will melt away and you will be left with a nice clean tranny.
From this:
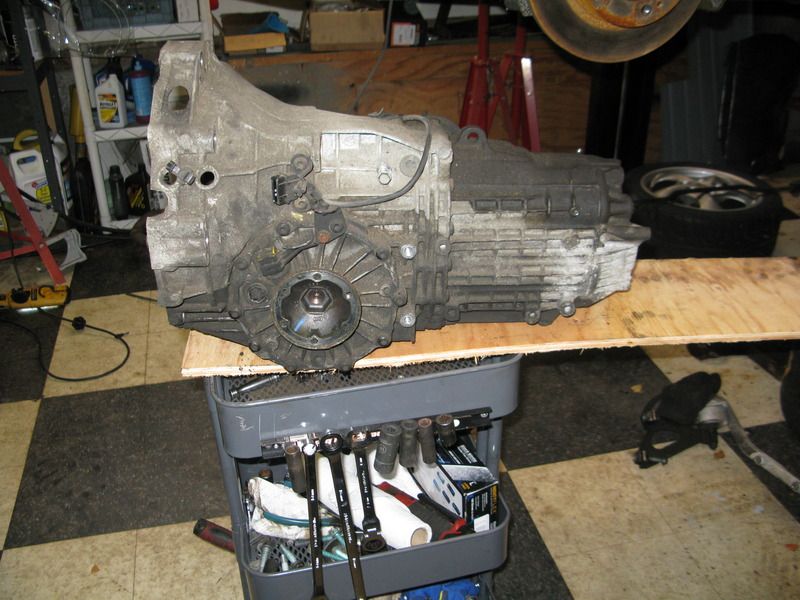
To this:
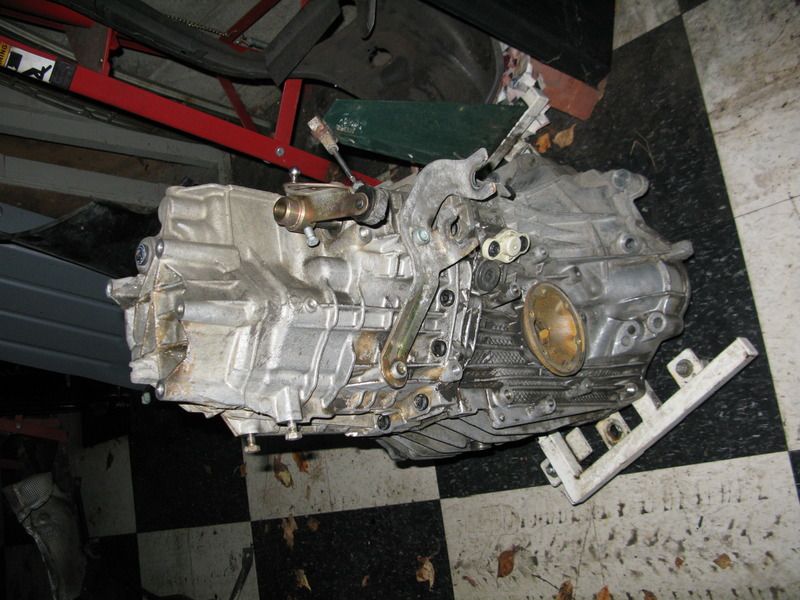
Much nicer to work with the clean parts vs filthy parts!! The trans might meet the engine again tonight, if I can get Missus Better 7/8ths to run the lift for me.
__________________
______
Jon
1966 912, 1976 911
1986 944, 2000 Boxster
Last edited by jcslocum; 10-13-2015 at 08:23 AM.
|
|
|
|
|
10-13-2015, 08:41 AM
|
#30
|
|
On the slippery slope
Join Date: Mar 2014
Location: Austin and Palm Springs
Posts: 3,803
|
once again, a stellar writeup
Did notice your trouble light needs to have the power cord repaired before it gets frayed and zaps you
__________________
2004 Boxster S 6 speed - DRL relay hack, Polaris AutoTop DIY
2004 996 Targa Tip
Instructor - San Diego region
2014 Porsche Performance Driving School
2020 BMW X3, 2013 Ram 1500, 2016 Cmax, 2004 F-150 "Big Red"
|
|
|
|
|
10-13-2015, 10:13 AM
|
#31
|
|
Project Addicted
Join Date: Aug 2015
Location: Eastern Shore, MD
Posts: 623
|
Thanks for the kind words, all of you.
In one of my previous rambles, I mentioned that the timing chain tensioner did not pop out when removed, but must have worn a groove and it was stuck in that groove. I can push it in and feel the "click" of the pin going over the groove. I ordered a new tensioner and put it in this past Saturday. As I was handling it, it was obvious that this new tensioner had a heavier spring in it an looked a bit different too.
I decided to make and un-scientific test and grabbed the old flywheel and set it onto the old tensioner (on the left) to see how far it would push the spring in. I marked it and this is about 85% of the full range of motion for the plunger. I did the same thing to the new tensioner and you can see the difference. Old = 122K miles and about 2x the movement under the same weight. The old spring is much weaker and the plunger was stuck.
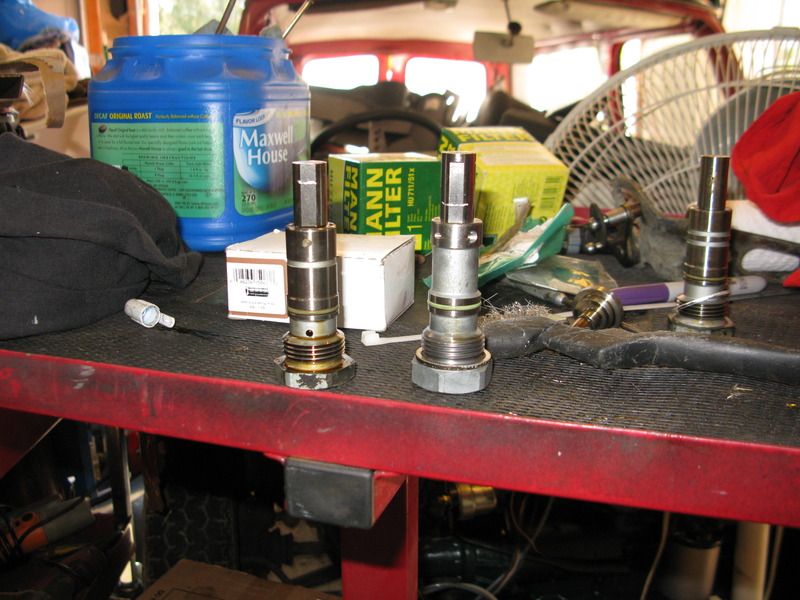
Not sure what this all means but my guess is that the old tensioner spring is tired and/or Porsche has made many updates and one being a new heavier spring.
__________________
______
Jon
1966 912, 1976 911
1986 944, 2000 Boxster
|
|
|
|
|
10-14-2015, 05:50 PM
|
#32
|
|
Project Addicted
Join Date: Aug 2015
Location: Eastern Shore, MD
Posts: 623
|
Got some work done today after work. Put the trans in with the help of Missus Better 7/8ths and it went pretty smooth overall. Cleaned up the inside of the bell housing and the pivot for the fork. Greased all the friction points and noticed some wear on the fork where the throwout bearing rides.
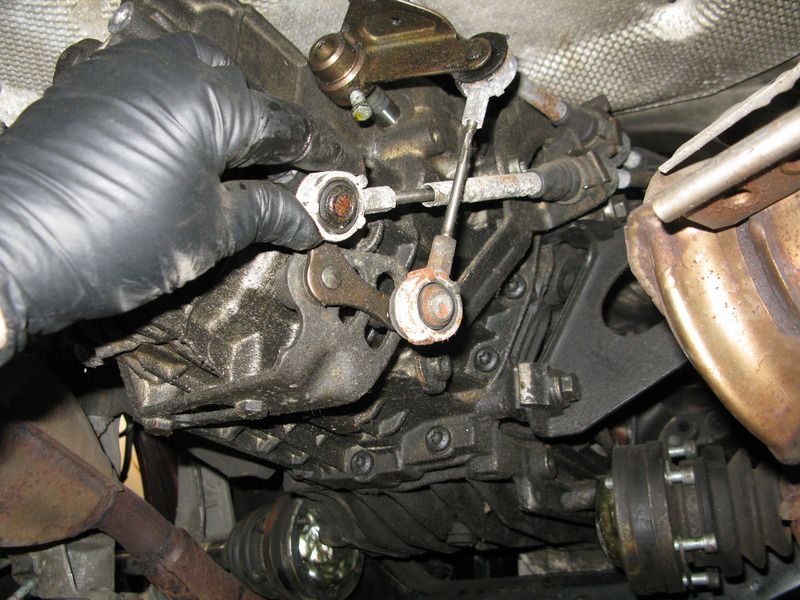
I cleaned up the motor mounts and got them bolted in. Lubed the shifter linkage. I need new ends for the cables. Has anyone figured out if these can be replaced or rebuilt?

I filled the tans with oil and love the way I was able to squeeze the quart of oil up there and squirt the oil thru the hole to fill it! Most of the time I end up using the pump or a hose and getting 1/2 of the oil in my hair (not much on top but the sides are very absorbent), down my arms and inside my gloves. Not tonight though, engineering may have made some poor fastener choices and that stupid security drain plug, but the hit a home run with the filler location!
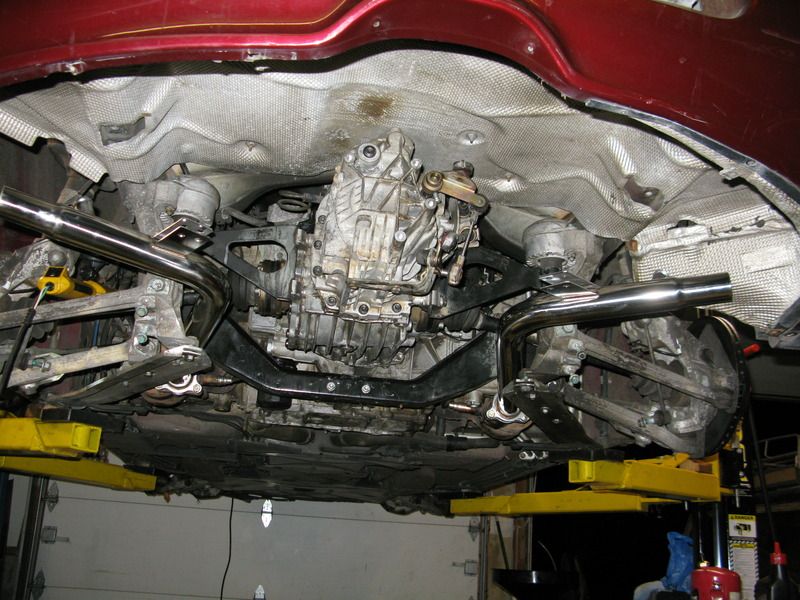
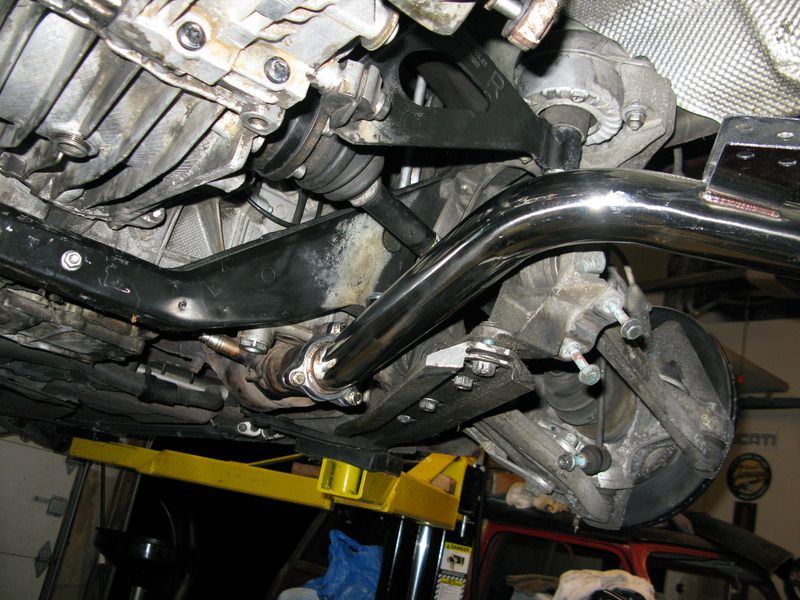
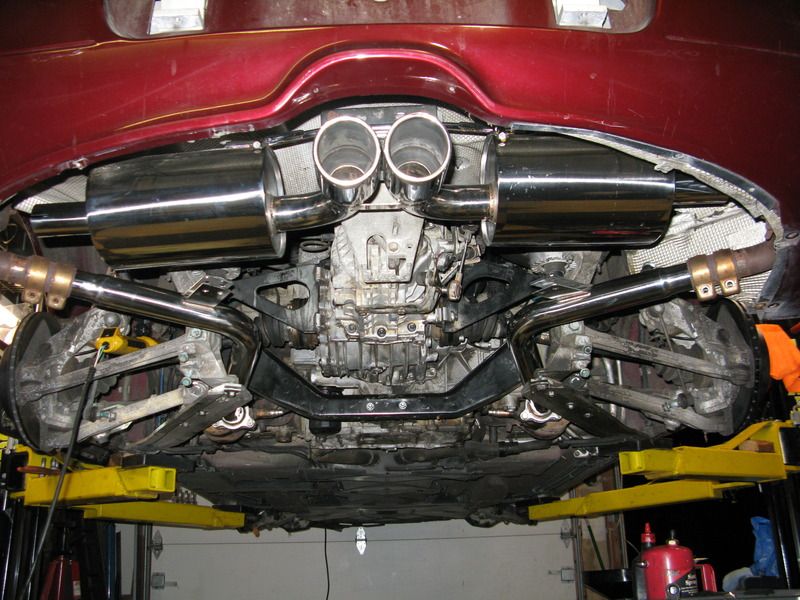
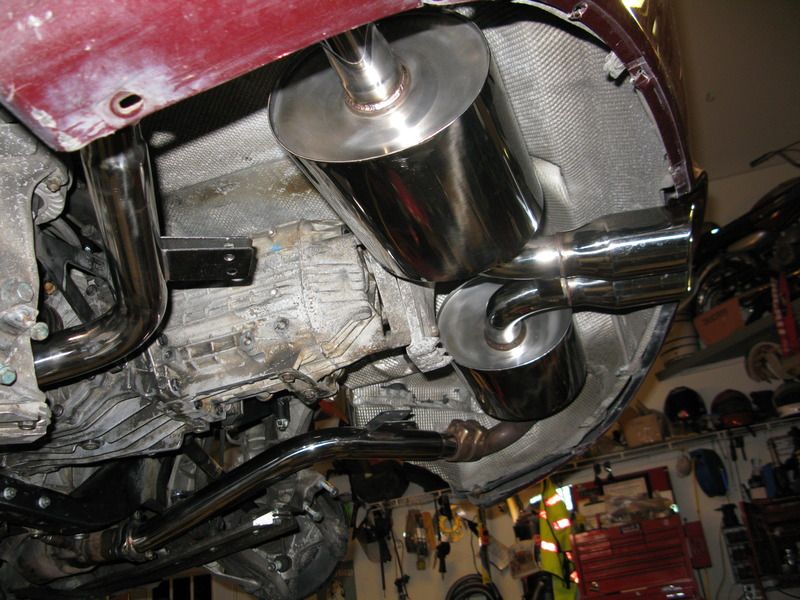
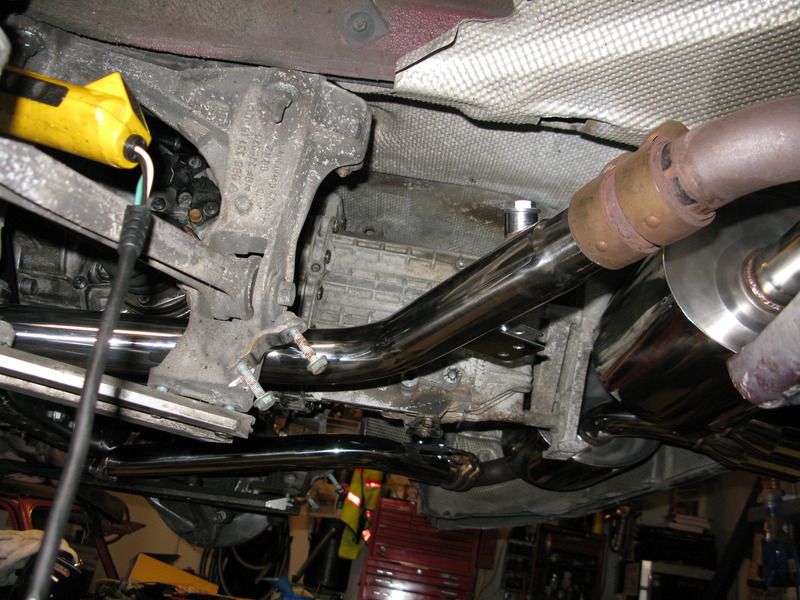
Now, finally some eye candy! Muffler and pipes from Top Speed will look and sound awesome.
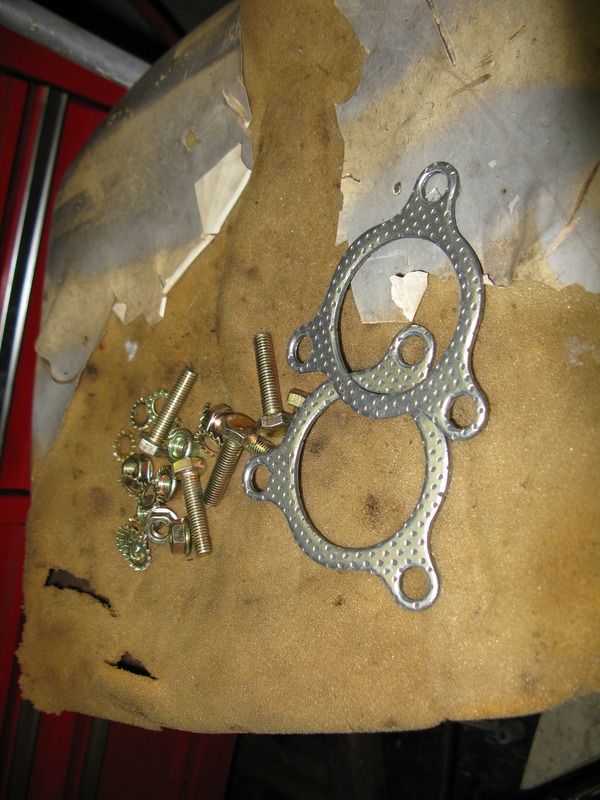
Nice welds on the 2nd cat eliminator pipes and they also sent new hardware.
I might have to cut those extra brackets off if you use them with the original muffler.
More to come.
__________________
______
Jon
1966 912, 1976 911
1986 944, 2000 Boxster
Last edited by jcslocum; 10-14-2015 at 06:56 PM.
|
|
|
|
|
10-16-2015, 03:46 PM
|
#33
|
|
Registered User
Join Date: Jan 2008
Location: St Catherines, Ontario
Posts: 439
|
Subscribed to this thread
Youre one bad ass dad
__________________
2006 Audi A4 Avant 2.0t Quattro
1997 Boxster Glacier White w/facelift(gone but not forgotten)
2004 Boxster S 550 Spyder Anniversary Edition
|
|
|
|
|
10-18-2015, 05:29 AM
|
#34
|
|
Project Addicted
Join Date: Aug 2015
Location: Eastern Shore, MD
Posts: 623
|
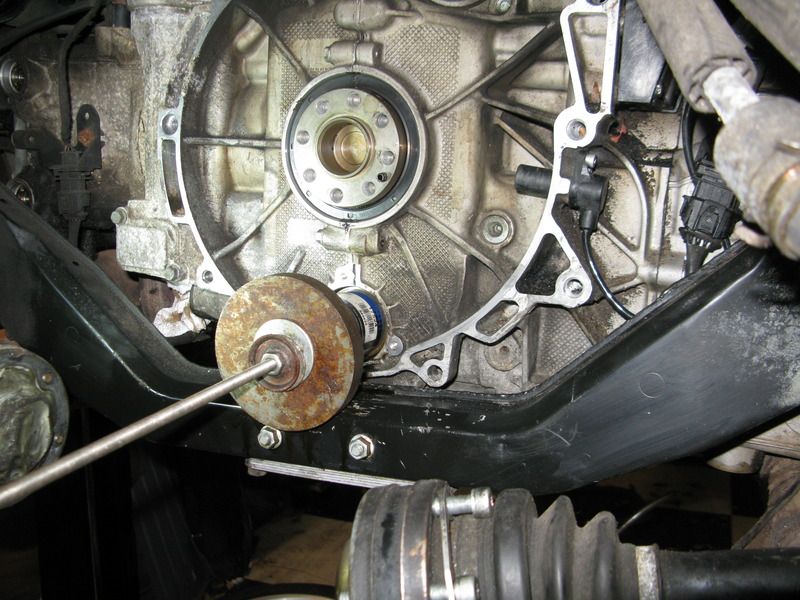
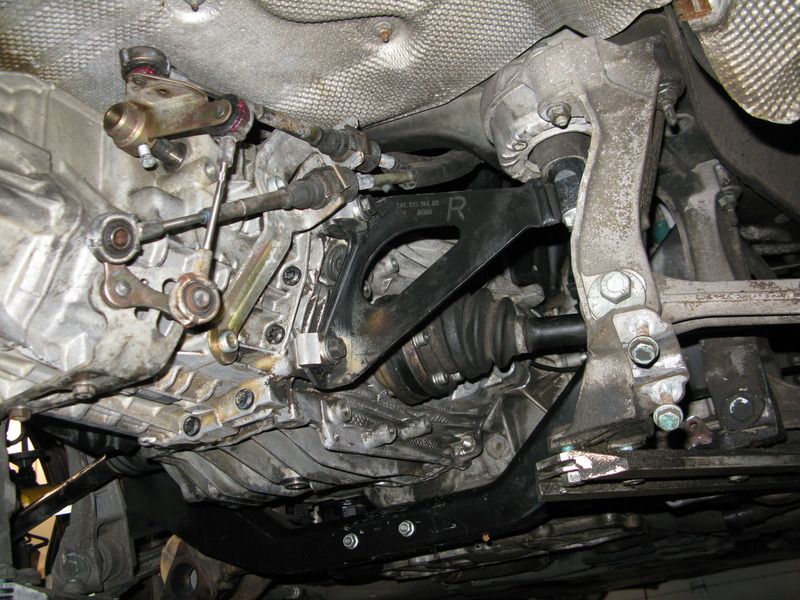
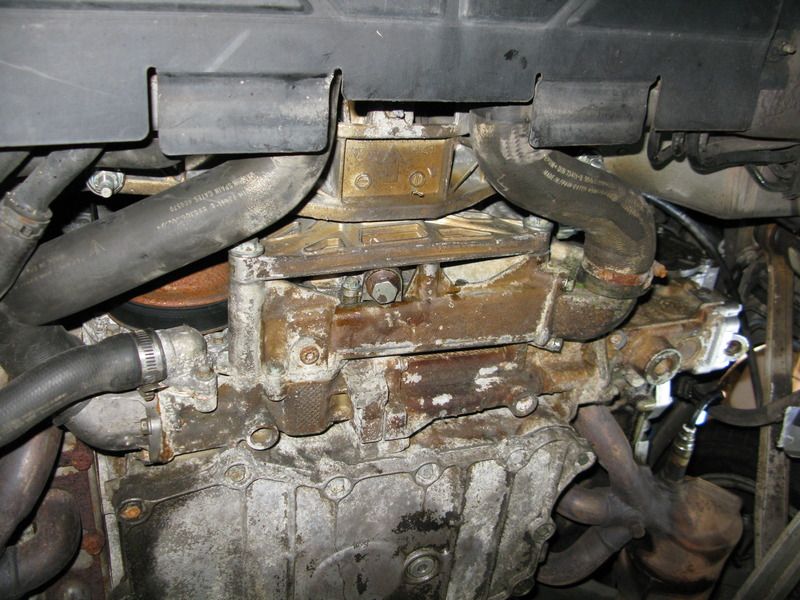
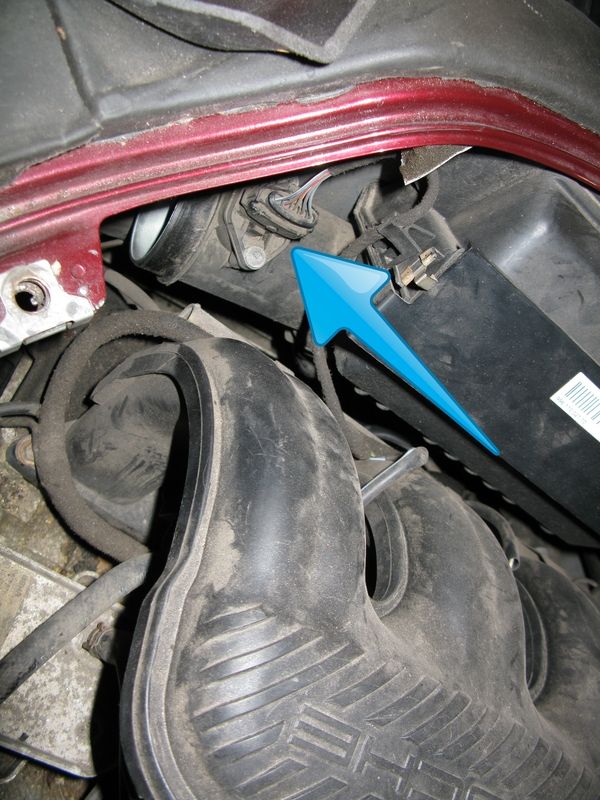
Another Saturday another plow thru the list of things that need to be done and finished up underneath the Box. With the IMS bearing installed it's time to modify the oil pump to feed it fresh oil instead of letting it turn to some kind of primordial soup over tim. At the same time, the front engine mont was rockin and rolling and I had a new bushing to install.
The red arrow is the oil pump buried behind the motor mount, which is the blue arrow.
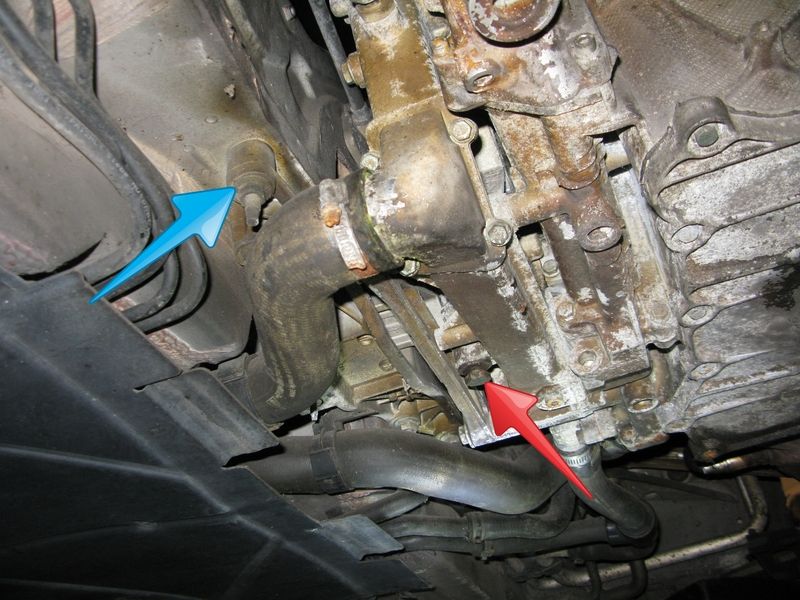
The 4 body nuts are easy to get to but the 2 top bolts (green head) to the engine are not. The trick is to let the engine hang as low as possible after the body fasteners are off. Like hang on the hoses and the jack not touching the engine. To give you MAX wiggle room to pull it out, you should also make sure that there is NO pressure in the cooling system by opening the coolant cap in the trunk and letting it sit loosely. This will allow you max squeeze on the hoses to allow the mount to slide out. It came out pretty easily towards the passenger side. On a scale of 10-10 on the swear jar scale, I put only a couple of quarters in and didn't you any of the more exotic words I know.
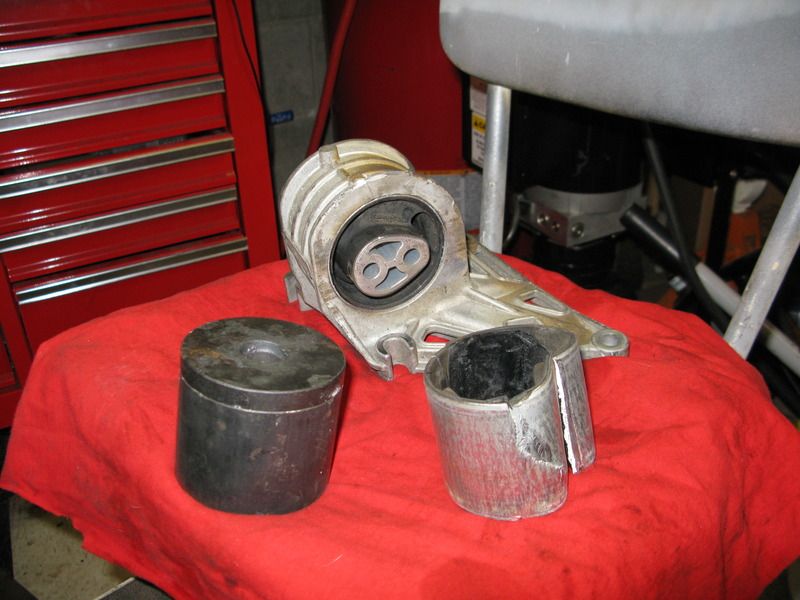
Once the mount was out, I can see that it is destroyed. The inner part is not even connected to the rubber. I guess 122K is just too much!!!
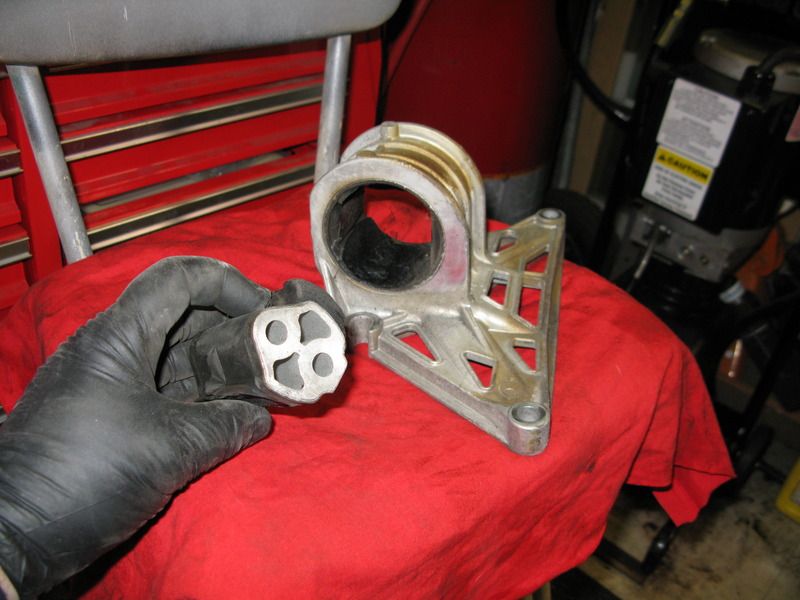
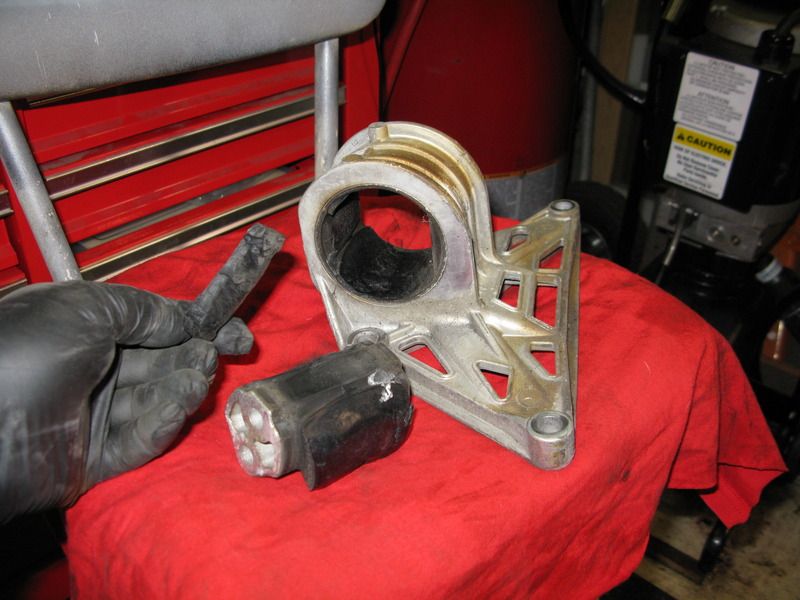
This shows the new bushing vs. what's left of the old one. Out with the old and in with the new.
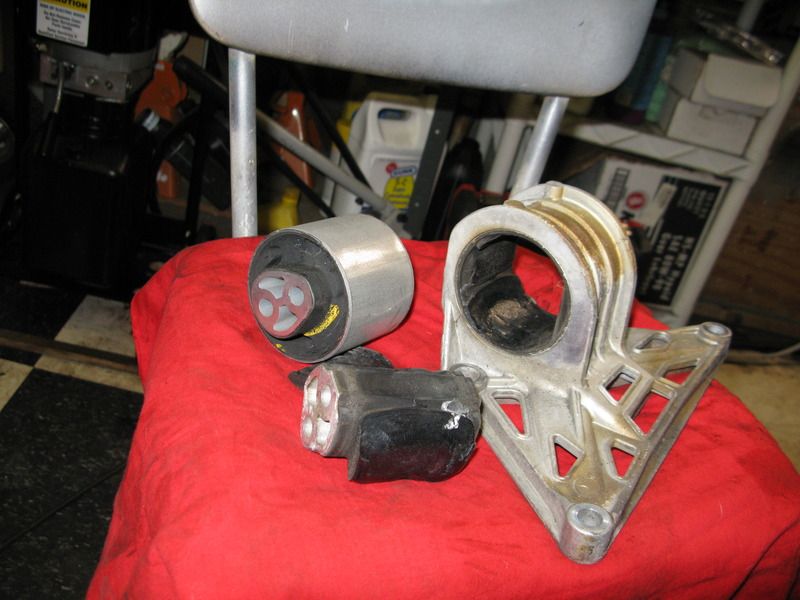
This part didn't fit into my crappy little press, so Brute Force and Ignorance to the rescue! With no way to press it out/in, the only option is to make a slice into the outer steel ring and collapse this ring to enable it to be knocked out. A few minutes with a hack saw and then a chisel and punch and the old part was out. The new part had to be pressed in and I did that with a driver and 3lb hammer. Once side of the mount has a nice bevel made into the opening to allow an easy start of the new bush. A bit of white lube on the leading edge and then some judicious pounding and the new bush was in. It must be oriented properly as well.
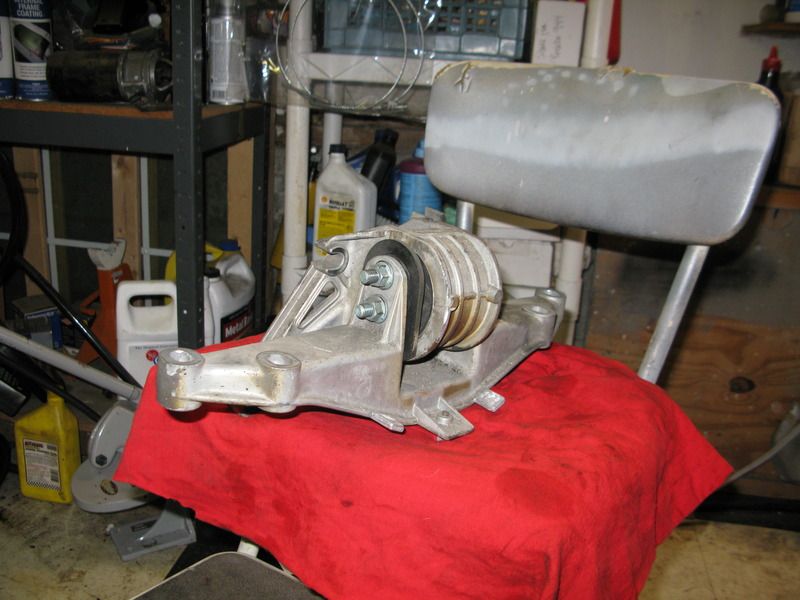
A little clean up and bolting the 2 parts together and she ready to go back in. But not yet!
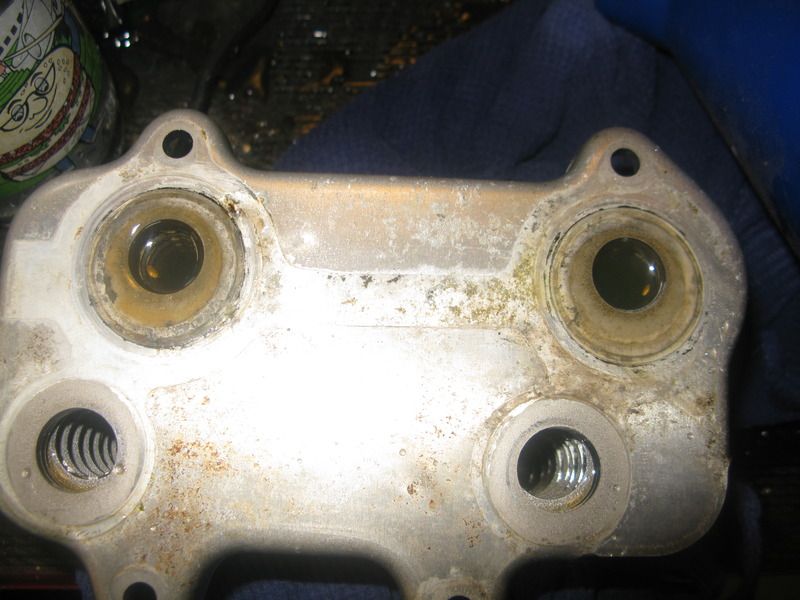
Time for some open heart surgery. The EPS bearing needs the oil pump modded to feed fresh oil to the bearing. The oil pump is behind the motor mount and has about 10 10mm bolts holding it to the front of the engine. It has an o-ring making the seal, not a gasket so it's not going to be hard to take off. It also has dowel pins locating it accurately and a lug to pry on to get it off without breaking the cover.
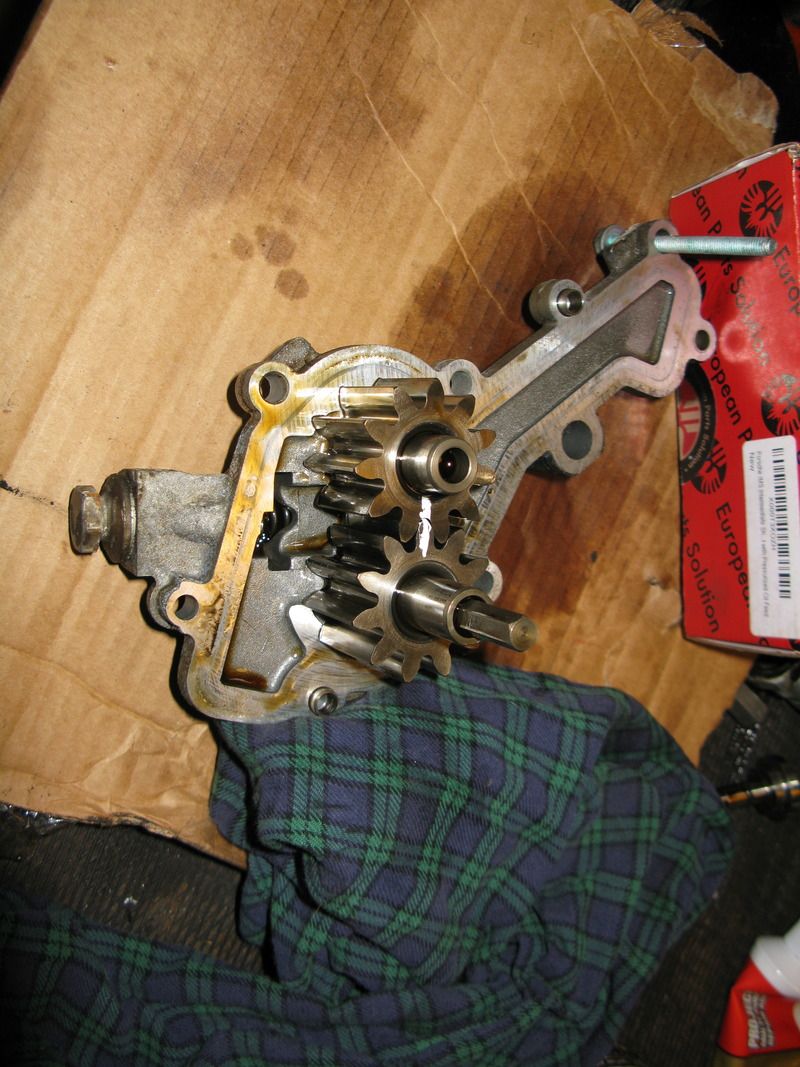
The prying lug is up near the bolt sticking thru and the oil pressure spring is under the hex head plug on the left side of the pic. A few taps on the hex and a long pry driver to get the top moving and it came right off. The oil pump drive hex is sticking out on the right side. Mark the gears so they go back in the same place and inspect them for wear. These look just fine and a quick clean up and they are ready to go back in.
This is the pump drive hole that the hex fits into and needs to have a hole punched into plug deep in there. EPS supplies the nicely sharpened punch in the kit and all it took was a few strong taps to break thru and get the 3mm hole required. It was stuck in there like a nail into wood, so it took a few side taps to get it loose and pull it out. Because I have a "show me" streak, I grabbed a piece of wire to probe the hole and just see how far it can go in.
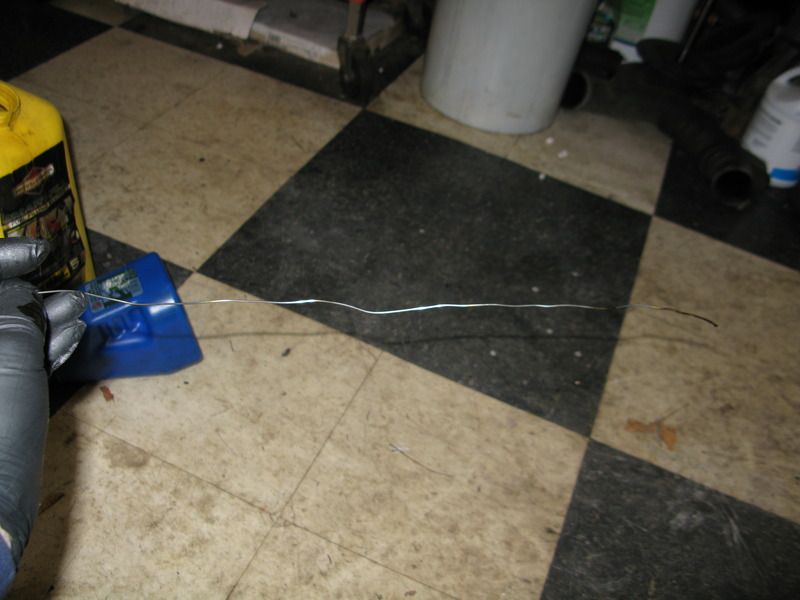
I stuck this in and it goes in quite a ways and came out with the skanky smelling oil on it that I found when I pulled the IMS bearing out. So, I'm now happy with the design thinking that went into this.
Change out the hex drive for the oil pump that has the special groove cut into it and remount the pump cover and gears. I filled the cover and gears with oil to make sure it was lubed on startup.
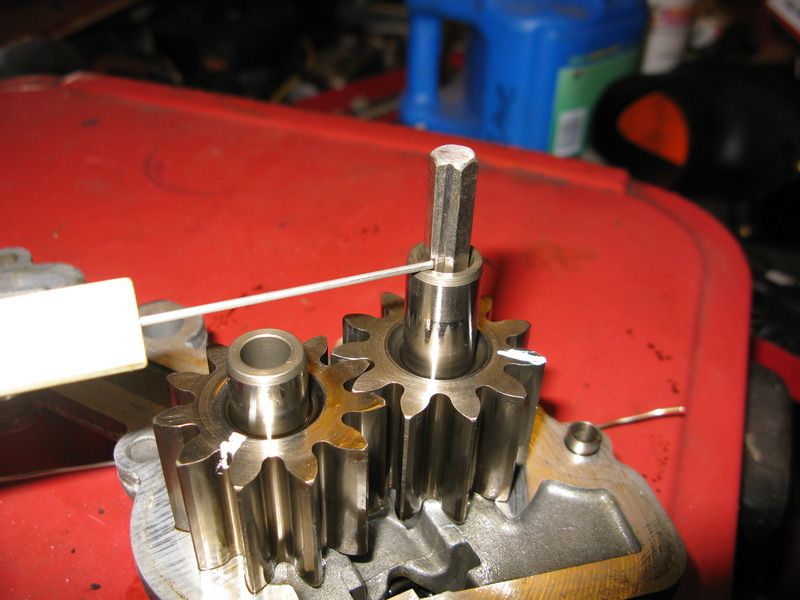
The oil pump is a finely made and finished part and uses no gaskets or seals in it's operation. The shafts and gears use the oil and the close tolerances to make a seal so that is doesn't bypass more then a certain amount. This is what the hex drive needs to have the groove cut into it. Even with the 3mm hole in the back of the pump, oil would not really run in there by traveling down the original hex drive. This slot must meter/bleed a certain amount oil thru to the back side and into the IMS to then feed the bearing.
All buttoned up and ready to run!!
__________________
______
Jon
1966 912, 1976 911
1986 944, 2000 Boxster
Last edited by jcslocum; 10-18-2015 at 05:47 AM.
|
|
|
|
|
10-18-2015, 06:15 AM
|
#35
|
|
Project Addicted
Join Date: Aug 2015
Location: Eastern Shore, MD
Posts: 623
|
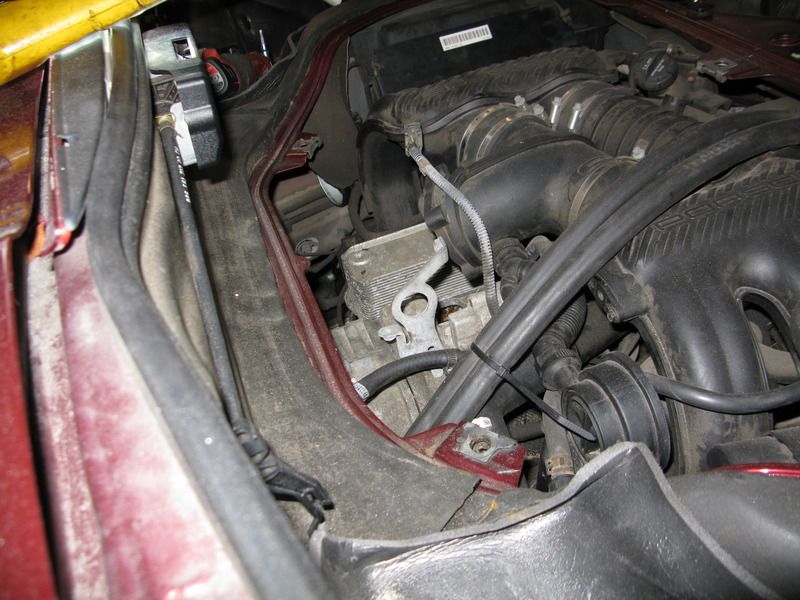
Now we move to the top side to do some maintenance and some upgrades. I love the access allowed but wish the clam shell would just pop off. Being old make leaning into the engine compartment a slight drag, BUT my shoulders were tired from working over my head for the past few weeks too. One is never satisfied....
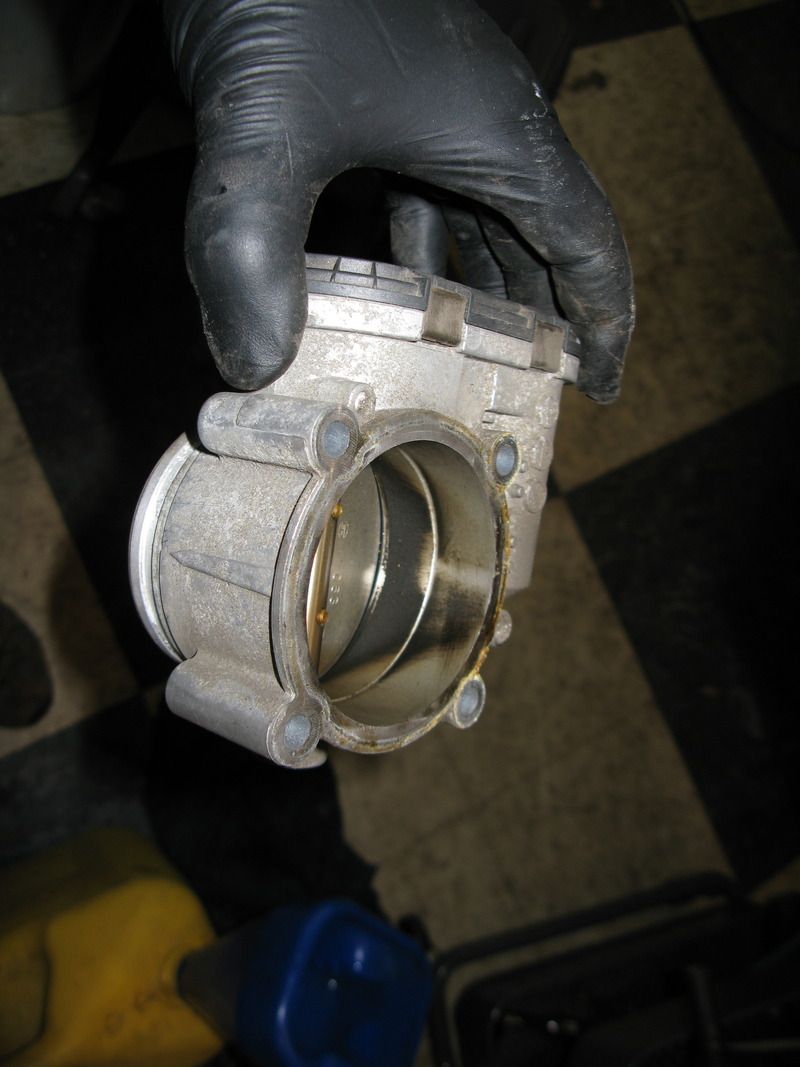
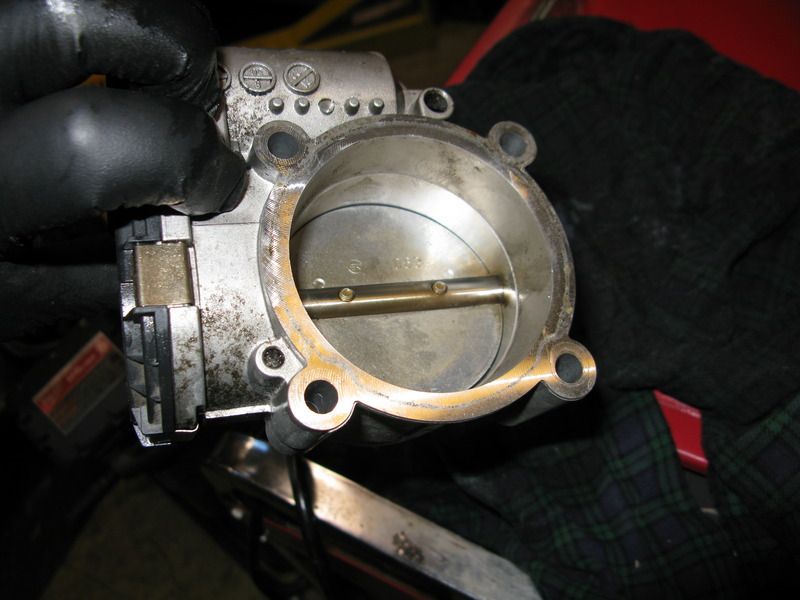
Off comes the throttle body for a cleaning and to mount the Pedro's torque tube thingy. The TB is quite filthy and gets a good cleaning.
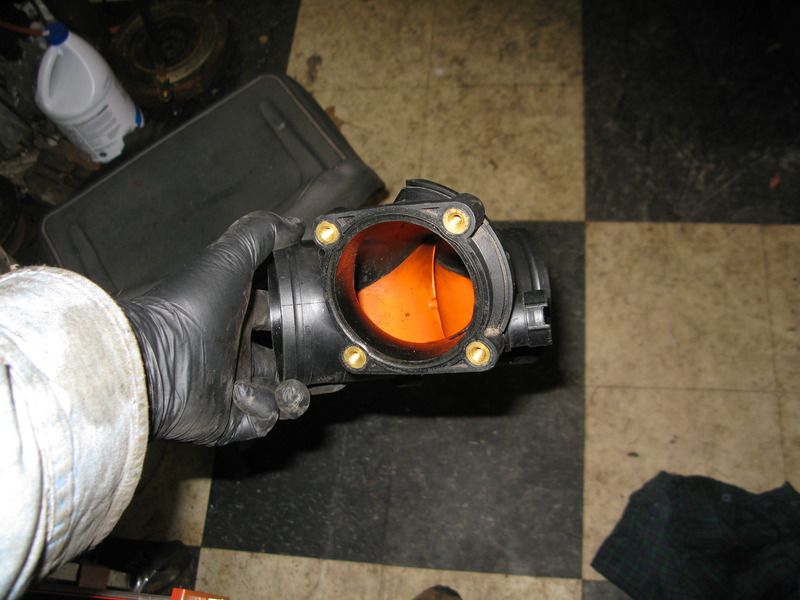
With the TB out, the "T" needs to be removed. This involves some hose clamps and then some pushing and pulling and it pops right out.
Also, while disconnecting the tube from the AOS it crumbled and I'm sure was leaking false air into the system. I hate cheap $hit stuff like this. So many things are so well designed and executed on the engine/drive train but this piece of tube was pulled from a clothes dryer or something to save $0.02. It's a thin corrugated plastic that lives in a hot place and just got hard and very very crispy. It really did crumble into pieces when trying to disconnect it.

This happened while taking the clip type ends off of the "T' thing. I'm 100% certain that this was a vacuum leaker and by it's design and location, it is really hard to inspect. If you have some work done, get this replaced as preventive maintenance. As it was saturday and no dealer in sight and I didn't want to wait, I called Missus Better 7/8 ths who happened to be out doing some retail therapy. Before she took off, we had discussed what I was working on and she recalled just how tight the TB was to the other parts. What I needed was a 7/8" ID rubber hose to replace the shattered AOS pipe. I gave her a call to give her the dimensions (she was in the dressing room trying on a dress) and we chatted about being naked and the hose I needed. I sent her a text with a picture and size/length of hose needed. She returns home victorious but not with just 1 hose. The 7/8" ID hose was too stiff in her opinion to make the turn from TB to AOS so she got a short piece of that and then a smaller hose that was very flexi that would go inside of the larger hose to make the connection. I ended up having to use about 16" of the smaller flexi hose in a loop but it worked perfectly. The 7/8 hose just collapsed on itself when I tried to make the bend and would have just closed up and pinched off the vacuum. She's the best and I don't know what she sees in me. Puty I guess.......
A nice clean TB ready to go back in.
Time to clean the MAF, not only is it tucked away under the edge on the engine compartment but the same clown the designed the transmission drain bolt, did the MAF screws too. The screws are a security type of screw. Really???
Is there a run on MAF's being stolen out there?? Is it the mob or just kids yanking them out for fun?? This is a maintenance item and needs to be easy to be cleaned. The saved $0.02 on the AOS tube and then wasted here with these stupid screws...
Another design conundrum. One end of the air tube that carries the fresh are past the hard to steal MAF into my nicely cleaned TB is nearly impossible to slip onto the TB!! I had to use a huge pry driver to get it to pop on, BUT the other end?? Slips on like an old slipper with ZERO effort. WTF is up with this kind of execution?? I definitely put some $$ in the swear jar while performing this feat.
It was getting late, I was tired and wanted to crank it over and hear it run!!! Fighting with this friggin tube pushed my patience to the limit.
I filler her up with oil, checked and rechecked all connections, got my foot on the clutch and turned the key. Fire on 1/2 of a crank!! It settled into a nice high idle, showed oil pressure when the idiot light went out. I slipped out and looked underneath to make sure I wasn't pumping 9 Qts of oil onto the floor and let it run a bit. It settled into a nice slow idle and the new exhaust sounded GREAT!
It was very satisfying after so may different little projects were done. Some major some very minor, but all done to make a better car.
__________________
______
Jon
1966 912, 1976 911
1986 944, 2000 Boxster
Last edited by jcslocum; 10-18-2015 at 06:26 AM.
|
|
|
|
|
11-06-2015, 04:10 PM
|
#36
|
|
Project Addicted
Join Date: Aug 2015
Location: Eastern Shore, MD
Posts: 623
|
It's been s few weeks since the last update but work has continued. Once the engine was buttoned up I began working on the seats that Allie picked up. The issue we ran into was that they were memory seats and we don't have that option in the car. I figured this would be easy and just wire the power up to the switches, but no such luck!! The memory panel has to be powered to make the seats work as the switches don't really switch power. After a bit of messing about with jumpers and filling a new swear jar, I got it worked out and the seats work just fine.
So, after the seats were sorted and bolted in I could finally go for a decent drive (still no plates)up and down the road we live on and a few of the side roads. Well, once out for more then 2 minutes it got good and hot. The temp gauge moved up above the 180 mark, so i figured it needed some additional coolant, as this was the first time it was good and hot. Well, I pull into the garage, get out and there is steam and water in the truck and on the ground. I immediately felt bad and figured the coolant take was bad that the PO had put in. I ordered up a new one and waited for it to arrive.
While waiting i continued to work on the paint and scratches. I have wet sanded about 40% of the car by now after working with the touch up paint and clear.
New coolant tank comes in and I get ready for that epic task. I empty the swear jar and buy some new beer. I figure this job from what I have read with be a real swear jar filler. Undo a few bolts, and then get busy under the hood to undo the hoses. Lo and behold, one of the hoses on the back side has blown off now that the engine has been hot enough to build pressure!!

I threw some money in the swear jar, got my pliers out and proceeded to try to [put that hose back on. Well, that is no easy task. But with the help of wallet emptying swearing I got it on and clamped up. This job is much better done by a flexible skinny (anorexic?) person. That is not me :-)
Hose hooked up, tank topped up and a restart to make sure we have a pretty good fill before we go out for another shake down ride. a couple of BIG air burps and a continued top up and I now begin to see some motor oil getting burped up and small globules of oil running out. Severe depression has now set in and I'm swearing in 6 or 7 languages. F the swear jar, I'm working up a real hate for this car now. So I shut it off, close it up and move on to other projects and ignore the car for a few days. I do some reading and find that the oil cooler is a failure spot for this as there is only oil in the water but no water in the oil. Tonight I pull the oil drain plug to let out some oil into a pan and there is no water. No oil in the oil filter housing.
I decide to pull the cooler and check for leaks. Drain the coolant and see some but not a lot of oil come out with the water. Once the coolant was probably down below the cooler level I screwed the plug in and got busy taking the cooler off. Pull the hose, unscrew the 4 - 5mm bolts and slip it onto a zip lock bag so no mess gets all over the engine.
Once on the bench, I allow the cooler to drain, mostly oil as the coolant went down when the rest of the system drained. I put a rubber cap on the hose nipple, made up a rubber fitting to go on my air gun, set the regulator to 25 PSI. I run inside and ask Missus better 7/8ths to come out and be the looker for bubbles as a try to hold my Rube Goldberg pressure thing together and onto the bottom of the cooler. Fill the one side with water, apply pressure and after 10 seconds bubbles are definitely coming up on the left side of the cooler!!! YAY!! we may have just dodged the big bad, bad engine event. Whew I feel better and will now have an adult beverage supplied by the swear jar :-0
I ordered the "S" cooler from FCP for 121$$ along with new seals and we should be back in shake down mode next week.
__________________
______
Jon
1966 912, 1976 911
1986 944, 2000 Boxster
|
|
|
|
|
11-06-2015, 11:45 PM
|
#37
|
|
Registered User
Join Date: Jun 2014
Location: LB, Germany
Posts: 1,526
|
Quote:
Originally Posted by jcslocum
Not sure what this all means but my guess is that the old tensioner spring is tired and/or Porsche has made many updates and one being a new heavier spring.
|
Porsche has updated the chain tensioners. It's recommended to replace them all if you have to replace one.
Don't let the engine hang on the hoses if you replace the motor mount. There are special tools - long wrenches to unsrew and screw the upper 2 screws.
BTW: nice write up.
Regards from Germany
Markus
Last edited by Smallblock454; 11-07-2015 at 12:01 AM.
|
|
|
|
|
11-07-2015, 08:34 AM
|
#38
|
|
Project Addicted
Join Date: Aug 2015
Location: Eastern Shore, MD
Posts: 623
|
Allie is working with a really TIGHT budget so we replaced what was needed. As time goes by, she will replace the other tensioners. The new tensioner completely removed a start up chatter issue that sounded like bad lifters and then would go away after 2-3 seconds. An unexpected benefit!!
__________________
______
Jon
1966 912, 1976 911
1986 944, 2000 Boxster
|
|
|
|
|
11-07-2015, 02:50 PM
|
#39
|
|
Registered User
Join Date: Dec 2013
Location: Cambridge. Ontario
Posts: 128
|
Thanks for documenting your work so well! This thread will help a lot of people!
__________________
Chris
'86 944, manual steering, a/c delete, 944Max chip
'87 951, K27, LBE, Turbo S brakes, Koni Yellows, Weltmeister sway bars / strut brace, LSD, full cage, OMP race seats
'01 Boxster - Seal Grey / Black / Black, Litronics upgrade / de-ambered
|
|
|
|
|
11-09-2015, 02:38 PM
|
#40
|
|
Registered User
Join Date: Jun 2014
Location: LB, Germany
Posts: 1,526
|
Quote:
Originally Posted by jcslocum
Allie is working with a really TIGHT budget so we replaced what was needed.!
|
That's OK. Preload of the new style ones differs slightly. Also these parts tend to wear. So it's better to replace them as soon as it is affordable, to keep the chains at similar tension.
Regards
Markus
|
|
|
|
 Posting Rules
|
You may not post new threads
You may not post replies
You may not post attachments
You may not edit your posts
HTML code is On
|
|
|
All times are GMT -8. The time now is 03:33 AM.
| |


 2004 Porsche Boxster S
 2004 Porsche 996 Targa
 2001 Porsche 996
 Linear Mode


