Go Back   986 Forum - The Community for Porsche Boxster & Cayman Owners > Porsche Boxster & Cayman Forums > Boxster General Discussions

Post Reply
 
LinkBack Thread Tools Display Modes
Old 08-31-2014, 10:45 PM   #1
Registered User
 
Join Date: Aug 2014
Location: San Francisco
Posts: 2
Need help with vacuum lines

Hi,

This is a 2000 Boxster S.
I took off the plastic boot to clean the inside and I ended up with 3 hoses that are not connected.
Read a few posts online with vacuum hoses and I am still clueless.
Would be good to get some help here.

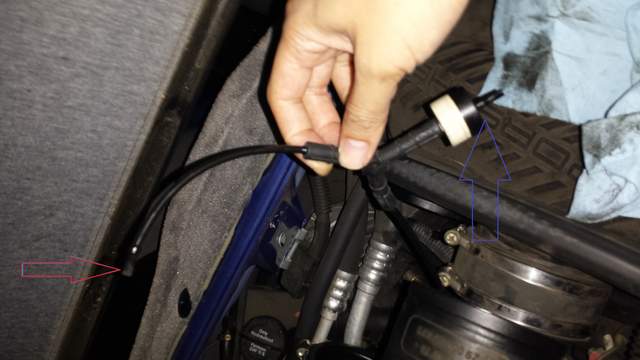
I have a Y connector here, where do the longer hose (red arrow) and the other one (blue arrow) connect to?


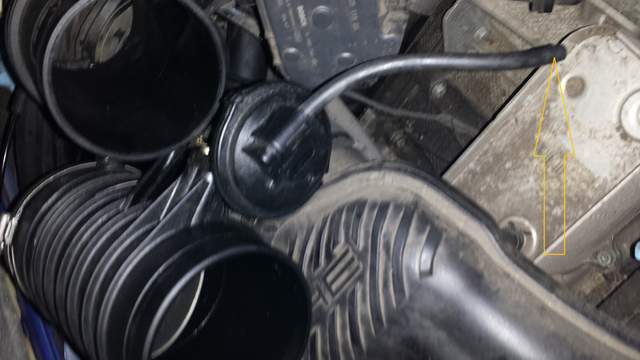
Where does this hose (orange arrow) go to?


Thank you in advance for the help
Robert

Rochan is offline   Reply With Quote
Old 09-01-2014, 06:39 AM   #2
Registered User
 
jsceash's Avatar
 
Join Date: Aug 2009
Posts: 1,466
Garage
There should be a switch between intake tubes for cylinder 4 and 5. The second tube should connect to the base of the switch.
__________________
2003 Black 986. modified for Advanced level HPDE and open track days.
* 3.6L LN block, 06 heads, Carrillo H rods, IDP with 987 intake, Oil mods, LN IMS. * Spec II Clutch, 3.2L S Spec P-P FW. * D2 shocks, GT3 arms & and links, Spacers front and rear * Weight reduced, No carpet, AC deleted, Remote PS pump, PS pump deleted. Recaro Pole position seats, Brey crouse ext. 5 point harness, NHP sport exhaust
jsceash is offline   Reply With Quote
Old 09-01-2014, 07:09 AM   #3
Registered User
 
thom4782's Avatar
 
Join Date: Sep 2010
Location: Foster City CA
Posts: 1,099
This may help

thom4782 is offline   Reply With Quote
Old 09-01-2014, 07:15 AM   #4
Registered User
 
thom4782's Avatar
 
Join Date: Sep 2010
Location: Foster City CA
Posts: 1,099
Or this

thom4782 is offline   Reply With Quote
Old 09-01-2014, 10:41 AM   #5
Registered User
 
Join Date: Aug 2014
Location: San Francisco
Posts: 2
I looked at those 2 diagrams before.
#22 seems like to be the Y connector cable that I am holding, but where does #22 connect to?

Also, the wire that goes to intake plenum isn't on either of the diagram here.
Rochan is offline   Reply With Quote
Old 08-04-2015, 01:31 PM   #6
Registered User
 
Join Date: Aug 2015
Location: St.Maarten
Posts: 2
Hey Robert,

Im just wondering seeing how old your post is, if you ever found out where the hose by the orange arrow leads or goes to.

I'm having that problem as well.

Thanks Nelgenn
vruity is offline   Reply With Quote
Old 08-05-2015, 07:34 AM   #7
Registered User
 
Join Date: May 2013
Location: Orange County, California
Posts: 266
I think there's a sticker in the trunk that has the vacuum hose diagram that will show you how they are connected.
hancock1701 is offline   Reply With Quote
Old 02-22-2016, 02:02 PM   #8
fornowh
 
Join Date: Dec 2013
Location: Southern California
Posts: 5
Vacuum Line

Quote:
Originally Posted by thom4782 View Post
Or this

Where does #22 Hook up to? Can't seem to find it.
fornowh03 is offline   Reply With Quote
Old 02-22-2016, 07:03 PM   #9
Motorist & Coffee Drinker
 
78F350's Avatar
 
Join Date: Jul 2014
Location: Oklahoma
Posts: 3,672
Garage
Quote:
Originally Posted by fornowh03 View Post
Where does #22 Hook up to? Can't seem to find it.
Since you asked a little differently in each thread, here's a different way of answering:

Exactly where it goes will depend on the year of your car and if anyone has moved stuff around on the intake before. In general, it should go where the red arrow is pointing in the picture.
__________________
I am not an attorney, mechanic, or member of the clergy. Following any advice given in my posts is done at your own peril.
78F350 is offline   Reply With Quote
Old 02-22-2016, 07:34 PM   #10
Registered User
 
flaps10's Avatar
 
Join Date: Jul 2014
Location: Tacoma
Posts: 430
In my 00 S, that picture is exactly where that vac line plugs in. It will not be visible. You'll have to dig around. If you have children you have the skills needed to find it

Last edited by flaps10; 02-22-2016 at 07:37 PM.
flaps10 is offline   Reply With Quote
Old 10-03-2017, 06:33 AM   #11
Registered User
 
bcinphx's Avatar
 
Join Date: Aug 2016
Location: Arizona
Posts: 75
Found this Old Post. And the comment number 9 where the red arrow is. the Red Arrow protrusion does not go through the plenum tube on my car. It is blocked. How can the valve work ? Should I go drill it open?
__________________
Bill
02 Boxster S
01 Carrera Cab
91 BMW 850i
71 MGB GT
bcinphx is offline   Reply With Quote
Old 10-03-2017, 06:55 AM   #12
Registered User
 
Join Date: Sep 2017
Location: MALIBU
Posts: 166
#22 check valve should go in that hole. On my 2003 boxster it would slip out no barbs or ridge to hold it in.

I got a 3/16 brass barbed fitting from the hardware store and some 4mm silicon tubing.

I put the barbed fitting in the hole, and connected the tubing to the other end of the fitting and then the check valve.

I used another barbed brass fitting to plug into the "Y" connector.

Unfortunately the brass fitting into the manifold is hidden here behind a hose. I will try to get a better photo next time I am in there.


I also replaced my vacuum reservoir as it was leaking.

When done I had 18"Hg on a vacuum gauge I installed.

After a month of messing around my car cleared all monitors in 200 miles and passed CA smog!!
__________________
2003Boxster
1973 Carreras RS tribute
2000 Saab Aero wagon stick
1990 Chevrolet pu pre runner
boxfix is offline   Reply With Quote
Old 10-03-2017, 08:39 AM   #13
Custom User Title Here
 
particlewave's Avatar
 
Join Date: Mar 2012
Location: Ft. Leonard Wood
Posts: 6,163
Garage
Quote:
Originally Posted by bcinphx View Post
Found this Old Post. And the comment number 9 where the red arrow is. the Red Arrow protrusion does not go through the plenum tube on my car. It is blocked. How can the valve work ? Should I go drill it open?
You need to take the cross tube off and find exactly where it goes. If the hole you're looking at "doesn't go all the way through", then you're looking at the wrong hole.

If you drill extra holes in the cross tube, you're going to have other issues.
particlewave is offline   Reply With Quote
Old 10-03-2017, 08:52 AM   #14
Registered User
 
Join Date: May 2014
Location: S.California
Posts: 2,027
Well done to pass SMog !
The cure for many of the Boxster vacuum problems is silicone hose,brass barb fittings and a Mighty Vac to test the system.Cheap enough but tedious. Your repair will outlive the M96 !
Quote:
Originally Posted by boxfix View Post
#22 check valve should go in that hole. On my 2003 boxster it would slip out no barbs or ridge to hold it in.

I got a 3/16 brass barbed fitting from the hardware store and some 4mm silicon tubing.

I put the barbed fitting in the hole, and connected the tubing to the other end of the fitting and then the check valve.

I used another barbed brass fitting to plug into the "Y" connector.

Unfortunately the brass fitting into the manifold is hidden here behind a hose. I will try to get a better photo next time I am in there.


I also replaced my vacuum reservoir as it was leaking.

When done I had 18"Hg on a vacuum gauge I installed.

After a month of messing around my car cleared all monitors in 200 miles and passed CA smog!!
Gelbster is offline   Reply With Quote
Old 10-03-2017, 04:52 PM   #15
Registered User
 
Join Date: Sep 2017
Location: MALIBU
Posts: 166
Quote:
Originally Posted by Gelbster View Post
Well done to pass SMog !
The cure for many of the Boxster vacuum problems is silicone hose,brass barb fittings and a Mighty Vac to test the system.Cheap enough but tedious. Your repair will outlive the M96 !

Thanks
Gelbster I know you have been down the same rabbit hole and you did influence my work.

I bought a new vacuum reservoir and it would hold 15 psi of vacuum. I then hooked the same "mighty vac" type tester to the installed reservoir and it would hold NO vacuum. DUHH......

New reservoir and the hoses connections in the photo the photo let me hold 18 "Hg at idle.
__________________
2003Boxster
1973 Carreras RS tribute
2000 Saab Aero wagon stick
1990 Chevrolet pu pre runner
boxfix is offline   Reply With Quote
Old 10-03-2017, 04:58 PM   #16
Registered User
 
Join Date: May 2014
Location: S.California
Posts: 2,027
For curiosity - slightly pressurize the old vac reservoir with it's base under water in a bowl.Look for bubbles and hissing when you elevate it bove the water level. This will be a satisfying diagnosis.
In theory you could epoxy the base of the old leaker. Why Porsche did not use a one piece blow molded part like other manufacturers do ,I have no idea. It would have been a cheaper part too !
Gelbster is offline   Reply With Quote
Old 10-03-2017, 08:13 PM   #17
Registered User
 
Join Date: Sep 2017
Location: MALIBU
Posts: 166
Quote:
Originally Posted by Gelbster View Post
For curiosity - slightly pressurize the old vac reservoir with it's base under water in a bowl.Look for bubbles and hissing when you elevate it bove the water level. This will be a satisfying diagnosis.
In theory you could epoxy the base of the old leaker. Why Porsche did not use a one piece blow molded part like other manufacturers do ,I have no idea. It would have been a cheaper part too !
sounds like you are saying it leaks at the seam at the base.

I would like to test it, but the old one is still in there. I was not about to R&R the alternator to fit the new vacuum reservoir in. I was trying to meet a CA smog deadline and I knew I had good vacuum now.


So I left it in place and installed the new one temporarily over near the SAI air pump. I will take the old one out when/if i have to change the alternator.

__________________
2003Boxster
1973 Carreras RS tribute
2000 Saab Aero wagon stick
1990 Chevrolet pu pre runner
boxfix is offline   Reply With Quote
Old 07-08-2018, 05:10 PM   #18
Registered User
 
Join Date: Jun 2012
Location: Frederick MD
Posts: 658
Quote:
Originally Posted by boxfix View Post
sounds like you are saying it leaks at the seam at the base.

I would like to test it, but the old one is still in there. I was not about to R&R the alternator to fit the new vacuum reservoir in. I was trying to meet a CA smog deadline and I knew I had good vacuum now.


So I left it in place and installed the new one temporarily over near the SAI air pump. I will take the old one out when/if i have to change the alternator.

I too am sorting through the vacuum system. Non of the diagrams I’ve seen show the second intake flapper solenoid. I had to stop looking at diagrams and start thinking about how the system worked. My problems were mostly due to a leaky accumulator tank.

Also, I’m not sure why anyone would remove the alternator to get to the accumulator tank. On my 02 S the tank is right under the passenger side intake plenum. It’s a bit of a pain in the ass, but it does not require alternator removal. Perhaps the 03 is completely different, but I doubt it.
shadrach74 is offline   Reply With Quote
Old 07-09-2018, 06:36 AM   #19
Registered User
 
Join Date: May 2014
Location: S.California
Posts: 2,027
"I’m not sure why anyone would remove the alternator to get to the accumulator tank. On my 02 S the tank is right under the passenger side intake plenum."
Correct ,but for most SAI repairs there are multiple points of potential failure. Piecemeal, random replacement seldom yields a good result because of the usual Porsche problem - access. So it is often wise to test the entire system. To do that you need to remove the alternator or Intake manifold. Neither are difficult - just tedious and procedural.
Ther is a recent Youtube on this that has been mentioned.
Gelbster is offline   Reply With Quote
Old 02-27-2023, 06:10 PM   #20
Registered User
 
Join Date: Jan 2023
Posts: 4
Quote:
Originally Posted by thom4782 View Post
Or this

What is #20??

ellie is offline   Reply With Quote
Post Reply


Posting Rules
You may not post new threads
You may not post replies
You may not post attachments
You may not edit your posts

BB code is On
Smilies are On
[IMG] code is On
HTML code is On
Trackbacks are On
Pingbacks are On
Refbacks are On


All times are GMT -8. The time now is 06:05 AM.


Powered by vBulletin® Version 3.8.7
Copyright ©2000 - 2024, vBulletin Solutions, Inc.
Content Relevant URLs by vBSEO 3.6.0
Copyright 2024 Pelican Parts, LLC - Posts may be archived for display on the Pelican Parts Website -    DMCA Registered Agent Contact Page