 06-10-2013, 10:47 AM
|
#1
|
|
Registered User
Join Date: Jun 2012
Location: Hernando Beach, Florida
Posts: 444
|
Radiator cleaning paranoia
I have done a search and it seems that the only way to really get the rats nest of materials from the radiators is to remove the bumper. That is just something that I am not comfortable doing on my own. I am sure it is easy, but I just KNOW that I would permanently screw something up. :chicken:
Is there another way of cleaning that area?
How concerned should I be? I am not having any temperature issues.
Any advice, comments are greatly appreciated.
__________________
2003 Boxster S, 6-spd, Seal Grey/Grey top
Ka is a wheel, and everything is 19
|

|

|
|
06-10-2013, 10:51 AM
|
#2
|
|
Registered User
Join Date: Feb 2005
Location: It's a kind of magic.....
Posts: 6,683
|
Quote:
Originally Posted by Coffinhunter

Is there another way of cleaning that area?
How concerned should I be? I am not having any temperature issues.
Any advice, comments are greatly appreciated.
|
No, there is no other way to get at it.
You should be very concerned, you would be amazed at what we find in there, and how much cooler the car runs afterwards.
Read up o the subject, it is very easy to do.
__________________
Anything really new is invented only in ones youth. Later, one becomes more experienced, more famous and more stupid. - Albert Einstein
|

|
|
|
06-10-2013, 10:53 AM
|
#3
|
|
Registered User
Join Date: Sep 2008
Location: Agoura Hills (LA) So.Cal.
Posts: 1,574
|
Quote:
Originally Posted by JFP in PA
No, there is no other way to get at it.
You should be very concerned, you would be amazed at what we find in there, and how much cooler the car runs afterwards.
Read up o the subject, it is very easy to do.
|
I agree. There are tons of thread on how to remove the bumper. You'll surprise yourself with how easy and rewarding it was to do.
__________________
1995 Porsche C4 Cab
2016 BMW M2, 6 Speed LBB - ED 7/2016
1997 993 Cab - Sold; 1997 993 Turbo - Sold
2001 Boxster S - Original Owner - 30K Miles -SOLD
|
|
|
|
|
06-10-2013, 11:00 AM
|
#4
|
|
Camibox
Join Date: Apr 2013
Location: Pahrump, NV
Posts: 110
|
I had the same fears. I just did mine a few weeks ago. Easier than I thought
Watch the youtube videos. You do not need to remove the inner fender liners. Pm or email if you need any help or get stuck in the process
|
|
|
|
|
06-10-2013, 11:04 AM
|
#5
|
|
Custom User Title Here
Join Date: Mar 2012
Location: Ft. Leonard Wood
Posts: 6,169
|
Seriously CH, it's beyond easy 
Takes less than 10 minutes to get the bumper cover off. It is a little trickier getting it back on with just one person because you get one side aligned and the other side moves. What I did was to use the one screw behind the side marker to hold one side while I aligned and attached the other...pretty simple.
The whole job took 45 minutes. I was quite surprised at how easy it was to remove and re-install.
Quit being such a :chicken:
 
__________________
https://youtube.com/@UnwindTimeVintageWatchMuseum
|
|
|
|
|
06-10-2013, 11:11 AM
|
#6
|
|
Registered User
Join Date: Jun 2012
Location: Hernando Beach, Florida
Posts: 444
|
Alright guys, this may be next weekends project. But I'm warning you now, if this goes horribly awry, I am hunting you all down
__________________
2003 Boxster S, 6-spd, Seal Grey/Grey top
Ka is a wheel, and everything is 19
|
|
|
|
|
06-10-2013, 11:13 AM
|
#7
|
|
Registered User
Join Date: Jun 2007
Location: Maryland
Posts: 275
|
I had to get a 2nd compost bin.
|
|
|
|
|
06-10-2013, 11:15 AM
|
#8
|
|
Registered User
Join Date: Nov 2008
Location: Florida
Posts: 1,111
|
Its sooo easy.
|
|
|
|
|
06-10-2013, 12:02 PM
|
#9
|
|
Registered User
Join Date: Feb 2013
Location: Ontario, Canada
Posts: 22
|
After reading a lot on this subject I decided to go ahead and do mine... I used the you tube video as a guide and it took all of 10 - 15 minutes to remove the front bumper. The only trouble was getting at the verticle screws behind the side markers. Once I got to the rads I couldnt believe the buildup between the rads... it was caked on solid as well as having twigs and leaves in there...Used a garden hose to rinse them out and got them perfectly clean. Took 15 minutes or more per side to get all of the built up crap off the rads...
Putting the bumper back on was a snap.. even by myself.. I used the top front two bolt holes (by the hood release) to keep the bumper in position while I worked on the sides and underneath to line everything up. Took about 15 minutes to get it put all back together and now runs cooler for sure...
While I had the bumper off, I took off the grills, repainted them black, then added mesh covers to keep the bigger debris out in the future.
While I was at it, I installed my Escort 9500CI radar sensor and jammers and with the black mesh grills, you cant see them at all!!!
Very happy with the final result... it is not a difficult job so dont be afraid to tackle this on your own...Thanks to the forum for having so much information available to allow us to do these projects on our own!!!
|
|
|
|
|
06-10-2013, 12:17 PM
|
#10
|
|
Registered User
Join Date: Sep 2010
Location: Foster City CA
Posts: 1,099
|
Agree with all posters. If you watch the youtube video, it's a walk in the park to clean the space between the radiators.
PS: While you have the bumper cover off, you might relocate your emergency hood release cable to behind the tow hole. I moved mine. Added about 15 minutes to the job because I located it in front of the hole,
|
|
|
|
|
06-11-2013, 05:30 AM
|
#11
|
|
Vista glass
Join Date: Jun 2012
Location: Florida
Posts: 88
|
Hard to hose this up
Watch the videos ! Have a piece of carpet to lay the cover on. A very rewarding exercise. When I had to change a rad fan later in life it made me fearless in going after that task. I too installed grills after seeing the size of the debris in my radiators. Don't use crowbars or torches it will all come undone readily. You will appreciate the engineering/design of your machine. We need all the cooling we can get in Fla. My AC worked measurably better when done. 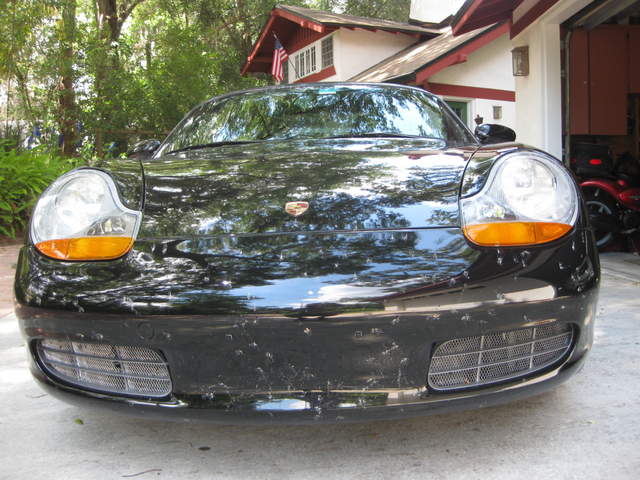 I think I will get a radar detector for fathers day. If they have been getting my hints. I will take it off again to install the detector behind the grills and maybe add some leds drls while I am at it.
|
|
|
|
|
06-11-2013, 06:37 AM
|
#12
|
|
Certified Boxster Addict
Join Date: Nov 2010
Location: Los Angeles
Posts: 7,675
|
Quote:
Originally Posted by Coffinhunter
I have done a search and it seems that the only way to really get the rats nest of materials from the radiators is to remove the bumper. That is just something that I am not comfortable doing on my own. I am sure it is easy, but I just KNOW that I would permanently screw something up. :chicken:
Is there another way of cleaning that area?
How concerned should I be? I am not having any temperature issues.
Any advice, comments are greatly appreciated.
|
CH - I hear you! Despite doing almost all of my own maintenance and repairs, removing the front bumper cover is the ONE thing that I have also been somewhat afraid to touch for fear of damaging something expensive or not being able to get the dang thing back on. I guess I'll take a look at some of those YouTube videos and maybe give it a try...
__________________
1999 996 C2 - sold - bought back - sold for more
1997 Spec Boxster BSR #254
1979 911 SC
POC Licensed DE/TT Instructor
|
|
|
|
|
06-11-2013, 07:40 AM
|
#13
|
|
Registered User
Join Date: Apr 2012
Location: Ontario, Canada
Posts: 598
|
thom, what is required in locating the emergency frunk release 'in front of the hole'? Inotherwords, is there something required to keep it attached to the tow hook, but under the cover? And what are people using for mesh covers and where did you get them?
Brad
|
|
|
|
|
06-11-2013, 07:44 AM
|
#14
|
|
Registered User
Join Date: Feb 2013
Location: Ontario, Canada
Posts: 22
|
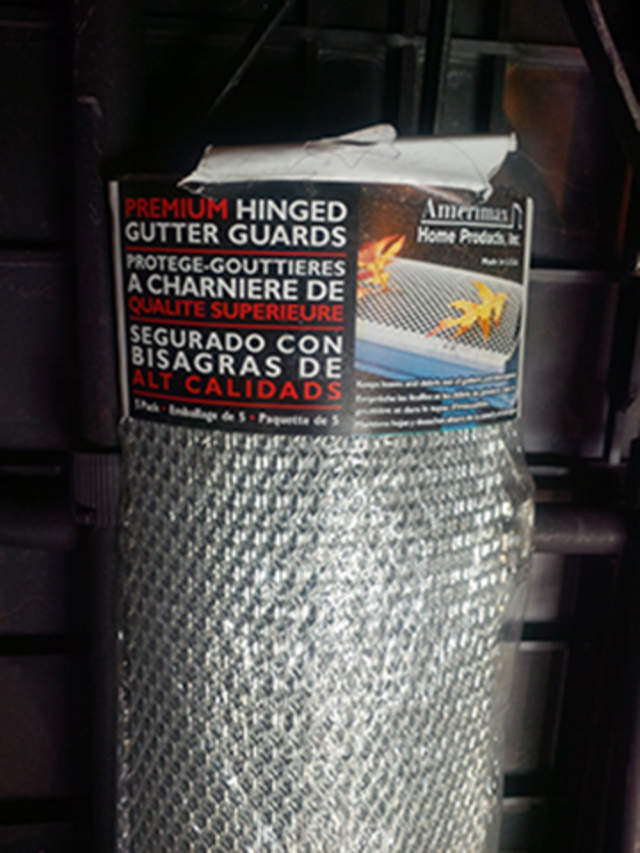
For the mesh guards, I purchased some galvanized "gutter guards" and removed the grills from the bumper, cut the mesh to fit, and painted them black, then attached the grills between the original grills and the bumper. The clips on the original grills hold the new mesh in place so they won't move.
I will post a pic later today to show the final result..
|
|
|
|
|
06-11-2013, 08:04 AM
|
#15
|
|
Registered User
Join Date: Apr 2012
Location: Ontario, Canada
Posts: 598
|
Thanks traven, appreciate it.
|
|
|
|
|
06-11-2013, 08:28 AM
|
#16
|
|
Registered User
Join Date: May 2012
Location: Vancouver Island, Canada
Posts: 211
|
Quote:
Originally Posted by southernstar
thom, what is required in locating the emergency frunk release 'in front of the hole'? Inotherwords, is there something required to keep it attached to the tow hook, but under the cover? And what are people using for mesh covers and where did you get them?
Brad
|
I relocated my hood release last fall (thanks to the info from this forum).
My cable was located beside the passenger headlight. Removed the light, pulled the cable into the space behind the front bumper, pulled the cable loop through the threaded portion of the tow hook tube and secured it with a small zip-tie.
Repaced headlight....done. Peace of mind and 20 minutes max
__________________
'01 Boxster S (purchased new) triple black, litronics, cruise, heated seats,18's.
|
|
|
|
|
06-11-2013, 08:36 AM
|
#17
|
|
Registered User
Join Date: Apr 2012
Location: Ontario, Canada
Posts: 598
|
Thanks CCjazz.
Brad
|
|
|
|
|
06-11-2013, 08:40 AM
|
#18
|
|
Registered User
Join Date: Mar 2011
Location: Orange County, CA
Posts: 316
|
Sorry to Thread jack but...
If anyone in Orange County want to do a RADIATOR cleaning day I'm down.
I havn't done mine since I bought my car and summer is around the corner!
|
|
|
|
|
06-11-2013, 08:44 AM
|
#19
|
|
Registered User
Join Date: Feb 2013
Location: Ontario, Canada
Posts: 22
|
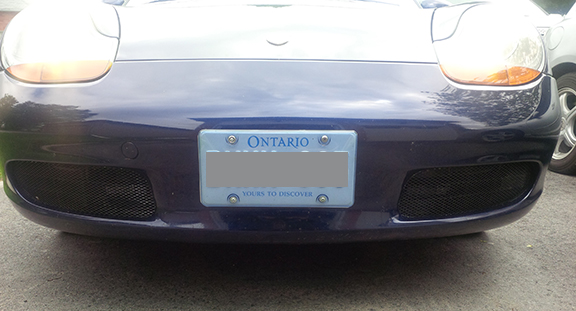
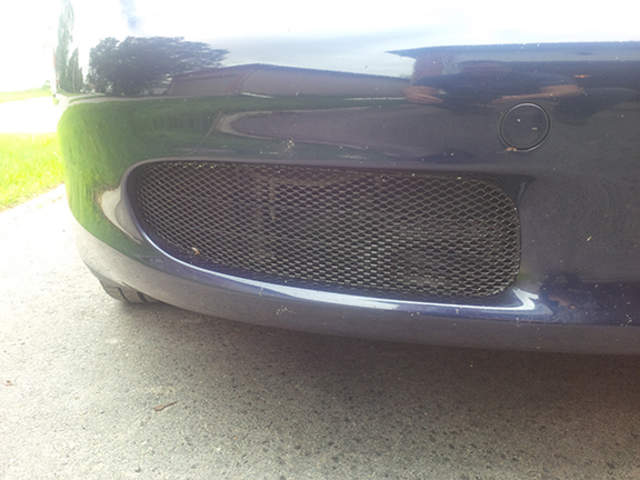
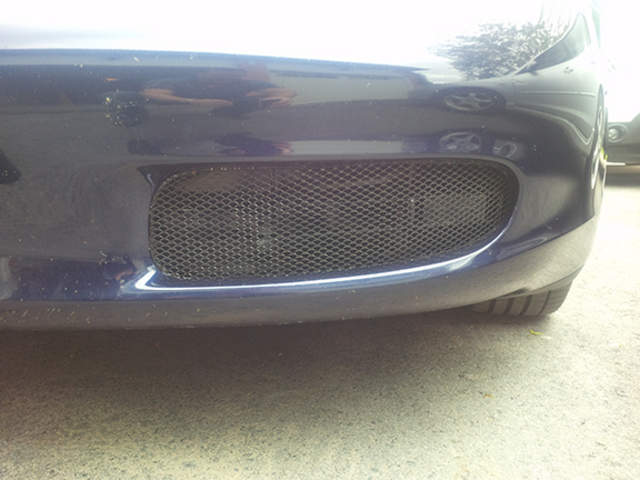
Here are photos of the finished product and the material used..
Very simple installation and it hides my radar / laser jammers quite well!!!
As you can see in one of the pics that the new grills have caught a few bugs and stopped them from going to the rads...
|
|
|
|
|
06-11-2013, 09:08 AM
|
#20
|
|
Registered User
Join Date: Apr 2012
Location: Ontario, Canada
Posts: 598
|
I was hoping to find something made in aluminum in order not to have two dissimilar metals come into direct contact (galvanic corrosion), but may have to go that route. Tthanks again!
Brad
|
|
|
|
 Posting Rules
|
You may not post new threads
You may not post replies
You may not post attachments
You may not edit your posts
HTML code is On
|
|
|
All times are GMT -8. The time now is 02:21 AM.
| |


 Sancha
 1998 Boxster
 2006 Ford F150
 1972 JEEP CJ5
 2001 Porsche Boxster S
 Linear Mode


