Go Back   986 Forum - The Community for Porsche Boxster & Cayman Owners > Porsche Boxster & Cayman Forums > Boxster General Discussions

Post Reply
 
LinkBack Thread Tools Display Modes
Old 10-30-2012, 01:30 PM   #1
Registered User
 
Join Date: Jan 2011
Location: Philippines
Posts: 32
Talking Leak between Foam Liner/tray and Drain hose

Hello,

I have a 97 Boxster 986. I have troubles finding the leak that floods my module found under driver's seat. I had the car thoroughly repainted and I am not sure if everything was in place during re-installation by painter.

There was no leak from the front drains. I suspect that the leak comes from the backside drain specifically on the drainhole of the foam liner tray undearneath clamshell. There is no leak on the foam liner itself since every suspected hole was sealed and tested but I think the problem lies specifically in between the liner/tray drainhole and the drain hose underneath it which runs underneath the wheel well. The drain hose does not have a leak but perhaps water seeps right from the drainhole of liner/tray just before it goes to the drain hose underneath it since I noticed a partial gap in between them (liner drain hole vs drain hose).

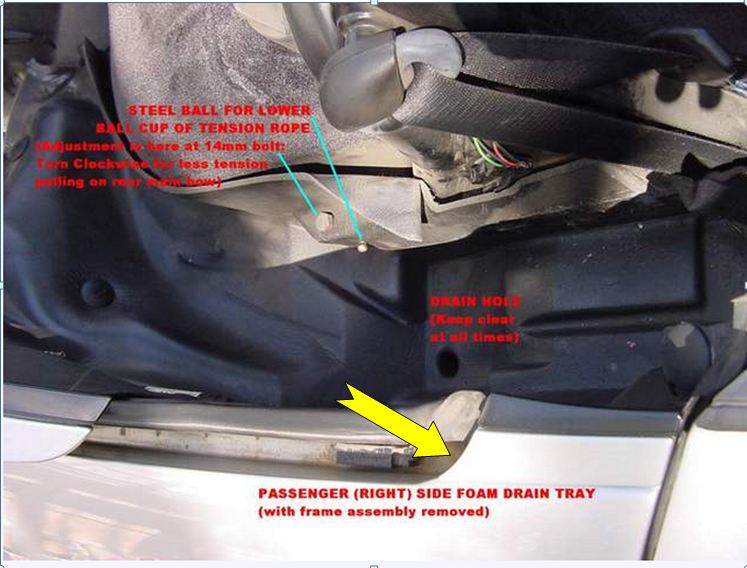
Pic taken from web to show what part I am talking about. (Thank you to original image poster)


Can anybody give me an image of what exactly is underneath the foam liner in the drainhole part? I think its missing something or maybe needing adhesion to the drain hose to avoid the gap that is suspected to run water in between them which is seeping to the cabin. A picture of the part in between drainhole to drain hose will help me conclude on what is wrong. I cant dissasemble the foam liner tray as I do not have proper tools. I wanted to first know whats wrong so I may plan how to fix it.

Well this is only my hypothesis on the dilema. Though maybe somebody has a better answer? I am just guessing and any input is greatly appreciated.

Thank you everyone!


Last edited by gunman168; 10-30-2012 at 01:37 PM.
gunman168 is offline   Reply With Quote
Old 11-07-2012, 09:51 AM   #2
Registered User
 
Join Date: Jan 2011
Location: Philippines
Posts: 32
Anyone have any idea about this?

Thanks.
gunman168 is offline   Reply With Quote
Old 11-07-2012, 10:21 AM   #3
Moderator
 
Join Date: Feb 2012
Location: DFW
Posts: 782
Garage
Hi gunman168, before you take anything apart, is it possible the drain holes are clogged? Leaves and debris easily clog them up. Run some compressed air or bicycle brake cable through them and see if that helps.
Kenny Boxster is offline   Reply With Quote
Old 11-07-2012, 11:42 AM   #4
Registered User
 
Join Date: Jan 2011
Location: Philippines
Posts: 32
Yes they were clogged before, after the painting but I was able to unclog them. I tested and watter flows freely to bottom of wheelwell. Still had the same problem after unclogging.
gunman168 is offline   Reply With Quote
Old 11-07-2012, 11:58 AM   #5
Certified Boxster Addict
 
Join Date: Nov 2010
Location: Los Angeles
Posts: 7,669
From your description of the problem, my first instinct is to wonder about a crack in the foam liner. This would create the same situation as you theorize where water gets between the foam liner and the fenderwell drain but does not go down the drain line. This might be more likely if the painter removed any portion of the foam liner during the paint job.
__________________
1999 996 C2 - sold - bought back - sold for more
1997 Spec Boxster BSR #254
1979 911 SC
POC Licensed DE/TT Instructor
thstone is offline   Reply With Quote
Old 11-07-2012, 12:17 PM   #6
1999 base
 
Meir's Avatar
 
Join Date: Dec 2011
Location: Coral Springs FL
Posts: 1,617
Garage
hi gunman.
there is another drain hole that is very hard to find.
its located at the end of the clam-shell rail.
see yellow arrow (took me 3 months to find it )
not sure it will solve your problem, but it needs to be clean.


Last edited by Meir; 11-07-2012 at 12:20 PM.
Meir is offline   Reply With Quote
Old 11-07-2012, 01:12 PM   #7
Registered User
 
Join Date: Jan 2011
Location: Philippines
Posts: 32
@ thstone

There is no existing crack in the liner as I covered every suspected crack with a dynamat type of material. I even tested it if everything goes down the drainhole of the foam liner and it seems all was well. I just cant tell if the leak is between the foam liner drainhole and the drain hose mouth since I cant see underneath but there is a space in between them.

@ Meir

Yes I also unclogged it was well. Pumped it with airpressure and it seems all water went inside the hole when tested.


Any other input guys?
gunman168 is offline   Reply With Quote
Old 11-08-2012, 08:06 AM   #8
Registered User
 
Join Date: Sep 2011
Location: eastern NC Crystal Coast
Posts: 413
there should be 2 thinwall PVC tubes that fit in the rear drain holes. These tubes keep the water from seeping between the foam. I made sure that they were at the proper height (flush) for complete drainage and then sealed around the edge with "Elmers " old fashion glue to seal the tube to the foam. With " Elmers" there is no chemical reaction or distruction to the foam. The tubes are about...1/2 '' ib X 4''
milliemax is offline   Reply With Quote
Old 11-08-2012, 11:12 AM   #9
Registered User
 
Join Date: Jan 2011
Location: Philippines
Posts: 32
Talking

Quote:
Originally Posted by milliemax View Post
there should be 2 thinwall PVC tubes that fit in the rear drain holes. These tubes keep the water from seeping between the foam.

The tubes are about...1/2 '' ib X 4''
Do you have pics of these 2 thinwall PVC tubes my friend? Just so I will know if I am missing them or perhaps I could order them online.

Thank you.
gunman168 is offline   Reply With Quote
Old 11-10-2012, 05:25 PM   #10
Registered User
 
Join Date: Sep 2011
Location: eastern NC Crystal Coast
Posts: 413
Quote:
Originally Posted by gunman168 View Post
Do you have pics of these 2 thinwall PVC tubes my friend? Just so I will know if I am missing them or perhaps I could order them online.

Thank you.
I do not think the thin wall has much to do with it. OB is most important. PVC water pipe should fit. Just make sure you set it down enough to drain the water , then seal it. Sorry , no pictures. Be careful and do not tear the foam, make sure the pipe goes thru all the way so the water does not enter the foam layers. The reason for the pipe is to flow the water by all the layers, top thin layer,thick foam layer, bottom layer and the metal body. IT'S A DRAIN just like the "tail piece" drain in your sink. Good luck , It should be simple for you to do .
milliemax is offline   Reply With Quote
Old 11-16-2012, 08:40 PM   #11
Registered User
 
Join Date: Jan 2011
Location: Philippines
Posts: 32
Quote:
Originally Posted by milliemax View Post
I do not think the thin wall has much to do with it. OB is most important. PVC water pipe should fit. Just make sure you set it down enough to drain the water , then seal it. Sorry , no pictures. Be careful and do not tear the foam, make sure the pipe goes thru all the way so the water does not enter the foam layers. The reason for the pipe is to flow the water by all the layers, top thin layer,thick foam layer, bottom layer and the metal body. IT'S A DRAIN just like the "tail piece" drain in your sink. Good luck , It should be simple for you to do .

So from what I understand, I should put some kind of PVC tube to connect the drain hole of liner to the drain tube on the metal body? This way it will keep the water from going in between the foam underneath but instead directly to the drain tube. Is this correct? But is there really an OEM part for this which I am missing after my paint job?
gunman168 is offline   Reply With Quote
Old 11-16-2012, 09:25 PM   #12
Registered User
 
Join Date: Jun 2007
Location: Freeport, New York
Posts: 471
There is a small white plastic cup shaped like a small funnel directly under the drain hole and the foam liner.

Sometimes that cup/funnel gets separated from the drain tube, and sometimes the cup/funnel develops a hairline crack due to age and vibration.

In either case, it will cause a leak into the cabin.

In order to properly seal it, you have to remove the foam drain tray liner.

You can remove the foam liner only after removing the top frame assembly. If you look at the other parts of the DIY from where you got the photo that you posted, you will find instructions on how to remove the complete top and frame assembly. It's not overly complicated as it basically involves removing three 13mm bolts from each side of the frame base.

Regards, Maurice.


Last edited by schoir; 11-17-2012 at 10:51 AM. Reason: correct bolt size
schoir is offline   Reply With Quote
Post Reply


Thread Tools
Display Modes

Posting Rules
You may not post new threads
You may not post replies
You may not post attachments
You may not edit your posts

BB code is On
Smilies are On
[IMG] code is On
HTML code is On
Trackbacks are On
Pingbacks are On
Refbacks are On


All times are GMT -8. The time now is 04:51 PM.


Powered by vBulletin® Version 3.8.7
Copyright ©2000 - 2024, vBulletin Solutions, Inc.
Content Relevant URLs by vBSEO 3.6.0
Copyright 2024 Pelican Parts, LLC - Posts may be archived for display on the Pelican Parts Website -    DMCA Registered Agent Contact Page