 10-31-2024, 01:17 AM
|
#21
|
|
Registered User
Join Date: Jun 2014
Location: LB, Germany
Posts: 1,526
|
Hope you'll find all metal pieces.
Would be bad if you rebuild the engine and something is left in there that causes future damages.
The chain guides look pretty good. Seems the mileage of the car is correct.
__________________
My Porsche keyfob, instrument cluster and alarm ecu repair service: https://sportwagendoktor.de
|

|

|
|
11-02-2024, 09:29 AM
|
#22
|
|
Registered User
Join Date: Oct 2018
Location: North Cali
Posts: 857
|
Quote:
Originally Posted by Smallblock454

Hope you'll find all metal pieces.
Would be bad if you rebuild the engine and something is left in there that causes future damages.
|
For sure, that would be an absolute disaster.
Quote:
Originally Posted by Smallblock454
The chain guides look pretty good. Seems the mileage of the car is correct.
|
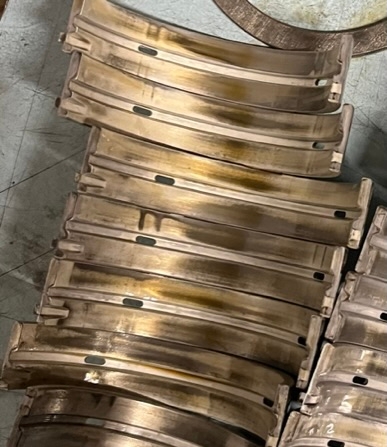
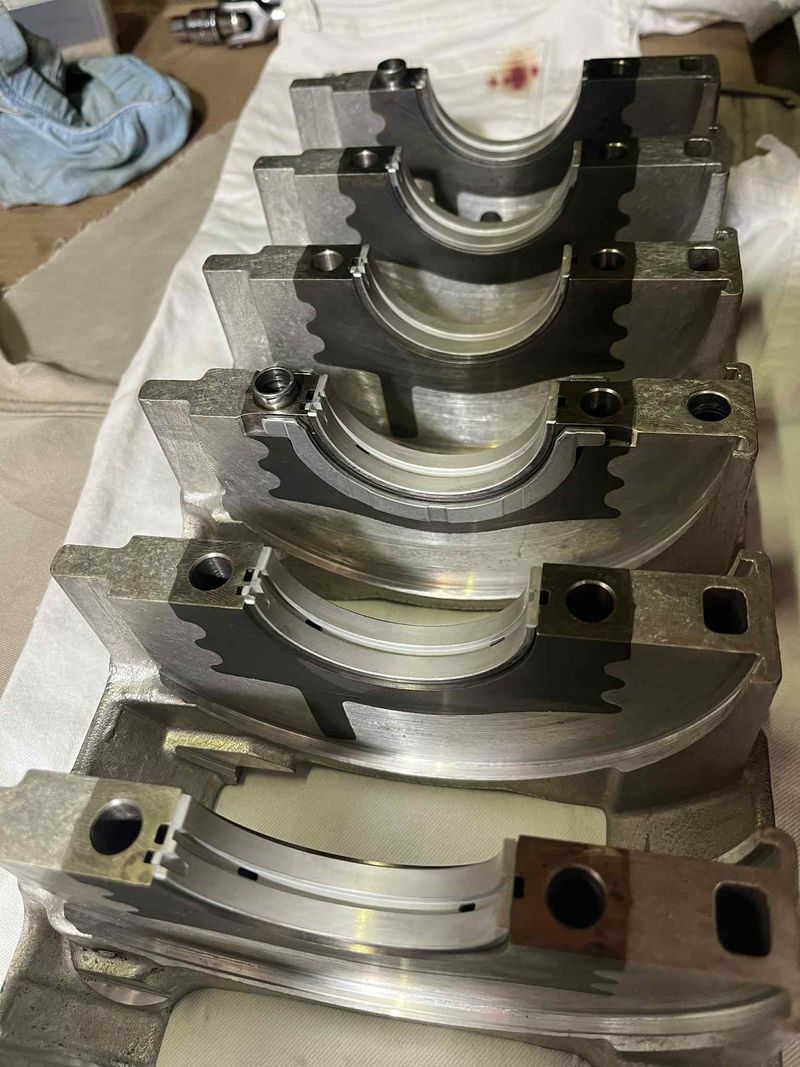
Yeah, most parts show really low wear representing the low mileage, while others are kind of puzzling and I just don't get it. Look at the main bearings for instance.
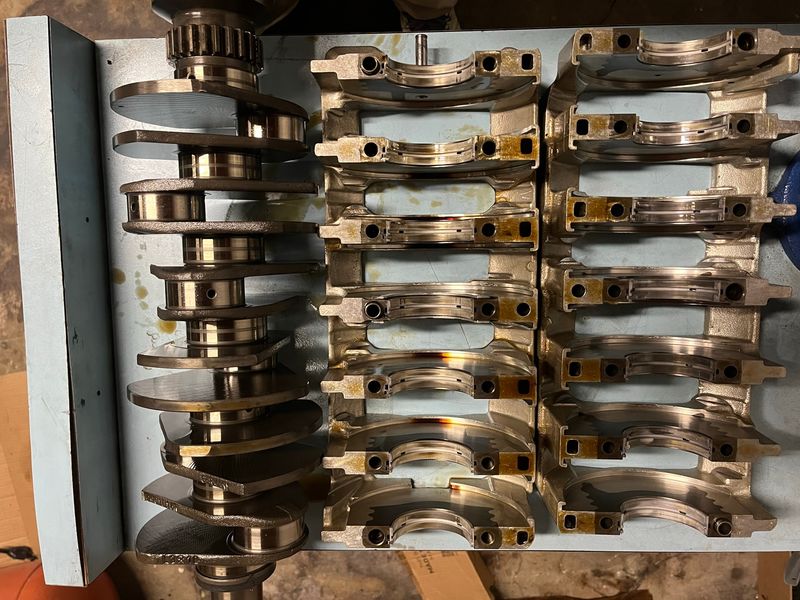
The crank seems fine, but the bearings show quite a bit of wear. However, the thrust bearing washers have no wear, underlining the low mileage.
Especially around the small windows where the oil gets in there's a lot of wear, suggesting there was something in the oil and made most of the damage here. What I don't understand is, how can the debris get through the filter?
Also, it seems most of the damage can't be accounted for the chain snap, I think this wear had happened before... Just in comparison, in the other engine I rebuilt there was literally no wear on the bearing shells, at 100.000 miles. This engine had 22.000 in it...
This car was a garage queen. Since it is 22 years old, on average it ran 1000 miles/year, meaning probably there were several month-long gaps when it was not running at all, which is not really healthy for the bearings for obvious reasons. Still, hard to believe that this alone could have caused this much wear.
|
|
|
|
|
11-03-2024, 02:25 AM
|
#23
|
|
Registered User
Join Date: Jun 2014
Location: LB, Germany
Posts: 1,526
|
Quote:
Originally Posted by Homeoboxter
What I don't understand is, how can the debris get through the filter?
|
That is pretty easy to answer. The oil filter has a valve / bypass. The valve is actuated by a spring. If the oil pressure is too high especially when the oil is cold the bypass opens and unfiltered oil runs through the engine. Sometimes these springs also get old. And in the 9x6 oil system the spring loaded bypass is not part of the oil filter itself, but of the oil filter housing - so potentially never gets replaced.
The rod bearing wear doesn't look evenly to me. That should be investigated further.
__________________
My Porsche keyfob, instrument cluster and alarm ecu repair service: https://sportwagendoktor.de
|
|
|
|
|
11-03-2024, 10:16 AM
|
#24
|
|
Registered User
Join Date: Oct 2018
Location: North Cali
Posts: 857
|
Quote:
Originally Posted by old911doc
I see that the engine still has the plastic-cup oil filter thingy. Those sometimes become extremely tight, requiring, I estimate, 250+ ft-lbs to remove. I suggest you remove that from the engine before you remove the engine or transmission from the chassis. Exerting that much force on an engine on a stand only serves to move the stand across your shop. IMHO that plastic cup is the second-worse thing Porsche ever did, after locating the immobilizer module under the drivers seat.
Oh, also: to remove the oil filter cup, use the aluminum filter wrench branded as Craftsman and sold through Lowes, but be aware that you likely wont be able to remove the cap wrench from the plastic cup once you get it off.
Good luck with project!
|
Thanks for the tip, I never had a problem with loosening that cap. A kit is available to convert it to a spin-on type filter and then you can choose different filter materials with different filtering pore diameters.
|
|
|
|
|
11-03-2024, 10:35 AM
|
#25
|
|
Registered User
Join Date: Oct 2018
Location: North Cali
Posts: 857
|
Quote:
Originally Posted by Smallblock454
That is pretty easy to answer. The oil filter has a valve / bypass. The valve is actuated by a spring. If the oil pressure is too high especially when the oil is cold the bypass opens and unfiltered oil runs through the engine. Sometimes these springs also get old. And in the 9x6 oil system the spring loaded bypass is not part of the oil filter itself, but of the oil filter housing - so potentially never gets replaced.
|
Yeah, that's a possibility, but the bypass valve should only open when the filter gets completely clogged up. This was not the case in this engine. I think the wear on the bearings would look different also. I opened up the filter and it looks like this:
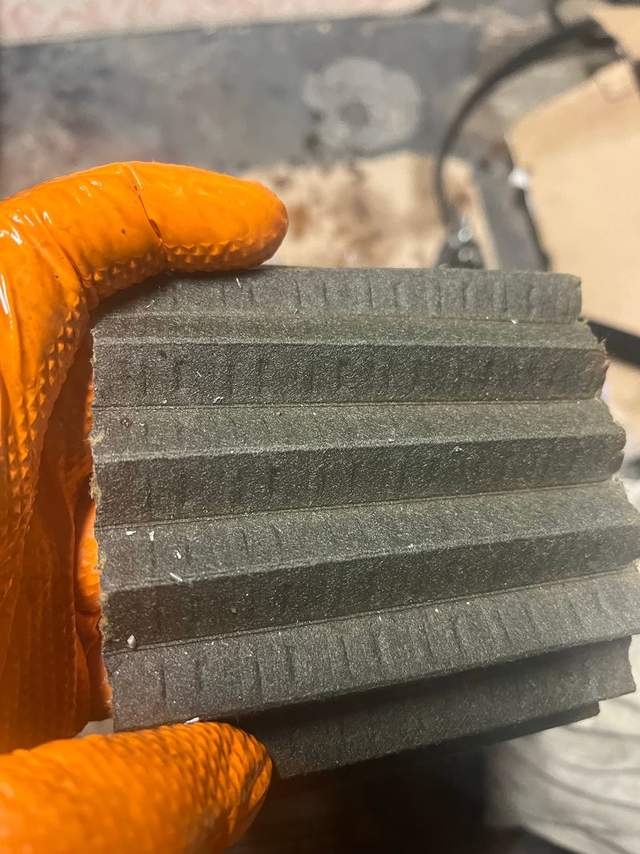
Hundreds of these tiny metal chips. I also found one or two on the back side but I'm not sure if they made it through the filter material or I just contaminated it when I cut the filter apart. Anyways, I think if these pieces went through the main bearing clearances they would have left a lot of scratch marks on the bearing surfaces and even on the journals. Instead, the wear on the bearings looks smooth to me. So it's more like a wear caused by oil starvation. I'll look into the spin-on filter conversion though, that adds some extra protection against the old bypass valve failure also. Thanks for the tip 
Quote:
Originally Posted by Smallblock454
The rod bearing wear doesn't look evenly to me. That should be investigated further.
|
I didn't post pictures of the rod bearings. If you meant the main bearings, there is indeed some unevennness. One side must have undergone a lot of impact when the pistons were hammering on the valves, that force went down all the way to the main bearings. This could cause some asymmetry in the wear pattern...
|
|
|
|
|
11-03-2024, 02:09 PM
|
#26
|
|
Registered User
Join Date: Jun 2014
Location: LB, Germany
Posts: 1,526
|
Quote:
Originally Posted by Homeoboxter
Yeah, that's a possibility, but the bypass valve should only open when the filter gets completely clogged up.
|
Sorry, but you're wrong on that. It will also open if the oil pressure exceeds a specified pressure level. And this can also happen when the oil is cold and thick.
Quote:
Originally Posted by Homeoboxter
Hundreds of these tiny metal chips.
|
That explains the main bearings (i meant main bearings, sorry. English is not my mother language).
Because of the metal chip contamination, all bearings should be checked.
__________________
My Porsche keyfob, instrument cluster and alarm ecu repair service: https://sportwagendoktor.de
|
|
|
|
|
11-03-2024, 02:33 PM
|
#27
|
|
Registered User
Join Date: Oct 2018
Location: North Cali
Posts: 857
|
Quote:
Originally Posted by Smallblock454
Sorry, but you're wrong on that. It will also open if the oil pressure exceeds a specified pressure level. And this can also happen when the oil is cold and thick.
|
Yes, you are right. I'm not sure though if at this climate the oil can get that thick.
Quote:
Originally Posted by Smallblock454
English is not my mother language).
|
Mine neither 
|
|
|
|
|
11-19-2024, 12:56 AM
|
#28
|
|
Registered User
Join Date: Jun 2014
Location: LB, Germany
Posts: 1,526
|
Any news? Any new findings?
__________________
My Porsche keyfob, instrument cluster and alarm ecu repair service: https://sportwagendoktor.de
|
|
|
|
|
11-21-2024, 10:37 PM
|
#29
|
|
Registered User
Join Date: Oct 2018
Location: North Cali
Posts: 857
|
Quote:
Originally Posted by Smallblock454
Any news? Any new findings?
|
Not much, really. I did some measurements on the crank journals, they are all uniform and don't show any wear, so I dropped the crankshaft off at a machine shop for polishing. I ordered new bearings, once they arrive I'll assemble the bearing carrier, so there's that. Regarding the wear on the main bearings, I contacted the original owner to get to know more details about the circumstances of the failure. He says the engine was running for about half a minute after the bang and it was running pretty rough. So, it's surprising that the engine did not just stall, with only 3 functional cylinders. It's also interesting to consider that it was running without oil returning from the head to the sump, potentially resulting oil starvation at the main bearings at idle..
|
|
|
|
|
04-23-2025, 07:56 PM
|
#30
|
|
Registered User
Join Date: Oct 2018
Location: North Cali
Posts: 857
|
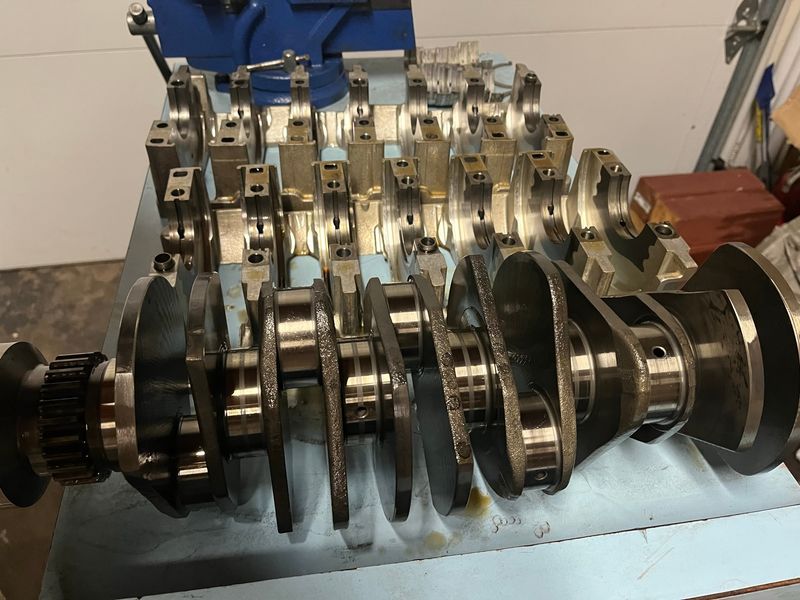
I've been busy with lots of other stuff but now I'm back at this project. Weather is getting awesome here and my kids also keep asking when we'll have a working convertible again, so I better keep up the pace.
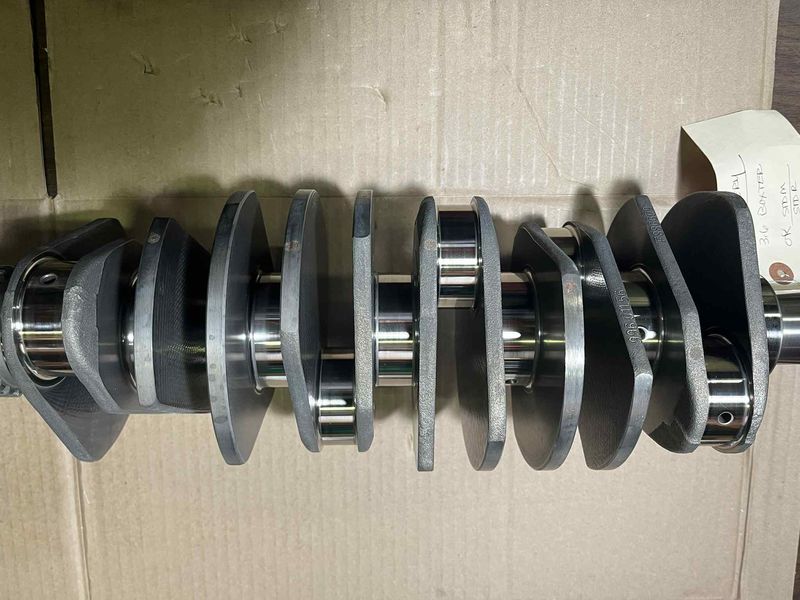
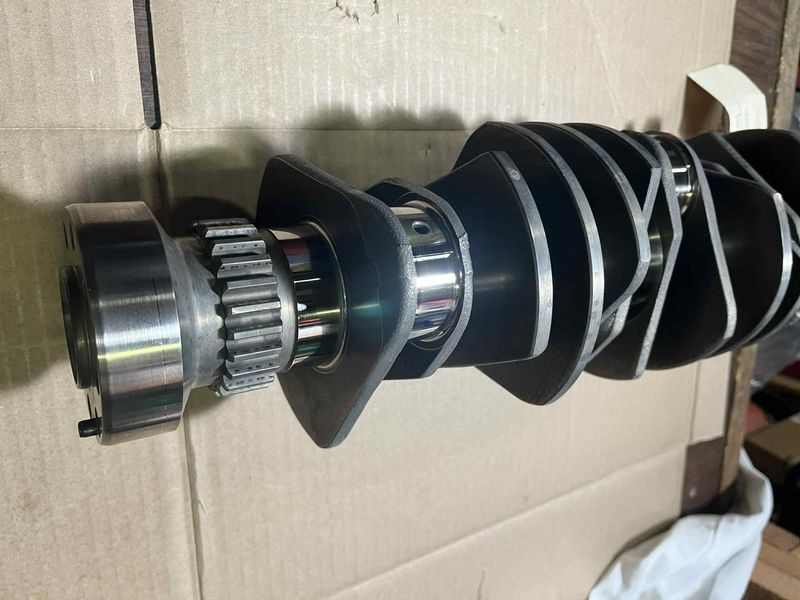
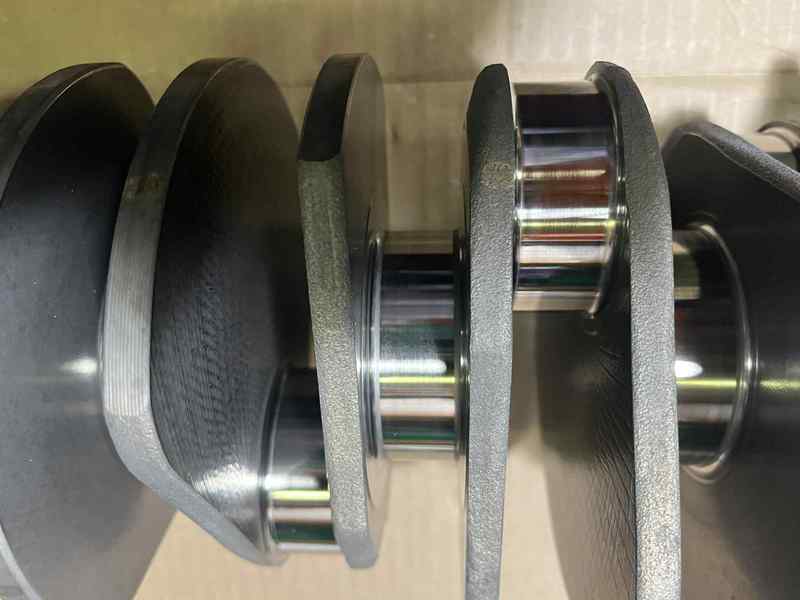
I got the crank back from the machine shop (months ago...). The machinist (it's a one man shop) polished the journals, mic'd them and said it's good to go. Now they (the journals) are smooth and shiny.
I cleaned and tested the squirters and put them back in.

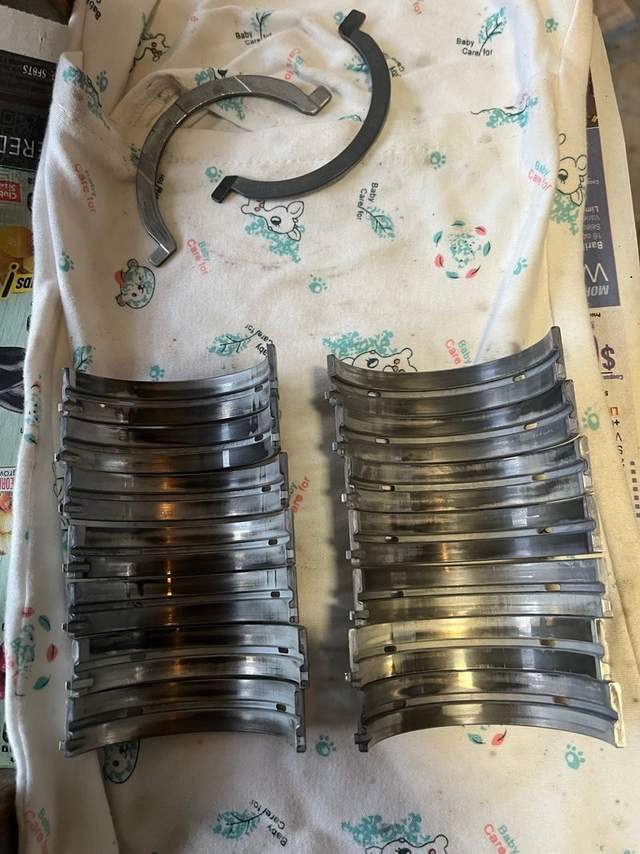
Fresh set of bearings.
I checked the clearances all around with platigauge, just in case. Everything is within specs.


I replaced one thrust bearing also as it showed some minor wear.
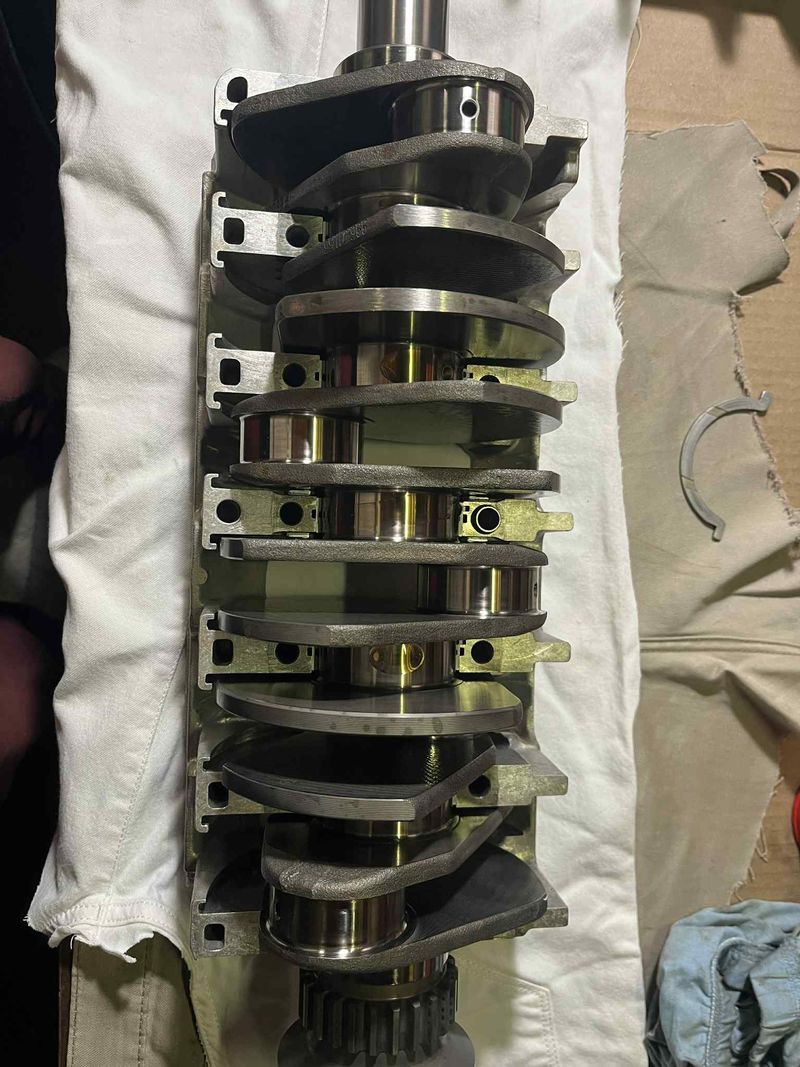
Torqued down.

The bearing carrier is now ready for the conrods. I'll throw them in once I received the new rod bolts from Pelican.

|
|
|
|
|
04-24-2025, 05:47 AM
|
#31
|
|
Registered User
Join Date: Sep 2018
Location: Illinois
Posts: 315
|
The engine I'm assembling had oil starvation since the previous idi--owner drove it after the cam tensioners had disintegrated. There was debris blocking the oil pickup pretty much completely. The only effect was one main bearing toasted and the others had a little heat. The crank needed only a polish on the one journal.
I reassembled the bottom end and found a tight spot. Looking at it again, there were high spots in one shell. I'm going to follow professional advice and just try smoothing with some grey Scotchbrite.
Otherwise, I'll just get another shell.
Did you use the ARP bolts for the crankcase? I found it helpful since they are reusable and I have definitely used that feature!
__________________
A cynic is a man who, when he smells flowers, looks around for a coffin.
-H. L. Mencken
|

|
|
|
04-25-2025, 09:54 PM
|
#32
|
|
Registered User
Join Date: Oct 2018
Location: North Cali
Posts: 857
|
Quote:
Originally Posted by Newsguy
The engine I'm assembling had oil starvation since the previous idi--owner drove it after the cam tensioners had disintegrated. There was debris blocking the oil pickup pretty much completely. The only effect was one main bearing toasted and the others had a little heat. The crank needed only a polish on the one journal.
I reassembled the bottom end and found a tight spot. Looking at it again, there were high spots in one shell. I'm going to follow professional advice and just try smoothing with some grey Scotchbrite.
Otherwise, I'll just get another shell.
Did you use the ARP bolts for the crankcase? I found it helpful since they are reusable and I have definitely used that feature!
|
Yep, worn cam tensioners is a typical failure, one of my previous Porsches had to be rebuilt for the same reason, the tensioner wore off, fell apart, then the chain jumped over one or more teeth.
These high spots are surprising because the whole unit is pretty robust and should survive some extra heat without being damaged. Did you tighten the bolts down to the secified torque in the correct order? The bearing carrier halves have to be perfectly and evenly bolted to each other so the clearances will be the same all around.
I used genuine bolts.
|
|
|
|
|
05-26-2025, 11:17 PM
|
#33
|
|
Registered User
Join Date: Oct 2018
Location: North Cali
Posts: 857
|
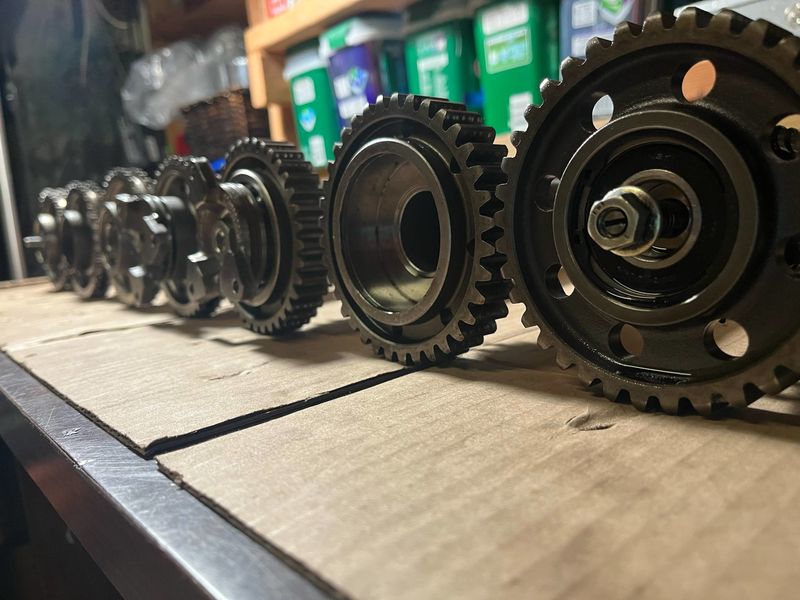
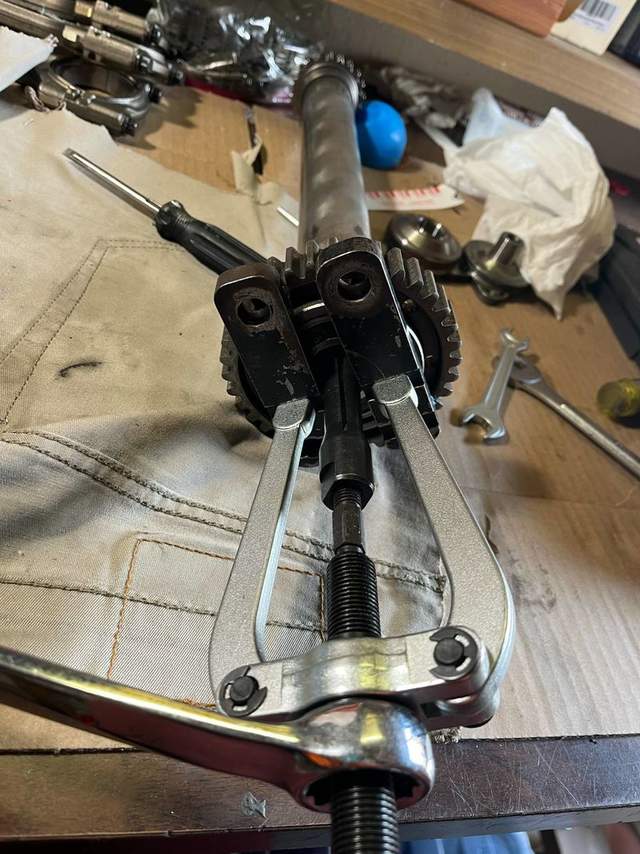
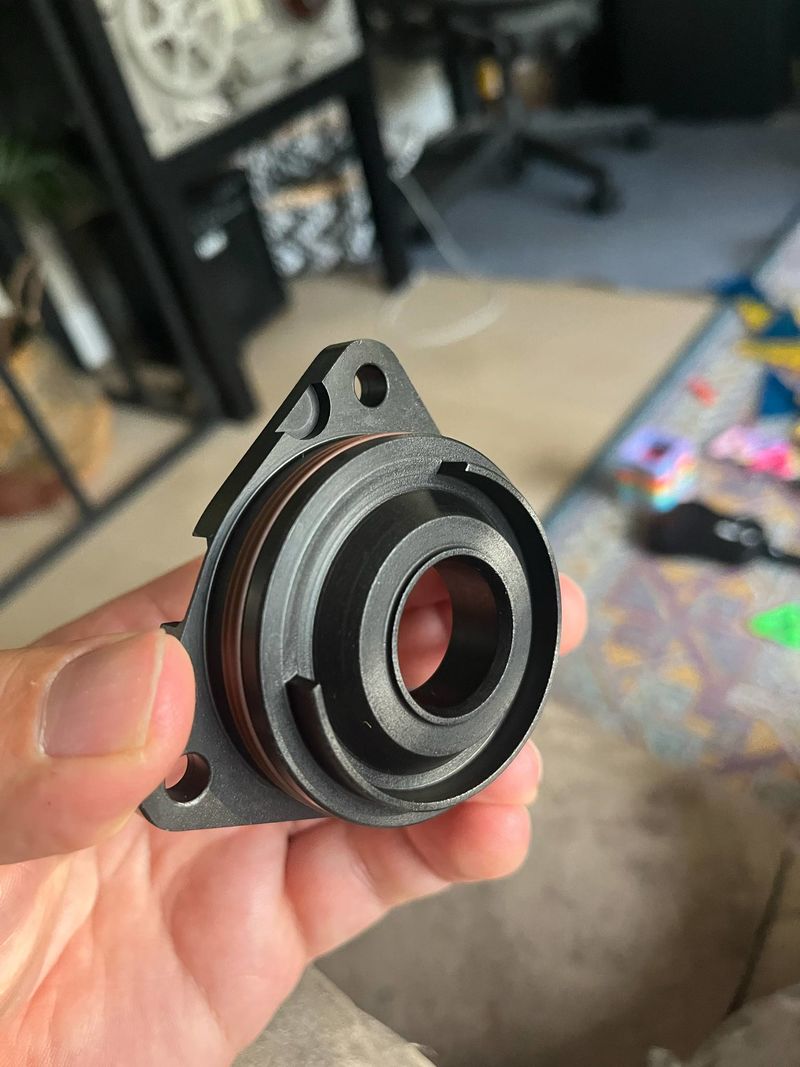
Replacement IMS and fitting new bearing
This car had the single-row, small bearing, which is the weakest of them all. Although it's still perfect and shows no wear, I didn't want to just leave it as is.
Luckily I have a few more IMSs lying around that I can pick from.
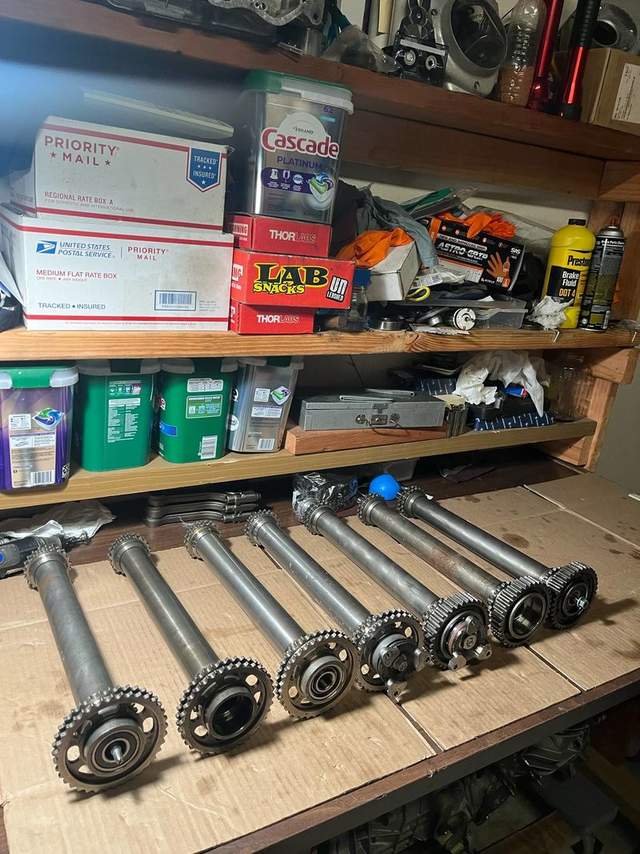
The right most is the original. On its left is the newer IMS with the non-servicable bearing (not in place). To one more on the left is a similar one, with a flange. I found this on ebay a few months ago for a good price. This is the one I'll go with.
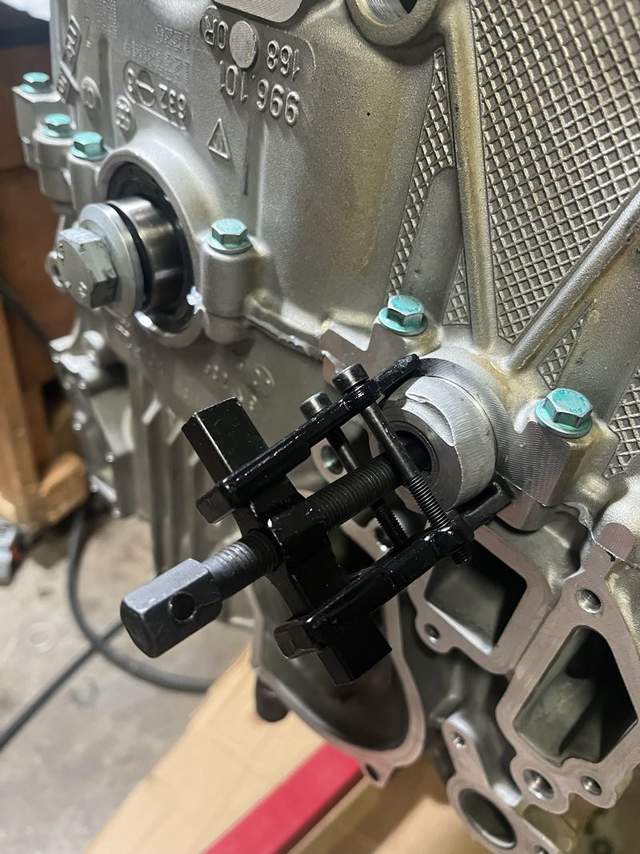
Deflanged.

Extracting the old bearing.
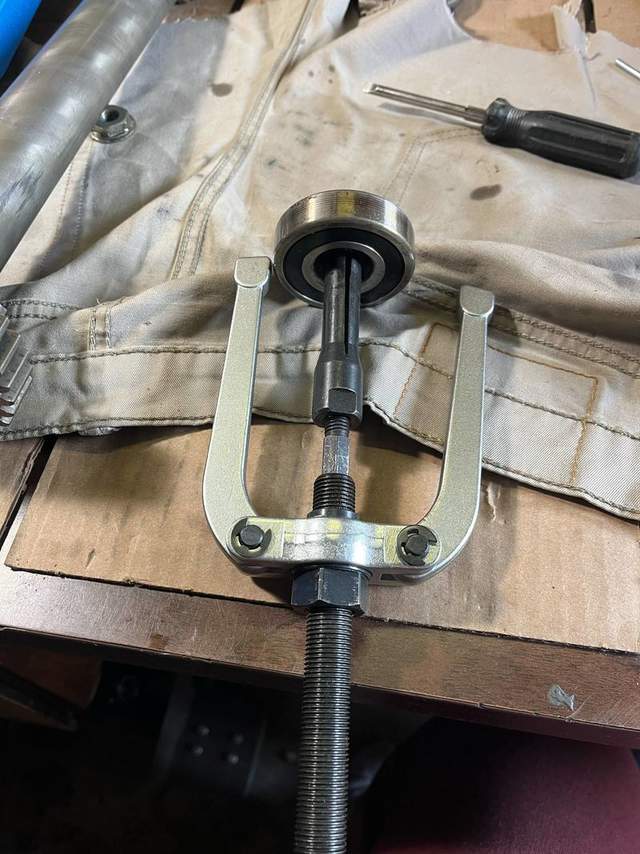
Side by side is a small bearing and the larger kind (6305).

This is new replacement bearing chilling in the freezer to accompany some ice creams. The next morning I heated up the IMS in the oven. If you do this installing the bearing does not require any force, it just slides right in.
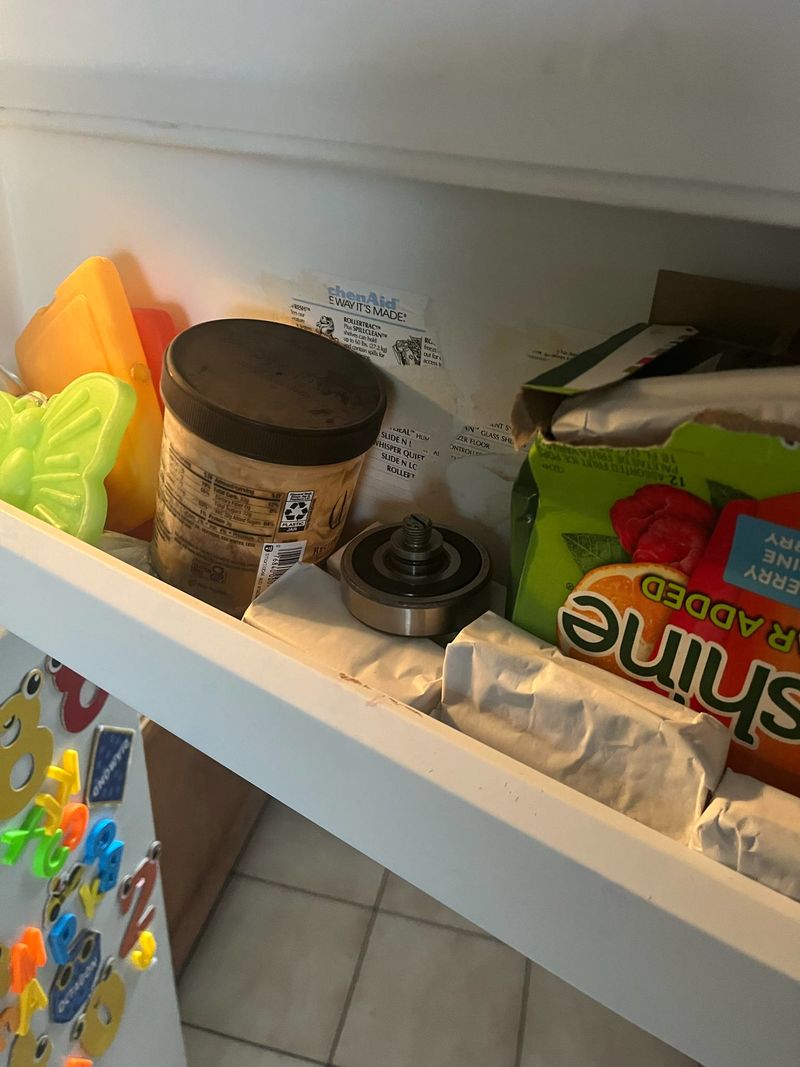
Spins nicely with negligible runout.
I added a Hartech-flange to the assembly instead of the original for increased lubrication by the splashed oil.

|
|
|
|
|
05-27-2025, 05:50 AM
|
#34
|
|
Registered User
Join Date: Sep 2018
Location: Illinois
Posts: 315
|
Quote:
Originally Posted by Homeoboxter
Yep, worn cam tensioners is a typical failure, one of my previous Porsches had to be rebuilt for the same reason, the tensioner wore off, fell apart, then the chain jumped over one or more teeth.
These high spots are surprising because the whole unit is pretty robust and should survive some extra heat without being damaged. Did you tighten the bolts down to the secified torque in the correct order? The bearing carrier halves have to be perfectly and evenly bolted to each other so the clearances will be the same all around.
I used genuine bolts.
|
Since that post I have been fortunate to work with an experienced mechanic close to one of the major M96 sources (and worked there.)
He was worried the crank was bad so we had it checked. It's good so we are going with new bearings. He doesn't like the coated bearings and thinks that is the problem or there is an issue with the carrier.
I had really aimed for getting this on the road this summer, but as these things go, that is looking less likely.
__________________
A cynic is a man who, when he smells flowers, looks around for a coffin.
-H. L. Mencken
|
|
|
|
|
05-28-2025, 09:21 AM
|
#35
|
|
Registered User
Join Date: Oct 2018
Location: North Cali
Posts: 857
|
Quote:
Originally Posted by Newsguy
Since that post I have been fortunate to work with an experienced mechanic close to one of the major M96 sources (and worked there.)
He was worried the crank was bad so we had it checked. It's good so we are going with new bearings. He doesn't like the coated bearings and thinks that is the problem or there is an issue with the carrier.
I had really aimed for getting this on the road this summer, but as these things go, that is looking less likely.
|
Yeah, it takes a lot longer than one would think.. Especially if you get lost in the details. What are those coated bearings like?
|
|
|
|
|
05-28-2025, 04:27 PM
|
#36
|
|
Registered User
Join Date: Sep 2018
Location: Illinois
Posts: 315
|
Quote:
Originally Posted by Homeoboxter
Yeah, it takes a lot longer than one would think.. Especially if you get lost in the details. What are those coated bearings like?
|
They look like bearings to me, but I'm not remotely an expert! All I know is they are substantially more expensive than your basic Clivites!
Yes, it has taken longer than I thought. I've been amassing parts for a while, and in fact, noticed a box dated 2020 just yesterday. But there are a couple of factors like a 1000-mile move and a second bad engine, but we'll skip over that.
__________________
A cynic is a man who, when he smells flowers, looks around for a coffin.
-H. L. Mencken
|
|
|
|
|
07-22-2025, 09:31 PM
|
#37
|
|
Registered User
Join Date: Oct 2018
Location: North Cali
Posts: 857
|
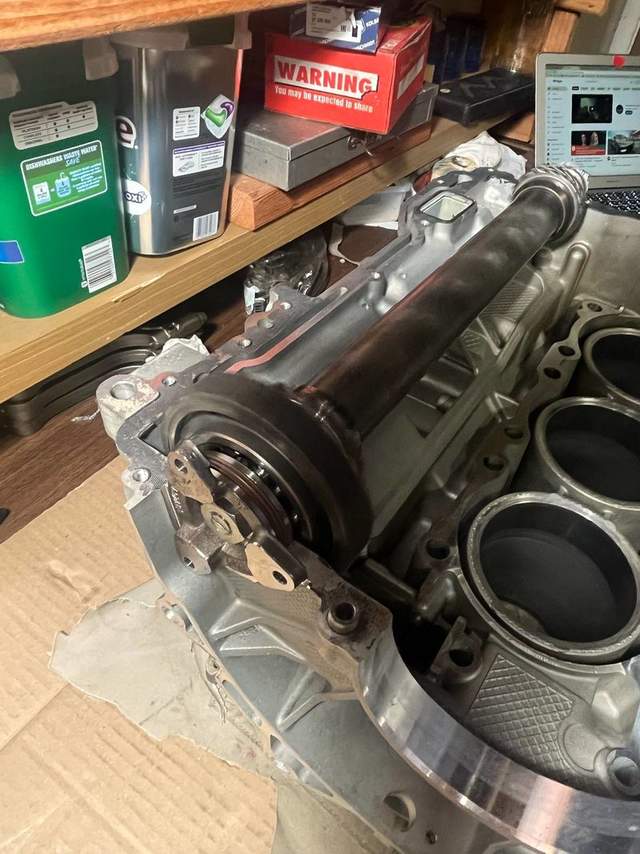
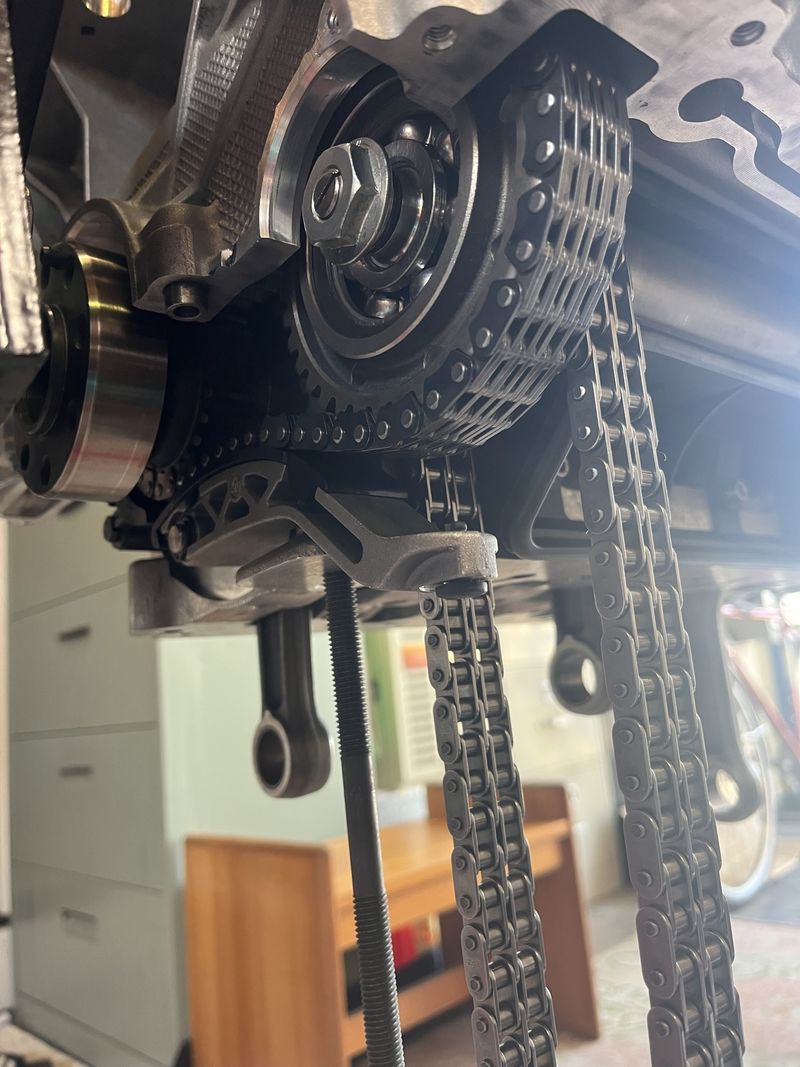
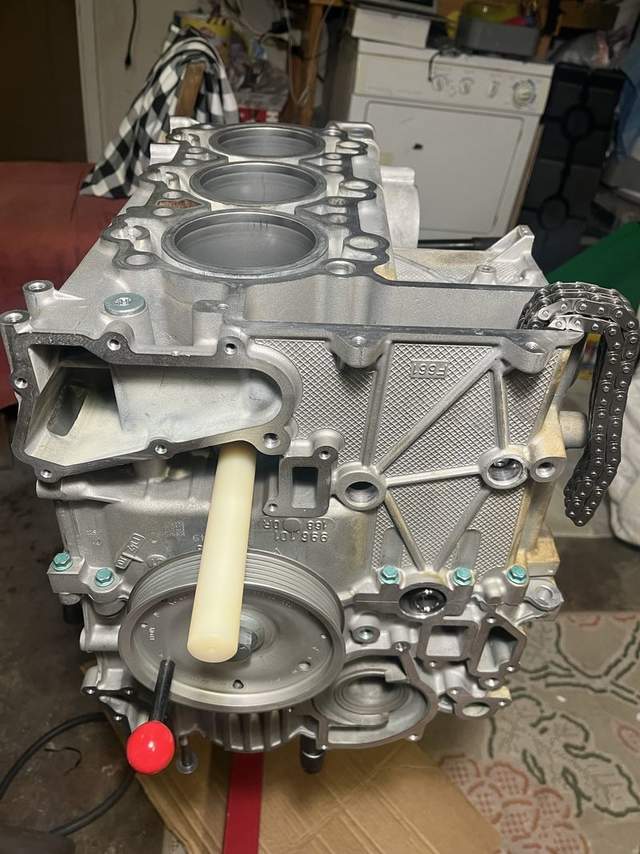
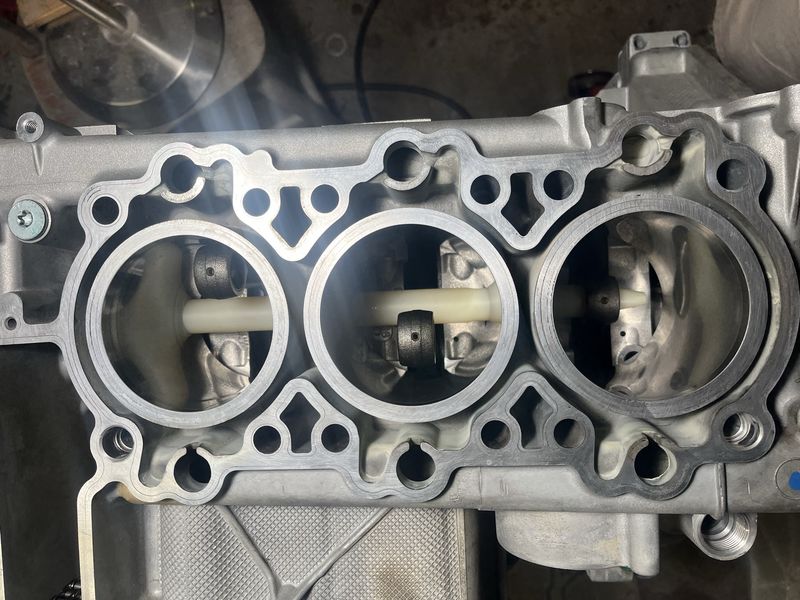
Joining the cases
I had some progress with the engine in the past weeks (months?), starting with some clean-up. Case halves drying in the sun.
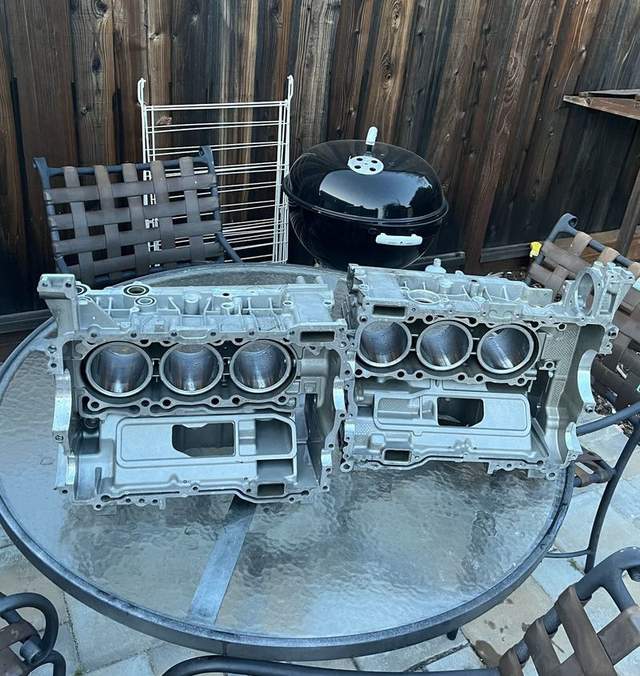
Ready for the crank assembly.
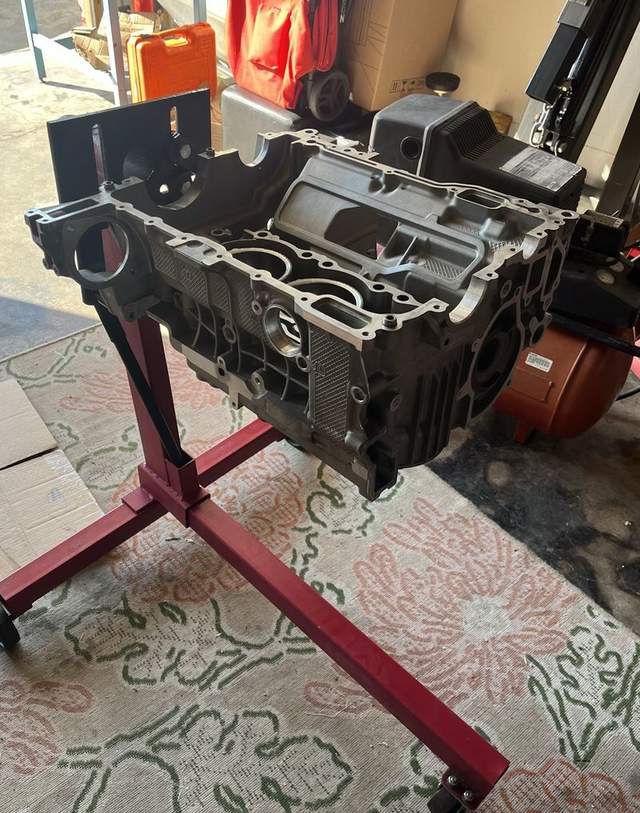
Here it goes.
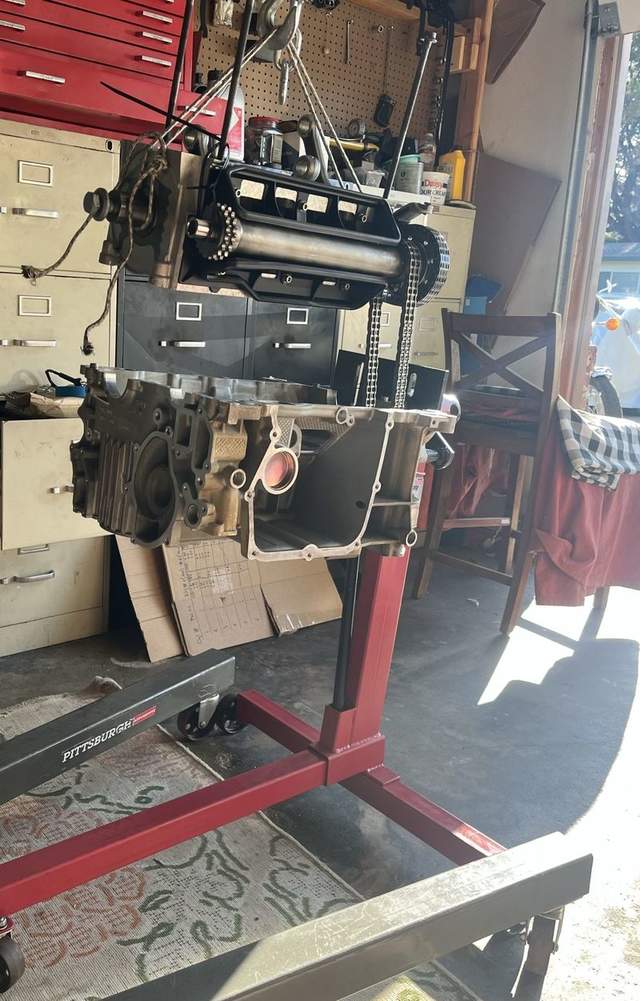
Chains...
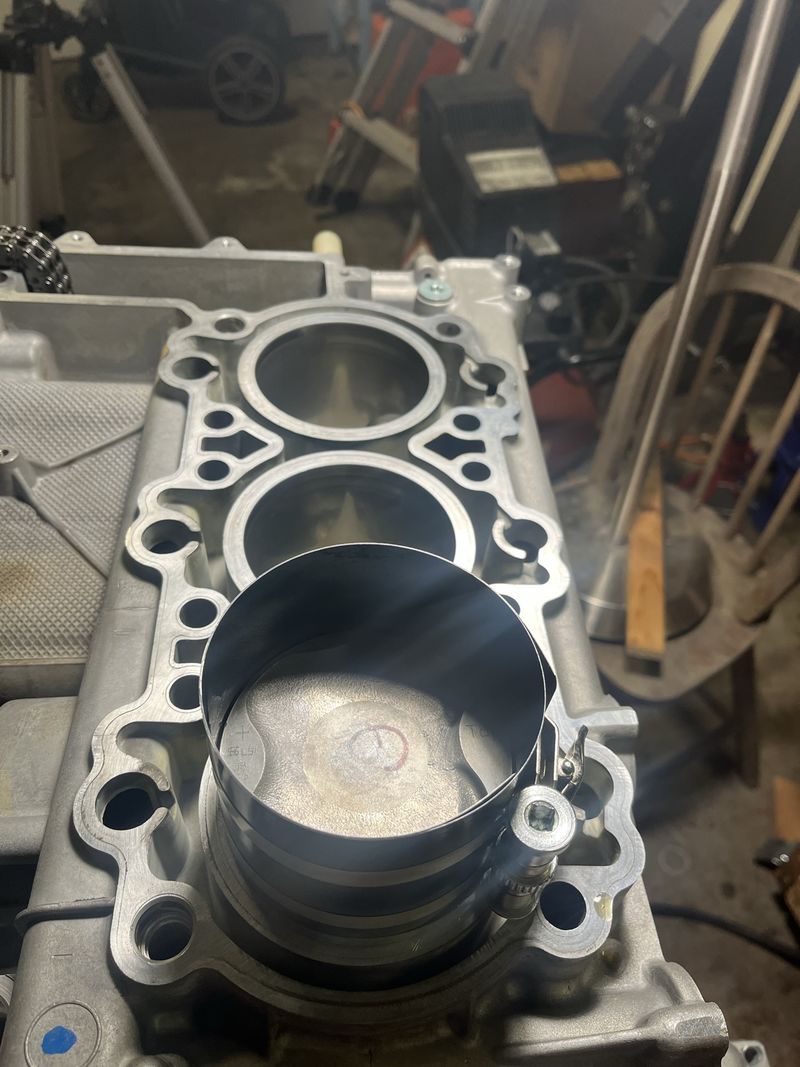
Gapping the new rings.
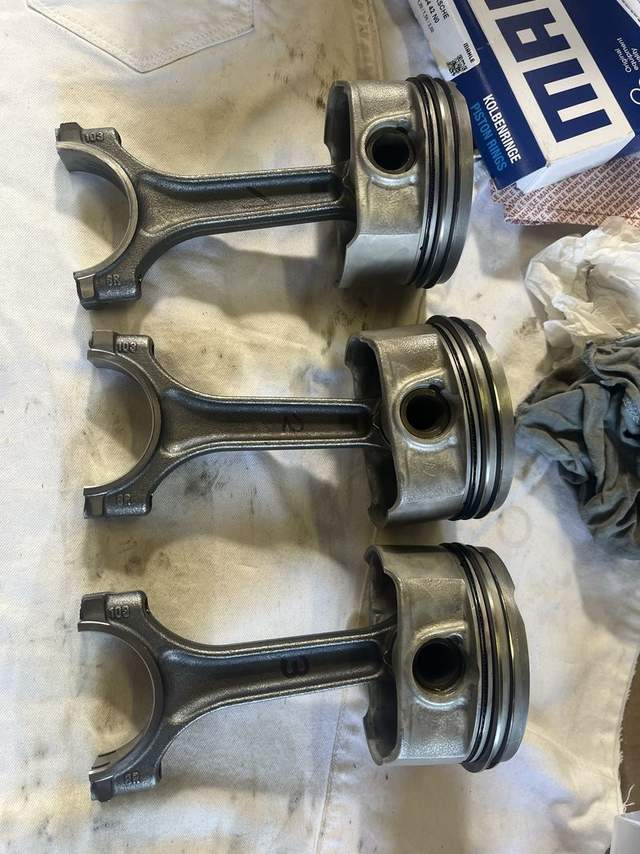
Torquing down the rod bolts.
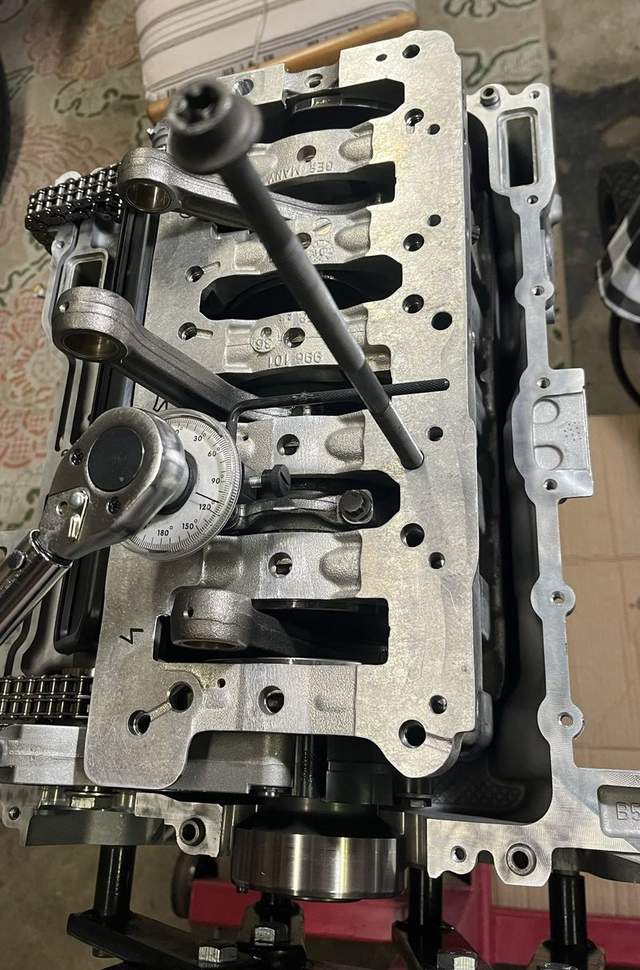
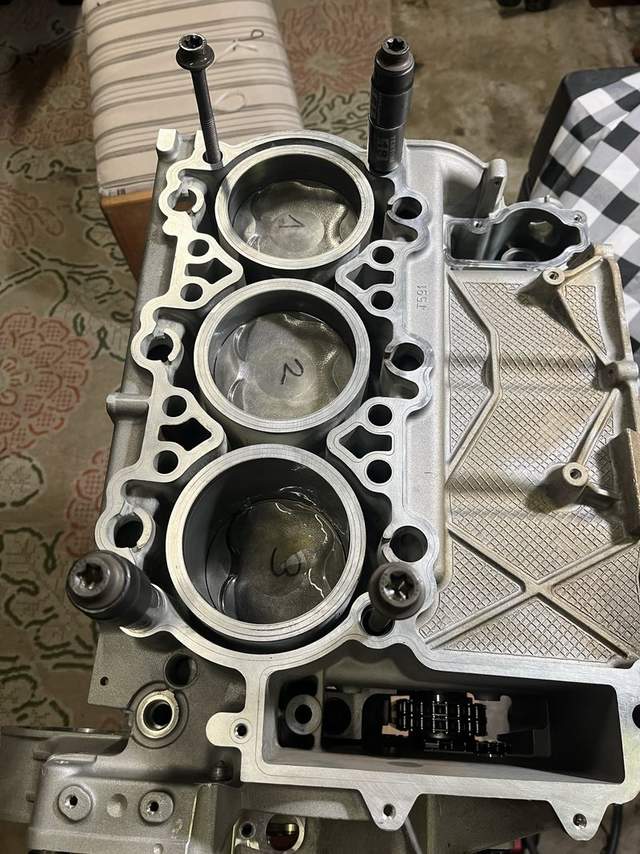
Case halves rejoined. 
|
|
|
|
|
08-05-2025, 07:39 PM
|
#38
|
|
Registered User
Join Date: Oct 2018
Location: North Cali
Posts: 857
|
|
|
|
|
|
08-06-2025, 05:12 PM
|
#39
|
|
Registered User
Join Date: Sep 2018
Location: Illinois
Posts: 315
|
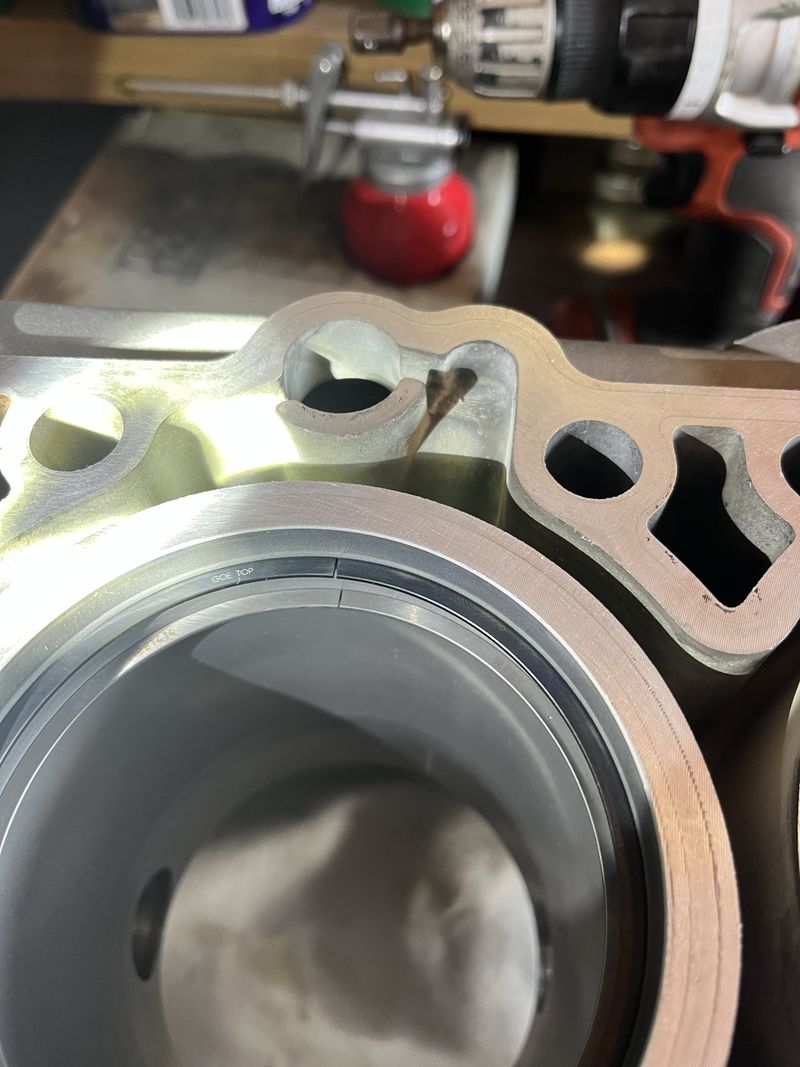
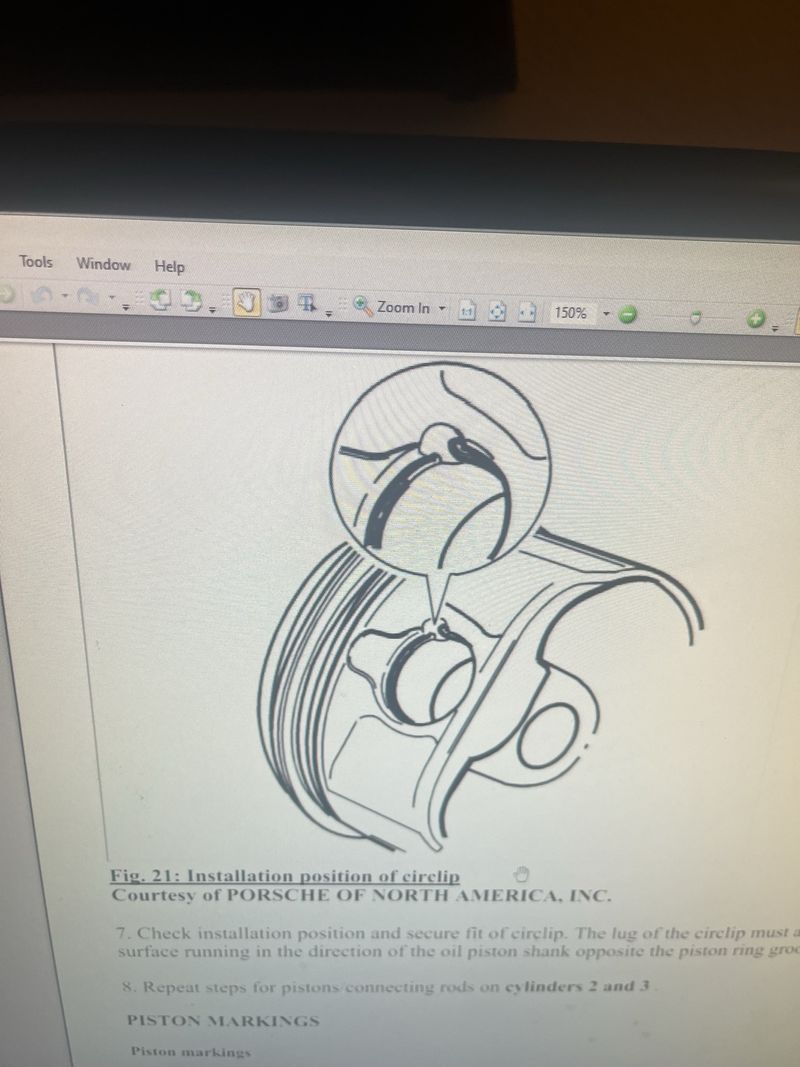
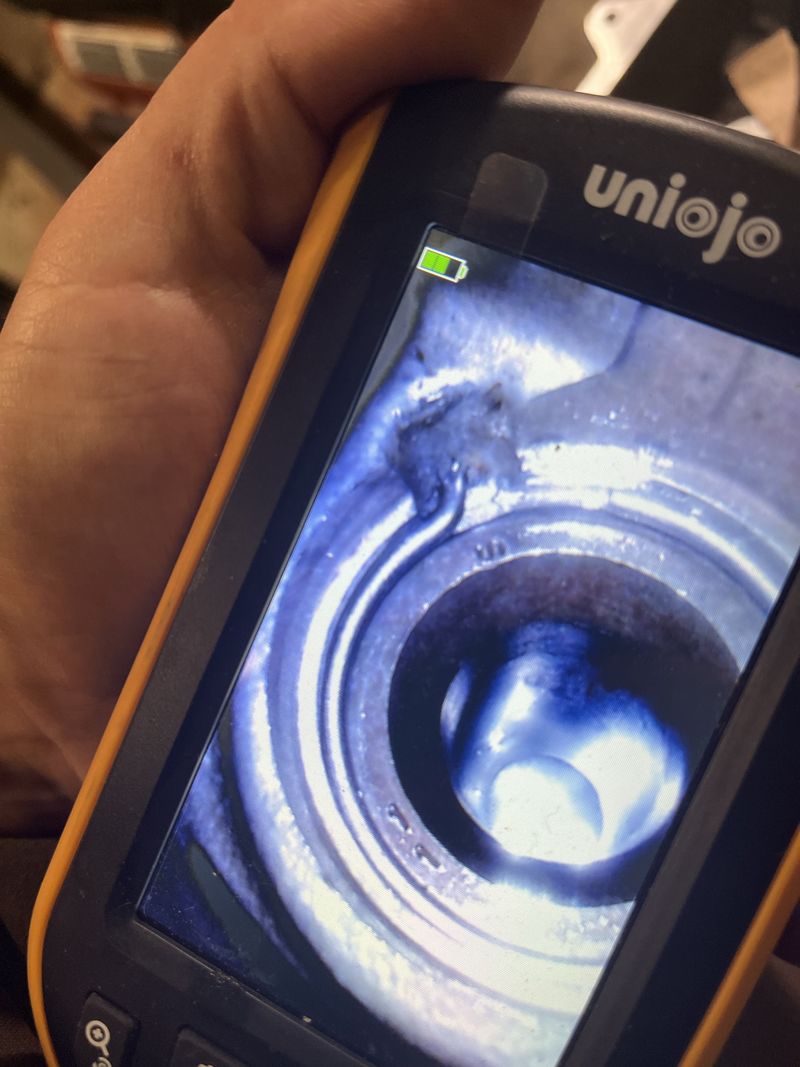
Amazing clarity with that boescope! When we assembled mine, I could barely make it out. On that topic, Jake says in the video he just clips that lug. My mechanic friend who has LN ties, doesn’t, but it would seem to complicate assembly.
As far as the rings, the Mahles were pretty much right in the ballpark, not needing any filing, except one was slightly looser but still acceptable.
__________________
A cynic is a man who, when he smells flowers, looks around for a coffin.
-H. L. Mencken
|
|
|
|
|
08-06-2025, 11:48 PM
|
#40
|
|
Registered User
Join Date: Oct 2018
Location: North Cali
Posts: 857
|
Quote:
Originally Posted by Newsguy
Amazing clarity with that boescope! When we assembled mine, I could barely make it out. On that topic, Jake says in the video he just clips that lug. My mechanic friend who has LN ties, doesnt, but it would seem to complicate assembly.
As far as the rings, the Mahles were pretty much right in the ballpark, not needing any filing, except one was slightly looser but still acceptable.
|
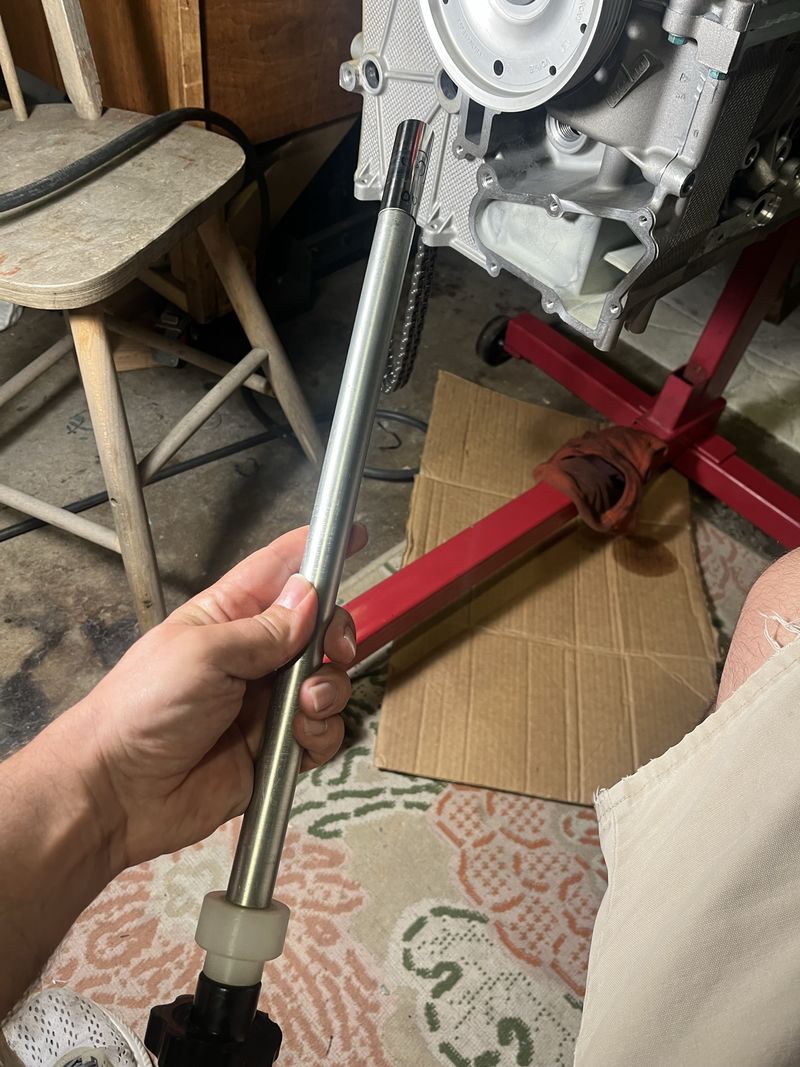
Yeah, I tried a couple borescopes, I got lucky with this one, it stays in focus even when it is really close to the object, while the others became blurry,.
Actually it doesn't take longer to install the circlip with the lug, you can clearly feel where exactly it is by gently rotating the tool in the piston pin bore. I don't think it's a smart idea to clip it off, but unnecessary at the very least.
I used Mahles too, but they were all tighter than Mahle specs so I needed to file off a little bit of each.
|
|
|
|
 Posting Rules
|
You may not post new threads
You may not post replies
You may not post attachments
You may not edit your posts
HTML code is Off
|
|
|
All times are GMT -8. The time now is 01:02 AM.
| |


 Boxster
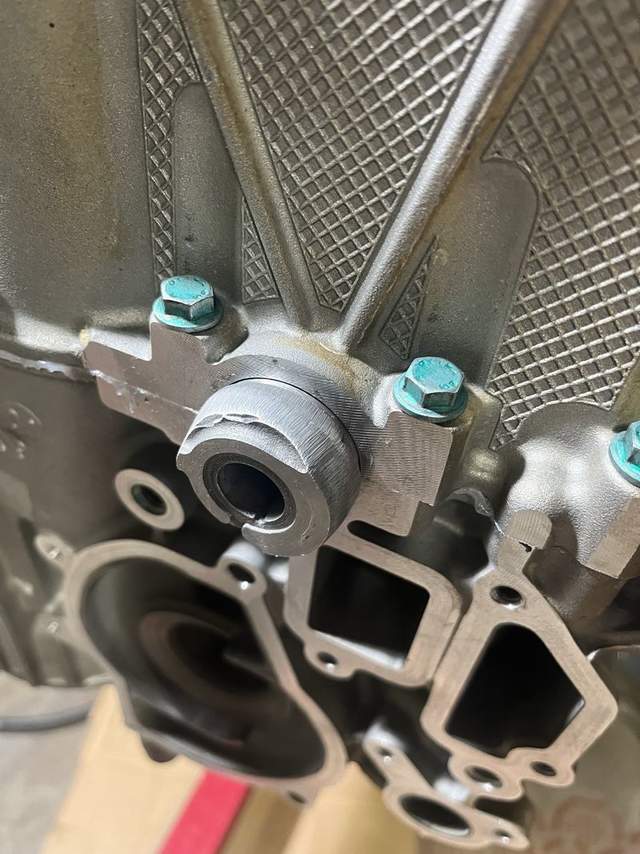
 Linear Mode


