Go Back   986 Forum - The Community for Porsche Boxster & Cayman Owners > Porsche Boxster & Cayman Forums > Show and Tell Gallery

Post Reply
 
LinkBack Thread Tools Display Modes
Old 01-07-2019, 07:27 AM   #1
2003 S, Arctic Silver, M6
 
paulofto's Avatar
 
Join Date: Oct 2014
Location: Winnipeg, MB, Canada
Posts: 1,346
Garage
Yay! He's back. I really missed your pictures of that high gloss paint. Welcome back.
paulofto is offline   Reply With Quote
Old 01-07-2019, 12:33 PM   #2
Registered User
 
geraintthomas's Avatar
 
Join Date: Nov 2015
Location: South Wales, UK
Posts: 852
Hah, thanking you! You wouldn't want to see it at the moment, it's a bit of a mess. But once it's mechanically sound, it's nothing that a two-day detail wouldn't fix. It'll be better than it's ever been then.

Had a load of things delivered today, including this wee little thing:


I've got the black and red ones of these, but the yellows were discontinued years ago. Managed to get it still in its box/packet off someone for £15! The normal colours are £25 new, and the yellows are seriously rare. So yeah, quite happy with that. Goes with my dials too:

__________________
Porsche Boxster S Type 986

Bi-xenon Headlight Upgrade | 987 S 18" Anthracite Alloys | Android Head Unit | 5000k 55w HID's | 5000k Cree DRL's | 5000k Cree number plate lights | Cree LED Indicators | One-touch roof operation | Bypass exhaust pipes | Parking sensors | Ambient footwell lighting
geraintthomas is offline   Reply With Quote
Old 01-07-2019, 05:52 PM   #3
Registered User
 
Join Date: Jun 2014
Location: LB, Germany
Posts: 1,515
Quote:
Originally Posted by geraintthomas View Post
Hah, thanking you! You wouldn't want to see it at the moment, it's a bit of a mess. But once it's mechanically sound, it's nothing that a two-day detail wouldn't fix. It'll be better than it's ever been then.

Had a load of things delivered today, including this wee little thing:


I've got the black and red ones of these, but the yellows were discontinued years ago. Managed to get it still in its box/packet off someone for £15! The normal colours are £25 new, and the yellows are seriously rare. So yeah, quite happy with that. Goes with my dials too:

I like that.

Do you know if there are any black ones for the 986S? And perhaps i would need Km.

Regards, Markus
__________________
My Porsche keyfob, instrument cluster and alarm ecu repair service: https://sportwagendoktor.de
Smallblock454 is offline   Reply With Quote
Old 01-07-2019, 10:55 PM   #4
Registered User
 
geraintthomas's Avatar
 
Join Date: Nov 2015
Location: South Wales, UK
Posts: 852
Quote:
Originally Posted by Smallblock454 View Post
I like that.

Do you know if there are any black ones for the 986S? And perhaps i would need Km.

Regards, Markus
I designed and printed the overlay myself (it's on here of you scroll back)

Right, riddle me this.

I need to get this nut off:


Trouble is, the socket on the bolt has rounded and I can no longer stop it from spinning while I attempt to undo the bolt. I've bought another arm to go on so I'm happy to butcher this one.

Initial thought was a nut splitter, but would it split the nut this thick?

Another idea is to cut a groove in the top to place a flat head screwdriver (or socket) into it, but the nut rising may close this gap.

I've tried forcing a bigger head into this but he aftermarket part has such soft metal that it didn't work.

Bit skeptical of dremelling the nut off due to how close it is to the hub, but it may be an option.

Thoughts?
geraintthomas is offline   Reply With Quote
Old 01-08-2019, 05:02 AM   #5
Who's askin'?
 
maytag's Avatar
 
Join Date: Mar 2018
Location: Utah
Posts: 2,448
Quote:
Originally Posted by geraintthomas View Post
I designed and printed the overlay myself (it's on here of you scroll back)


Right, riddle me this.


I need to get this nut off:


Trouble is, the socket on the bolt has rounded and I can no longer stop it from spinning while I attempt to undo the bolt. I've bought another arm to go on so I'm happy to butcher this one.


Initial thought was a nut splitter, but would it split the nut this thick?


Another idea is to cut a groove in the top to place a flat head screwdriver (or socket) into it, but the nut rising may close this gap.


I've tried forcing a bigger head into this but he aftermarket part has such soft metal that it didn't work.


Bit skeptical of dremelling the nut off due to how close it is to the hub, but it may be an option.


Thoughts?
I've been known to weld another bolt to the rounded one. Or even buy a cheap wrench at a pawn shop and weld the wrench right to it.

Sent from my SM-G930T using Tapatalk
maytag is offline   Reply With Quote
Old 01-09-2019, 05:42 AM   #6
Registered User
 
geraintthomas's Avatar
 
Join Date: Nov 2015
Location: South Wales, UK
Posts: 852
Quote:
Originally Posted by maytag View Post
I've been known to weld another bolt to the rounded one. Or even buy a cheap wrench at a pawn shop and weld the wrench right to it.

Sent from my SM-G930T using Tapatalk
Great idea! Though I've not got a weld gun nor have access to it - I also can't take it to a garage as I'd need to insure it, which it's not, and then we're talking trailer costs, and so on.

I tried lowering the arm on an axle stand, specifically the end so that it stops it from spinning, but this didn't make the slightest bit of difference. Not sure if I'm doing it wrong...
__________________
Porsche Boxster S Type 986

Bi-xenon Headlight Upgrade | 987 S 18" Anthracite Alloys | Android Head Unit | 5000k 55w HID's | 5000k Cree DRL's | 5000k Cree number plate lights | Cree LED Indicators | One-touch roof operation | Bypass exhaust pipes | Parking sensors | Ambient footwell lighting
geraintthomas is offline   Reply With Quote
Old 02-22-2019, 04:35 AM   #7
Registered User
 
RayW's Avatar
 
Join Date: Jun 2014
Location: Chicago
Posts: 39
Garage
one of the guys on the Boxster group on Facebook posted a link to your thread here. Read through the whole thing and am inspired to get the cover off mine if it ever warms up here. Love your wheels and gauge faces. I have a Speed Yellow base with the same gauge setup as yours. Would you be interested in printing a non S tach face in Yellow for me. I love the fact that these just slip over the needle, as removing it troubles me. Anyway, if this is an option, let me know what it would take to get one sent to the states, and if you don’t have the time or desire, I understand. Thanks, and good luck getting yours back on the road!! I know you gotta bemissing it.
RayW is offline   Reply With Quote
Old 01-16-2019, 03:25 AM   #8
Registered User
 
Join Date: Oct 2015
Location: Melbourne, Australia
Posts: 243
Ger's 2003 Porsche Boxster S

I'd try a single hex socket with an impact gun.

If it starts spinning once it loosens then I'd reach for multigrips to push the arm back 'home' and go again with the inpact gun so that it bites.

This almost always worked in my trade days with compressed air driven guns that had very high levels of instantaneous torque.

Nowadays I only have a 36v cordless impact gun, but I expect that it would still work. My gut feel is that the heat introduced into the male threaded part expands it so that it doesn't spin.
__________________
2001 Boxster S, TipTronic in Seal Grey aka "The Imp"
2001 TE50, ESS in (now) Grigio Titanio Matallizzato aka "The Golden child"
TrumpyAl is offline   Reply With Quote
Old 04-06-2019, 11:24 AM   #9
Registered User
 
Join Date: Mar 2019
Location: Northumberland
Posts: 1
Hi, may I ask what compounds and pads you used for the correction detail?
StuatP is offline   Reply With Quote
Old 05-09-2019, 06:55 AM   #10
Registered User
 
Join Date: Oct 2015
Location: Melbourne, Australia
Posts: 243
In case anyone's reading through here and wishes that there was a base version of the startup animation.


It's not perfect, but is probably good enough for most.
__________________
2001 Boxster S, TipTronic in Seal Grey aka "The Imp"
2001 TE50, ESS in (now) Grigio Titanio Matallizzato aka "The Golden child"

Last edited by TrumpyAl; 05-09-2019 at 06:57 AM.
TrumpyAl is offline   Reply With Quote
Old 11-22-2019, 05:43 AM   #11
Registered User
 
geraintthomas's Avatar
 
Join Date: Nov 2015
Location: South Wales, UK
Posts: 852
I've just realised I haven't updated this thread!

IT'S FINALLY F***ING FIXED AFTER 2 YEARS!


Get yourself a cuppa, this is a long one.

The hub, the subframe, everything's done! Finally had some spare time in the summer to work on the car!It was stood on three wheels for almost a year with things going wrong here and there, but it's now road legal with a fresh MOT. It's been one hell of a journey to get this suspension fixed since the last time I posted. Wrong hubs posted, two faulty arms received, etc.

It looked like absolute shyate though. Matted paint, mould on the roof, faded plastics, bird poo damage to the paintwork (light enough to sand/polish), cobwebs completely covered the engine bay, fuel cap, all wheel arches and even some inside the car, etc. It's honestly a state. To think of the condition it was in before... but, as you can see from the photos below, it's back to it's former glory.

But I took to the garage like that for an MOT. I only started refurbishing it when I knew it's road legal again which, thankfully, it passed the MOT with flying colours! A huge relief. It's also been serviced, new battery, and new tyres too with a four wheel alignment also. Drives like a dream.

As you can see in the photos below, I've had the wheels refurbished back to silver with black center caps. I feel like the anthracite was too muddy and got lost in the contrast. Now they ping out lovely.

Whilst the wheels were off to be powder coated, I had the chance to scrub the suspension area and to re-clean and coat some parts. They look 10x better.


Going to eventually do a lot more of this under the car.

I'm going to take it to an exhaust garage soon as I want both pre-cat O2 sensors swapped (they need to blow torch them), and at the same time I'm going to ask them to replace both gaskets between the manifold & exhausts and all of the clamps on the exhaust to ensure all leaks are sound. Not that there's any, but emissions weren't the most comfortable at the MOT. Being stood on my drive wouldn't have done it any favours, so it's precautionary.

Other things I've done - I've dropped the horseshoe radio surround at a local bodyshop to get it resprayed gloss black for £50. It was scratched and, no matter what I did, I wasn't happy with the finish. I tried wrapping it but it bubbled in the heat. Tried spraying it but it was never a good finish. If this looks good I'd be tempted to take more interior bits of trim in to get them done. The black surround around the dials, the centre console, door bin lids and handle covers would look beautiful in gloss black, so I may get those done too.

Here's what the radio horseshoe looks like now:


Also temporarily wrapped the ashtray in gloss black before spraying.

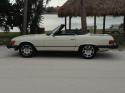
And here's how the car stands now:


And that's it! I'm going to fit an external amp for the stereo as the built in amp chip is weak as hell on this chinese radio. I've replaced the speakers and didn't notice the improvement, so the amp is needed. Aside from that and the exhaust work I need to do, it's all done! I've got some performance upgrades I'm planning on doing soon though.


Oh, and by the way...


I figured out something. I thought the lip that cracked off the subframe when I was replacing a track rod arm was the sole culprit of the alignment constantly going out, but I was wrong.

The original track rod arm two years ago sheared its bolt on me whilst driving, right? Remember this?


And remember how I replaced it, and not long after that I decided to reverse into a Tesco bollard and clip the rear quarter (same side), which bent the bolt of the new arm I put in? The bolt was bent at the same point that the old one snapped, which was odd:


I never figured this out.

Either way, a third arm went in. Following that, the alignment never stayed true and the arm always came loose with the nut needing constant tightening. I never got to figuring out why. Until recently.

So this is the new hub's hole that the track rod arm goes into:


But this is the old hub I took off the car...


Oh, my god.

From the fact that the original arm snapped its bolt, it would seem that the arm was actually replaced before I bought the car. That bush most likely fell out without the previous mechanic/owner's knowledge, so they didn't put it back in when the arm was changed. This explains the original arm's bolt snapping and the second arm's bolt bending due to the tremendous force on that particular section of the bolt rather than having a snug fit. Everything is explained. I'm quite shocked to be honest.

Either way, the new hub is in, new subframe, handbrake cable guide, eccentric bolts, tyres, etc. It's all fresh and it all feels fantastic.

And here we are now.


If you've read this far, thank you!
__________________
Porsche Boxster S Type 986

Bi-xenon Headlight Upgrade | 987 S 18" Anthracite Alloys | Android Head Unit | 5000k 55w HID's | 5000k Cree DRL's | 5000k Cree number plate lights | Cree LED Indicators | One-touch roof operation | Bypass exhaust pipes | Parking sensors | Ambient footwell lighting

Last edited by geraintthomas; 11-22-2019 at 05:45 AM.
geraintthomas is offline   Reply With Quote
Old 11-22-2019, 06:56 AM   #12
Registered User
 
Join Date: Oct 2015
Posts: 24
Garage
Yikes, that's alarming!

It's great to see the car back on the road Ger, well done!
Silver' is offline   Reply With Quote
Old 11-23-2019, 07:03 AM   #13
2003 S, Arctic Silver, M6
 
paulofto's Avatar
 
Join Date: Oct 2014
Location: Winnipeg, MB, Canada
Posts: 1,346
Garage
Great story and a happy ending. Anyone contemplating parting out a Boxster should read this and take heart that these cars can be resuscitated and turned into beautiful machines. A ton of work and patience has paid off for you Geraint. Congratulations!

Also, love that first photo!
paulofto is offline   Reply With Quote
Old 11-23-2019, 01:02 PM   #14
Registered User
 
geraintthomas's Avatar
 
Join Date: Nov 2015
Location: South Wales, UK
Posts: 852
Quote:
Originally Posted by Silver' View Post
Yikes, that's alarming!

It's great to see the car back on the road Ger, well done!
I very much apprechate that, thanks!

Quote:
Originally Posted by paulofto View Post
Great story and a happy ending. Anyone contemplating parting out a Boxster should read this and take heart that these cars can be resuscitated and turned into beautiful machines. A ton of work and patience has paid off for you Geraint. Congratulations!

Also, love that first photo!
Thanks so much for the kind words, means a lot. It's been a very up and down ride with this car, but as it stands I absolutely love it and wouldn't trade it for the world.


I've just found out that there's now 718 rear lights for the 986, and I'm kind of obsessed by them.


I REALLY want them, but they're massively expensive as I'd have to ship them to the UK
__________________
Porsche Boxster S Type 986

Bi-xenon Headlight Upgrade | 987 S 18" Anthracite Alloys | Android Head Unit | 5000k 55w HID's | 5000k Cree DRL's | 5000k Cree number plate lights | Cree LED Indicators | One-touch roof operation | Bypass exhaust pipes | Parking sensors | Ambient footwell lighting
geraintthomas is offline   Reply With Quote
Old 11-25-2019, 06:10 AM   #15
Registered User
 
Join Date: Nov 2019
Location: Phoenix, Arizona, USA
Posts: 7
Great work on the Boxster.
ivexpron is offline   Reply With Quote
Old 11-25-2019, 11:55 PM   #16
Registered User
 
Join Date: Aug 2016
Location: Norway
Posts: 99
Still alive, and still have the Boxster! Great to see you and your great car again!
Nevergrowup is offline   Reply With Quote
Old 12-03-2019, 12:53 AM   #17
Registered User
 
geraintthomas's Avatar
 
Join Date: Nov 2015
Location: South Wales, UK
Posts: 852
Thank you, appreciate it very much. It's great to have it back on the road.

So I've got a plan with my bi-xenons. I'd love the 4-LED Panamera style ones but I really don't think they'd fit in the housing.

Instead I'm looking to modify these:


The square style matches the aesthetics of the modern Porsche headlights, but the halo ring is horrible.

Unless I mask up the lenses so that I'm spraying the halo's black aside from 4 circular spots on the corners.

From this:


To this:


If you see what I mean? I get a similar look with the 4-LED layout, and they're 2.5" so they'll fit.


I'll see how it goes.
__________________
Porsche Boxster S Type 986

Bi-xenon Headlight Upgrade | 987 S 18" Anthracite Alloys | Android Head Unit | 5000k 55w HID's | 5000k Cree DRL's | 5000k Cree number plate lights | Cree LED Indicators | One-touch roof operation | Bypass exhaust pipes | Parking sensors | Ambient footwell lighting
geraintthomas is offline   Reply With Quote
Old 12-05-2019, 06:50 PM   #18
Registered User
 
Join Date: Oct 2015
Posts: 24
Garage
I look forward to seeing the results Ger.

I've been admiring a couple of 9x6 retrofits that I've seen pics of recently. Lots more work in these though as they are using the a simple screw in projector, but are mounting them using custom hardware and even fabricating a trim piece in the dual setup. Very nice work.


Silver' is offline   Reply With Quote
Old 12-10-2019, 02:48 PM   #19
Registered User
 
geraintthomas's Avatar
 
Join Date: Nov 2015
Location: South Wales, UK
Posts: 852
Quote:
Originally Posted by Silver' View Post
I look forward to seeing the results Ger.

I've been admiring a couple of 9x6 retrofits that I've seen pics of recently. Lots more work in these though as they are using the a simple screw in projector, but are mounting them using custom hardware and even fabricating a trim piece in the dual setup. Very nice work.


Holy cow! Is there a thread for these?
__________________
Porsche Boxster S Type 986

Bi-xenon Headlight Upgrade | 987 S 18" Anthracite Alloys | Android Head Unit | 5000k 55w HID's | 5000k Cree DRL's | 5000k Cree number plate lights | Cree LED Indicators | One-touch roof operation | Bypass exhaust pipes | Parking sensors | Ambient footwell lighting
geraintthomas is offline   Reply With Quote
Old 01-06-2020, 06:42 AM   #20
Registered User
 
Join Date: Oct 2015
Posts: 24
Garage
Quote:
Originally Posted by geraintthomas View Post
Holy cow! Is there a thread for these?

No, not that I’m aware of. I found them in a Facebook group: Boxster Outlaws.

I’d use any old wire laying around to connect the jump battery to that special terminal in the fuse panel - no need for it to be a jump cable. It only needs to give the circuit 12v long enough to pop the frunk. Definitely find that cable and re-route it if it isn’t already behind the tow bung.
Silver' is offline   Reply With Quote
Post Reply

Tags
3.2 , black , boxster s , oem+ , porsche


Posting Rules
You may not post new threads
You may not post replies
You may not post attachments
You may not edit your posts

BB code is On
Smilies are On
[IMG] code is On
HTML code is Off
Trackbacks are On
Pingbacks are On
Refbacks are On


All times are GMT -8. The time now is 01:45 AM.


Powered by vBulletin® Version 3.8.7
Copyright ©2000 - 2025, vBulletin Solutions, Inc.
Content Relevant URLs by vBSEO 3.6.0
Copyright 2025 Pelican Parts, LLC - Posts may be archived for display on the Pelican Parts Website -    DMCA Registered Agent Contact Page