 12-27-2014, 03:52 AM
|
#101
|
|
Registered User
Join Date: Oct 2014
Location: Georgia
Posts: 53
|
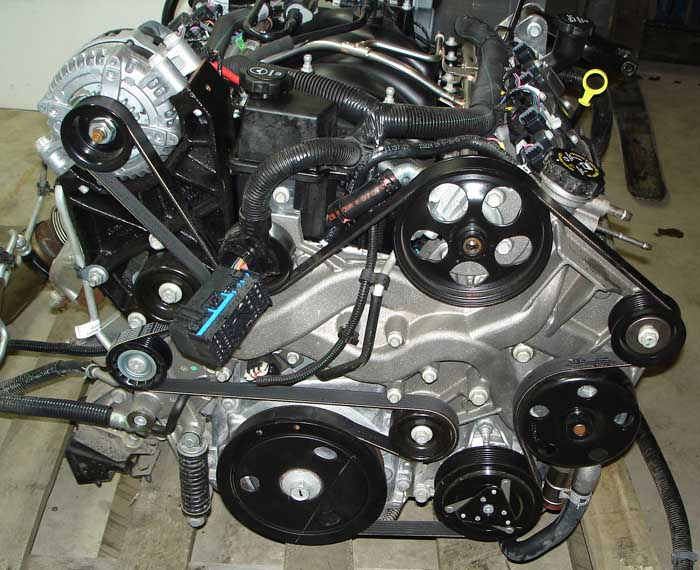
Wow tight isn't the word.
Looks like paper thin clearance on the oil pan.
Nice job.
I need to drop by the shop next week - let me know what works
R
|

|

|
|
12-27-2014, 04:18 AM
|
#102
|
|
Registered User
Join Date: Nov 2014
Location: WI
Posts: 96
|
 CLU needed?
My CLU (Immobilizer) and my 3.2L are both toast on my 01 Box S so looking at the LS. I think I read the conversion uses both the Chevy and the German ECUs but is the Immobilizer also needed?
|
|
|
|
|
12-28-2014, 07:10 AM
|
#103
|
|
Registered User
Join Date: Jul 2013
Location: Bastrop, Tx
Posts: 2,644
|
Quote:
Originally Posted by BoxsterLS376

Yeah I'm sure they are not too far off, LS3 weighs in at 466 pounds, can't seem to find a weight on the 3.2 off hand, but I'm sure it's a good 400+. , J
|
I shipped a complete 3.2 on a pallet and it weighed 420lbs. Great build thread and I'm shocked we haven't had any haters say anything yet.
__________________
Woody
|
|
|
|
|
12-28-2014, 12:33 PM
|
#104
|
|
Registered User
Join Date: Oct 2014
Location: Georgia
Posts: 53
|
Quote:
Originally Posted by itsnotanova
I shipped a complete 3.2 on a pallet and it weighed 420lbs. Great build thread and I'm shocked we haven't had any haters say anything yet.
|
Thanks for the info.
Based on that I'd guess the conversion will add 200 - 300 pounds possibly a little more. Still a good trade off as you are just about doubling the HP.
I think the stock Boxster S is carrying about 11- 12 pounds per HP - the converted car should be in the 6 - 7 pound per HP range all things being equal. 
|
|
|
|
|
12-28-2014, 02:34 PM
|
#105
|
|
Registered User
Join Date: Oct 2014
Location: Georgia
Posts: 391
|
Quote:
Originally Posted by itsnotanova
I shipped a complete 3.2 on a pallet and it weighed 420lbs. Great build thread and I'm shocked we haven't had any haters say anything yet.
|
Thanks, hopefully the haters stay away, this build is definitely not for the purist! You will probably have to weigh everything individually to know the exact number... i'll just weigh the car after I'm done, which will be done on corner balancing scales~
All told probably 250-300 is a good guess as the LS3 motor is right at 500 lbs itself... add the kit and I can definitely see about +300~ or so.
Quote:
Originally Posted by JRL
the converted car should be in the 6 - 7 pound per HP range all things being equal. |
I LIKE THIS VERY MUCH 
My internet has been giving me crap the last 2 days so I am re-uploading the longer version video I made and hopefully it will work this time. If so it will be available here in about 2 hours or so - http://youtu.be/ixPZD731alM
I made 2 more quick videos today which i'll try and upload as well. Pulled the motor back out and put the intake manifold on, tried to tuck it in and not enough room so I pulled it back out and got the cutting saw out again. I trimmed away all the excess metal underneath the center lock latch for the engine cover and it got me another half inch or so but more room is still needed.
I also went ahead and trimmed up the back of the compartment to make room for the throttle body and MAF stuffs. There is not really as much structure back there as I thought, just pulled the foam out of the way and basically made 3 cuts and whacked a large area off to make sure I have plenty of room. i'll post the videos after this long one finishes
Thanks!
J
Last edited by BoxsterLS376; 12-28-2014 at 02:42 PM.
|
|
|
|
|
12-28-2014, 03:02 PM
|
#106
|
|
Registered User
Join Date: Jul 2013
Location: Bastrop, Tx
Posts: 2,644
|
With the extra weight in the middle, it should have less negative effect than if it was in the front or back. I know a guy locally that's sticking an iron block 6.0 in his boxster. He also plans on throwing some turbos on it!!. 
__________________
Woody
|
|
|
|
|
12-28-2014, 05:31 PM
|
#107
|
|
Registered User
Join Date: Oct 2014
Location: Georgia
Posts: 391
|
First video from today is ready, you can check it out here~ http://youtu.be/GgzC2a4_Nb0
Thanks
J
|
|
|
|
|
12-28-2014, 08:18 PM
|
#108
|
|
inveniam viam aut faciam
Join Date: Mar 2014
Location: Arvada, CO
Posts: 441
|
Quote:
Originally Posted by BOOTLEG
My CLU (Immobilizer) and my 3.2L are both toast on my 01 Box S so looking at the LS. I think I read the conversion uses both the Chevy and the German ECUs but is the Immobilizer also needed?
|
I'll grab this one. Yes, you still will need your immobilizer unit. It also controls the top, windows, locks, etc., so you will still need to have that module functional.
__________________
'03 S, manual, 18" Carrera wheels, PSM, PSE, Litronic, 996 Cluster, +
|
|
|
|
|
12-28-2014, 09:09 PM
|
#109
|
|
Registered User
Join Date: Jul 2008
Location: San Jose, CA
Posts: 207
|
Dang .. I was really excited at the propect of an LS3 motor in my car when my stocker goes .. but at $30k all in from Renegade, "DIY'in" this huge undertaking with little support from the "kit" manufacturer, or have a shop tackle it at $100 / hr. Personally, I don't see a good option out of those 3. Mad respect that you're able to do it.
|
|
|
|
|
12-29-2014, 04:05 AM
|
#110
|
|
Registered User
Join Date: Oct 2014
Location: Georgia
Posts: 391
|
Quote:
Originally Posted by nefarious986
Dang .. I was really excited at the propect of an LS3 motor in my car when my stocker goes .. but at $30k all in from Renegade, "DIY'in" this huge undertaking with little support from the "kit" manufacturer, or have a shop tackle it at $100 / hr. Personally, I don't see a good option out of those 3. Mad respect that you're able to do it.
|
Thanks man,
It is definitely a big undertaking but to make it less intimidating just look at it one little step at a time and it has not been that bad. I'm going to try and highlight all the difficult areas here so everyone understands what they are getting into.
Reality is that if you already have a car to use, have the time and patience for a project like this and are willing to take on the project yourself, it can be done for right about $20,000 which is definitely a bargain for what you are getting!
Got the last video of the weekend uploaded this morning, should be available shortly~
http://youtu.be/f44Lh86yric
Anywho back to the daily grind Maybe i'll get some more work done on the car today 
Thanks everyone!
J
|
|
|
|
|
01-03-2015, 12:03 PM
|
#111
|
|
Registered User
Join Date: Oct 2014
Location: Georgia
Posts: 391
|
Greetings all.
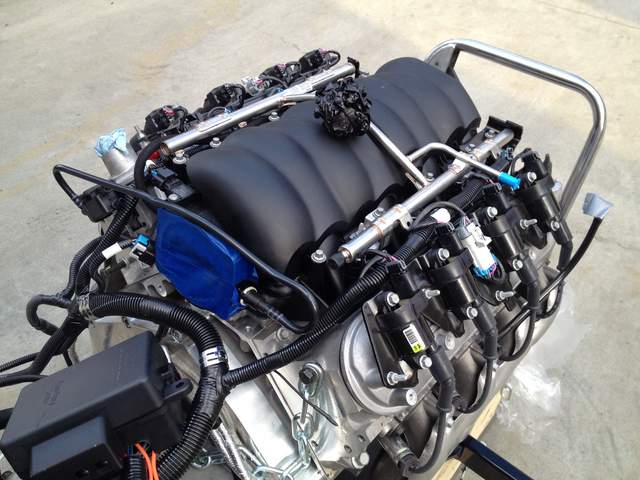
Hope everyone is having a better new year then me so far! Sooo been making good progress doing final fitment for the motor etc. and decided that the valve covers needed to be swapped around to have better access to the oil fill...
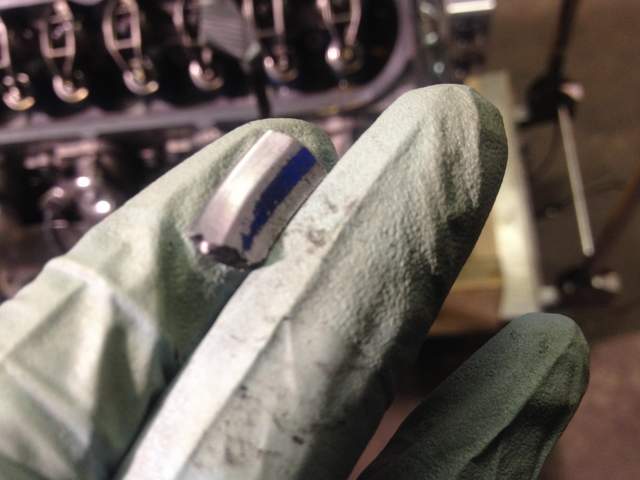
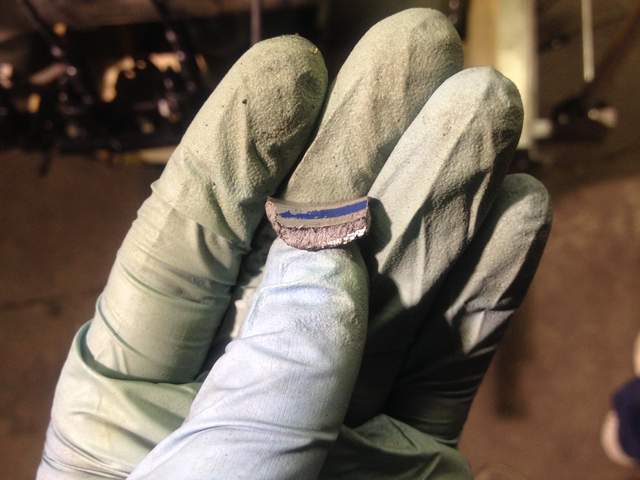
Well in pulling off the passenger side valve cover I found a HUGE chunk of aluminum in the cylinder head. It not Eiffel Tower huge - but for being inside of a brand new motor it is pretty damn big... I've already talked to Chevy and sent them an email which you can see here that better explains the entire situation:
-------------------------------
Hello Travis,
Thanks for looking into this situation for me. Here is a quick overview of the situation so you can pass it along to whoever needs the info...
When the motor first arrived the oil filler cap was not on the motor and I assumed that someone had simply taken it, but it was later found down in the bottom of the crate. It appeared to have been knocked off but still works so I didn't think much of it. Today I was in the process of switching the valve covers to make oil fill easier in this project car. When I took off the passenger side valve cover, almost directly below the oil fill spout(see pointing picture) I found a small piece of broken plastic which I believe to be the lock from the oil filler tube, but then also found a large piece of broken aluminum which I have pictured below. It is about 1/4" wide, about 1/2" long and about 1-2mm thick. Beveled/machined on one side, broken on the other with signs of blue valve spring paint on it.
I have thoroughly examined both cylinder heads and can not see any place where this piece could have broken off of, there appears to be no damage at all.
Please pass this information along to your technical department and if there is anything I need to do by way of additional pictures/videos or information just let me know.
--------------------------------------------------
They have been very responsive and are awaiting more pictures and info from me, but right now this is a big bummer as I may have to send the motor back to Chevy and have them go through it to make sure everything is OK. This my friends is a prime example of why I decided to purchase a new crate motor vs. a used motor. I would be SOL with a junk yard motor, but instead it's going to be taken care of - a lot to be said for buying new with a warranty!!!
Well that took the wind out of my sails until I find out what needs to happen with the motor. In the mean time I went ahead and got the electric power steering pump mounts fabricated and I think it's gonna work. I'll get some more pictures and try to put a quick video together on it this week.
Thanks
J
|
|
|
|
|
01-03-2015, 12:12 PM
|
#112
|
|
Registered User
Join Date: Oct 2014
Location: Georgia
Posts: 391
|
Pictures of offending metal chunk~
|
|
|
|
|
01-03-2015, 02:48 PM
|
#113
|
|
Track rat
Join Date: Nov 2006
Location: Southern ID
Posts: 3,701
|
Hang in there because it will be worth it. I just spent New Years Day carving canyons with Scott Mann of Renegade in his LS Boxster. That thing is a monster that looks bone stock. All the 930 Turbo guys were suitably annoyed as you might imagine.
__________________
2009 Cayman 2.9L PDK (with a few tweaks)
PCA-GPX Chief Driving Instructor-Ret.
|
|
|
|
|
01-03-2015, 05:06 PM
|
#114
|
|
Registered User
Join Date: Jan 2015
Location: San Diego, CA
Posts: 1
|
Awesome build! I'm very tempted to try to do this myself. Can't use a crate engine and pass smog in California though. You have to use an engine pulled from a newer car. Looks like the stock Corvette cats would fit since they are so close to the exhaust manifolds.
I wonder if it would be possible to use the LS4 water pump and accessory layout? It was mentioned in the Cayman + LS3 thread on LS1tech. Might be able to avoid having to use an electric water and power steering pumps. Looks like the alternator position would be a problem.
Bummer about the engine. At least you caught it before you fired it up.
|
|
|
|
|
01-05-2015, 03:38 PM
|
#115
|
|
Registered User
Join Date: Oct 2014
Location: Georgia
Posts: 391
|
Thanks everyone!
Well good news - ish~ After sending pictures and videos to Chevy I just spoke with them and they advised to proceed with installation. We are 99.9% sure that the chunk is from a broken valve cover filler spout. The oil filler was clearly knocked off at some point and the valve cover broken and replaced, but obviously the broken wasn't recovered until now.
They did give me the option to go ahead and send it back to them but it would require putting the motor back to stock configuration. Even if there is a problem it is under warranty so I can send it in later, plus I they mentioned that the warranty may also cover part or all of the removal & reinstallation of the new motor. So it would definitely suck if there is a problem but I think we will be ok.
sooo BACK TO WORK!
J
|
|
|
|
|
01-06-2015, 06:55 AM
|
#116
|
|
Registered User
Join Date: Jan 2015
Location: Illinois
Posts: 104
|
Can we be friends? Haha seriously, I am doing the same thing I have my kit and I'm getting ready to get this going but lack of instructions and "lots of pictures" is killing me.
|
|
|
|
|
01-10-2015, 01:54 PM
|
#117
|
|
Registered User
Join Date: Oct 2014
Location: Georgia
Posts: 391
|
Quote:
Originally Posted by Lcrivers816
Can we be friends? Haha seriously, I am doing the same thing I have my kit and I'm getting ready to get this going but lack of instructions and "lots of pictures" is killing me.
|
Greetings my friend - of course!! I totally feel your pain which is why I've been trying to document this as much as possible. To show people the ups and downs of the project and try to make it easier for the next guy.
I feel pretty damn comfortable at this point and feel like I'm actually getting closer to the finish line as things are really starting to come together. Only a few more blind corners ahead and hopefully this baby will be making heat before the weather does!!
So after finding that hunk of metal in the top of the motor after changing the valve covers around I got the top of the motor back together with the intake on. Make sure you clearance the intake as there are a few bits that hit which will keep it from seating properly. It is pretty easy to cut out what you don't need with a small dremel tool or even a sharp razor blade. I'll put together a better video and show all those bits soon.
Car was buried in the shop so instead of trying to get the motor back in I decided to play with the wiring a little which all seems very straight forward, again I'll put together a more detailed video later this week!
Here is a quick video for those who are interested~
http://youtu.be/dlLVfMJD-vc
A few pictures below... including a very appropriate fortune cookie this week!!!
Thanks!
J


|
|
|
|
|
01-14-2015, 10:25 AM
|
#118
|
|
Registered User
Join Date: Jan 2015
Location: Illinois
Posts: 104
|
Thanks so much, I will definitely take all and any advice for this if you are willing to lend a hand. I am in the middle of rebuilding my motor and once we get to it I am sure I will have some questions. Thanks man!! 
BTW in case you didn't find out yet the OEM part for the engine cover I'm 90% sure it's was the OEM TOP engine cover for a 987, they just pounded it down to shape. It's about 1-200 bucks online. They said it even matches up to some bolt holes!
Last edited by Lcrivers816; 01-14-2015 at 10:33 AM.
|
|
|
|
|
01-15-2015, 02:23 PM
|
#119
|
|
Registered User
Join Date: Oct 2012
Location: New Jersey
Posts: 52
|
I bought 2000 s now saving my money to start . THanks for your pics and directions at least I know that my build will have some help.
|
|
|
|
|
01-18-2015, 05:51 AM
|
#120
|
|
Registered User
Join Date: Oct 2014
Location: Georgia
Posts: 391
|
Quote:
Originally Posted by Lcrivers816
Thanks so much, I will definitely take all and any advice for this if you are willing to lend a hand. I am in the middle of rebuilding my motor and once we get to it I am sure I will have some questions. Thanks man!!
BTW in case you didn't find out yet the OEM part for the engine cover I'm 90% sure it's was the OEM TOP engine cover for a 987, they just pounded it down to shape. It's about 1-200 bucks online. They said it even matches up to some bolt holes! |
You are welcome and good luck! I'll check into that cover once we get this bad boy moving on its own!!
Quote:
Originally Posted by shockandawe
I bought 2000 s now saving my money to start . THanks for your pics and directions at least I know that my build will have some help.
|
You are very welcome too! PM replied to~ I think that everyone should have a V8 Boxster so just let me know if I can help!
1.18.15 Update -
Greetings all,
Been a crazy week so not much progress, I wanted to get the motor test fit this weekend but we got unusually busy at the shop this week so it may have to wait. Finally had some time to get the wiring onto the motor and sorted a bit better. Since the intake manifold got swapped backwards there are some critical bits of the wiring harness that no longer reach where they need. Luckily Chevy decided to use a split loom for the harness so after lots of removal of electrical tape I was able to get the wires where they needed to be. Also when you are taping it back up - THIS IS NOT THE TIME FOR CHEAP ELECTRICAL TAPE!! Go out and buy some good Scotch/3M tape and you will be much happier with the results!
Also got my harmonic balancer space from Renegade which they ended up sending at no additional cost - YAY!!! THANKS RENEGADE!!!
Did a few quick videos on the wiring, here is the first and a second is on its way:
http://youtu.be/OZzcvV3ngeI
http://youtu.be/PdM4idlNjrM
Plus a few pics including part of the reason I can't get to the car so easily - had a true "barn find" dropped off on us yesterday - a bahama yellow 1970 911T!
Thanks!
John


|
|
|
|
 Posting Rules
|
You may not post new threads
You may not post replies
You may not post attachments
You may not edit your posts
HTML code is Off
|
|
|
All times are GMT -8. The time now is 02:53 AM.
| |


 2001 Porsche Boxster S
 1995 Mazda Miata
 1978 MG MGB
 Big Bad Green AMX
 2002 Chevrolet Corvette
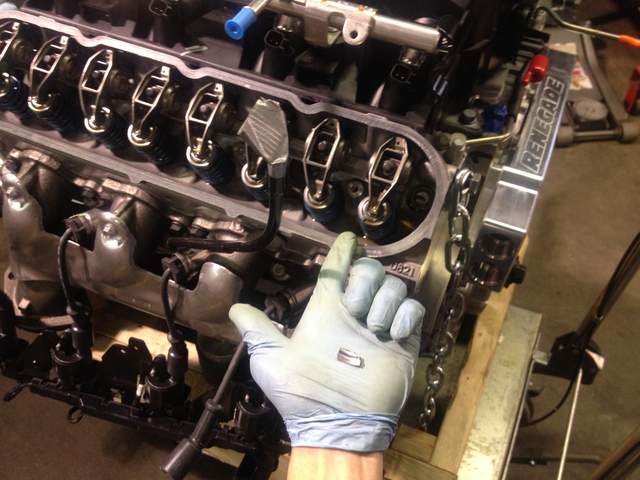

 Lil Red
 2009 Porsche Cayman 2.9L
 Linear Mode


