 07-11-2018, 04:21 AM
|
#1
|
|
Registered User
Join Date: May 2018
Location: Michigan
Posts: 108
|
Tips and Tricks for exhaust swap
just curious if there are any tips or tricks that may be specific to the Boxster for an exhaust swap?
Little oddities that you found or learned when you swapped. Tricks that that you thought of along the way or after the fact. Things that were different specific to the Boxster.
Got my CircuitWerks catless mid pipe and the FVD sound version was delivered yesterday.
Hoping to get it all done this week.
Thanks for any input.

Last edited by 2ata; 07-11-2018 at 05:06 AM.
|

|

|
 07-11-2018, 05:34 AM
|
#2
|
|
Registered User
Join Date: Sep 2016
Location: Central Ohio
Posts: 415
|
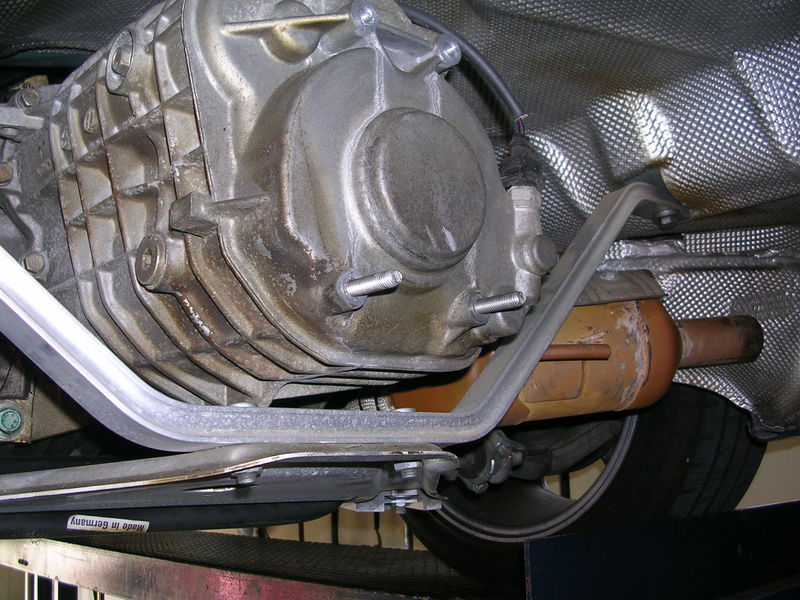
Yup - When you get to this point, replace the pair of OEM M8 x 1.25 bolts on the end of the tranny case with a pair of studs, which are shown in the picture below.
You can then "hang" the bracket on these studs while you sort the other fasteners, instead of needing three hands so to work with the OEM bolts.
Beyond that, mostly a plug and play swap. Use lots of penetrating oil on the other fasteners should this be your first time in.
Thanks - DM

__________________
2000 Ocean Blue Boxster S
1980 Ferrari 308 GTSi
2019 Alfa Romeo Giulia Ti Sport AWD
|

|

|
 07-11-2018, 05:39 AM
|
#3
|
|
Registered User
Join Date: May 2018
Location: Michigan
Posts: 108
|
Dave,
That's exactly the kind of stuff I was looking for. Thank you sir.
|

|

|
 07-11-2018, 05:49 AM
|
#4
|
|
Registered User
Join Date: Dec 2012
Location: FL
Posts: 4,145
|
Quote:
Originally Posted by Dave80GTSi

Yup - When you get to this point, replace the pair of OEM M8 x 1.25 bolts on the end of the tranny case with a pair of studs, which are shown in the picture below.
You can then "hang" the bracket on these studs while you sort the other fasteners, instead of needing three hands so to work with the OEM bolts.
Beyond that, mostly a plug and play swap. Use lots of penetrating oil on the other fasteners should this be your first time in.
Thanks - DM
|
That's a cool trick!
My advice would be, although folks have done it without taking off the rear bumper, it really isn't that much work to take off the rear bumper and it gives you a lot more room.
Clamps:
For the "test pipes" - I'm not sure what comes with your brand or pipes, but a 2" Easy Seal is a better fastener than the little clamps that came with the Top Speed pipes I got.
For the "u" pipe that connects the test pipes to the muffler, my clamps were very corroded, so I got these from Amazon:
https://www.amazon.com/gp/product/B00317DKWO/ref=oh_aui_search_detailpage?ie=UTF8&psc=1
Another consideration, that I don't have any hard data on, is that the stock 2nd cats are shielded but the 2nd cat delete pipe is not and can radiate a lot of heat into the inner CV Boot, and also the inner rubber bushing on the rear LCA, so you may want to evaluate that and see if you want to add any shielding.
My first approach was heatshield armor as documented here:
Use Heatshield armor and stainless zip ties for test pipes to shield inner cv boots
Since then I sent all my exhaust out for ceramic coating and that made it slippery I guess and the heatshield armor would slide around, where when on the bare stainless it stayed in one place so for now I am using just the ceramic coating and the heatshield is uninstalled.
It is a hassle to work on these pipes once installed so if you were going to wrap, or do something like a Swain coating or a Jet Hot now would be the time.
Looking forward to the report after you get it installed!
|

|

|
 07-11-2018, 06:12 AM
|
#5
|
|
Registered User
Join Date: Jul 2005
Location: MA
Posts: 885
|
Regarding the Easy Seal band clamps, i believe:
* 97-99 needs a Lap Joint style
* 00+ needs a Butt Joint style.
Can someone confirm/refute this?
__________________
98 Arena Red 986
|

|

|
 07-11-2018, 06:16 AM
|
#6
|
|
Who's askin'?
Join Date: Mar 2018
Location: Utah
Posts: 2,448
|
Quote:
Originally Posted by Stroked & Blown

Regarding the Easy Seal band clamps, i believe:
* 97-99 needs a Lap Joint style
* 00+ needs a Butt Joint style.
Can someone confirm/refute this? |
I can confirm that my '03 has the butt-joint style.
Sent from my SM-G930T using Tapatalk
|

|

|
 07-11-2018, 08:00 AM
|
#7
|
|
Registered User
Join Date: May 2018
Location: Michigan
Posts: 108
|
Quote:
Originally Posted by steved0x

That's a cool trick!
My advice would be, although folks have done it without taking off the rear bumper, it really isn't that much work to take off the rear bumper and it gives you a lot more room.
Clamps:
For the "test pipes" - I'm not sure what comes with your brand or pipes, but a 2" Easy Seal is a better fastener than the little clamps that came with the Top Speed pipes I got.
For the "u" pipe that connects the test pipes to the muffler, my clamps were very corroded, so I got these from Amazon:
https://www.amazon.com/gp/product/B00317DKWO/ref=oh_aui_search_detailpage?ie=UTF8&psc=1
Another consideration, that I don't have any hard data on, is that the stock 2nd cats are shielded but the 2nd cat delete pipe is not and can radiate a lot of heat into the inner CV Boot, and also the inner rubber bushing on the rear LCA, so you may want to evaluate that and see if you want to add any shielding.
My first approach was heatshield armor as documented here:
Use Heatshield armor and stainless zip ties for test pipes to shield inner cv boots
Since then I sent all my exhaust out for ceramic coating and that made it slippery I guess and the heatshield armor would slide around, where when on the bare stainless it stayed in one place so for now I am using just the ceramic coating and the heatshield is uninstalled.
It is a hassle to work on these pipes once installed so if you were going to wrap, or do something like a Swain coating or a Jet Hot now would be the time.
Looking forward to the report after you get it installed! |
Thanks for the suggestion here. I hadn't considered heat issues. Header wrap ordered.
|

|

|
 07-11-2018, 08:01 AM
|
#8
|
|
Registered User
Join Date: May 2018
Location: Michigan
Posts: 108
|
Quote:
Originally Posted by maytag

I can confirm that my '03 has the butt-joint style.
Sent from my SM-G930T using Tapatalk
|
Quote:
Originally Posted by Stroked & Blown

Regarding the Easy Seal band clamps, i believe:
* 97-99 needs a Lap Joint style
* 00+ needs a Butt Joint style.
Can someone confirm/refute this? |
Any reason to go this route vs. factory Porsche clamps?
|

|

|
 07-11-2018, 08:15 AM
|
#9
|
|
Registered User
Join Date: Dec 2012
Location: FL
Posts: 4,145
|
Quote:
Originally Posted by 2ata

Any reason to go this route vs. factory Porsche clamps?
|
On the Top Speed pipes at least, this connector does not replace a Porsche part, it is an extra fastener since OEM 2nd cat assembly is 1 piece, and the mid pipes are in 2 pieces, I think in order to facilitate a step down (or up, can't remember which) in diameter at the very end, and also maybe to help with fitment?. The clamp that came with the Top Speed pipes as a small little flimsy clamp, and many folks had reported that the easy seal made a better seal and helped prevent exhaust leaks.
|

|

|
 07-12-2018, 06:18 AM
|
#10
|
|
Registered User
Join Date: Jun 2012
Location: Bedford, TX
Posts: 2,755
|
Quote:
Originally Posted by steved0x

On the Top Speed pipes at least, this connector does not replace a Porsche part, it is an extra fastener since OEM 2nd cat assembly is 1 piece, and the mid pipes are in 2 pieces, I think in order to facilitate a step down (or up, can't remember which) in diameter at the very end, and also maybe to help with fitment?. The clamp that came with the Top Speed pipes as a small little flimsy clamp, and many folks had reported that the easy seal made a better seal and helped prevent exhaust leaks.
|
I can vouch for that! A much better clamp for that joint 
__________________
______________________________________________
2001 Boxster S Lapis Blue
TS Cat Bypass Pipes and exhaust
iPad Mini Dash Install
DEPO Tail Lights
|

|

|
 07-12-2018, 08:18 AM
|
#11
|
|
Registered User
Join Date: Jul 2005
Location: MA
Posts: 885
|
Got it - for those looking for a visual on the TopSpeed pipes, they have an additional slip-on adapter:

Whereas some others do not:

__________________
98 Arena Red 986
|

|

|
 07-12-2018, 08:39 AM
|
#12
|
|
Registered User
Join Date: May 2018
Location: Michigan
Posts: 108
|
Quote:
Originally Posted by Stroked & Blown

Got it - for those looking for a visual on the TopSpeed pipes, they have an additional slip-on adapter:

Whereas some others do not:
 |
That makes sense. Thanks for the visual.
I have same new OEM clamps I think will be fine.
|

|

|
 07-14-2018, 05:54 PM
|
#13
|
|
Registered User
Join Date: May 2018
Location: Michigan
Posts: 108
|
Just need a moment....
17 year old exhaust is a pain in the butt to get apart..... 
Last edited by 2ata; 07-14-2018 at 05:59 PM.
|

|

|
 07-24-2018, 05:00 AM
|
#14
|
|
Registered User
Join Date: May 2018
Location: Michigan
Posts: 108
|
I finely got the FVD muffler situated.
The problem I have now is, how the heck do you get at the bolts from the primary cat flange to the midpipe?
I just can't work it out. Thanks for any suggestions.
ETA: more specifically the top bolt of the triangle.
Last edited by 2ata; 07-24-2018 at 05:02 AM.
|

|

|
 07-24-2018, 03:15 PM
|
#15
|
|
Registered User
Join Date: Sep 2016
Location: Central Ohio
Posts: 415
|
Quote:
Originally Posted by 2ata

ETA: more specifically the top bolt of the triangle.
|
Assuming that you mean the top bolt at the outlet end of the manifold, the best way that I have found is from the rear bumper area, using every single wrench extension that I own, one end plugged into the next, so to give yourself roughly a three foot long reach.
You can then snake your long wrench in and around the various rear suspension bits and easily twist the wrench from the rear.
Looks super goofy, but it works very well!
DM
__________________
2000 Ocean Blue Boxster S
1980 Ferrari 308 GTSi
2019 Alfa Romeo Giulia Ti Sport AWD
|

|

|
 Posting Rules
|
You may not post new threads
You may not post replies
You may not post attachments
You may not edit your posts
HTML code is On
|
|
|
All times are GMT -8. The time now is 12:07 AM.
| |