 11-23-2015, 08:59 AM
|
#21
|
|
1999 base
Join Date: Dec 2011
Location: Coral Springs FL
Posts: 1,617
|
do you have a picture of the re foamd flap back in place?
|

|

|
 11-23-2015, 09:52 AM
|
#22
|
|
2003 Base 5-speed
Join Date: Jul 2015
Location: Stoneham, MA
Posts: 949
|
No, i didn't take a picture of that. I do recall the small side of the mixer door (with single row of holes) was facing into the heater core space , but maybe it was placed incorrectly. My thought is its not pivoting. I guess I could take it all apart again to compare to the pic I had of the door before I took it out, but I am not relishing that at this point! I am going away for Thanksgiving and may decide to do that when I come back, or just take it to the dealer to fix and probably chuckle at another DIY gone bad 
You have been very helpful and kind, Meir. Thanks!
Sent from my iPhone using Tapatalk
|

|

|
 11-24-2015, 06:47 PM
|
#23
|
|
1999 base
Join Date: Dec 2011
Location: Coral Springs FL
Posts: 1,617
|
The reason I asked, is becaus it looks liked you warped the flap on both sides.
Not only that, from the picture it looks like the new foam is wraped around the edge of the flap. I believe it create friction between the flap and the box, so the flap cannot move.
I whould give it another chance (after thanksgiving :chicken  .
Try to reform the flap again. I will post a pic of the foam I used.
You can get it at Home Depot.
|

|

|
 11-25-2015, 03:15 AM
|
#24
|
|
2003 Base 5-speed
Join Date: Jul 2015
Location: Stoneham, MA
Posts: 949
|
Quote:
Originally Posted by Meir

The reason I asked, is becaus it looks liked you warped the flap on both sides.
Not only that, from the picture it looks like the new foam is wraped around the edge of the flap. I believe it create friction between the flap and the box, so the flap cannot move.
I whould give it another chance (after thanksgiving :chicken  .
Try to reform the flap again. I will post a pic of the foam I used.
You can get it at Home Depot. |
Oh, I thought the DIY indicated to wrap the foam around the edges to create a "seal" effect (i.e. to prevent air going around the sides). But what you say makes sense to me. I suspect the door is stuck, or not properly seated.
I sent the car of to my indie today, along with my pics and the DIY document. I hope they can sort it out. I'll let you know.
Again, thanks for your input, Meir. Happy Thanksgiving to you and yours!
|

|

|
 11-25-2015, 10:42 AM
|
#25
|
|
1999 base
Join Date: Dec 2011
Location: Coral Springs FL
Posts: 1,617
|
Quote:
Originally Posted by grc0456

Oh, I thought the DIY indicated to wrap the foam around the edges to create a "seal" effect (i.e. to prevent air going around the sides). But what you say makes sense to me. I suspect the door is stuck, or not properly seated.
I sent the car of to my indie today, along with my pics and the DIY document. I hope they can sort it out. I'll let you know.
Again, thanks for your input, Meir. Happy Thanksgiving to you and yours!
|
happy thanksgiving to you and all forum members.
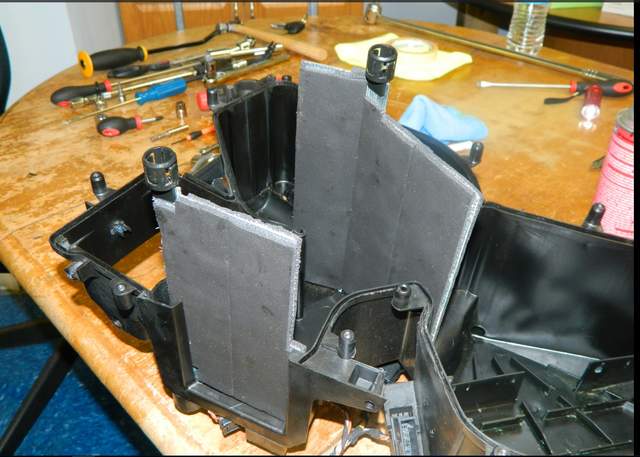
just in case, here is a pic of the foam i used:

looking at my pics i noticed i re foamed the flaps on both sides as well, but i trimmed the foam at the edges.
|

|

|
 12-01-2015, 03:26 PM
|
#26
|
|
2003 Base 5-speed
Join Date: Jul 2015
Location: Stoneham, MA
Posts: 949
|
Problem resolved
I have heat! Now measures 124F when at running temp on HIGH.
The DIY would have worked if I was a little more patient or skilled. The bushing at the bottom of the mixer door axis was cracked, causing the door not to pivot when activated by the servo motor. Not sure if I damaged it during reassembly (it was very tricky to remount the door), or if it had been broken all along. The problem area is located under the circle accessed from the under dash in passenger footwell:
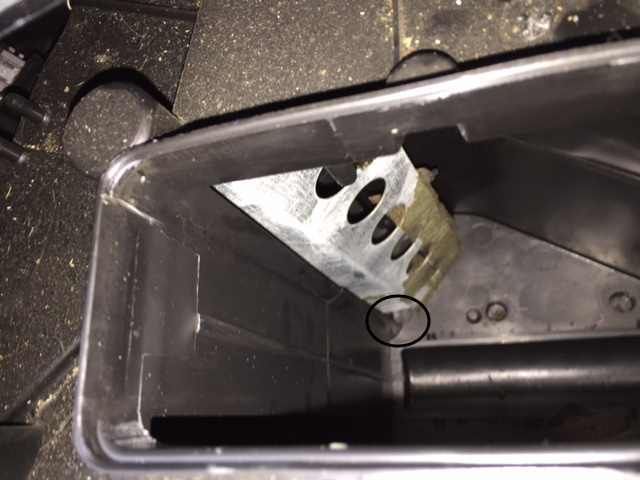
The indie was able to repair the bushing - hopefully - for a long term fix. They had never heard of this foam/mixer door problem, so they learned something. Maybe because it is not as common in colder climates. My car was born and raised in FL. Cost was 4 hours labor.
|

|

|
 12-04-2015, 07:08 PM
|
#27
|
|
1999 base
Join Date: Dec 2011
Location: Coral Springs FL
Posts: 1,617
|
Glad to see you sort it out.
:dance:
|

|

|
 12-05-2015, 02:23 AM
|
#28
|
|
2003 Base 5-speed
Join Date: Jul 2015
Location: Stoneham, MA
Posts: 949
|
Quote:
Originally Posted by Meir

Glad to see you sort it out.
:dance:
|
LOL, yes! The indie sorted it out for me for $400. Oh well, like you said - try it myself and if it fails then - I was going to pay anyway.
But seriously, I feel like I learned a lot about the car and, actually, the indie learned something new too. They had never seen this problem before as I guess the foam doesn't deteriorate over time up north like it does in the south.
Thanks for your help, Meir! 
|

|

|
 03-20-2016, 10:03 AM
|
#29
|
|
Registered User
Join Date: Jun 2006
Location: Indianapolis, IN
Posts: 30
|
I have a 1999 Boxster with the vent debris problem. I currently have the dash off for an unrelated issue, and decided to look into the debris problem at the same time. I'm trying to decide if I go down the full disassembly route or not, and have a couple of questions about the two different options. As I understand it, the options are:
1) Easy option - single flap repair. Access the hot/cold mixer flap from the front trunk. Flap is removed by using dremel tool to cut away flap upper bushing housing. Flap is removed through hole where heater core is mounted. Re-foam single flap. Reassemble.
2) Difficult option - dual flap repair. Remove heater core from front trunk, remove dash and dash mounting structure, evacuate A/C system, remove entire HVAC assembly from passenger compartment, disassemble HVAC housing. Re-foam both flaps. Reassemble.
Is this an accurate summary of the two options? If so, what does the second flap do? Is it for switching air between footwell/dash/defrost? Or outside air/recirculated air?
I'm thinking it's a better use of my time to skip the full repair option, to not further disassemble the dash, skip evacuating/refilling the A/C, and just re-foam the one flap from the front trunk. But I want to make sure I'm not missing some obvious justification for doing the full disassembly.
FYI, here's a picture of the flaps, taken through the passenger compartment center vent location.
 Thanks in advance!
Last edited by Carlton Bale; 03-20-2016 at 10:11 AM.
Reason: Added photo
|

|

|
 03-20-2016, 10:25 AM
|
#30
|
|
2003 Base 5-speed
Join Date: Jul 2015
Location: Stoneham, MA
Posts: 949
|
Boy, option 2 seems like an awful lot of work to me.
Let Meir chime in or PM him. He really knows this issue and I think has had the dash completely out.
Me, I just wanted heat - and to stop the foam debris from blowing everywhere - and option 1 worked.
|

|

|
 03-20-2016, 05:19 PM
|
#31
|
|
1999 base
Join Date: Dec 2011
Location: Coral Springs FL
Posts: 1,617
|
Hi Carlton.
Your summery is pretty accurate.
In both option 1&2, you are reforming the flap the directs the air from the AC blower fan, to the heater core or the evaporator.
The other flap, directs the air between upper and lower AC ducts.
The circulation is controls by a third flap that doesn't need to be reformed.
It has a thick foam that doesn't disintegrate.
So to answer your question, you will get the same result with option 1 and 2 with everything related to the heat/cold control.
I have never tried option one, but can tell you that option 2 took me about 4 hours to compleate (after the dash was out).
In my case reforming was just "while I'm in there" kind of thing, as I needed to replace the leaking evaporator. So I never really evaluated option 1.
If to be honest, I have the same issue (foam flakes) in my C2.
At the moment I have no intention of attending it.
But that is easy to say when I need to use the heat twice a year (if at all).
|

|

|
 03-21-2016, 01:24 PM
|
#32
|
|
Registered User
Join Date: Jun 2006
Location: Indianapolis, IN
Posts: 30
|
Thanks for the feedback! I'm starting reassembly of the dash and will deal with the re-foaming through the front trunk at a later time...
|

|

|
 04-20-2016, 01:51 PM
|
#33
|
|
Registered User
Join Date: Apr 2016
Location: va
Posts: 92
|
Would this foam cause the heater to not blow as warm as it should?
|

|

|
 04-20-2016, 02:06 PM
|
#34
|
|
Custom User Title Here
Join Date: Mar 2012
Location: Ft. Leonard Wood
Posts: 6,169
|
Quote:
Originally Posted by professorman

Would this foam cause the heater to not blow as warm as it should?
|
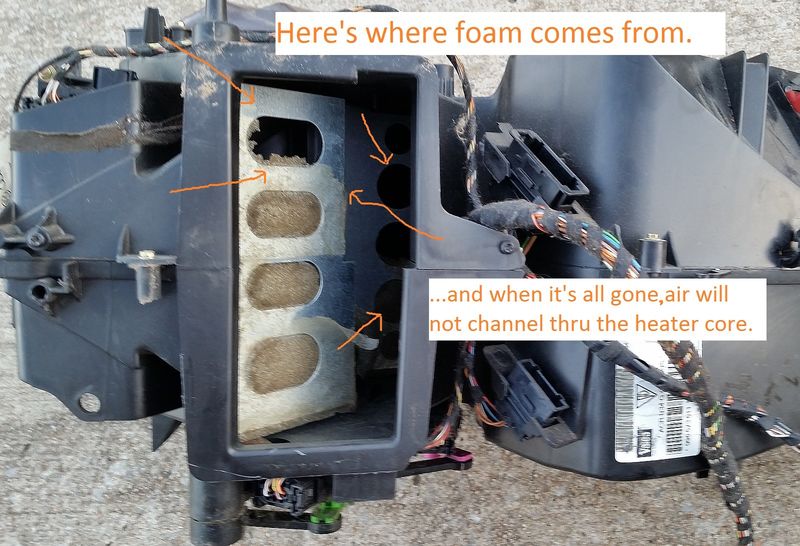
Yes. The flap has large holes that are covered by the foam. If the foam is missing, the flap won't divert as much incoming air over the heater core, causing low temps.
__________________
https://youtube.com/@UnwindTimeVintageWatchMuseum
|

|

|
 04-20-2016, 02:21 PM
|
#35
|
|
Registered User
Join Date: Jun 2014
Location: LB, Germany
Posts: 1,526
|
…
Sorry, Markus
|

|

|
 09-10-2016, 10:52 AM
|
#36
|
|
Registered User
Join Date: May 2015
Location: College Station
Posts: 16
|
So I've had this foam deterioration for a while but never understood why. Now I know. I live in central TX, so it's not about getting warm air in winter for me. The issue I am having (other than years of foam bits coming out of the vents) is that the AC blows cold air out of the defrost duct vents even though my AC control is set to blow air only out of the center/side dash vents. What this does is cool the windshield, and I get condensation on the outside of the windshield, along the bottom where the glass is cold.
I have tested the AC control settings. I get air through the center/side ducts no matter what. With all controls in the off position, but AC running, air comes out of center ducts and the defrost ducts. If I turn on the footwell ducts, air stops coming from the defrost ducts and out the footwell ducts. This tells me the defrost/footwell flap is working. Working the various combinations, it looks like the center/side ducts flap is not working correctly. It is not closing off completely the access to the defrost/footwell ducts, like it should if you want all air to come out the center/side ducts.
I am trying to figure out if all the flaps have this foam, in which case that is likely my problem, or if there is something else wrong that is preventing the center/side duct flap from functioning correctly.
|

|

|
 11-01-2016, 07:40 PM
|
#37
|
|
Motorist & Coffee Drinker
Join Date: Jul 2014
Location: Oklahoma
Posts: 3,955
|
There has to be another way...
At first I just had foam blowing out the vents, but after about a year, there was no hot air and on cold mornings, the windshield would frost back up. I quit driving that car on cold days.
I first saw Meir's DIY about two years ago. I downloaded the .pdfs and studied them getting ready to do the job. Great work and well documented. Recently I decided to stop putting it off and get the job done. I pulled the HVAC unit from my parts car off the shelf and used it for a visual aid. Looking it over, I came up with another way to access the flaps.
The flaps are behind a duct behind the dashboard center console.

I tried to see if there was a way to move it without removing the dashboard, but it can't be done.
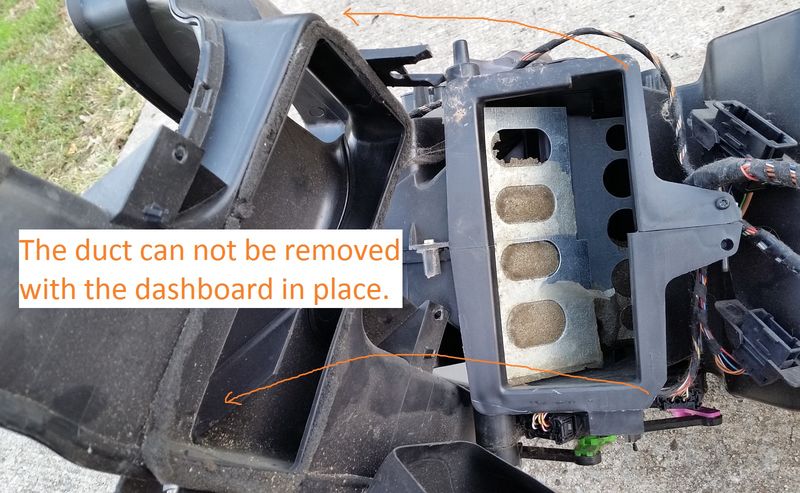
With that duct out of the way, the flaps are accessible. How to get there....?
__________________
I am not an attorney, mechanic, or member of the clergy. Following any advice given in my posts is done at your own peril.
|

|

|
 11-01-2016, 07:50 PM
|
#38
|
|
Motorist & Coffee Drinker
Join Date: Jul 2014
Location: Oklahoma
Posts: 3,955
|
Another way:
__________________
I am not an attorney, mechanic, or member of the clergy. Following any advice given in my posts is done at your own peril.
|

|

|
 11-02-2016, 04:28 AM
|
#39
|
|
Registered User
Join Date: Jun 2006
Location: Indianapolis, IN
Posts: 30
|
Quote:
Originally Posted by 78F350

|
This is awesome. Seems like relatively easy access to both flaps.
No issues getting your hands/arms in the hole to the bottoms of the flaps?
|

|

|
 11-02-2016, 07:21 AM
|
#40
|
|
Motorist & Coffee Drinker
Join Date: Jul 2014
Location: Oklahoma
Posts: 3,955
|
Quote:
Originally Posted by Carlton Bale

This is awesome. Seems like relatively easy access to both flaps.
No issues getting your hands/arms in the hole to the bottoms of the flaps?
|
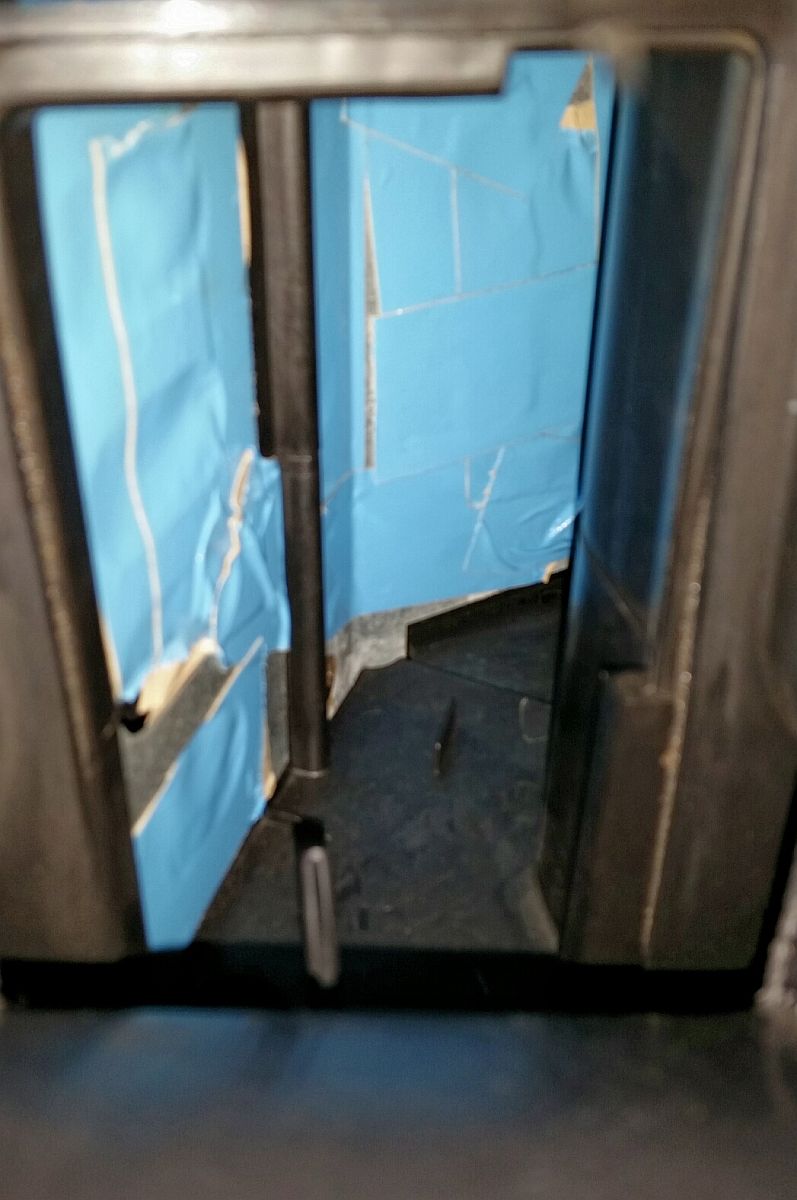
I used strips of tape that were between two and four inches long. At first I tried poking them in with a trim tool, but using my hand worked best. With the flaps in the resting position, it was difficult, but doable. I think that the best access was with the AC running and the fan on low. I poked my camera in for this shot, then put on one more piece of tape to caver a gap:
__________________
I am not an attorney, mechanic, or member of the clergy. Following any advice given in my posts is done at your own peril.
|

|

|
 Posting Rules
|
You may not post new threads
You may not post replies
You may not post attachments
You may not edit your posts
HTML code is On
|
|
|
All times are GMT -8. The time now is 09:18 PM.
| |