 12-11-2012, 08:18 AM
|
#41
|
|
Ex Esso kid
Join Date: Dec 2005
Location: NY
Posts: 1,605
|
Got some meat on it? Me thinks you replaced it at the exact right time.
|

|

|
|
12-11-2012, 09:07 AM
|
#42
|
|
1999 base
Join Date: Dec 2011
Location: Coral Springs FL
Posts: 1,617
|
Quote:
Originally Posted by Ghostrider 310

Got some meat on it? Me thinks you replaced it at the exact right time.
|
my intention was, that it still has 2 mm or so on the disc, so the rivets didn't damage the flywheel and the clutch wasn't slipping.
maybe i should have used the word "skin" instead of "meat" 
|
|
|
|
|
12-11-2012, 09:09 AM
|
#43
|
|
1999 base
Join Date: Dec 2011
Location: Coral Springs FL
Posts: 1,617
|
LNE retrofit kit is doing its way in (ordered from pelican parts), and will get here by Friday.
Last edited by Meir; 12-11-2012 at 09:12 AM.
|
|
|
|
|
12-11-2012, 09:36 AM
|
#44
|
|
Ex Esso kid
Join Date: Dec 2005
Location: NY
Posts: 1,605
|
Just seeing your house is making me sick, I have to leave NY! I don't care if I sell at a loss I'm sick of freezing and paying the highest taxes to do it...
|
|
|
|
|
12-11-2012, 09:49 AM
|
#45
|
|
1999 base
Join Date: Dec 2011
Location: Coral Springs FL
Posts: 1,617
|
Quote:
Originally Posted by Ghostrider 310
Just seeing your house is making me sick, I have to leave NY! I don't care if I sell at a loss I'm sick of freezing and paying the highest taxes to do it...
|
well, it looks like a house in the picture, but i actually live in a condo (the apartment is above the garage)
you should see my neighbors faces when they cross my garage. 
they all think i'm crazy.
you are always welcome to come for a visit. we do have a guest room, and guests are always welcome
Last edited by Meir; 02-15-2013 at 06:36 PM.
|
|
|
|
|
12-11-2012, 09:56 AM
|
#46
|
|
Ex Esso kid
Join Date: Dec 2005
Location: NY
Posts: 1,605
|
Thanks dude but I'm as serious as a heart attack about leaving NY. I currently live in my rental, if I can sell my other house when the renter is out in April that will get me started. I'm so motivated I'm willing to eat some of the 50K I put into the house simply because in some areas of NY you just can't expect sweat equity returns. Most other states you own a house 23 years and you would be looking at a substantial windfall, not good ol NY!!
|
|
|
|
|
12-11-2012, 10:05 AM
|
#47
|
|
Registered User
Join Date: Sep 2009
Location: toronto
Posts: 2,668
|
What oil filter are you using and did you do a delete on the oil "cooler"?
__________________
986 00S
|
|
|
|
|
12-11-2012, 10:29 AM
|
#48
|
|
Homeboy981
Join Date: Jan 2012
Location: Sherman, TX
Posts: 663
|
If you are upside down we can help you out with the bank to do a Short Sale, Ghosty. It is kind of my thing. Been doing them for a long time. PM me for details.
Anything to get you outta there! You are too nice to be a NYer! 
All things being equal
.Selling, even at a loss may take a back seat (if we had one), to the amount you will continue to pay in taxes, higher utility costs, food, etc.
__________________
2002 Porsche Boxtser S - Silver & Chrome - Died from IMS failure AFTER IMS was replaced!
|
|
|
|
|
12-11-2012, 10:36 AM
|
#49
|
|
Ex Esso kid
Join Date: Dec 2005
Location: NY
Posts: 1,605
|
I own them both homeboy, the issue is I need to get reasonable return from them for my future. After a while, when you age, you see that sometimes the smaller amount of profit you make is the price of freedom to move forward.
|
|
|
|
|
12-11-2012, 10:56 AM
|
#50
|
|
1999 base
Join Date: Dec 2011
Location: Coral Springs FL
Posts: 1,617
|
Quote:
Originally Posted by jaykay
What oil filter are you using and did you do a delete on the oil "cooler"?
|
hi jaykay.
i'm using Wix 51042 withe the LN spin on adapter.
i just replaced the O-Rings on the oil cooler as preventive maintenance.
didn't know there is a mod for "oil cooler" delete.
please, educate me on that.
|
|
|
|
|
12-14-2012, 08:29 AM
|
#51
|
|
1999 base
Join Date: Dec 2011
Location: Coral Springs FL
Posts: 1,617
|
last night i completed the replacement of the AOS and the coolant tank.
all together toke me 3 hours, and wasn't that bad (i will post some pics and tips later on). i did most of the job from under the car, and no doubt that when the trans is removed, the AOS is a piece of cake. the coolant tank is another story.
i would like to take this opportunity, and salute each and every one of you, that replaced one of them from the top.
again, it wasn't that bad for me, but even with the transmission out the coolant tank is a pain. i can only imagine how it would be with the trans installed.
Last edited by Meir; 12-14-2012 at 09:09 AM.
|
|
|
|
|
12-14-2012, 01:06 PM
|
#52
|
|
Theoretical propagandist
Join Date: Dec 2011
Location: Pacific Northwest
Posts: 793
|
No matter how many words are written, till you are under the car with everything removed do you truly understand why it is far better to do this now! It's a great feeling when you keep knocking these things out isn't it? Looking forward to seeing the pictures.
__________________
When life throws you curves, aim for the apex...
|
|
|
|
|
12-17-2012, 01:02 PM
|
#53
|
|
1999 base
Join Date: Dec 2011
Location: Coral Springs FL
Posts: 1,617
|
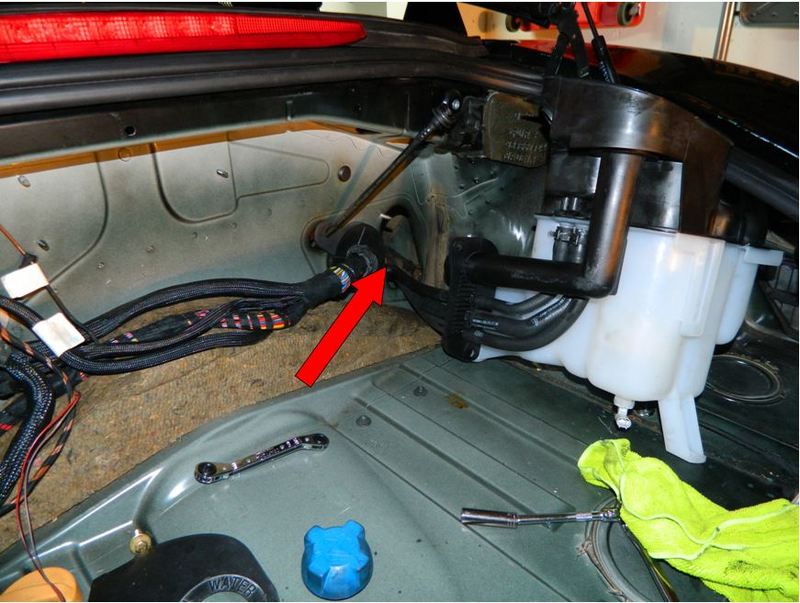
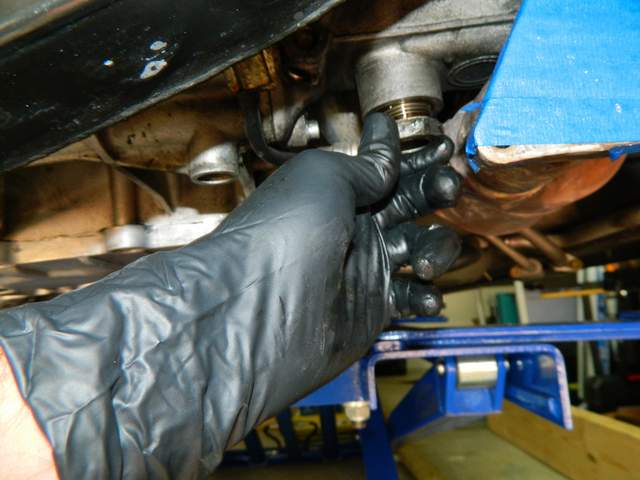
wanted to update about the progress i made this week. but most of the pics i took of the AOS and coolant tank, came out blurry. so ill show what i got and give some tips.
i started with the coolant tank, and as i mentioned earlier it wasn't easy, even when the transmission is removed.
took me sometime to figure where to disconnect the lines and to actually disconnect them. basically the lines should be disconnected from the clamps that are closer to the engine side, including the oil filler tube. then i pooled the coolant tank into the trunk (as much as i could), and disconnected the other clamp of the oil tube.
once i removed the oil tube, i was able to take the coolant tank out of the car.
this is a pic with the new tank in, but you can see the gap you can work with to remove the oil filler tube.
with the tank placed it on a bench i removed all the hoses from the old tank to the new one.
obviousness, i inspected each one of them to make sure they are not showing any signs of cracking. also moved the coolant level sensor to the new.
at this point you must remember to make a hole for the dipstick in the new coolant tank. i forgot and had to do that with the tank in the car, which make it a bit difficult. i just used a utility knife to carve the hole.
when the tank was out, i moved to the AOS.
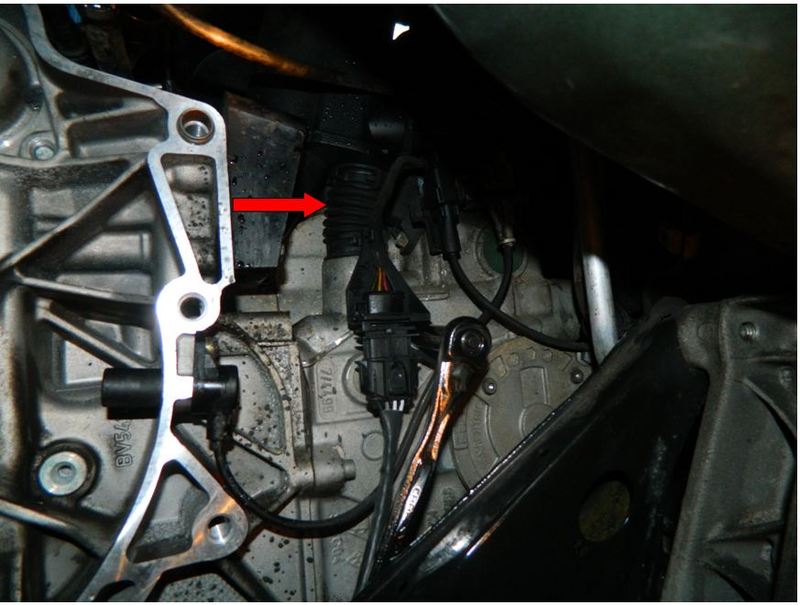
wasn't difficult at all to remove the lines, but i struggled a bit with disconnecting the lower bellow. after few minutes of trying, i decided its a waist of time and just cut it off. i suggest doing that, especially if working from the top. the new AOS comes with a new bellow, so no point of spending time and blood on the old one.
looking back at it, this is probably the most difficult part.
the upper hose of the AOS is very easy to disconnect and the lower one is not that bad ether.
this is not the best picture, but you can see the bellow you need to cut.
i was thinking to replace all relevant parts of the AOS, but i had to Change my plans. just as a reference for you who will think about doing it in the future.

part #5, is the lower hose of the AOS. goes to good knows where.
spent 10 minutes to figure it out with the new parts in my hand (also got part 6), where the hell it suppose to go. looks like the whole intake manifold needs to be remove in order to replace these parts. i'm going to keep them, and hope ill never get to use them
looks like a real PITA to do.
edit: the decision to use a new oil filler tube was smart though. hate to think of doing this job all over again in the future just for that.
Last edited by Meir; 12-24-2012 at 01:03 PM.
|
|
|
|
|
12-17-2012, 01:38 PM
|
#54
|
|
1999 base
Join Date: Dec 2011
Location: Coral Springs FL
Posts: 1,617
|
Sunday morning. change of plans.
my neighbor called me and tells me he cannot get into his car (box99).
looks like the door lever is broken.
disconnected his battery and removed the door cover. found out the lever itself is disconnects from the mechanism.
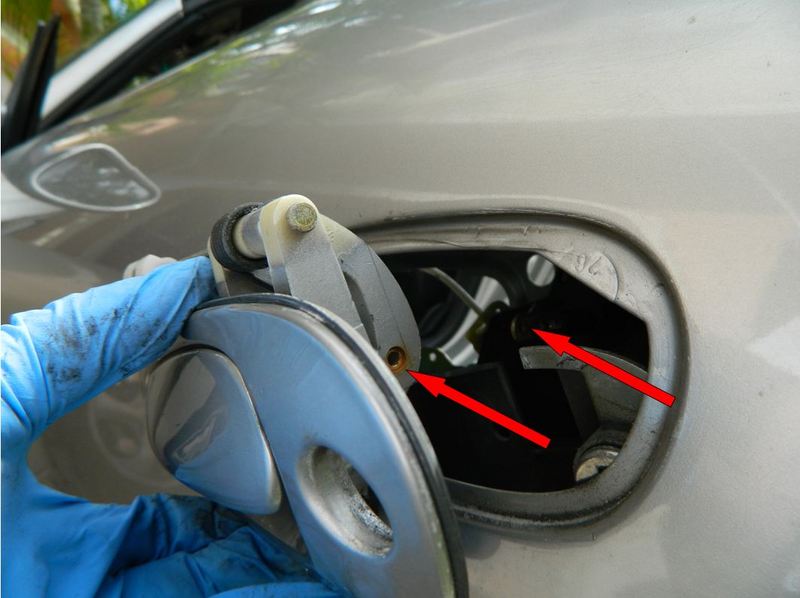
took a magnet, and swiped it on the bottom of the door from the inside.
this is what i found:
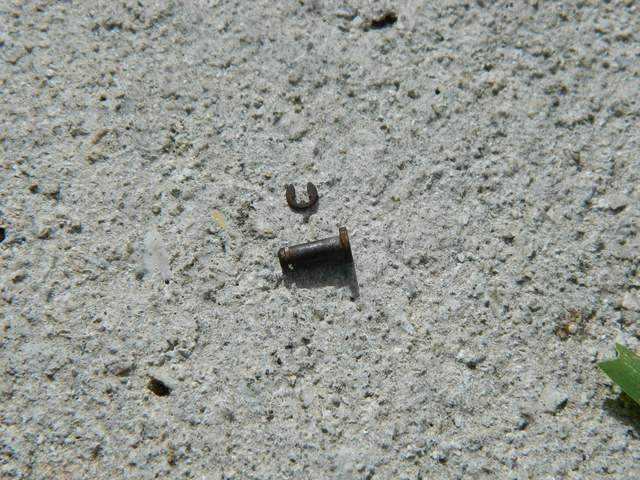
put every thing back in place, and sent my neighbor to buy a lottery ticket.
Last edited by Meir; 12-17-2012 at 08:00 PM.
|
|
|
|
|
12-17-2012, 08:49 PM
|
#55
|
|
Registered User
Join Date: Jun 2012
Location: Bedford, TX
Posts: 2,757
|
I need a neighbor like you! Nice work 
__________________
______________________________________________
2001 Boxster S Lapis Blue
TS Cat Bypass Pipes and exhaust
iPad Mini Dash Install
DEPO Tail Lights
|

|
|
|
02-01-2013, 07:19 AM
|
#56
|
|
1999 base
Join Date: Dec 2011
Location: Coral Springs FL
Posts: 1,617
|
it has been almost 3 weeks since i finished my project, but couldn't find the time to update the thread.
i will post some impressions, to help those who follow.
so i will pick up where i left. 
less then a week after my last post, i received my new bearing.
i put it in the freezer, connected to the installation tool (in a Ziploc bag)
next morning i jumped back in, put the engine at TDC and locked the pulley.
removed the lower cam plug on both banks and made sure the "groove" on the cam is seating vertically.
bank 1

bank2
just for additional reference, i marked the cam on bank 2 with a Sharpie, but i don't think it is necessary.
i installed the cam look tool on bank one, using a 6X10mm bolt i got from Ace.
this step is very crucial. i can definitely see how the tool can be installed without locking the cam.
MAKE SURE THE TOOL IS FULLY SEATED IN THE GROOVE.
Last edited by Meir; 02-01-2013 at 07:29 AM.
|
|
|
|
|
02-01-2013, 07:33 AM
|
#57
|
|
Registered User
Join Date: Nov 2008
Location: Massachusetts
Posts: 4,810
|
Once again ! Why aren't there any good DIY'ers up here in New England ?? 
__________________
Don't worry
I've got the microfilm.
|
|
|
|
|
02-01-2013, 07:54 AM
|
#58
|
|
1999 base
Join Date: Dec 2011
Location: Coral Springs FL
Posts: 1,617
|
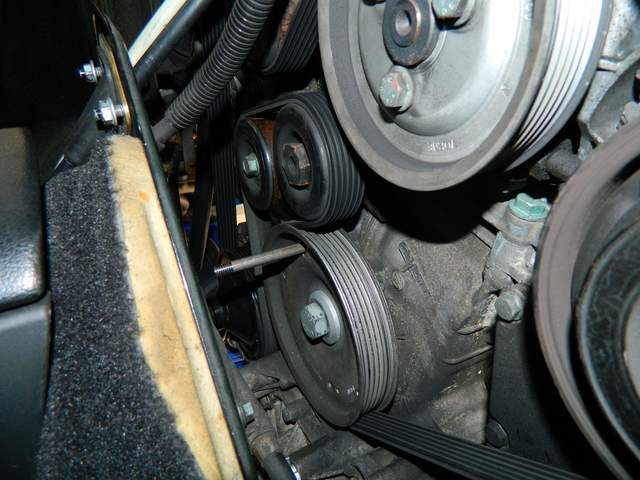
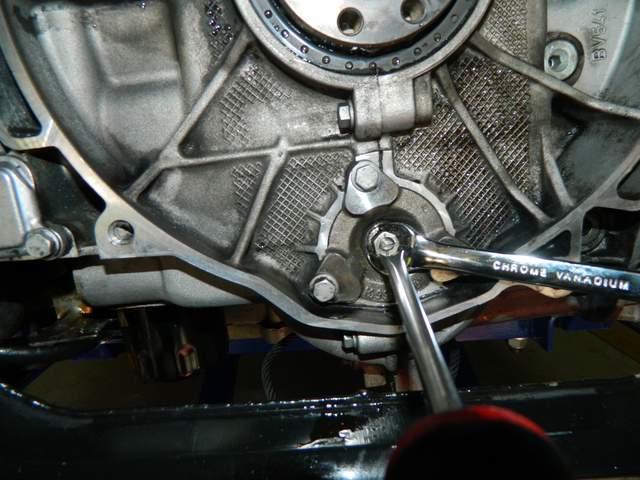
after checking myself 5 times, and making sure all is in place, i was ready to remove the old bearing.
started by removing the 2 tensioners.
the one that holds the IMS chain (seats horizontally next to bank 2):

second tensioner, from bank 1:

remove the center nut of the IMS cover, using a large screwdriver and 13 mm wrench:
|
|
|
|
|
02-01-2013, 08:03 AM
|
#59
|
|
1999 base
Join Date: Dec 2011
Location: Coral Springs FL
Posts: 1,617
|
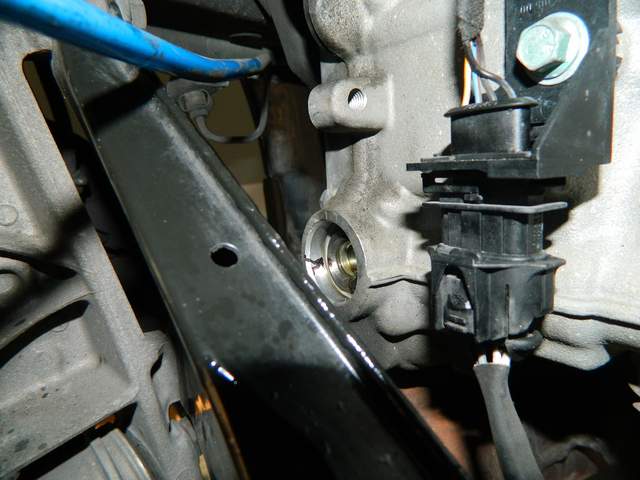
removed 3 bolts from IMS cover:
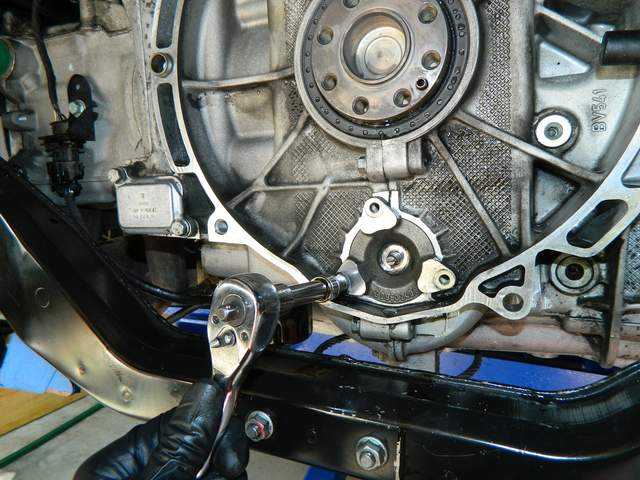
twisted the cover clockwise, and used small pray bar to remove cover.
take your time and be gentle with it. it will come out.
once the cover is removed, remove the circle clip. put you finger in the center, to prevent it from falling inside the engine.
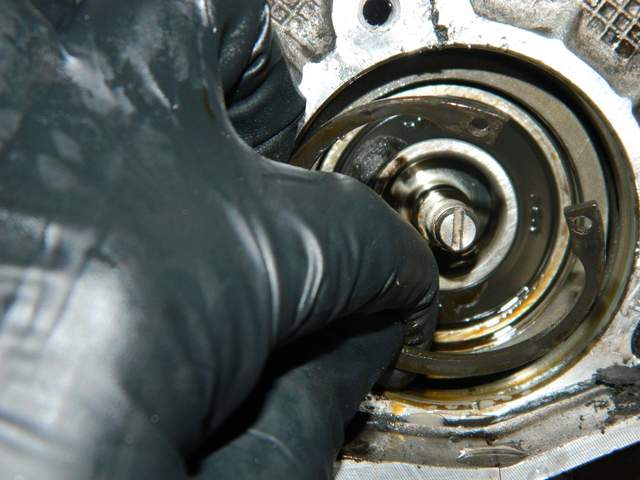
the bearing is ready to receive the removing tool.
i played with the center stud to check for play. non what so ever.
|
|
|
|
|
02-01-2013, 08:13 AM
|
#60
|
|
1999 base
Join Date: Dec 2011
Location: Coral Springs FL
Posts: 1,617
|
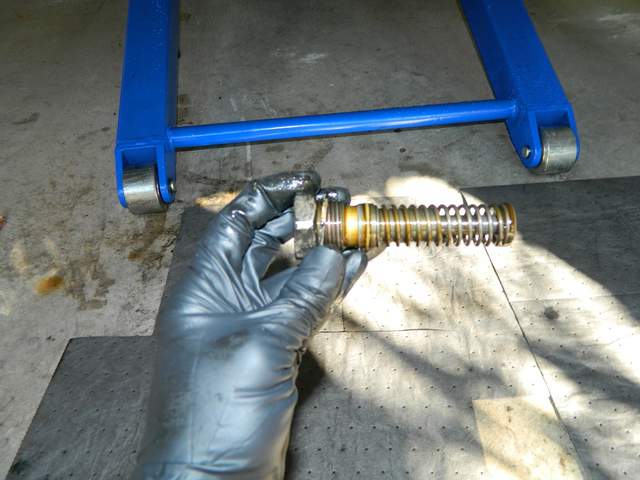
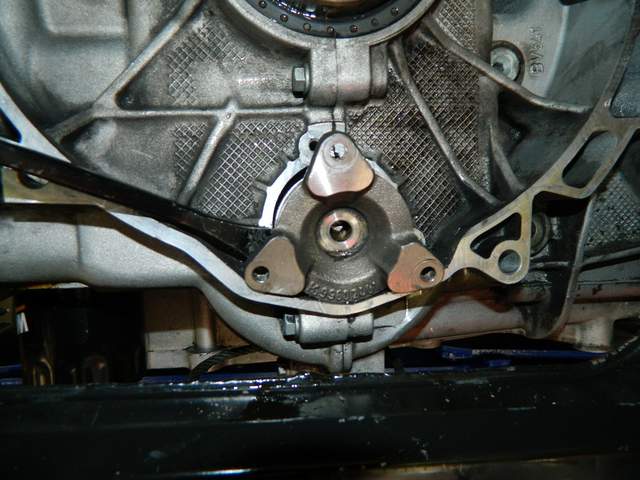
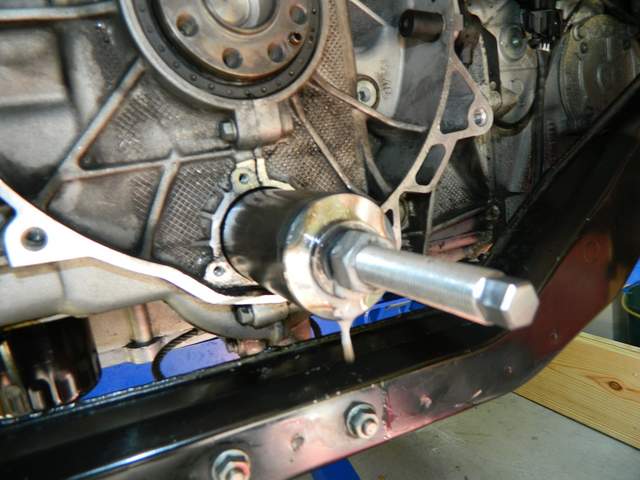
at this point, i wasn't sure if i was doing it right, but it worked, so i dont care.
the extraction tools comes with two studs.
i installed the short one on the bearing.

then the long one on top of it.
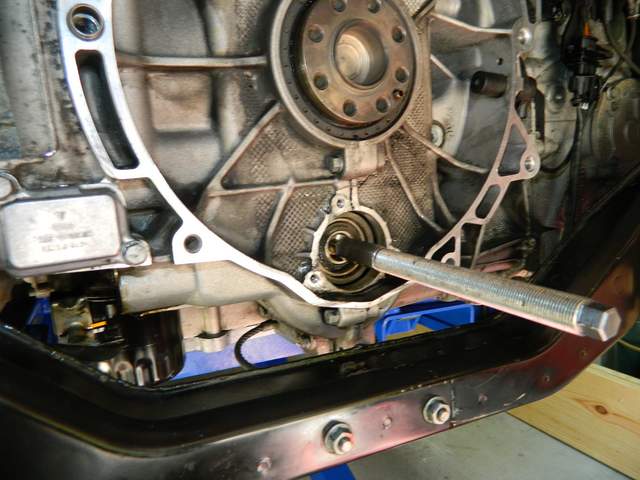
slide the removal tool with the washer and nut (hand tight).
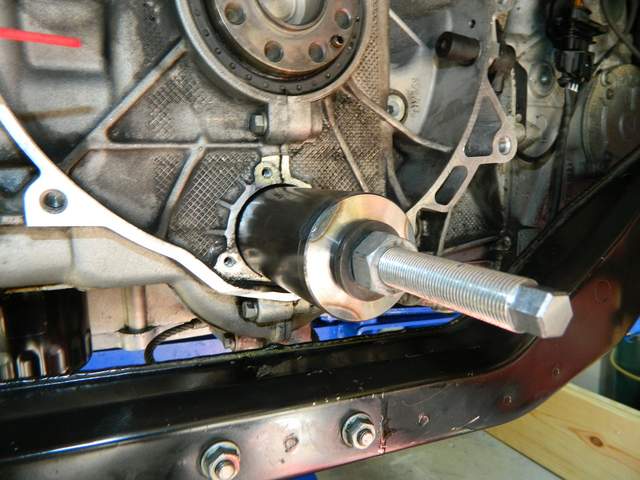
as recommended by LN, i sprayed the surface between the washer and the tool with WD-40
|
|
|
|
 Posting Rules
|
You may not post new threads
You may not post replies
You may not post attachments
You may not edit your posts
HTML code is On
|
|
|
All times are GMT -8. The time now is 12:01 PM.
| |


 boxster S
 "Bernie" - PONZI that 'made off' with my money!
 Esmeralda
 Gadget
 Sasha
Sasha Gertrude
 Bernice
 Mrs. T
 2001 Boxster S
 Dangermobile
 Linear Mode


