 08-08-2012, 01:34 PM
|
#1
|
|
1999 base
Join Date: Dec 2011
Location: Coral Springs FL
Posts: 1,617
|
AC question
hello guys.
last weekend i replaced the AC evaporator in my car.
also toke the opportunity to remove and redo the foam on the flaps.
since i have very limited knowledge with the AC system, i would like to know if there is something i need to do before recharging the AC.
a friend told me it is necessary to replace the drier every time the system is opened.
is that true?
are there any other parts recommended to be replaced?
thank you in advance, and here are some pics from the process.
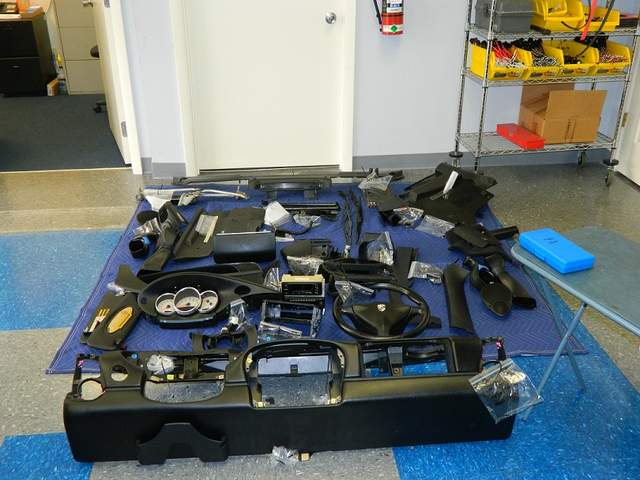
1. all the parts removed from the car:
2. this is what the car looked with all parts removed:

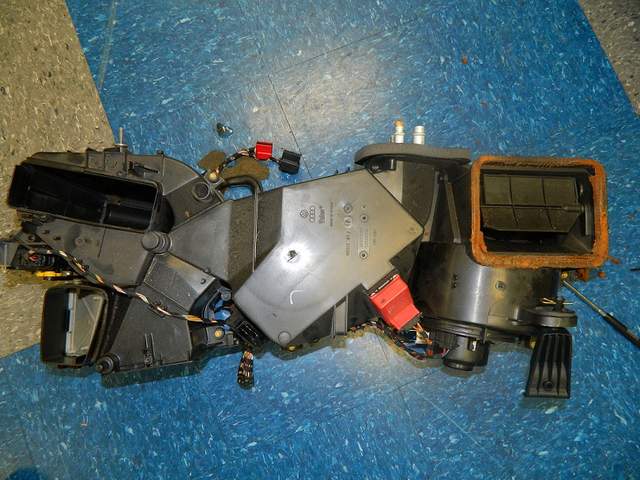
3. this is the air box outside the car:
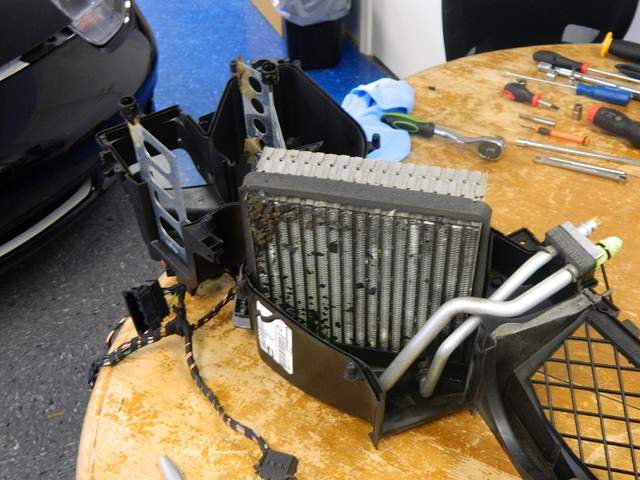
4.this is the open air box with the old evaporator. look at the flaps. no foam at all.
well,i got to see it very closely every time i turn the AC on 
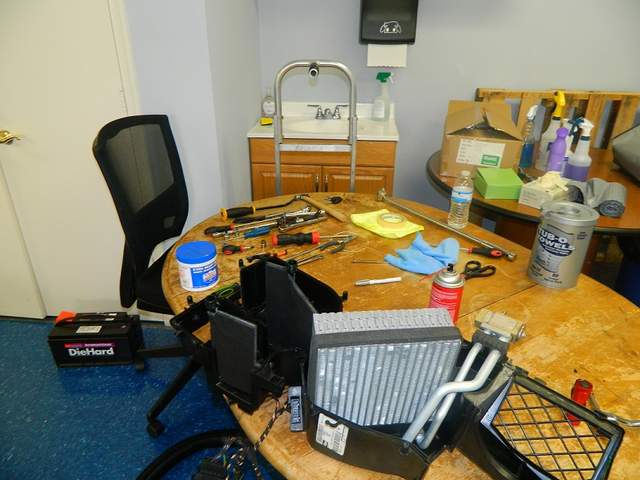
5. this is the open box with new evaporator and new foam in place.
i have almost 200 pics documenting the process in details. as soon as i have the time i will turn them into PDF DIY document.
|

|

|
|
08-08-2012, 02:19 PM
|
#2
|
|
Registered User
Join Date: Oct 2008
Location: O.C. CA
Posts: 3,709
|
That looks like a fun way to spend a couple hot days in august! 
It is recommended to replace the drier. 
|
|
|
|
|
08-08-2012, 02:23 PM
|
#3
|
|
1999 base
Join Date: Dec 2011
Location: Coral Springs FL
Posts: 1,617
|
thanks BY.
wasn't that bad with the AC on. 
|
|
|
|
|
08-08-2012, 02:50 PM
|
#4
|
|
Registered User
Join Date: May 2007
Location: Kingwood, TX
Posts: 445
|
I feel you are going to miss all those foam particals hiting you in the face when you turn on the A/C 
Would love to see the DIY on this, but if you find you forgot to document a step or two I can always drive over and you can do my car
|
|
|
|
|
08-08-2012, 04:42 PM
|
#5
|
|
1999 base
Join Date: Dec 2011
Location: Coral Springs FL
Posts: 1,617
|
Quote:
Originally Posted by boxster6354

I feel you are going to miss all those foam particals hiting you in the face when you turn on the A/C
Would love to see the DIY on this, but if you find you forgot to document a step or two I can always drive over and you can do my car |
don't worry, i collected them and will have them framed 
don't know if you are joking or not, but my guest room is available.
just take in mined it will take full 2 days of work.
well... maybe less, now i know how to do it. 
|
|
|
|
|
08-09-2012, 01:49 AM
|
#6
|
|
Rennzenn
Join Date: Feb 2005
Location: Virginia
Posts: 1,369
|
How much does that AC concensor weigh?
|
|
|
|
|
08-09-2012, 05:25 AM
|
#7
|
|
1999 base
Join Date: Dec 2011
Location: Coral Springs FL
Posts: 1,617
|
Quote:
Originally Posted by j.fro
How much does that AC concensor weigh?
|
are you refering to the evaporator or the whole air box?
the evaporator is 4 lb, and the whole boxs maybe 20.
|
|
|
|
|
08-16-2012, 04:56 PM
|
#8
|
|
1999 base
Join Date: Dec 2011
Location: Coral Springs FL
Posts: 1,617
|
Ok.
Got back from my trip, and the AC drier was waiting for me.
Installed the new part, and droped the car at a local AC shop this morning...
The guy told me the system needs to be evacuated from air an moister, and recharged with freon. So far so god.
Picked up the car this afternoon, and the AC works great.
No flakes, air distribution is much better after sealing the flaps, and no leaks.
The bad thing.... Is the price. The guy charged me 246$.
Is that reasonable, or I got robed?
The bill was 133$ for labor and the rest for parts (freon and oil)
|
|
|
|
|
08-16-2012, 05:48 PM
|
#9
|
|
Theoretical propagandist
Join Date: Dec 2011
Location: Pacific Northwest
Posts: 793
|
Very nice work! That second picture looks like the car blew its brains out. Always amazes me when you take them apart there is that moment when you go...this will go back together, right?
__________________
When life throws you curves, aim for the apex...
|
|
|
|
|
08-17-2012, 06:08 AM
|
#10
|
|
Track rat
Join Date: Nov 2006
Location: Southern ID
Posts: 3,701
|
Quote:
Originally Posted by Meir
The bad thing.... Is the price. The guy charged me 246$.
Is that reasonable, or I got robed?
|
$246 for complete evacuation, recharge with refrigerant, and testing? I'd say you stole it. A Dealer would have charged $900.
__________________
2009 Cayman 2.9L PDK (with a few tweaks)
PCA-GPX Chief Driving Instructor-Ret.
|
|
|
|
|
08-17-2012, 09:16 AM
|
#11
|
|
1999 base
Join Date: Dec 2011
Location: Coral Springs FL
Posts: 1,617
|
thanks for the feedback topless.
i have to admit i have 0 experiences with cars AC systems.
i have never had to pay for AC repair before.
since i owned my car i have done everything myself, so i guess i never had the "feeling" for the costs of labor in the US.
don't get me wrong, i have full respect for professionals, and i'm not a cheap person,
but this is the firs time i had to pay someone to do something to my car.
just for reference, the PO of my car told me he was quoted 3.5K to replace the evaporator. i thought he was exaggerating...
i guess he wasn't.
|
|
|
|
|
08-17-2012, 12:11 PM
|
#12
|
|
1999 base
Join Date: Dec 2011
Location: Coral Springs FL
Posts: 1,617
|
Quote:
Originally Posted by Eric G
Very nice work! That second picture looks like the car blew its brains out. Always amazes me when you take them apart there is that moment when you go...this will go back together, right?
|
LOL!
that was exactly my toughs Saturday night when i saw all the parts on the floor.
knowing putting every thing back is usually more complicated then taking it apart.
i was surprised to find out how simple it was (relatively speaking).
it toke me a whole day to take the car apart, including taking pictures and tagging the parts and screws.
the next day i rebuild the air box and put all the parts back.
surprised how all the parts are "falling" into place.
i was working many years as car alarm/stereo installer, and can tell you the boxster is one of the most simple car to work on, and has very high quality interior.
i even think mechanically the boxster is an easy car to work on.
especially if you have the right tools, books, and the support of the members of this forum (and other as well)
|
|
|
|
|
08-18-2012, 02:13 AM
|
#13
|
|
Registered User
Join Date: Sep 2010
Location: UK
Posts: 303
|
Meir,
Excellent job!
pretty ballsy too; really looking forward to your DIY guide going up
__________________
986 x2 6sp
2x Range Rover Vogue 4.6
2004 MX5 Sport 6speed Strato Blue (wifelet)
2x Range Rover Classic & CSK
|
|
|
|
|
09-05-2012, 01:36 PM
|
#14
|
|
1999 base
Join Date: Dec 2011
Location: Coral Springs FL
Posts: 1,617
|
well, i'm finally done with the DIY.
"thanks" to hurricane Isaac i spent most of that weekend writing these documents.
i was going over the documents over and over again, and found some spelling errors, and minor mistakes(that i fixed), but if ill keep looking for them, i will probebly never realease the documents .
so, here we are.
i decided to split the DIY into 3 separate documents.
in order to complete the process, you will need to remove the heater core and the dashboard, so i decided to create separate DIY for that.
some people who might need to remove the dashboard for other purposes, or replacing a leaking heater core, will be able to use these documents on their own.
these are the links for the full process:
step 1 - heater core removal/replacement.
https://www.dropbox.com/s/6bi2dlsy47ygaky/step%201%20heater%20core%20removal.pdf?dl=0
step - 2 - dashboard cover removal.
https://www.dropbox.com/s/lcthesknynmqaaz/step%202%20Dashboard%20cover%20removal.pdf?dl=0
step 3 - replacing the evaporator and re- foaming the flaps.
https://www.dropbox.com/s/gja11v6yi6h6sq9/step%203%20Evaporator%20replacement.pdf?dl=0
i will also post these links in the DIY section, and the pelican parts website.
all together, and separate, in order to help other members locate the files with the search tool (even i have never figured out how do use it. i never find anything i'm looking for  ).
please feel free to send me any comments, suggestions or questions. I will try to keep these files updated in case we will find some errors.
i posted the PDF files in my dropbox. from some reason it reduce the quality of the PDF document.
if anyone has an idea for a better place to host these document or would like to have the original copy of the PDF, just let me know, and ill email it to you.
by the way, this job is not as hard as it looks. it just take a lot of time, and a lot of parts to remove. if you will follow this document, take your time, and tag the parts
and screws, you will be fine.
writing this documents was more complicated then doing the job.
good luck.
Last edited by Meir; 11-21-2018 at 07:03 AM.
|
|
|
|
|
09-05-2012, 05:01 PM
|
#15
|
|
Registered User
Join Date: Aug 2011
Location: USA
Posts: 414
|
Excellent work Mr. Meir. Thank you for your contribution to the knowledge base here. I'm sure I'll need it sometime in the future.
__________________
Kippis
986S
991S
Van Diemen RF97
|
|
|
|
|
09-06-2012, 10:55 PM
|
#16
|
|
Registered User
Join Date: Jan 2012
Location: Dubai
Posts: 62
|
What great write up - my 02 base ac stopped working last week - it was recharged a few moths ago but seems to be ineffective again. Not the best for summer in Dubai...
When the indy charged mine up last time he looked for leaks but did not spot any - he warned me it may be the evaporator and advised of the cost to do the work.
How did you determine it was the evaporator?
Thanks
Simon
|
|
|
|
|
09-07-2012, 07:07 AM
|
#17
|
|
1999 base
Join Date: Dec 2011
Location: Coral Springs FL
Posts: 1,617
|
Quote:
Originally Posted by ferrytrip1
What great write up - my 02 base ac stopped working last week - it was recharged a few moths ago but seems to be ineffective again. Not the best for summer in Dubai...
When the indy charged mine up last time he looked for leaks but did not spot any - he warned me it may be the evaporator and advised of the cost to do the work.
How did you determine it was the evaporator?
Thanks
Simon
|
First, I would like to thank you all for the kind words.
After spending almost a year now, on this forum (and the pelican forum), and seeing the kindness of this community, and the wheeling to help each other, it was a no brainer for me.
I learned so much (and still learning) from the forums members, so Im happy to be able to pay back.
As for your leak issue.
As the evaporator is probably the hardest component in the A/C system to replace, it is the easiest to diagnose.
First you need to charge the A/C system with AC dye. This is a special fluid that glows under black light.
Look here:
quick automotive a/c system leak detection using uv dye. - YouTube
AC dye works. Here's how to use it right. - YouTube
You will need these:
Amazon.com: UV Protecting Adjustable Safety Glasses Yellow Tint,7821: Health & Personal Care
Ledwholesalers 400 Nm Uv Ultra Violet Blacklight Flashlight 3 Aaa,7301uv400 - Amazon.com
As you probably know, when you run the A/C, and the car is not moving, you will have a puddle of water under the car. This is the moisture in the air, condensing on the evaporator and accumulating on the bottom of the air box. If the evaporator is leaking, the AC dye you put in the system will mix with the water, and you will have a very nice glowing puddle under your car.
In my case it was so obvious, that I didnt even needed the black light to see the dye, the water came out greenish.
Looks very cool tough with the flash light and glasses, especially if you are an 80s fan.
If the leak is not coming from the evaporator, the dye will help you locate where its leaking from.
Just follow the lines of the system.
good luck.
|
|
|
|
|
09-07-2012, 04:33 PM
|
#18
|
|
Registered User
Join Date: Jul 2010
Location: California
Posts: 1,859
|
Meir,
Awesome work
Thank you very much for documenting and sharing. Im sure these instructions will come in handy someday. BTW the PDF files downloaded look great, photos are fine.
__________________
Jäger
300K Mile Club
|
|
|
|
|
11-20-2018, 07:29 PM
|
#19
|
|
Registered User
Join Date: Jul 2016
Location: Hawaii
Posts: 5
|
Anyone could re-post Meir pdf instructions? (Links are dead)
|
|
|
|
|
11-20-2018, 11:03 PM
|
#20
|
|
Registered User
Join Date: Apr 2017
Location: Czech republic
Posts: 26
|
I am also interested.
__________________
________________
Boxster S 2003
|
|
|
|
 Posting Rules
|
You may not post new threads
You may not post replies
You may not post attachments
You may not edit your posts
HTML code is On
|
|
|
All times are GMT -8. The time now is 11:53 PM.
| |


 boxster S
 Mean Motor Scooter
 Monica
 986RS
986RS Long term project...
 Fiat 500 Abarth Cabriolet
 Esmeralda
 Gadget
 Sasha
Sasha Gertrude
 Bernice
 Mrs. T
 Lil Red
 2009 Porsche Cayman 2.9L
 Boxster
 Range Rover
 928GTS
 928 GTS manual
 928 S4
 928's in a line up
 Jägermobile
 Jagermobiles
 Jager4Smobile
 Linear Mode


