 12-28-2011, 10:21 PM
|
#21
|
|
Autobahn Glanz
Join Date: Dec 2010
Location: Charlotte, NC
Posts: 1,282
|
Quote:
Originally Posted by feelyx

I will try and get you some pics of this today.
|
I was looking at the old seal and there is was the spring you are talking about. I didn't happen to look on the new seal before I put it in so I'm not sure how it can be made smaller (other then what you explain)...pretty cool idea though.
|

|

|
|
12-29-2011, 05:17 PM
|
#22
|
|
Autobahn Glanz
Join Date: Dec 2010
Location: Charlotte, NC
Posts: 1,282
|
Update
So last night and this afternoon were an adventure!
- Last night I managed to get the AOS out, I figured I would stimulate the economy and put a new one in while everything was out of car. Not sure if others found this job easy but I didn't and I had total access. The easy off hoses didn't behave, I've found with them you have to catch them just right and they do come off easy...I guess practice helps. I have to hand it to anyone that did this from the top of the car and reaching up from the bottom.
I wonder what happens to these when they fail...anyone know what actually goes wrong. So anyway if anyone needs an AOS with 57k miles on it I'll sell it cheap...for all I know it could have plenty of miles left on it.
- Also last night I finally removed my leaky oil fill tube...this is the worst job I have ever done. I assume there is a tool that releases the hose clamps that makes it much easier. Now that I have done one though I'm sure it would not be very bad next time. This tube has been the source of the minor oil drip.
- Now for the interesting part, this after noon I got my LN Engineering bearing and pulling kit. I went slow making sure everything was done correctly and I still think I messed up. I had to rotate the crank 360 degrees again to get the exhaust cam rotated 180 degrees so the tool to hold it in place would seat properly. No big deal there. Got the cover off the IMS and started the removal process. So I'm pulling out my double row and having to torque so much it just didn't feel right...then pop! Not the good pop, the center bolt in the bearing at it's weak point had snapped off! At this point fear and concern set in. Took a break made some calls, did some reading and went back to see what can be done. The LN kit also contains an "Easy Out" nut that takes a little work to get setup but it is very clever. The quality of the LN kit is really good, I'm glad I got it. I started over and crossed my fingers, my pride was on the line this time. So I torque it up good and was taking a 30 second mental break when I heard a little 'click' sound. I think the wire-loc had given out at this point because things started moving! So long story long...the bearing is out and it is time for a drink! I talked to a guy at LN and he said he had never heard of the center bolt breaking like that.
I think what happen is the center bolt fell inside the shaft before i started and probably never seated back correctly I was probably pulling on it at an angle...live and learn.
Here is a pic of the bearing, the center bolt, and Easy Out. It amazes me these double rows ever fail, they seem really well made.
One other thing, there was over a pint of old crappy nasty smelly oil in the ims tube. I assume it comes in from the other end.
Cheers. 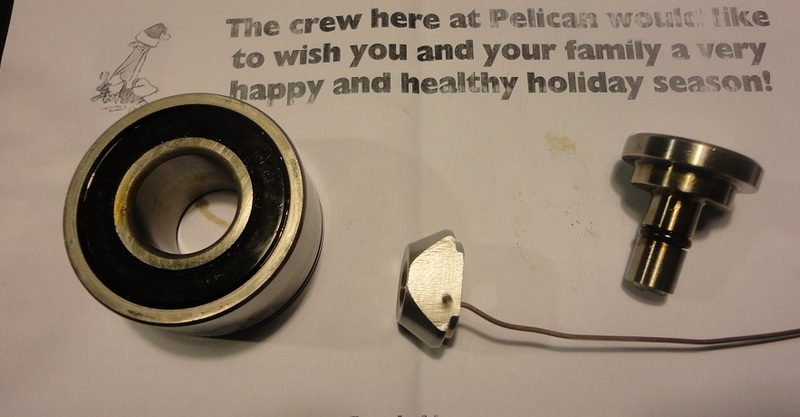
|
|
|
|
|
12-29-2011, 07:56 PM
|
#23
|
|
Registered User
Join Date: May 2011
Location: Miami florida
Posts: 1,591
|
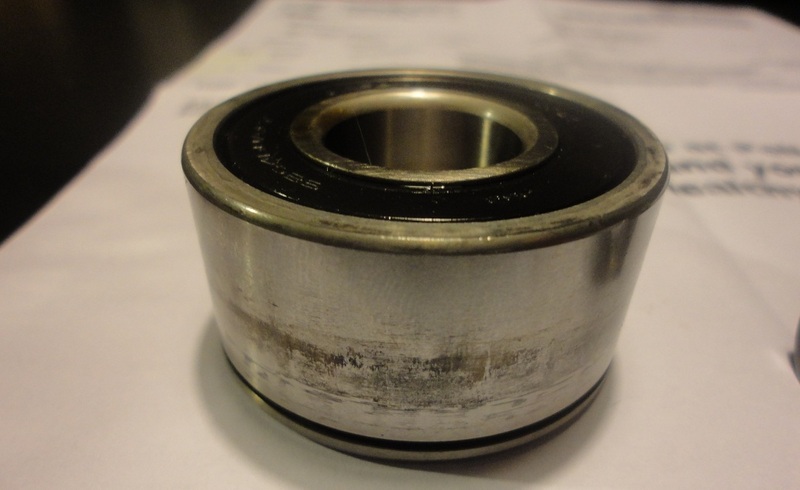
Good work. So whats the condition of the old bearing? Loose? Rough? Ball and race condition? Seal condition?
__________________
Current car
2000 Boxster 2.7l red/black
Previous cars
1973 Opel Manta
1969(?) Fiat 850 Convertible
1979 Lancia Beta Coupe
1981 Alfa Romeo GTV 6
1985 Alfa Romeo Graduate
1985 Porsche 944
1989 Porsche 944
1981 Triumph TR7
1989 (?) Alfa Romeo Milano
1993 Saab 9000
|
|
|
|
|
12-29-2011, 08:46 PM
|
#24
|
|
Registered User
Join Date: Oct 2011
Location: sac. ca
Posts: 156
|
Nice work, How many miles on the bearing?
|
|
|
|
|
12-29-2011, 09:15 PM
|
#25
|
|
Autobahn Glanz
Join Date: Dec 2010
Location: Charlotte, NC
Posts: 1,282
|
Everything about the bearing, center bolt, and seals were like new. The IMS did NOT need to be done imho. It was fun though and I'm glad I got in there and am updating so many parts (IMS, RMS, Clutch, ASO, Oil fill tube, Clutch Slave, and cracked under panel). The clutch slave is working but in poor condition so I'm glad that is getting changed.
I certainly don't know the condition of the inside of the bearing, that will take analysis.
I amazed at what good condition parts have been on this car. I did the water pump and engine mount and they were in great shape too. The engine mount had a small crack forming and it was time to change it.
It's interesting how some Boxsters have a good amount of parts wear out. The guy that owned this before me only changed the oil every 10 to 15k miles. There were times it sat for years without an oil change.
No regrets, I bought the car to have something to work on and bring back to life both visually and mechanically. As I'm finding though most components have held up great.
Oh 57k on bearing...
Last edited by WhipE350; 12-29-2011 at 09:16 PM.
Reason: Add mileage.
|
|
|
|
|
12-31-2011, 07:52 PM
|
#27
|
|
Autobahn Glanz
Join Date: Dec 2010
Location: Charlotte, NC
Posts: 1,282
|
Quote:
Originally Posted by feelyx
|
I'll measure both of mine...original and LN.
|
|
|
|
|
12-31-2011, 08:02 PM
|
#28
|
|
Autobahn Glanz
Join Date: Dec 2010
Location: Charlotte, NC
Posts: 1,282
|
Need some help. Can't get the transmission back in. I know this shouldn't be so hard. I was hoping to have everything back together and on my way again by Tuesday  . I realize these things are always easy the second time so I understand the first time can be hard.
Here is my situation:
I kept my flywheel and put in a new clutch, pressure plate, and throwout bearing. I was putting the transmission back in tonight with my Dad and we couldn't get it in far enough to get the bolts to grab all the way around.
I had my new slave cylinder in already and figured maybe the throwout bearing was pushing on the pressure plate so I removed the slave, no difference.
We were able to get a couple bolts started but then the others don't reach enough to grab. I could tell I had the input shaft into the clutch because when I turned the crank I saw the transmission spin the drives.
We did everything and couldn't get it in far enough so decided to drop things out and make sure we weren't messing something up.
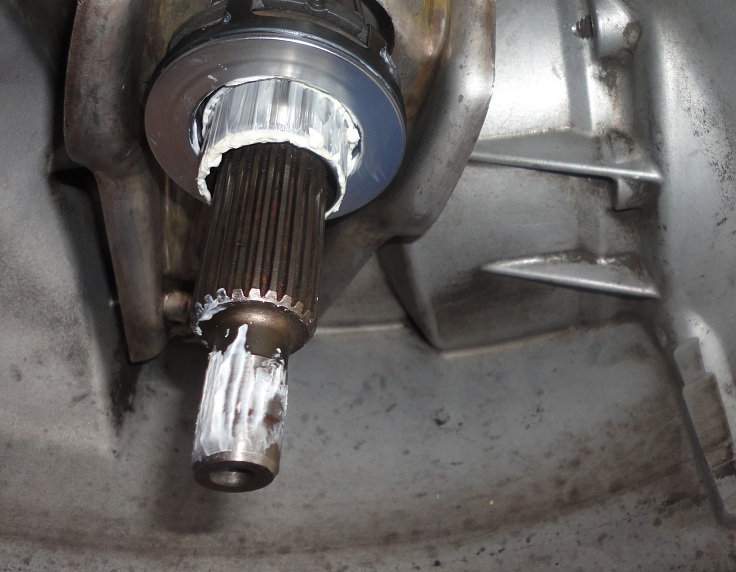
So here is the weird part, the input shaft clearly made it into the pilot bearing because I could see the bearing marks on the shaft lithium grease. So we are thinking is the input shaft out from the transmission too far, or is my flywheel not in correctly. So I measured the following:
- The input shaft is 5/16 below the edge of the transmission.
- The pilot bearing is only 3/16 further out from the engine then where transmission mounts to the engine .
This gives me 2/16 which is a perfect fit, yet I could never get the engine closer then 1 inch from the engine.
This doesn't add up! How do I have pilot bearing marks on the shaft if I still have an inch to go?!! It also felt to us like the transmission wasn't going in far enough because it was pivoting on something. Again remember I saw pilot bearing grease marks on the shaft, so it really was like I had reached bottom.
I'll go measure everything again.
|
|
|
|
|
12-31-2011, 08:29 PM
|
#29
|
|
Registered User
Join Date: Oct 2011
Location: sac. ca
Posts: 156
|
Is there too much grease in the pilot bearing? It will sorta hydrolock the input shaft.
|
|
|
|
|
12-31-2011, 09:41 PM
|
#30
|
|
Autobahn Glanz
Join Date: Dec 2010
Location: Charlotte, NC
Posts: 1,282
|
Quote:
Originally Posted by feelyx
Is there too much grease in the pilot bearing? It will sorta hydrolock the input shaft.
|
I'll double check but I don't think so. Put only a thin layer on. Have your transmissions slid back in pretty easy? With an inch left to pull the two together I shouldn't see any bearing marks on the shaft...so weird .
Side question (so I can make sure flywheel is on right), I assume the starter teeth should not be linked into the flywheel, I'm guessing when the starter engages it moves toward the teeth of the flywheel...no?
I'll even take pictures with better light.
I've read where others had problems but the got enough bolts in top and bottom to pull things together.
|
|
|
|
|
12-31-2011, 10:00 PM
|
#31
|
|
Registered User
Join Date: Oct 2011
Location: sac. ca
Posts: 156
|
When you say bearing marks... are they scratched into the input shaft or just grease marks? No the starter should not be engaged.
Stick a pencil in the pilot bearing hole, mark it and compare it to the tip of the input shaft length.
Usually the trans will go right on if everything is lined up, also that starter might be an issue.
|
|
|
|
|
01-01-2012, 07:01 AM
|
#32
|
|
Autobahn Glanz
Join Date: Dec 2010
Location: Charlotte, NC
Posts: 1,282
|
Quote:
Originally Posted by feelyx
When you say bearing marks... are they scratched into the input shaft or just grease marks? No the starter should not be engaged.
Stick a pencil in the pilot bearing hole, mark it and compare it to the tip of the input shaft length.
Usually the trans will go right on if everything is lined up, also that starter might be an issue.
|
I'll go look closely again. The marks were nice clean lines in the grease from when we pulled the trans back out, no scratching. Yes I agree based on my measurements it should slide right back in. First timers luck.
|
|
|
|
|
01-01-2012, 08:05 AM
|
#33
|
|
Registered User
Join Date: Apr 2008
Location: Southern New jersey
Posts: 1,054
|
I would loosen the clutch pressure plate and realign the disc. I've had this happen when the disc isn't perfectly centered, even using an alignment tool. Also, DO NOT try and pull up the gap with the mounting bolts, you'll break whatever is interferring.
|
|
|
|
|
01-01-2012, 08:18 AM
|
#34
|
|
Registered User
Join Date: Oct 2007
Location: Midwest
Posts: 1,746
|
Quote:
Originally Posted by stephen wilson
I would loosen the clutch pressure plate and realign the disc. I've had this happen when the disc isn't perfectly centered, even using an alignment tool. Also, DO NOT try and pull up the gap with the mounting bolts, you'll break whatever is interferring.
|
What he said, DO NOT try to draw it in with the bolts. I installed my transmission twice, once it slid in like butter, the next time took nearly 2 hours of wiggling / wrestling with it. If it were me, I'd pull it back out, recenter the splines with the alignment tool, turn the input shaft a tad and try again. She'll go in eventually.
|
|
|
|
|
01-01-2012, 08:30 AM
|
#35
|
|
Autobahn Glanz
Join Date: Dec 2010
Location: Charlotte, NC
Posts: 1,282
|
Thanks guys...ya we didn't pull but a small amount, I told my Dad this didn't make sense so we dropped it back out. I was thinking it should be butter if the stars are aligned right. It is good to know sometimes it is hard and sometimes easy because the point it is should just slide right in.
|
|
|
|
|
01-01-2012, 08:52 AM
|
#36
|
|
Autobahn Glanz
Join Date: Dec 2010
Location: Charlotte, NC
Posts: 1,282
|
OK here are some pics. Quick question, should I be able to turn the clutch disc at all or is the light pressure on it from pressure plate enough to cause a small amount of friction. I'll pull pressure plate back off just to be safe and redo.
|
|
|
|
|
01-01-2012, 09:34 AM
|
#37
|
|
Autobahn Glanz
Join Date: Dec 2010
Location: Charlotte, NC
Posts: 1,282
|
Quote:
Originally Posted by WhipE350
OK here are some pics. Quick question, should I be able to turn the clutch disc at all or is the light pressure on it from pressure plate enough to cause a small amount of friction. I'll pull pressure plate back off just to be safe and redo.
|
Sorry answered this question...had my thoughts backwords.
|
|
|
|
|
01-01-2012, 03:07 PM
|
#38
|
|
Autobahn Glanz
Join Date: Dec 2010
Location: Charlotte, NC
Posts: 1,282
|
Hey guys, believe I have found the error of my ways! It isn't in yet but I took the day and did other things then took a more relaxed look at things. I'm actually glad it didn't go in because I made a rookie mistake.
Once I get it in and running I'll give an up and post all my parts and costs.
|
|
|
|
|
01-01-2012, 03:21 PM
|
#39
|
|
Autobahn Glanz
Join Date: Dec 2010
Location: Charlotte, NC
Posts: 1,282
|
Quote:
Originally Posted by feelyx
|
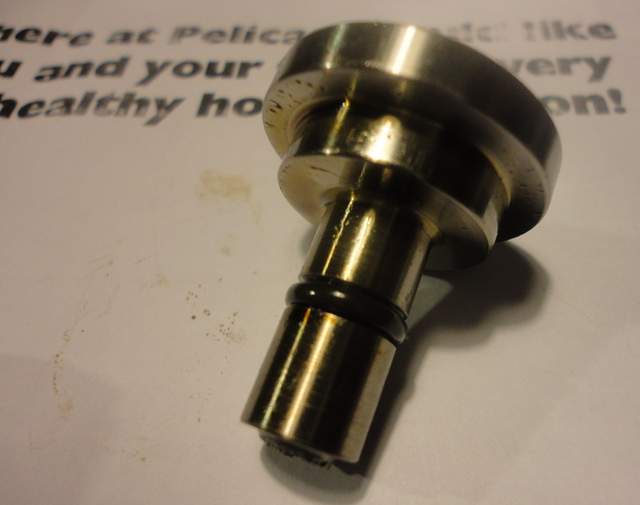
The double row that came out of mine had the following measurements:
24mm deep
48mm total diameter
21mm inner race diameter
Note - The new bearing had to be less then 20mm because the spiroclip is put in after the bearing goes in where as the original has the clip groove on the bearing it's self.
Measuring to just the grove on the depth is 20mm.
Hope this helps. You can make more accurate measurements once you get it. I'm keeping it in one piece so the grease can be analyzed.
|
|
|
|
|
01-01-2012, 03:51 PM
|
#40
|
|
Registered User
Join Date: Oct 2007
Location: Midwest
Posts: 1,746
|
Quote:
Originally Posted by WhipE350
Hey guys, believe I have found the error of my ways! It isn't in yet but I took the day and did other things then took a more relaxed look at things. I'm actually glad it didn't go in because I made a rookie mistake.
Once I get it in and running I'll give an up and post all my parts and costs.
|
Good Thinking. When I was running into difficulties getting my tranny in the second time I was fit to be tied, walked away until the next day and it went right in.
|
|
|
|
| Thread Tools |
|
|
| Display Modes |
 Linear Mode Linear Mode
|
 Posting Rules
|
You may not post new threads
You may not post replies
You may not post attachments
You may not edit your posts
HTML code is On
|
|
|
All times are GMT -8. The time now is 02:35 AM.
| |


 Whip986S - SOLD but will live the good life!
 Peter Jr - SOLD but not forgotten!
 The Silver Surfer (SOLD)
 The Black Widow
 Nite
Nite


