Go Back   986 Forum - The Community for Porsche Boxster & Cayman Owners > Porsche Boxster & Cayman Forums > DIY Project Guides

Post Reply
 
LinkBack Thread Tools Display Modes
Old 02-17-2007, 08:16 PM   #1
Registered User
 
Join Date: Jul 2006
Location: Where the Sewer Meets the Sea, CA. USA
Posts: 2,695
Send a message via MSN to CJ_Boxster
Post DIY - Replace Rear Upper Control Arms (Track Arms)

Ok This is a DIY on how to replace your Rear Upper Control Arms (Track Arms), However I am not replacing the factory equipment with OEM Rear Upper Control Arms (Track Arms), I will be installing a Set of Adjustable Control Arms purchased from forum sponser DelubozParts. Adjustable Rear Upper Control Arms (Track Arms) are a MUCH LESS expensive alternative inlew of buying a set of OEM Rear Upper Control Arms (Track Arms).

If you have chattering or rattling noise coming from your rear suspension, Chances are that its a worn-out Bearing Cartridge on the Rear Upper Control Arms (Track Arms).

Ok Lets Start,

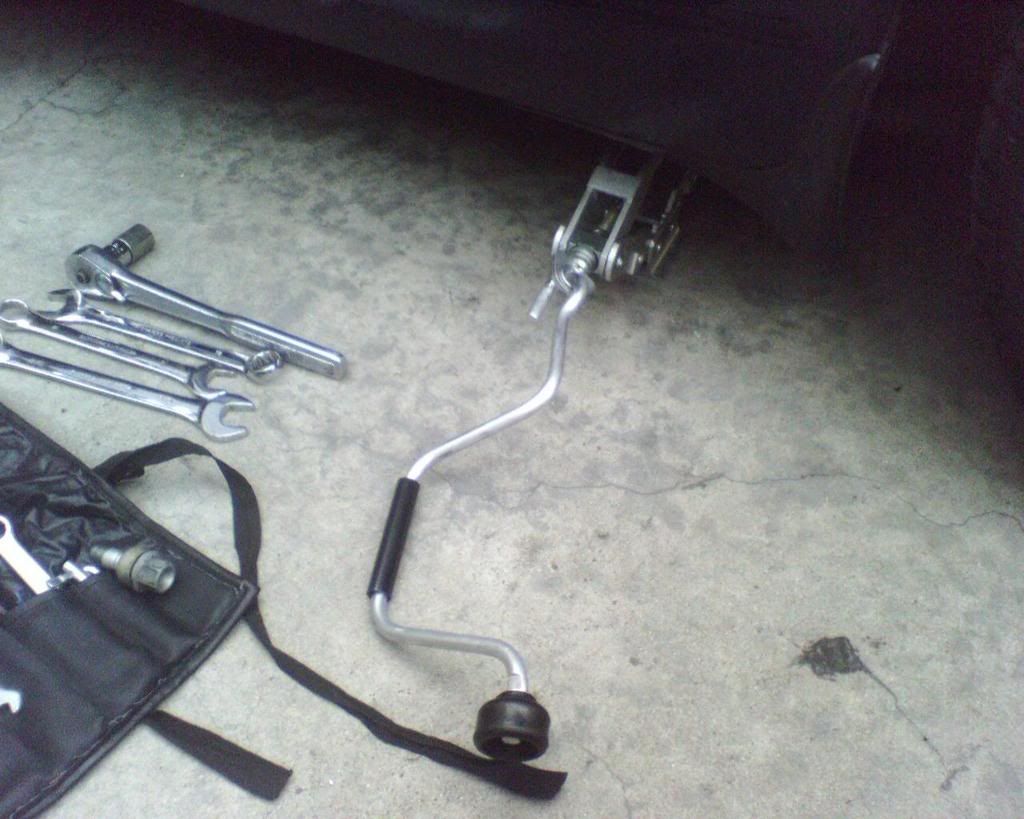
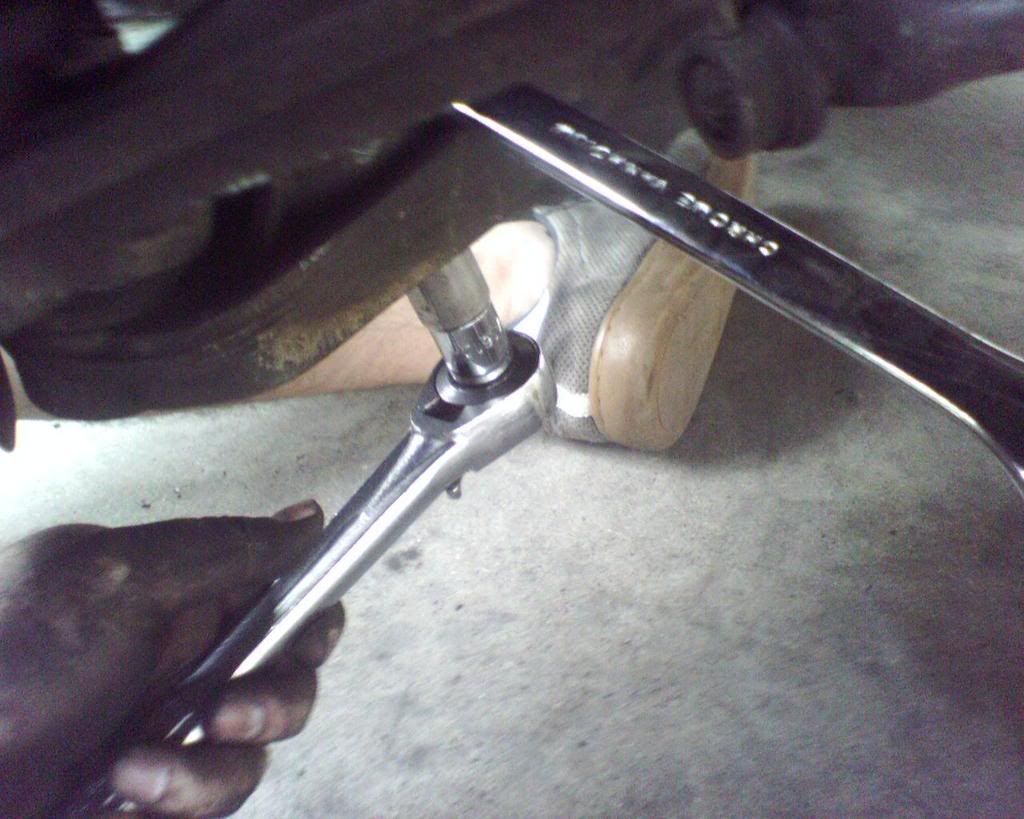
Tools list: Floor-jack, 18mm Ratchet, 21mm Closed-End Wrench, Torque Wrench, 2 Vise Grip Pliers.

1) Get your floor jack and tool set out. Break loose the lug nuts and security lug on the wheels.


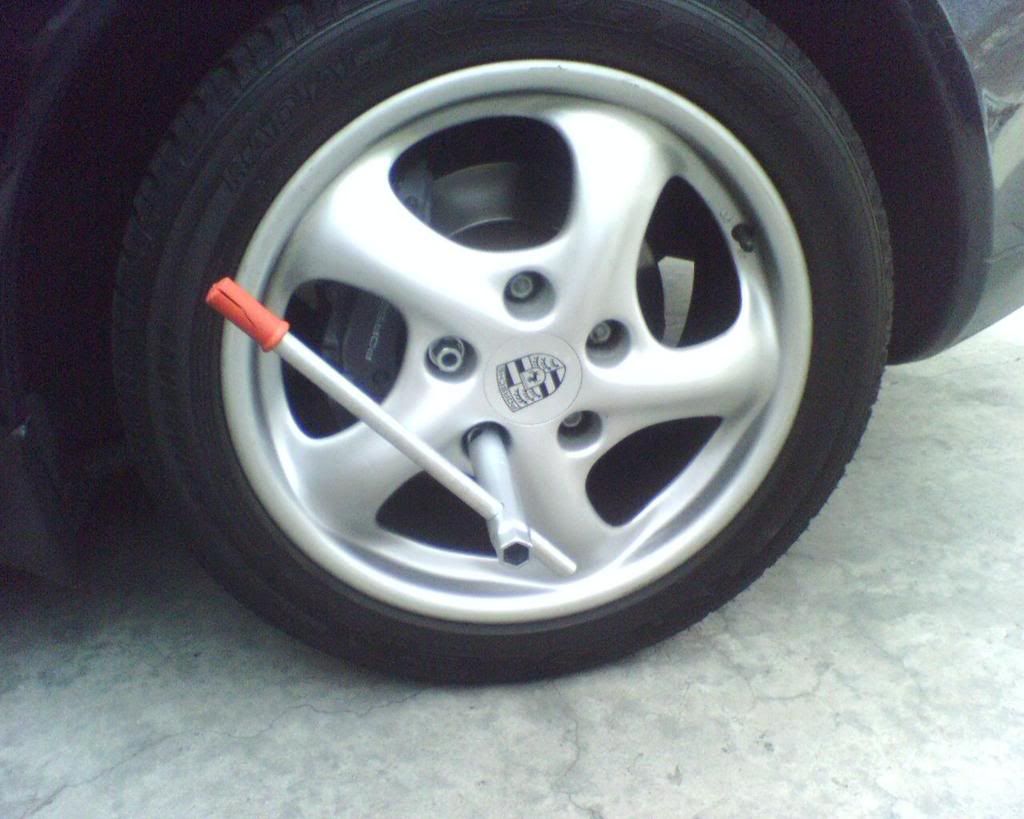
2) Remove the lug that is sitting higher than all others and insert/screw the threaded metal rod into that hole.


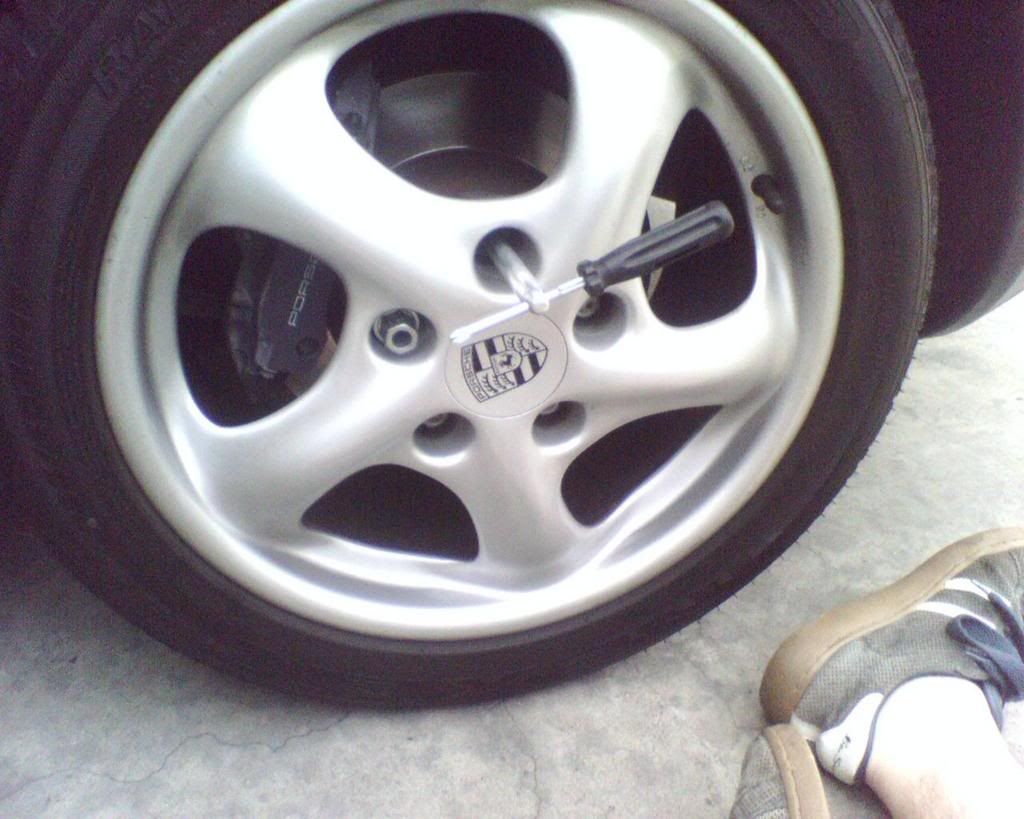
3) Now Jack the car up and once the rear wheel is off the ground, Remove the wheel and remove the Metal rod guide from the wheel hub


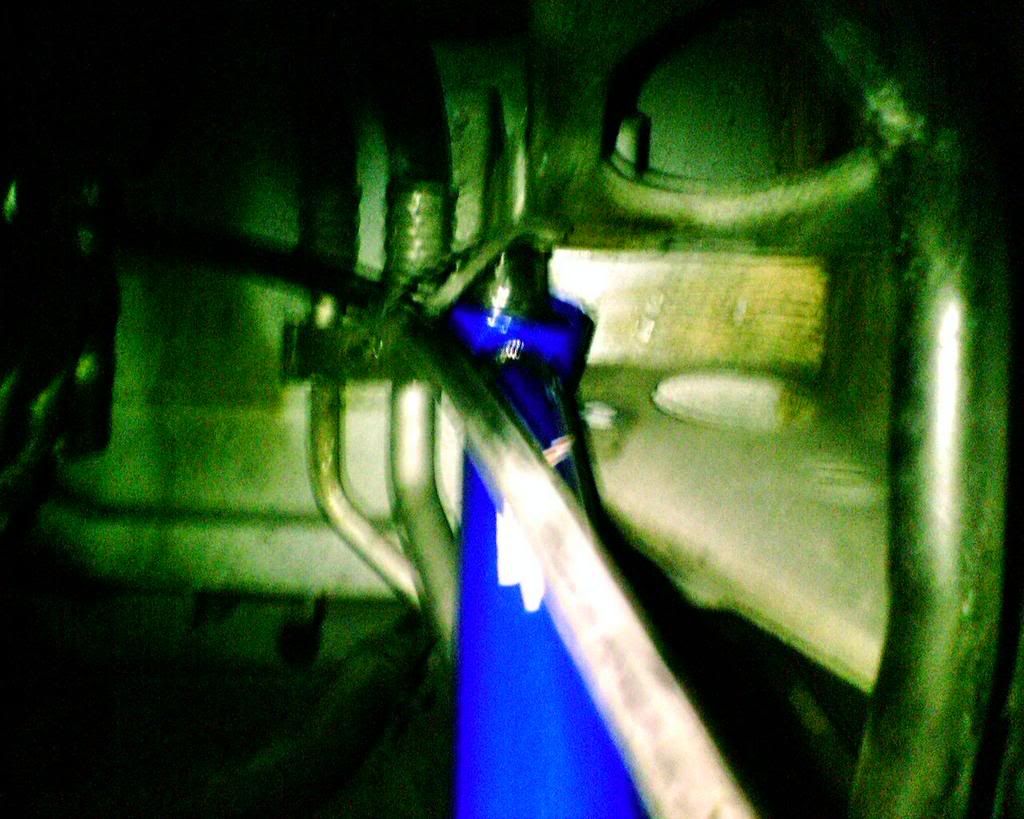
4) Remove the 2 plastic nuts that hold this plastic cover against the wheel well then remove Plastic cover.


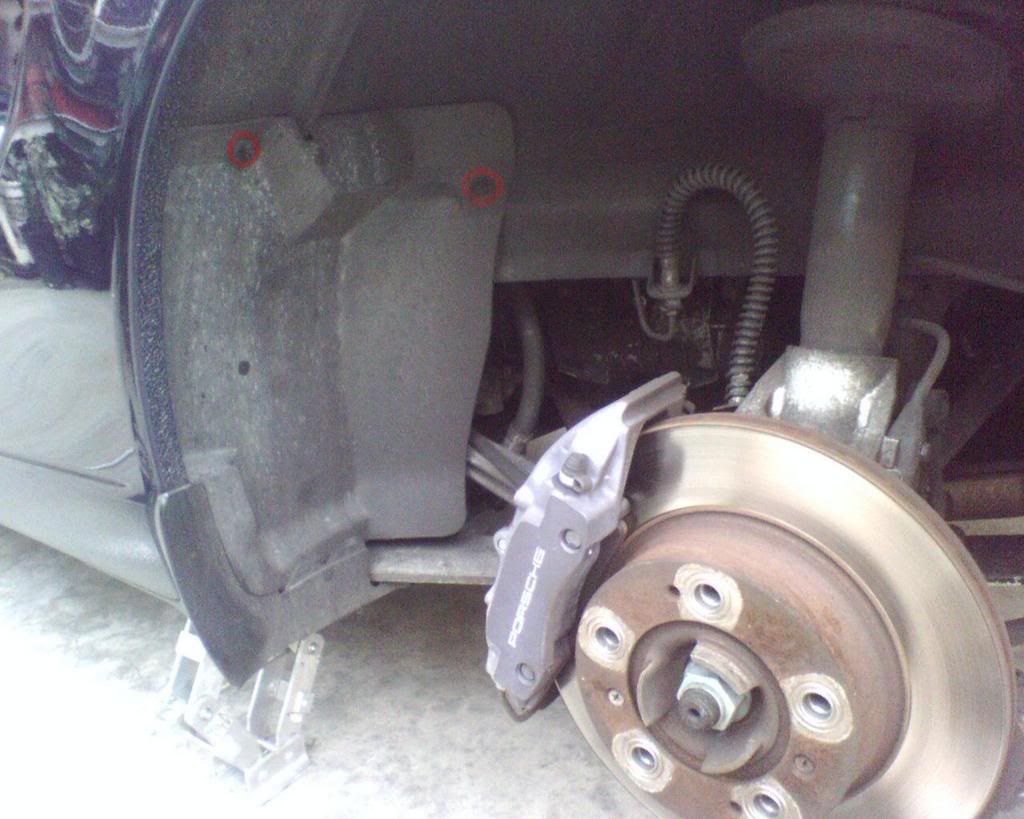
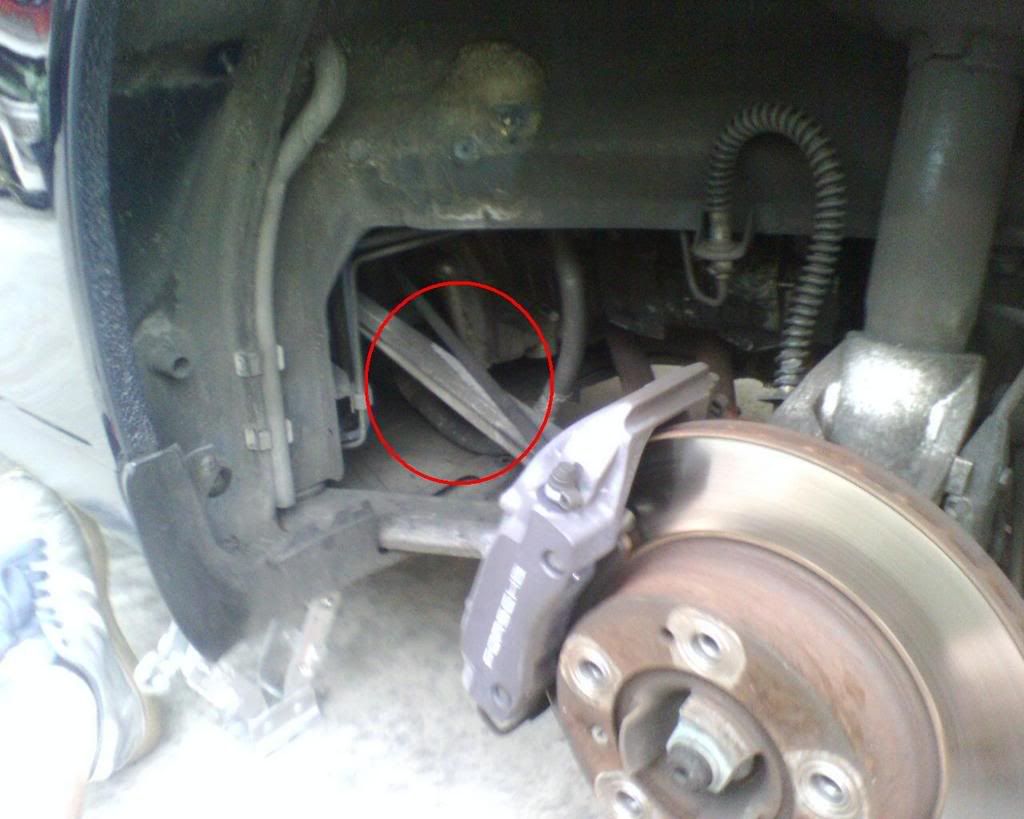
5) Now you can see the Rear Upper Control Arm circled in red. That is what we will be removing/replacing.


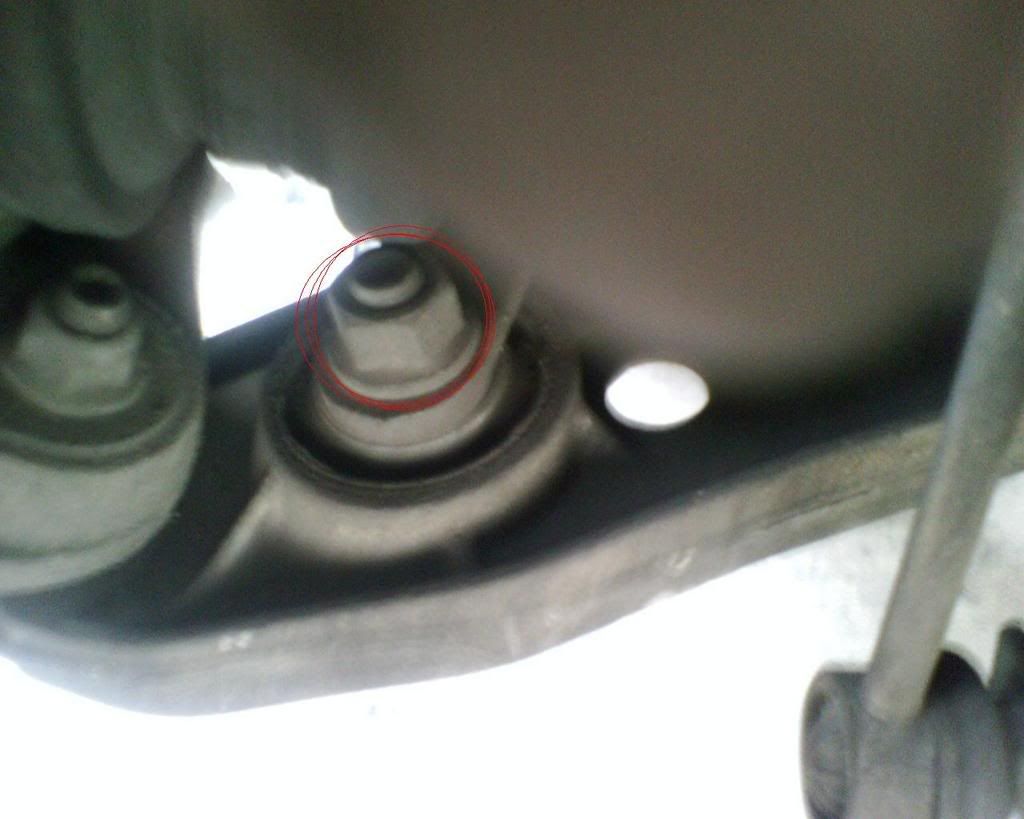
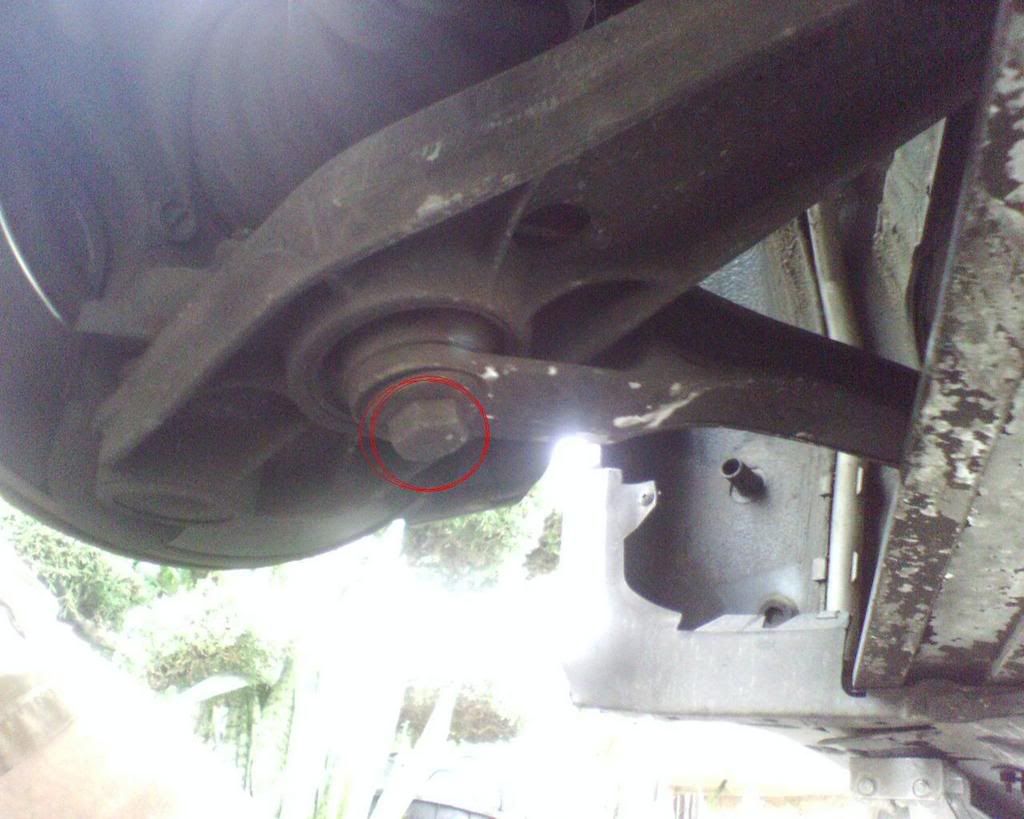
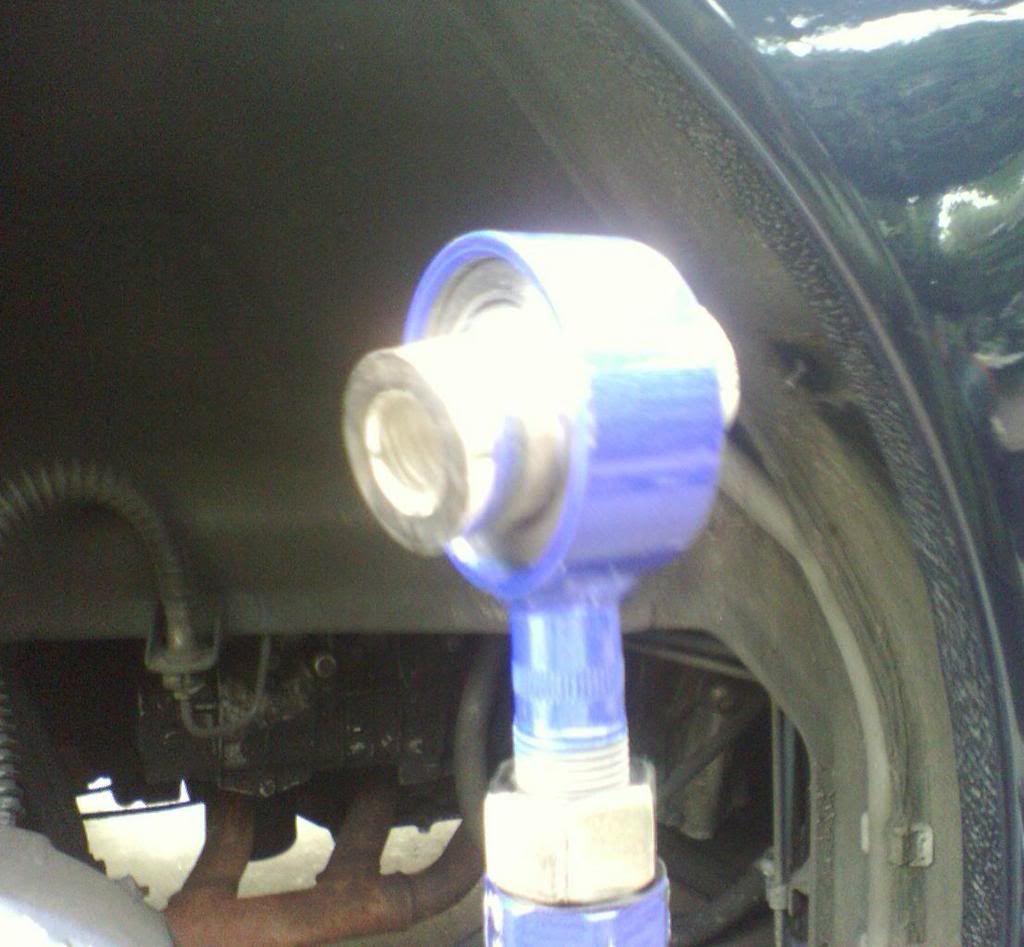
6) Time to locate the bolt & nut that secure the "Fork-end" of the control arm to the suspension. Just look behind the Wheel hub, on the lower control arm and you will see this nut and bolt on top and below the lower control arm.


__________________
--Proud Boxster Owner/Tech,

Carlos J Cazares

FastForward Performance
http://i10.photobucket.com/albums/a1...er/newsig1.jpg

Last edited by CJ_Boxster; 04-08-2008 at 07:44 AM. Reason: Orgainized Photobucket account folders, fixing broken links now.
CJ_Boxster is offline   Reply With Quote
Old 02-17-2007, 08:17 PM   #2
Registered User
 
Join Date: Jul 2006
Location: Where the Sewer Meets the Sea, CA. USA
Posts: 2,695
Send a message via MSN to CJ_Boxster
Post Part 2

7) Now unbolt these by using a 18mm ratchet socket and 21mm closed end wrench as pictured below. FYI- Never hit a ratchet with a hammer... the internals will shatter.


8) After the 18mm bolt and 21mm nut are removed, Use your 18 mm ratchet socket to remove the 18mm bolt that holds the Rear Control Arm to the chasis. FYI- Its very very tight, try holding the ratchet on the bolt and sliding the closed-end of your 21mm wrench over the handle of the ratchet, Hold it firmly so the socket doesnt slip off the bolt and manage to get your foot on the wrench holding the ratchet and pull or push (depending on drivers side or passenger side Control Arm) until the 18mm bolt loosens enough so that you dont require the leverage of the wrench attached to the ratchet.


9) Once the 18mm bolt is removed, Slide the control arm out of the car. (Install in reverse order if replacing with OEM Control Arms, torque both bolts to 160NM / 118lb-ft. If installing Adjustables...Proceed to read rest of directions)...

Now place old control arm and new adjustable Control Arm side by side and slide one of the 18mm bolts through the Bearing Cartridge of the adjustable Control arm and into the Fork-End of the OEM Control Arm. Rotate the Adjustment bar on the Control arm until the other end of the Control Arm bolt holes light up perfectly. Once they line up, slide other other 18mm bolt through the other end to keep them from rotating anymore and make any other adjustments as needed.


10) Now tighten the Adjustment Lock Nut on the the Bearing Cartridge side of the Adjustable Control Arm AS TIGHT AS YOU CAN to prevent it from loosening. If it loosens, it wont fall off but it will rattle and you will have to remove the entire Control Arm and re-tighten the Adjustment Lock Nut again. DO NOT tighten the Lock Nut on the FORK-END. Also rotate the Bearing Cartridge in the same angle that the OEM was while still in the car like so.
(FYI The Adjustment nuts are larger than 1inch wrench so I used 2 Vise Grip Pliers to tighten the nut.)

__________________
--Proud Boxster Owner/Tech,

Carlos J Cazares

FastForward Performance
http://i10.photobucket.com/albums/a1...er/newsig1.jpg

Last edited by CJ_Boxster; 04-08-2008 at 07:45 AM. Reason: Fixing broken links
CJ_Boxster is offline   Reply With Quote
Old 02-17-2007, 08:18 PM   #3
Registered User
 
Join Date: Jul 2006
Location: Where the Sewer Meets the Sea, CA. USA
Posts: 2,695
Send a message via MSN to CJ_Boxster
Post Part 3

11) Now slide the Adjustable Control Arm into place by first aligning the Bearing Cartridge side first and screwing the 18mm bolt in only 4 turns. Now Slide the Fork-End over the mounting point and align it with the bolt hole. FYI- If the Fork-End appears to be too far back or forward, Remove the 18mm bolt from the Bearing-Side and Remove the arm and rotate the Fork-End in half turn intervals and re-install and repeat as needed until the Fork End is very close to perfect.

If needed, You may slide a screw driver into the hole to align the holes to better install the 18mm bolt.


12) Once the bolt is through the Fork-End, Install the 21mm nut and snug down the bolt, Dont torque it yet.

13) Use your Ratchet to tighten the 18mm bolt that is holding the Bearing-End of the Control Arm to the Chasis. Get it as close as you can to 160NM / 118lb-ft of torque with your ratchet cause you cannot get a torque wrench in that confined area.

14) Now using your 21mm closed wrench and 18mm socket on a torque wrench, tighten the bolt to 160NM / 118lb-ft of torque.


15) Now tighten the adjustment nut on the Fork-End of the Control Arm as tight as you can without having the Vise Grip Pliers slip off.

16) Now reinstall the Plastic Cover and its 2 plastic nuts and Place the Guide Rod back in the Top Lug Hole & Reinstall the Wheel with 130NM of torque on the lug bolts.


Now go for a drive and enjoy the sound of the other noises you have in your interior like rattling windstop, dash rattles, leaf in your ventalation system and convertible top rattles
__________________
--Proud Boxster Owner/Tech,

Carlos J Cazares

FastForward Performance
http://i10.photobucket.com/albums/a1...er/newsig1.jpg

Last edited by CJ_Boxster; 04-08-2008 at 07:46 AM.
CJ_Boxster is offline   Reply With Quote
Old 02-17-2007, 08:52 PM   #4
Registered User
 
Join Date: Sep 2005
Location: Sacramento
Posts: 3,417
Send a message via AIM to blinkwatt
That looks like it was a major P.I.T.A.,good write-up.
__________________
-99' Zenith Blue 5-spd...didn't agree with a center divider on the freeway
-01' S Orient Red Metallic 6-spd...money pit...sold to buy a house
blinkwatt is offline   Reply With Quote
Old 02-17-2007, 09:25 PM   #5
Registered User
 
Join Date: Jul 2006
Location: Where the Sewer Meets the Sea, CA. USA
Posts: 2,695
Send a message via MSN to CJ_Boxster
Quote:
Originally Posted by blinkwatt
That looks like it was a major P.I.T.A.,good write-up.
Actually isnt, Took me 1 hour 30 minutes on the drivers side and 1 hour on the passenger side. The directions make it seem alittle overwhelming cause Its alot of direction but only to make certain that the DIY'er does not run into ANY snags along the way.
__________________
--Proud Boxster Owner/Tech,

Carlos J Cazares

FastForward Performance
http://i10.photobucket.com/albums/a1...er/newsig1.jpg
CJ_Boxster is offline   Reply With Quote
Old 02-17-2007, 09:46 PM   #6
Registered User
 
Join Date: Sep 2005
Location: Sacramento
Posts: 3,417
Send a message via AIM to blinkwatt
The Bentley version of installing/removing the control arm is choppy at best. I'm still a little fuzzy on how to install the bushing side. Not that I need to do it,but knowledge is power. Do you have any pics of how you used the vice grip pliers?
__________________
-99' Zenith Blue 5-spd...didn't agree with a center divider on the freeway
-01' S Orient Red Metallic 6-spd...money pit...sold to buy a house
blinkwatt is offline   Reply With Quote
Old 02-17-2007, 10:03 PM   #7
Registered User
 
Join Date: Jul 2006
Location: Where the Sewer Meets the Sea, CA. USA
Posts: 2,695
Send a message via MSN to CJ_Boxster
Quote:
Originally Posted by blinkwatt
Do you have any pics of how you used the vice grip pliers?
Oh sorry, Like this....
__________________
--Proud Boxster Owner/Tech,

Carlos J Cazares

FastForward Performance
http://i10.photobucket.com/albums/a1...er/newsig1.jpg
CJ_Boxster is offline   Reply With Quote
Old 02-17-2007, 10:04 PM   #8
boggtown
Guest
 
Posts: n/a
What are your thoughts on the ride now? Would this help prevent wheel hop when trying to do a burnout? Or was it just that it was squeeking?
  Reply With Quote
Old 02-17-2007, 10:11 PM   #9
Registered User
 
Join Date: Jul 2006
Location: Where the Sewer Meets the Sea, CA. USA
Posts: 2,695
Send a message via MSN to CJ_Boxster
The Feel of the rear end is now very solid and doesnt feel as sloppy as it did before the replacement, Of course the clacking and rattles in the rear end are gone. I have yet to do a burnout or donut... I didnt get wheel hop before the install, If the Original bearing Cartridge has ALOT of play then i can understand see how you would experience wheel hop, but mine were only worn just a tad, only enough to have bad rattling noise in the warm temps and nearly no noise during colder temps. But all in all I love it.
__________________
--Proud Boxster Owner/Tech,

Carlos J Cazares

FastForward Performance
http://i10.photobucket.com/albums/a1...er/newsig1.jpg
CJ_Boxster is offline   Reply With Quote
Old 02-19-2007, 01:01 PM   #10
Registered User
 
Join Date: Sep 2006
Location: California
Posts: 713
Wow, congrats on the new arms!
__________________
http://farm4.static.flickr.com/3420/...90927559_o.jpg

Some stuff for sale: M030 S 24mm front sway bar, M030 base 19.6mm rear sway bar, 996 GT3 OEM Porsche Motorsport front strut mounts monoball "camber plates"

WTB: looking for some 5-7mm spacers with extended bolts
chaudanova is offline   Reply With Quote
Old 02-19-2007, 01:33 PM   #11
Registered User
 
Join Date: Aug 2005
Location: Alexandria, VA
Posts: 180
Thank you very much

I was wondering how the installation went.

I'll be changing mine as soon as the temperature warms up.

Question:

What price difference was it between the stock and the aftermarket ones?

I looked them up on eBay, but none were listed.

thanks
BobMarley1 is offline   Reply With Quote
Old 02-19-2007, 02:08 PM   #12
Registered User
 
Join Date: Jul 2006
Location: Where the Sewer Meets the Sea, CA. USA
Posts: 2,695
Send a message via MSN to CJ_Boxster
Quote:
Originally Posted by BobMarley1
I was wondering how the installation went.

I'll be changing mine as soon as the temperature warms up.

Question:

What price difference was it between the stock and the aftermarket ones?

I looked them up on eBay, but none were listed.

thanks
Price difference is big... Pacific Porsche sells the Control Arm for $511.76 with tax, thats $1023.52 for a set.

DelubozParts sells them for $269.99 a set. Thats a $753.53 price difference for a set.

He doesnt sell them yet to the public, I was the test guinea pig... im one satisfied pig
__________________
--Proud Boxster Owner/Tech,

Carlos J Cazares

FastForward Performance
http://i10.photobucket.com/albums/a1...er/newsig1.jpg
CJ_Boxster is offline   Reply With Quote
Old 02-19-2007, 02:19 PM   #13
Registered User
 
Join Date: Aug 2005
Location: Alexandria, VA
Posts: 180
Thumbs up Huge!

Thanks man, I've contacted the seller in order to notify me once these go public.

thanks again for the pics and write up procedures.
BobMarley1 is offline   Reply With Quote
Old 02-19-2007, 02:38 PM   #14
Registered User
 
Join Date: Jul 2006
Location: Where the Sewer Meets the Sea, CA. USA
Posts: 2,695
Send a message via MSN to CJ_Boxster
No problem, I was worried that my Write-Up would have been the worst Write-Up in DIY history.
__________________
--Proud Boxster Owner/Tech,

Carlos J Cazares

FastForward Performance
http://i10.photobucket.com/albums/a1...er/newsig1.jpg
CJ_Boxster is offline   Reply With Quote
Old 02-19-2007, 03:02 PM   #15
Registered User
 
Join Date: Jul 2006
Location: Where the Sewer Meets the Sea, CA. USA
Posts: 2,695
Send a message via MSN to CJ_Boxster
Quote:
Originally Posted by boggtown
What are your thoughts on the ride now? Would this help prevent wheel hop when trying to do a burnout? Or was it just that it was squeeking?
Hey, i know people frown upon burnouts, but the nite installed the control arms, i did a burnout infront of my friends house, It was great, Rpms were at about 4500 when i popped the clutch, then the wheels broke traction and then i was at WOT and the RPMs pegged at 6000 rpms and the car went forward all the way to the end of the block wheels spinning till the end of the block and the front end up like a speed boat. It was great... cant wait for a track day.
__________________
--Proud Boxster Owner/Tech,

Carlos J Cazares

FastForward Performance
http://i10.photobucket.com/albums/a1...er/newsig1.jpg
CJ_Boxster is offline   Reply With Quote
Old 02-28-2007, 12:48 PM   #16
Registered User
 
Join Date: Jan 2007
Location: Alabama
Posts: 29
Thanks

Hey CJ_boxster thanks for the write up. I too had the mysterious rear end noise. I went with the OEM track arms and now it's nice and quiet! I wouldn't have ever attempted the repair without your DIY! Thanks again!
jsmithdmd is offline   Reply With Quote
Old 02-28-2007, 01:19 PM   #17
Registered User
 
Join Date: Jul 2006
Location: Where the Sewer Meets the Sea, CA. USA
Posts: 2,695
Send a message via MSN to CJ_Boxster
Oh wow you did it! nice, i wasnt sure if anyone would actually use the DIY i made. Glad it helped you.
__________________
--Proud Boxster Owner/Tech,

Carlos J Cazares

FastForward Performance
http://i10.photobucket.com/albums/a1...er/newsig1.jpg
CJ_Boxster is offline   Reply With Quote
Old 03-07-2007, 09:11 AM   #18
Registered User
 
Join Date: Nov 2006
Location: New York
Posts: 644
Hey, ....

very nice write-up CJ!! Thanks for the useful info!!

The only two (2) things I would consider adding would be:

(1) a DISCLAIMER, since you never know these days....

AND

(2) JACK STANDS ....it makes me nervous to see someone working underneath a car without one of these in place....too many horror stories out there!!

BTW, how are they holding up so far?
dcporsche99 is offline   Reply With Quote
Old 03-07-2007, 09:16 AM   #19
Registered User
 
Join Date: Jul 2006
Location: Where the Sewer Meets the Sea, CA. USA
Posts: 2,695
Send a message via MSN to CJ_Boxster
Yeah i should add those.... even though i didnt use them myself

They are holding up very well, Now that its getting warmer outside, i can here my front control arms chattering like a mofo. That will be the next arms i buy from debulozparts.
__________________
--Proud Boxster Owner/Tech,

Carlos J Cazares

FastForward Performance
http://i10.photobucket.com/albums/a1...er/newsig1.jpg
CJ_Boxster is offline   Reply With Quote
Old 03-07-2007, 09:25 AM   #20
Registered User
 
Join Date: Nov 2006
Location: New York
Posts: 644
You're killin' me... ...if something happens to you we don't get to benefit from future DIY projects from you...so go out and get some stands please!!

I haven't checked my Bentley manual, but is the install and parts the same for both the front and rears?? BTW, what's the part made of??

dcporsche99 is offline   Reply With Quote
Post Reply


Thread Tools
Display Modes

Posting Rules
You may not post new threads
You may not post replies
You may not post attachments
You may not edit your posts

BB code is On
Smilies are On
[IMG] code is On
HTML code is On
Trackbacks are On
Pingbacks are On
Refbacks are On


All times are GMT -8. The time now is 03:22 AM.


Powered by vBulletin® Version 3.8.7
Copyright ©2000 - 2024, vBulletin Solutions, Inc.
Content Relevant URLs by vBSEO 3.6.0
Copyright 2024 Pelican Parts, LLC - Posts may be archived for display on the Pelican Parts Website -    DMCA Registered Agent Contact Page