Go Back   986 Forum - The Community for Porsche Boxster & Cayman Owners > Porsche Boxster & Cayman Forums > DIY Project Guides

Post Reply
 
LinkBack Thread Tools Display Modes
Old 07-26-2015, 07:21 AM   #1
Registered User
 
Join Date: Apr 2010
Location: South Africa, Cape Town
Posts: 131
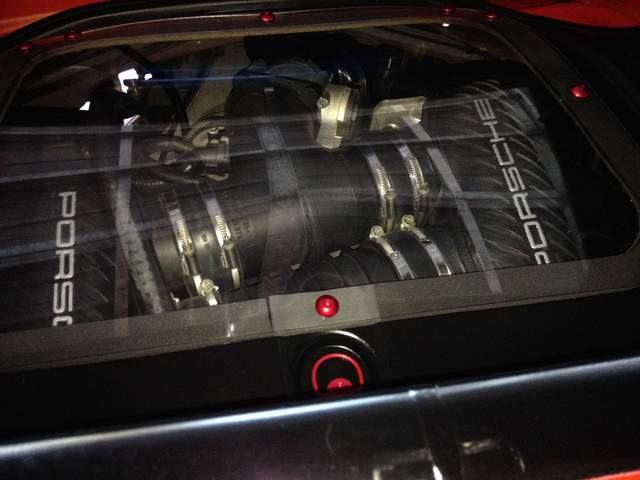
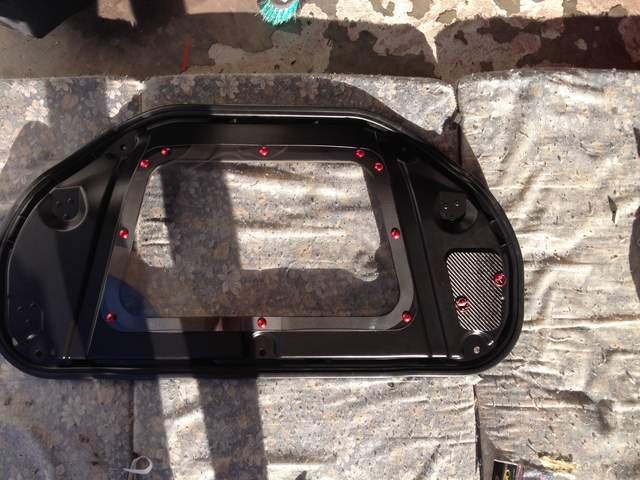
Clear engine cover made

After getting all the materials together last week, I took on the task to make my clear engine cover this weekend. Here are some pics of the finished product, if any one is interested in making something like this, I will post a how to with pictures.


__________________
de-snorkeled, clear lights, sports exhaust, zeintec hard top, zein wing, B&M short shifter, DesignTek lowering springs, DesignTek carbon fibre strut brace front and rear, 18'' carerra 5 spokes, semi slick tyres, entire soft top delete, engine cover delete,red console,L&N deep sump, volo performance chip, raptor shift light, de-cat'ed, OEM GT3 bucket seats.
sickbananas is offline   Reply With Quote
Old 07-26-2015, 08:48 AM   #2
Registered User
 
Join Date: Apr 2014
Location: DFW
Posts: 253
Wow! That looks great!

What's that little cutout on the driver's side? Any noise/heat issues that you've noticed?

And I would certainly like to hear more about how you made it!
CraigM is offline   Reply With Quote
Old 07-26-2015, 10:04 AM   #3
Registered User
 
Coxey's Avatar
 
Join Date: Jul 2015
Location: Hertfordshire UK
Posts: 7
Me too that looks great seen another thread on here some where with a similar mod
Coxey is offline   Reply With Quote
Old 07-26-2015, 10:50 AM   #4
Registered User
 
Join Date: Apr 2010
Location: South Africa, Cape Town
Posts: 131
Let me start by saying that I have been driving for +-2 years without a cover. Without a cover, it does not get hot inside unless you are stationary, or open the windows. Opening the windows cancels out the vacuum that pulls out the hot air and makes the cabin extremely hot. I also don't have any insulation around my engine bay as you can see in my pics and my soft top with all its mechanisms have been deleted as I have a Zeintop. Without the cover, the car is extremely noisy inside which will certainly not be everyone's cup of tea.

It would not be fair for me to comment on noise as I am so a accustomed to driving in a noisy car, which is not for every one. In the short time before I cut my cover to do my mod, I drove the car with the cover on but without the insulation, soft top delete etc as mentioned, comparing that to now with the clear cover, there is no difference in terms or heat or sound IMHO.

The cut out on the left is for sound, it sit directly above my cone filter, so when removed it creates an awesome sound inside the cabin, well that's my opinion at least.
I'll post a few pics to show the steps of what I did.
__________________
de-snorkeled, clear lights, sports exhaust, zeintec hard top, zein wing, B&M short shifter, DesignTek lowering springs, DesignTek carbon fibre strut brace front and rear, 18'' carerra 5 spokes, semi slick tyres, entire soft top delete, engine cover delete,red console,L&N deep sump, volo performance chip, raptor shift light, de-cat'ed, OEM GT3 bucket seats.

Last edited by sickbananas; 07-26-2015 at 10:53 AM.
sickbananas is offline   Reply With Quote
Old 07-26-2015, 02:15 PM   #5
Registered User
 
Join Date: Apr 2014
Location: DFW
Posts: 253
Very cool. Bet it looks sweet through the Zeintop!
CraigM is offline   Reply With Quote
Old 07-27-2015, 03:03 AM   #6
Registered User
 
Join Date: Jun 2014
Location: New Jersey
Posts: 230
Subscribed! Looks really nice.
__________________
2001 Seal Gray Boxster (Hair Salon on wheels)
2013 Audi Q5 (Family Mover)
2006 Yamaha R1 (Adrenaline Machine)
amitmishra4 is offline   Reply With Quote
Old 07-27-2015, 06:15 AM   #7
Registered User
 
Join Date: Oct 2012
Location: New Jersey
Posts: 52
I want one are making more? I'll buy one sir.
shockandawe is offline   Reply With Quote
Old 07-27-2015, 06:56 AM   #8
Registered User
 
Join Date: Apr 2010
Location: South Africa, Cape Town
Posts: 131
I will post the steps with pictures a little later of what I did, this is the standard cover that I have cut into and modified just in case anyone was confused.
__________________
de-snorkeled, clear lights, sports exhaust, zeintec hard top, zein wing, B&M short shifter, DesignTek lowering springs, DesignTek carbon fibre strut brace front and rear, 18'' carerra 5 spokes, semi slick tyres, entire soft top delete, engine cover delete,red console,L&N deep sump, volo performance chip, raptor shift light, de-cat'ed, OEM GT3 bucket seats.
sickbananas is offline   Reply With Quote
Old 07-28-2015, 07:04 AM   #9
Registered User
 
Join Date: Apr 2010
Location: South Africa, Cape Town
Posts: 131


__________________
de-snorkeled, clear lights, sports exhaust, zeintec hard top, zein wing, B&M short shifter, DesignTek lowering springs, DesignTek carbon fibre strut brace front and rear, 18'' carerra 5 spokes, semi slick tyres, entire soft top delete, engine cover delete,red console,L&N deep sump, volo performance chip, raptor shift light, de-cat'ed, OEM GT3 bucket seats.
sickbananas is offline   Reply With Quote
Old 07-28-2015, 07:40 AM   #10
Registered User
 
Join Date: Apr 2010
Location: South Africa, Cape Town
Posts: 131
Okay so here are the first steps. I drilled out the rivets to remove the 4x upright posts that the storage compartment locks into. I then riveted the holes to close them off.

I marked out the hole I wanted using some blue masking tape, and decided on a radius I like for the corners. The cut out allowed for a 1 inch clean border for the window to seat onto. As you can see I stayed away from all the moulded and indented areas to avoid sealing problem that would of also not looked good.

I opted for a 2mm thick lexan/polycarbonate as it can take the curve and potential heat. I marked it so that is was 1" bigger all the way around.

I then drilled the mounting holes in my lexan as seen in the pic, I opted for more securing on the bottom because of the curve. I then lined up my pre-drilled and cut window with the hole in my cover so that the two lined up as intended. I drilled the centre top hole and slotted it to allow for fine adjustment. Using some temperary screw I secured the top hole, lined every thing up and nipped the nut and bolt. I then worked myself down towards the curve by drilled each hole through the cover and bolting it down as I was going.
__________________
de-snorkeled, clear lights, sports exhaust, zeintec hard top, zein wing, B&M short shifter, DesignTek lowering springs, DesignTek carbon fibre strut brace front and rear, 18'' carerra 5 spokes, semi slick tyres, entire soft top delete, engine cover delete,red console,L&N deep sump, volo performance chip, raptor shift light, de-cat'ed, OEM GT3 bucket seats.
sickbananas is offline   Reply With Quote
Old 07-28-2015, 10:58 AM   #11
Registered User
 
Porsche9's Avatar
 
Join Date: Sep 2013
Location: Chandler, AZ
Posts: 1,796
Nice work and explanation.
__________________
03 Carrera
02 Boxster S Guards Red, black interior with matching hardtop
89 Carrera 4
89 944 S2
78 911SC
Porsche9 is offline   Reply With Quote
Old 08-03-2015, 11:32 AM   #12
Registered User
 
Join Date: Apr 2010
Location: South Africa, Cape Town
Posts: 131
Thought I should finish this DIY guide by explaining my final steps to the finished product.

My first bit of explanation covers how I 'dry' fitted my clear window, after this I made my sound cut out above the cone air filter, I then cut an oversized piece of carbon fibre to cover this hole so that it overlapped the hole enough for a seal. I used 1/4 turn quick release pins with matching recepticles that I riveted onto the engine cover.

I now scuffed the engine cover with 320 grit sand paper and sprayed on some plastic primer, after is was dry I scuffed it again and sprayed my top coat with some statin black. Both primer and top coat I used a good quality spray in a can and I am satisfied with the finish. While I was at it spraying I sanded, metal primer and sprayed red the 5x oem locking pins that secure the engine cover to the body.

When the paint was nice and hard, I stuck on my 1" wide self adhesive foam sealing tape around the edge of the cut out holes for the lexan and carbon fibre cover to seal onto when secured down. The last task was to secure the lexan window down, I used some red anodized allen dome head screws. The screws along with the 1/4 turn locking pins I bought from Pro Bolt.

My engine cover was now complete. I also got the auto upholstery shop to put a piping edging on the 'back rest' carpet to just finish things off nicely as the storage compartment etc back there is non existent. Also note that all the sound insulation, foam and entire soft top in my car has been deleted, when removing all the insulation I removed the contact glue that was left behind and spray painted the completed interior around the engine bay my body color. All this adds to the effect I was trying to achieve.

Next step is some lights that light up my engine bay that would be easy on the eye.

I will post some pics of the final engine cover build steps relating to my explanation above.
__________________
de-snorkeled, clear lights, sports exhaust, zeintec hard top, zein wing, B&M short shifter, DesignTek lowering springs, DesignTek carbon fibre strut brace front and rear, 18'' carerra 5 spokes, semi slick tyres, entire soft top delete, engine cover delete,red console,L&N deep sump, volo performance chip, raptor shift light, de-cat'ed, OEM GT3 bucket seats.
sickbananas is offline   Reply With Quote
Old 08-03-2015, 11:34 AM   #13
Registered User
 
Join Date: Jul 2012
Location: md
Posts: 55
really cool
whitedogs is offline   Reply With Quote
Old 08-03-2015, 11:57 AM   #14
Registered User
 
Join Date: Apr 2010
Location: South Africa, Cape Town
Posts: 131


__________________
de-snorkeled, clear lights, sports exhaust, zeintec hard top, zein wing, B&M short shifter, DesignTek lowering springs, DesignTek carbon fibre strut brace front and rear, 18'' carerra 5 spokes, semi slick tyres, entire soft top delete, engine cover delete,red console,L&N deep sump, volo performance chip, raptor shift light, de-cat'ed, OEM GT3 bucket seats.
sickbananas is offline   Reply With Quote
Old 08-03-2015, 05:59 PM   #15
Ben-Auto-Design
 
Ben006's Avatar
 
Join Date: Oct 2014
Location: French Riviera
Posts: 827
Really nice !

How long have you been using it ? Does it get too dirty ?

I drove a while without the carpet, just the cover, and the noise level was totally acceptable
Ben006 is offline   Reply With Quote
Old 08-24-2015, 10:41 AM   #16
Registered User
 
jaykay's Avatar
 
Join Date: Sep 2009
Location: toronto
Posts: 2,668
What did you do for the seal around the perimeter of the cover?
__________________
986 00S
jaykay is offline   Reply With Quote
Old 08-24-2015, 03:27 PM   #17
Registered User
 
Join Date: Mar 2015
Location: Santa Clara ca
Posts: 363
How has it lasted with prolonged use?
How is the sound change?

Thx, matt
Sassmatt72 is offline   Reply With Quote
Old 08-25-2015, 05:16 AM   #18
Registered User
 
mikesz's Avatar
 
Join Date: Feb 2013
Location: Cranston RI
Posts: 902
Garage
Smile

I gotta tell ya, GREAT JOB! I was thinking doing the same thing! I even bought an engine cover to use. Problem for me is I would rather have rear speakers in the storage shelf but I might do this and swap out the storage shelf for shows. Other problem is I would have to make sure my engine is clean! Any suggestions on how to clean the engine without ruining anything?
__________________
99 Porsche Boxster
mikesz is offline   Reply With Quote
Old 10-22-2015, 02:24 PM   #19
"50 Years of 550 Spyder"
 
10/10ths's Avatar
 
Join Date: Jun 2015
Location: The Road
Posts: 918
Updates?

How's it holding up? Dirty? Heat? Noise?

Updates, please.

Thanks.
__________________
550 SE #310---"It's more fun to drive a slow car fast, than a fast car slow."
10/10ths is offline   Reply With Quote
Old 11-26-2015, 12:43 AM   #20
Registered User
 
Join Date: Apr 2015
Location: SC
Posts: 33
Looks really cool. I'm also curious on how much dirt/dust would get on it after driving.

fredd5r is offline   Reply With Quote
Post Reply


Posting Rules
You may not post new threads
You may not post replies
You may not post attachments
You may not edit your posts

BB code is On
Smilies are On
[IMG] code is On
HTML code is On
Trackbacks are On
Pingbacks are On
Refbacks are On


All times are GMT -8. The time now is 05:36 AM.


Powered by vBulletin® Version 3.8.7
Copyright ©2000 - 2024, vBulletin Solutions, Inc.
Content Relevant URLs by vBSEO 3.6.0
Copyright 2024 Pelican Parts, LLC - Posts may be archived for display on the Pelican Parts Website -    DMCA Registered Agent Contact Page