 10-25-2013, 03:45 PM
|
#1
|
|
Registered User
Join Date: Nov 2008
Location: Florida
Posts: 1,111
|
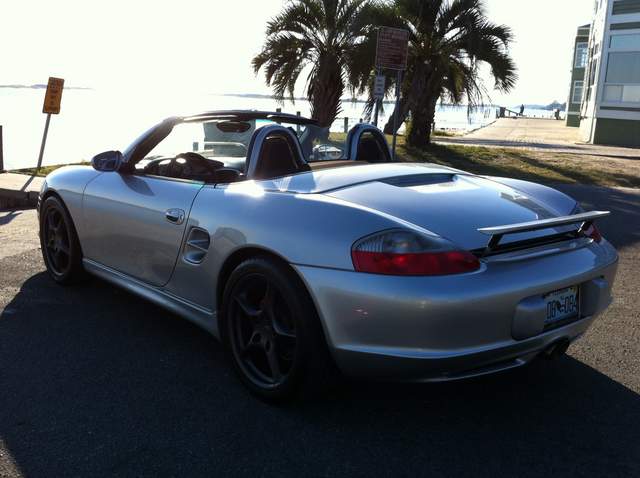
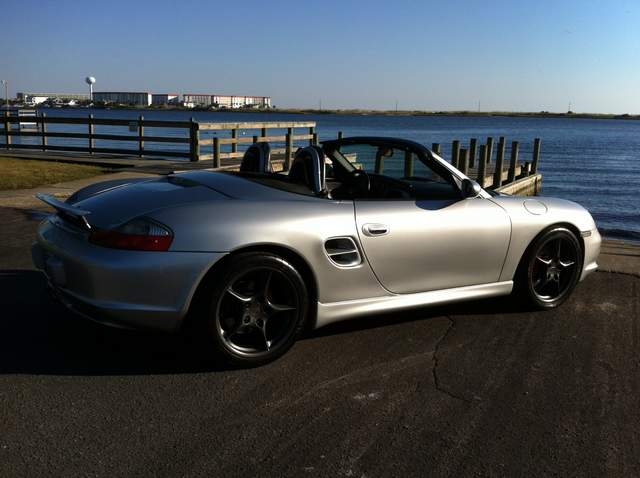
Aerokit I side skirts finally installed
I'm posting these pictures just for you Nine8Six.
I finally received my installation kit in the mail which consisted of about 15 sheet metal screws and about 20 C-clips for that go on the bottom rail of the car.
I painted the skirts using Arctic Silver spray cans from Automotivetouchup.com, then sprayed on several coats of clear. After about a week of drying I wet sanded with 2000 grit sandpaper, then buffed it out to a shine with a buffer.
I installed them with the included screws and 3M mounting tape.


|

|

|
|
10-25-2013, 03:57 PM
|
#2
|
|
Registered User
Join Date: Oct 2013
Location: San Jose, CA
Posts: 583
|
Looks nice! Surprised the color matches so well...
|
|
|
|
|
10-25-2013, 04:06 PM
|
#3
|
|
Registered User
Join Date: Nov 2008
Location: Florida
Posts: 1,111
|
That's automotivetouchup.com for you. It helps that over 10 years, silver doesn't fade.
|
|
|
|
|
10-25-2013, 05:28 PM
|
#4
|
|
Registered User
Join Date: Nov 2008
Location: Massachusetts
Posts: 4,810
|
Looks good !
__________________
Don't worry
I've got the microfilm.
|
|
|
|
|
10-26-2013, 06:06 AM
|
#5
|
|
Registered User
Join Date: Apr 2006
Location: Tejas/NorCal
Posts: 201
|
Mind sharing the details/link for the mounting kit you used?
__________________
2001 Lapis Blue Boxster S Tip (stock), 2001 Guards Red Boxster 5-speed (not very stock) 
|
|
|
|
|
10-26-2013, 11:33 AM
|
#6
|
|
Registered User
Join Date: Sep 2013
Location: Montreal, QC. (currently expat to Shanghai)
Posts: 3,249
|
Ahh my dream, a silver porsche car (one of these day!). With black wheel of course. Beautiful heliguy, thanks (what on earth took you so long).
I think this particular Porsche Part ground effect makes the Boxster side-curves look perfectly balanced. Unlike other eccentric aftermarket skirts screaming aftermarket fiberglass e.g. my TA/GT style (Made in Miami) rockers :/
Was very anxious to see this kit on a silver boxster and you finally made that happen! Magic day-time picture shootout and all. Top (TOP) quality man
Nice work on the paint & fitting... although I have no idea how you achieved this quality/match. You some kind of pro-paint guy???
__________________
______________________________
'97 Boxster base model 2.5L, Guards Red/Tan leather, with a new but old Alpine am/fm radio.
|
|
|
|
|
10-26-2013, 04:31 PM
|
#7
|
|
Registered User
Join Date: Nov 2008
Location: Florida
Posts: 1,111
|
Tightbox: I ordered the kit from a company overseas called Porschapart Limited (porschapart.gmail.com)
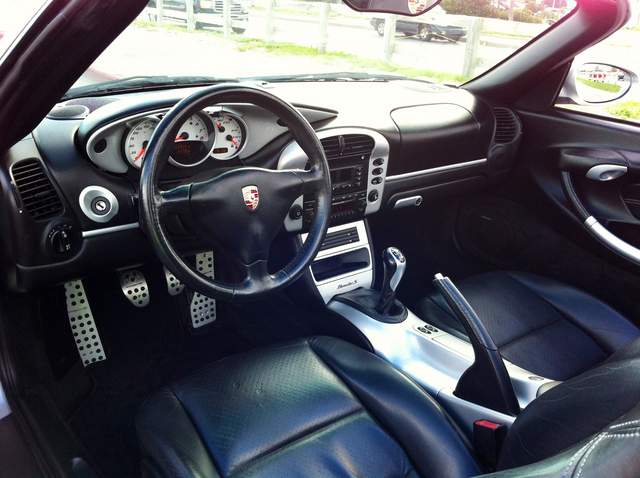
Nine8Six: Thank you for the compliments, especially coming from someone with your fabrication skills. I chose the Aerokit I over the Aerokit II because of the overall balance. I think they blend perfectly with the lines of the front bumpers of the '03 and '04 MY. I have learned that the secret to painting with spray cans is that it is all about taking your time in the preparation of the item. Sand thoroughly and clean before you paint and wet sand and buff after to get rid of any orange peel. Take your time and apply several even coats. I did the same on my interior pieces and it worked out great.
|
|
|
|
|
11-06-2013, 09:45 AM
|
#8
|
|
Registered User
Join Date: Mar 2013
Location: Long Island, NY
Posts: 378
|
Great job, looks awesome!
__________________
His: 2003 Boxster & 2008 MDX
Hers: 2011 Golf TDI
|
|
|
|
|
11-06-2013, 11:54 AM
|
#9
|
|
Registered User
Join Date: May 2012
Location: Wilbraham, ma
Posts: 65
|
Looks great! What clear did you use?
__________________
_________________
1999 BOXSTER
|
|
|
|
|
11-06-2013, 01:15 PM
|
#10
|
|
Registered User
Join Date: Nov 2008
Location: Florida
Posts: 1,111
|
I used the acrylic lacquer that comes from Automotivetouchup.com
|
|
|
|
|
11-14-2013, 12:04 PM
|
#11
|
|
Registered User
Join Date: Feb 2013
Location: Cranston RI
Posts: 902
|
I have a 99 arctic silver with Boxster red interior and hate the black plastic of the dash. I want to paint the interior pieces silver like you did. How difficult was it to get the parts off the car?
__________________
99 Porsche Boxster
|
|
|
|
|
11-14-2013, 06:02 PM
|
#12
|
|
Registered User
Join Date: Nov 2008
Location: Florida
Posts: 1,111
|
All of the interior pieces came off super easy, the hardest was the instrument surround and even that was easy...remember, its all in the prep work, make sure you sand them smooth before you paint them.
|
|
|
|
|
11-25-2013, 03:20 PM
|
#13
|
|
Registered User
Join Date: Feb 2013
Location: Land of naught
Posts: 1,302
|
Quote:
Originally Posted by heliguy

All of the interior pieces came off super easy, the hardest was the instrument surround and even that was easy...remember, its all in the prep work, make sure you sand them smooth before you paint them.
|
+1 and remember 'cleanliness is next to Godliness'! Use plenty of grease and wax remover to prevent chemical reactions- silicone based car care products have ruined many repaints. BTW your interior looks great!
__________________
Death is certain, life is not.
|
|
|
|
|
11-19-2013, 08:41 AM
|
#14
|
|
Registered User
Join Date: Nov 2013
Posts: 6
|
I always marvel at how something so simple can drastically change the look and feel of a car. Nice! Thanks for sharing.
|
|
|
|
|
11-19-2013, 01:51 PM
|
#15
|
|
Registered User
Join Date: Nov 2008
Location: Florida
Posts: 1,111
|
Thanks pacified. That goes for the short ****************er I installed. I'm filled with pleasure every time I drive the car.
|
|
|
|
|
11-22-2013, 06:02 AM
|
#16
|
|
Registered User
Join Date: Nov 2008
Location: Florida
Posts: 1,111
|
^^^Shifter, I don't know why it thought I was cursing.
|
|
|
|
|
11-24-2013, 08:07 AM
|
#17
|
|
Registered User
Join Date: Nov 2013
Location: Colorado
Posts: 442
|
nice!
I bought my 99 this summer and didn't even realize the rockers were an add on! I love how it sets mine apart from others. Love the look. 
|
|
|
|
|
11-25-2013, 09:54 AM
|
#18
|
|
Registered User
Join Date: Nov 2008
Location: Florida
Posts: 1,111
|
Your rockers and front bumper are the Aerokit I. Well done.
|
|
|
|
|
11-28-2013, 07:49 PM
|
#19
|
|
Registered User
Join Date: Nov 2013
Location: North Carolina
Posts: 80
|
looks great!!
|
|
|
|
|
06-12-2015, 05:58 AM
|
#20
|
|
Registered User
Join Date: Oct 2012
Location: Connecticut
Posts: 133
|
Where did you get the kit from, looking for the same side skirts....
__________________
1978 911 SC - sold
1987 944 - sold
2009 - Cayman S - sold
1997 - Boxster - sold
|
|
|
|
 Posting Rules
|
You may not post new threads
You may not post replies
You may not post attachments
You may not edit your posts
HTML code is On
|
|
|
All times are GMT -8. The time now is 11:18 PM.
| |


 Dangermobile
 Butzi
Butzi
 2001 Porsche Boxster 2.7
 Hybrid Mode


