 02-26-2012, 05:53 PM
|
#1
|
|
Registered User
Join Date: Feb 2012
Location: Virginia
Posts: 12
|
DIY HID Projector Install instructions
I saw others had installed HID projectors with bi-xenon lamps in their Boxsters, but they didn't provide many specific instructions, parts, etc. Well, I figured I had nothing to lose because my headlights were pretty bad anyways, so I invested $300 in HID projectors and embarked on my DIY HID journey. Hopefully, you can benefit from my mistakes and from what I learned.
First of all, simply putting HID bulbs in your H7 sockets is NOT the way to go. The light discharge is too intense and unfocused, which is dangerous to oncoming drivers.
Secondly, I'm not a professional, so if you see that I did something stupid, don't be too hard on me. Gentle correction is always constructive.
Thirdly, I'm told that altering headlights is not legal in most parts of the country, although the HID projectors will pass safety inspection.
Things you need.
I ordered from BlackFlameCustoms : HID Projector Headlight Retrofits, Retrofit Service & Parts- Mini-Morimoto MH1 bi-xenon projector
- H1 HID Bulbs (4300/5000k/6000k- your choice)
- All Digital Morimoto Ballasts
- Shrouds (to cover the new projectors)
- Plug-and-play wiring harness
Also other than basic hand tools, you will need a Dremel tool, silicone adhesive sealant, an Xacto knife and an oven.
- Follow the instructions to remove the headlight assembly from the car.
- Clean the headlight assembly and prepare the oven for baking. After reading various posts and viewing a number of YouTube videos on this process, what seemed to work best is to preheat the oven to around 225 F.
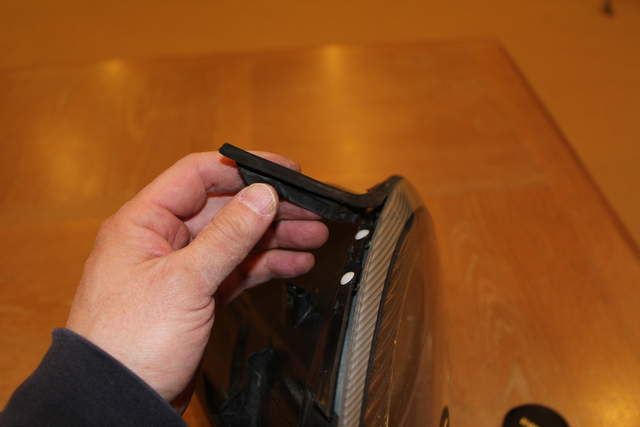
- Remove the rubber gasket around the assembly, remove the back cover, and remove all bulbs. Also if you have a Headlight Corner Trim, remove that too, as that piece warped easily in the heat. I had to purchase a replacement.
- Put the assembly in the oven, but not directly on the wire rack. Put some strips of wood on the rack, then put the assembly on top of the wood.

- Bake for 10 minutes.
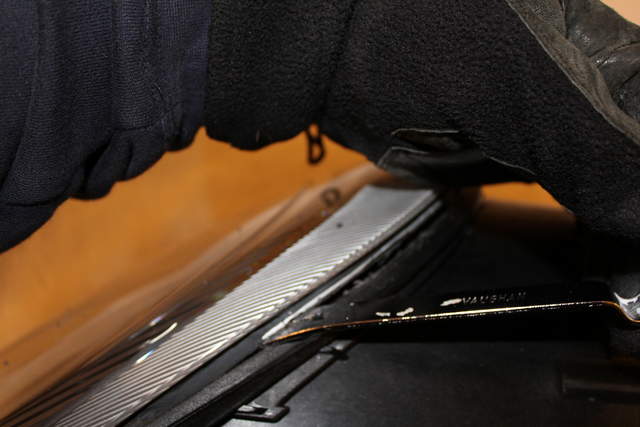
- Remove from the oven and us a flat bladed screwdriver to loosen the silicone adhesive. If you dont feel that its going to give, put it in the oven for another 10 minutes. I found that the side opposite of the flood light seemed to be the easiest place to start. You should hear the adhesive start to lift. Be patient and never force it. Repeated trips to the oven may be needed, but eventually the lens will come off. Wear gloves as the plastic gets pretty hot.
- Remove the outer lens and the plastic inner lining and set them aside carefully.
- As the adhesive is still soft, use the screwdriver blade to scrape off as much adhesive as possible from the main assembly.
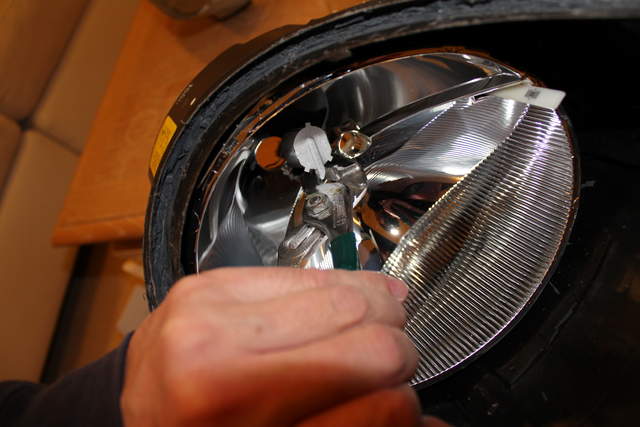
- The inner lens was melted on my headlights, so I was eager to trash them. Using a pair of pliers, the lens comes free. There are plastic tabs at 9, 12, and 3 oclock so those are the points you may need to pry a little. I used a mini pry bar with an angle to get behind the lens to pry it free.

- The upper hole on the chrome reflector is for the low beam bulb, and the lower for the high beam. In front of the low beam opening is a bulb deflector that needs to be removed. Looking at the back of the assembly, you see the tabs that hold it in place. I used a pair of wire snips and needle nose pliers to cut and bend the tabs so that it the bulb deflector came loose.
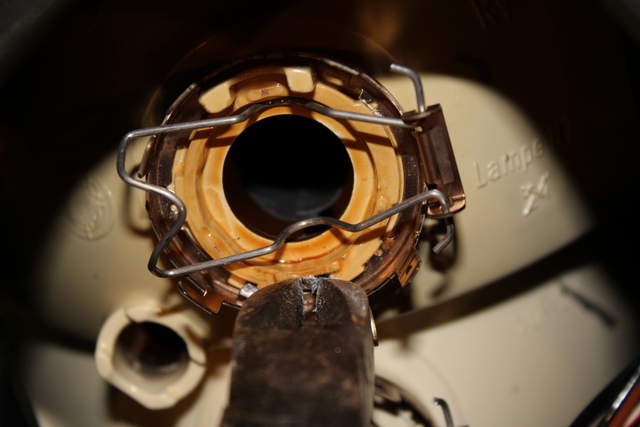
Remove it from the front side.
- Using the Dremel tool, the square base that held the bulb deflector needs to be cut away. The back of the HID projector needs that space to sit flush against the headlight reflector bowl. Run your fingers over that area to make sure you remove all remnants of the square base. This picture isn't very focused, but the red arrow points to the thing I'm talking about.
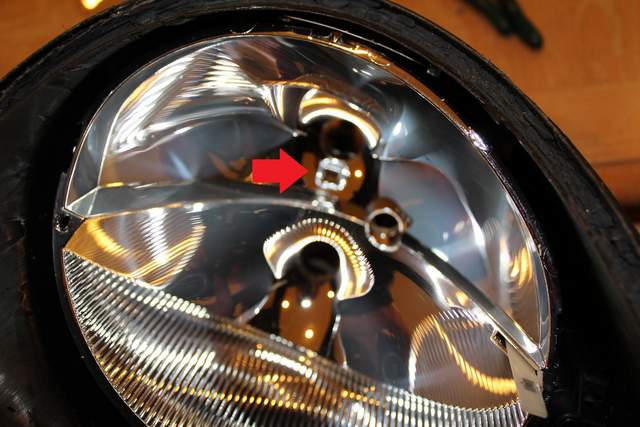
- You will discover that the back of the reflector bowl has a little shelf. You may also need to cut away part of it to get a good flush fit.
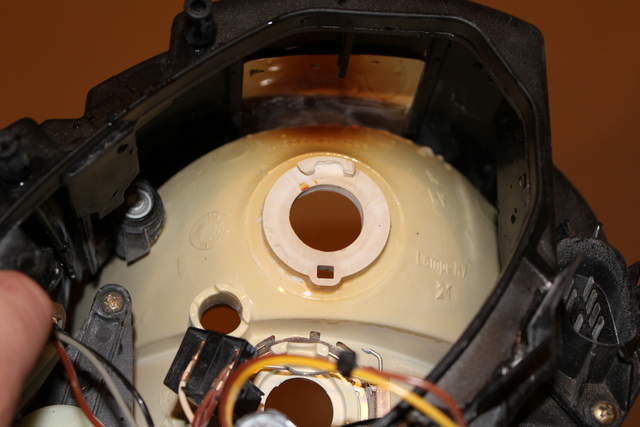
- Use the drum sanding bit on your Dremel tool to make the bulb opening a bit larger to the projector can fit in it. I took a Sharpie pen and drew a circle just around the opening, and then shaved away the markings. You dont want to make the opening too large.
- Next, use the Dremel tool to cut away the rim of the low beam bulb opening. This is necessary for the nut to be able to grasp onto the projector threads. The wire clip assembly that holds the H7 bulb should come right off.
- Make a notch on the top of the bulb opening. This will be used to align the projector and will keep it in place.
- Clean the whole headlight assembly well by using an air compressor or clean rag to remove all the dust particles. Shake the assembly upside down and sideways to make sure you get all the dust out. Remove any fingerprints
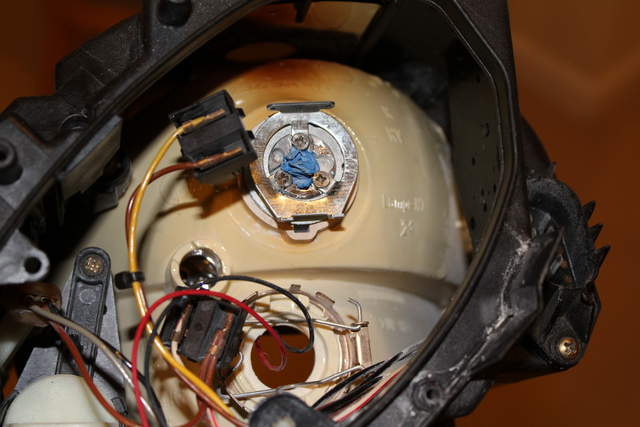
- Install the projector by placing the silicone washer on the projector first. Place the projector in the low beam opening. On the threaded side of the projector, put the H7 adapter place on, then secure the projector with the lock ring.
- At this point try to fit the shroud on the projector. It will require some cutting to fit it. There were two cuts I had to make, one at the top and another at the side to accommodate the shelf in the middle of the reflector. Use the Dremel tool on the shroud, cutting and measuring carefully in an iterative fashion to make sure you have a good fit. I cut the shroud too much on the top, leaving an gaping hole. Fortunately, this wont be noticeable once I cover it with aluminum tape. When the headlight lens covers the assembly, it will cover the top of the shroud anyways. No one will notice it unless they really really look for it.
- If the shroud is attached to the projector with screws, then you may need to remove the projector. Mine had a slip on collar so I was able to install it once I got it to fit.
- Attach the bulb holder and the bulb clip.
- This might be a good opportunity to replace all the bulbs. The H7 fog light bulb is easy to get out since the assembly is apart. Also, I removed the amber turn indicator reflector and replaced the clear bulb with an amber bulb (Sylvania 1156A) to give the headlight assembly a clear, clean look.
- Drill a 7/8 inch hole in the back cover and run the wires through it. The Morimoto HIDs came with a grommet that will fit in a 7/8 inch hole nicely.

- With that the headlight assembly is almost done. Before putting it all back together, its time to test that the wiring is all done correctly.
Last edited by blk986; 02-27-2012 at 04:10 PM.
Reason: Fix typo
|

|

|
|
02-27-2012, 03:46 PM
|
#2
|
|
Registered User
Join Date: Feb 2012
Location: Virginia
Posts: 12
|
DIY HID Projector Install instructions: Part 2 Wiring
The wiring harness looked a bit overwhelming when I first looked at it, but after a few email exchanges with JB at blackflamecustoms , it was easy to figure out.
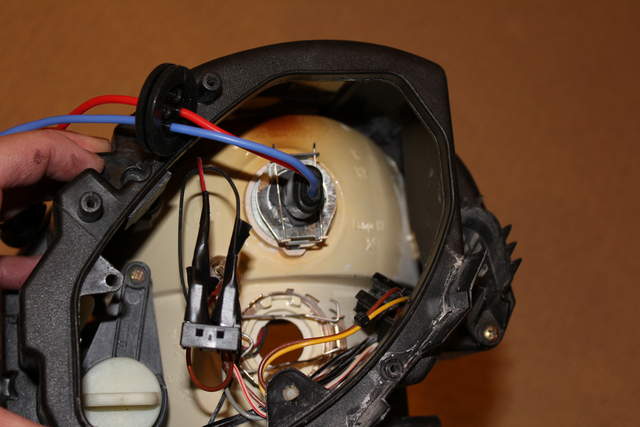
Connect the blades from the wires from the projector to the high beam connector. Brown is negative, so connect the black wire to brown, and the other to red. I ran the projector wires through the high beam hole which is the lower hole.
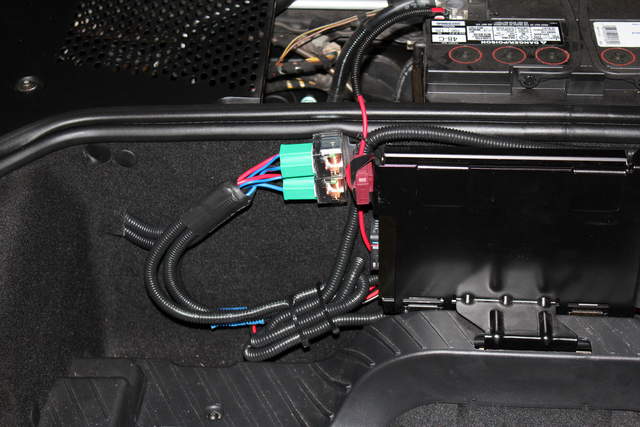
Plan the installation of the wiring harness. I had to extend some of the cables to because I wanted to install the main relay on the harness to the nut that secures the amp. The harness connections are simple.
Red wire with the brown fuse casing: to positive battery terminal
Black wire : to negative battery terminal
Two ballast cables will go to the ballasts.
Remaining cable with two blades (headlight connector) will go to the low beam connector on the headlight assembly. The brown wire on the low beam connector is negative, so I connected the negative blade to it. You only need to connect the headlight connector on one side of the car.
Before the final installation of the harness and before sealing the assembly, insert the headlight assemblies into car and test the lights, high beam, low beam, indicators, fog, parking lights, and side markers. Also test the beam of the projectors to make sure they arent aimed too high or low. At this point, you just want to get the aim in the right ball park. One mistake I made was that although the projector was secure, it was not flush with the back of the reflector bowl, so the aim was way too low.
Installing the Wiring Harness in my Boxster.
I didnt want to drill any holes in the car, but I needed to run wires from the front trunk compartment to the headlights. - Mount the harness relay to the amp nut.
- Extend the short ballast wire and the light switch connector so they are long enough to reach the headlight assembly.
- There is a large grommet on the right side of the trunk. Using an Xacto blade, I slit an X opening in the rubber grommet to run the ballast and the headlight connector.

- On the opposite side, I used the vertical headlight adjustment opening to run the ballast wire. Since this was one ballast wires that I extended, I threaded it through the opening before I terminated the cables.
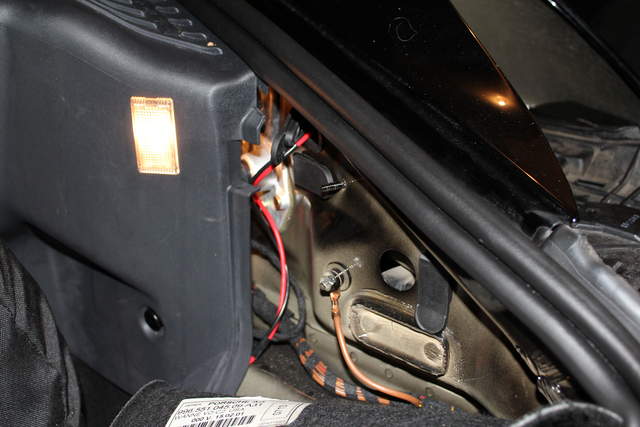
- Secure the cables behind the trunk liner and secure with zip ties as needed.
- Mount the ballasts on the side. There is plenty of space there. Secure with industrial strength Velcro.

- Use zip ties to make sure the cables dont interfere with the main connection from the car and the headlight assembly.
- Lock the headlight assemblies in place. I found that the tool that came with the Boxster was useless. A 5mm long neck socket I got from Sears is a lot more effective.
Last edited by blk986; 02-27-2012 at 04:10 PM.
|
|
|
|
|
02-27-2012, 04:16 PM
|
#3
|
|
Registered User
Join Date: Feb 2012
Location: Virginia
Posts: 12
|
DIY HID Projector Install instructions: Pictures
Before:

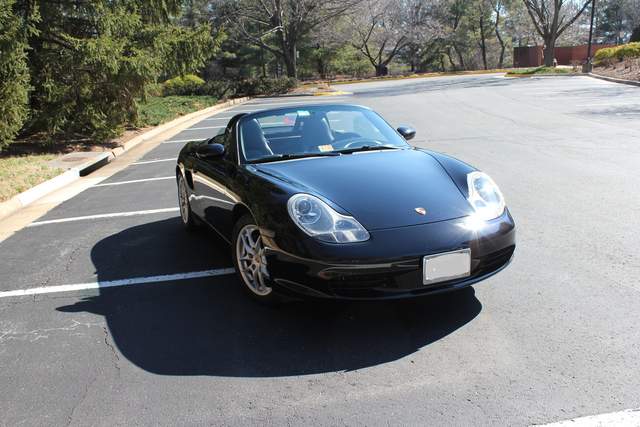
After:

Finshed product:

|
|
|
|
|
02-27-2012, 07:39 PM
|
#4
|
|
2001 RUF 3800S
Join Date: Mar 2009
Location: Ontario, Canada
Posts: 326
|
Well done, well done! Appreciate the effort with your detailed how to guide. I have xenons but just enjoy a good write up!
__________________
IG: RUF3800S
|
|
|
|
|
02-28-2012, 08:57 PM
|
#5
|
|
Registered User
Join Date: Jul 2010
Location: Oregon
Posts: 77
|
Very awesome post! Thanks for posting this! takes time and patience! but makes me want to do it to my headlights. Thats why I like this forum. 
|
|
|
|
|
02-29-2012, 05:42 AM
|
#6
|
|
Registered User
Join Date: Feb 2011
Location: Algonquin, Misarikwack
Posts: 710
|
............................
Last edited by madmods; 08-29-2013 at 04:15 AM.
|
|
|
|
|
02-29-2012, 07:25 AM
|
#7
|
|
Registered User
Join Date: Feb 2012
Location: Virginia
Posts: 12
|
Madmods-
I was actually inspired by your original post on another thread.
Last edited by blk986; 02-29-2012 at 07:27 AM.
|
|
|
|
|
02-29-2012, 09:58 AM
|
#8
|
|
Registered User
Join Date: Feb 2011
Location: Algonquin, Misarikwack
Posts: 710
|
...................
Last edited by madmods; 08-29-2013 at 04:15 AM.
|
|
|
|
|
03-02-2012, 02:02 PM
|
#9
|
|
2006 987
Join Date: Dec 2006
Location: st. louis
Posts: 443
|
Quote:
Originally Posted by blk986

Before:
After:
|
Wow what a difference!
My lenses have a similar problem, former owner must have put in bulbs that were too powerful, so I'm very eager to do a HID mod.
Can you take some night photos? I wish you had left one normal and took some night photos of the difference between the two but any photos would be better than nothing.
I'm thinking I might wait until I buy two new headlights so if I mess-up this mod at least I'm not left with no functioning headlights.
|
|
|
|
|
03-08-2012, 11:28 AM
|
#10
|
|
Registered User
Join Date: Apr 2010
Location: South Africa, Cape Town
Posts: 131
|
what kit?
Was this a complete retrofit kit bought from blackflamecustoms or were these parts bought separately? I am very keen to do this mod!
__________________
de-snorkeled, clear lights, sports exhaust, zeintec hard top, zein wing, B&M short shifter, DesignTek lowering springs, DesignTek carbon fibre strut brace front and rear, 18'' carerra 5 spokes, semi slick tyres, entire soft top delete, engine cover delete,red console,L&N deep sump, volo performance chip, raptor shift light, de-cat'ed, OEM GT3 bucket seats.
|
|
|
|
|
03-09-2012, 09:20 PM
|
#11
|
|
Registered User
Join Date: Feb 2012
Location: Virginia
Posts: 12
|
No, it wasn't a kit, but Blackflamecustoms basically provided everything I needed except the tools.
|
|
|
|
|
03-20-2012, 10:30 AM
|
#12
|
|
Registered User
Join Date: Apr 2010
Location: South Africa, Cape Town
Posts: 131
|
HID parts
Thanks,
Did you buy H1 bulbs and get the appropriate plug and play harness for the H1, as blackcustoms are telling me it should be a H7 bulb. I also like your shrouds you decided on, which ones were they?
__________________
de-snorkeled, clear lights, sports exhaust, zeintec hard top, zein wing, B&M short shifter, DesignTek lowering springs, DesignTek carbon fibre strut brace front and rear, 18'' carerra 5 spokes, semi slick tyres, entire soft top delete, engine cover delete,red console,L&N deep sump, volo performance chip, raptor shift light, de-cat'ed, OEM GT3 bucket seats.
|
|
|
|
|
03-20-2012, 07:15 PM
|
#13
|
|
Registered User
Join Date: Feb 2012
Location: Virginia
Posts: 12
|
The Morimoto Mini bulbs are called H1. The stock Boxster bulb type is H7. This link describes exactly what I got.
BlackFlameCustoms Inc.
In addition, I got IRIS shrouds, which were extra. Once I had them on, they fell off in about a week, so be sure you glue them on before you seal the headlight assembly.
|
|
|
|
|
06-05-2012, 10:05 AM
|
#14
|
|
Registered User
Join Date: Jul 2006
Location: Orlando, FL
Posts: 35
|
I still don't get the installation of the projector. Do you have more photos of it going in? How do you install the high beam HID? Thanks for the info, want to get it right before tearing mine apart.
|
|
|
|
|
06-22-2012, 02:49 PM
|
#15
|
|
Registered User
Join Date: Feb 2012
Location: Virginia
Posts: 12
|
Sorry, I dont have any more photos, but I'll try to answer your questions. For starters, there is no high beam HID. The bi-xenon projector serves both high and low beams. I ended up installing the original high beam H7 bulb back in its place, so when the high beam is activated, the H7 bulb turns on in addition to lowering the high beam shield in the projector. This way, I can flash my high beams without turning on the HIDs.
|
|
|
|
|
07-04-2012, 07:15 PM
|
#16
|
|
Registered User
Join Date: May 2010
Location: California
Posts: 4
|
Very nice write-up and great photos. The projectors really update the look of the front of the car. Well done!
|
|
|
|
|
07-05-2012, 02:01 AM
|
#17
|
|
Registered User
Join Date: Dec 2010
Location: South Wales UK
Posts: 139
|
Brilliant post well done for the photos and the write up, not sure why you didn't put chrome indicator light bulbs in your turn signal lights, as you wouldnt see any amber colour at all, as it is now you can just still see some amber in the background, I just thought "icing on the cake" but that doesn't take away what a good post this is, well done again.
Guvs.
|
|
|
|
|
07-14-2012, 07:45 AM
|
#18
|
|
Registered User
Join Date: Jul 2012
Posts: 8
|
what sealant would be the beset to use? anyone knows what bosch/hella OEM sealant they use?
a guy from my area who's been retrofitting headlights for a couple of years told me that those silicone sealants which is grayish in color shouldn't be used as per his experience. i've seen some of his work and noticed the sealant he uses are black in color. he wouldnt say though what brand it was. lol
|
|
|
|
|
09-14-2012, 01:03 AM
|
#19
|
|
Registered User
Join Date: Mar 2011
Location: Orange County, CA
Posts: 316
|
Greta job!
Do you have a link to where I can buy the projectors? I swapped out my old yellow ones all ready to this would be fun to try.
|
|
|
|
|
09-14-2012, 05:27 AM
|
#20
|
|
Registered User
Join Date: Aug 2012
Location: St. Louis
Posts: 22
|
I installed the same Morimoto HID kit in a BMW E46 I used to own. It is a 100% improvement in lighting. I did not have to bake the lights, though.
Check out: The Retrofit Source online: headlight upgrades for all applications
They sell several different kits, different HID bulbs, shrouds and separate components.
__________________
Steve03986
2003 Boxster S
Seal Grey, Grey leather, Tip
|
|
|
|
 Posting Rules
|
You may not post new threads
You may not post replies
You may not post attachments
You may not edit your posts
HTML code is On
|
|
|
All times are GMT -8. The time now is 08:25 AM.
| |


 Boxster
 2006 Porsche Boxster 987
 Linear Mode


