 03-14-2012, 05:36 PM
|
#1
|
|
Registered User
Join Date: Apr 2011
Location: Rockville, MD
Posts: 43
|
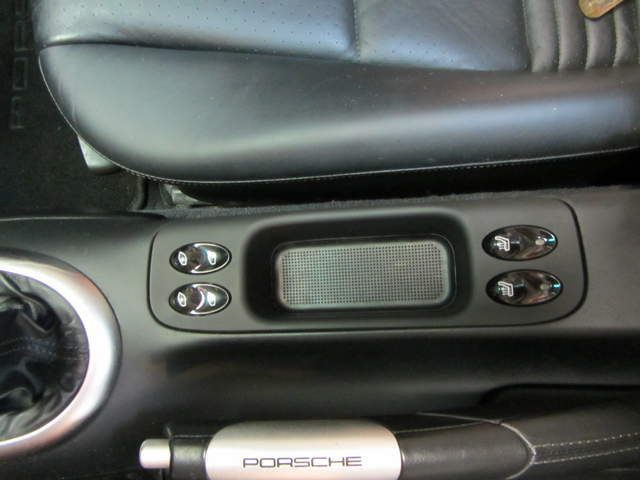
Porsche Boxster Ashtray Delete
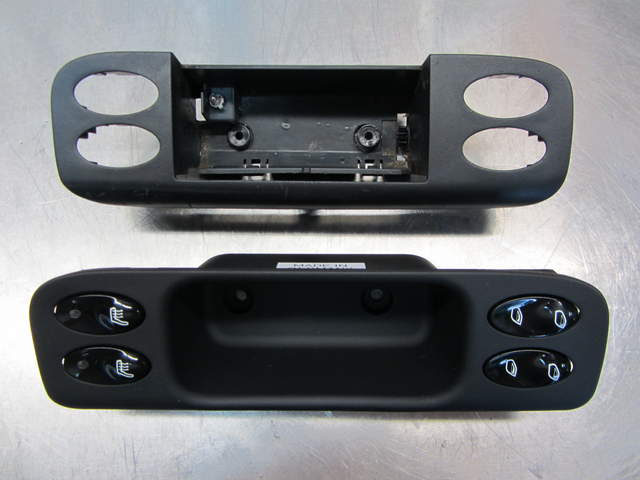
Since I'm not a smoker, and the available storage space in a Boxster is at a premium, I decided to replace the console ashtray with the factory ashtray delete. I purchased the ashtray delete components (ashtray replacement housing 996.552.096.01.A03 and the rubber console insert 996.552.596.00) from the good folks at Sunset Imports. Thanks Andraya for the excellent service and the way cool Boxster magnets! 

The whole process from start to finish took me just under an hour. I took my time, and the opportunity to clean up some of the remnants from a previous smoking owner. Obviously, if your center console is any color other than black, you're going to need to either have the ashtray delete housing painted to match, or leave it black and go with the contrast in color. Here's the whole process, with photos, from start to finish.
1) Pop out the ashtray unit. Just open the ashtray lid and pull the unit straight up out of the console housing.
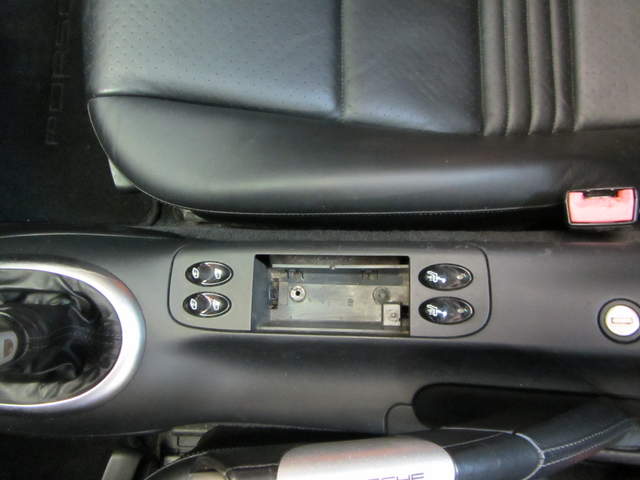
2) You should find two black plastic screws that hold the ashtray console housing in place. Back these out with a T-25 Torx screwdriver. Once the screws are removed, you can pull the ashtray console housing up and out of the center console.
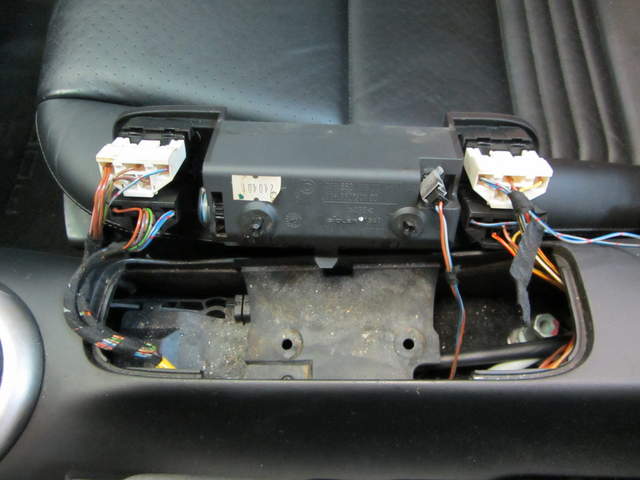
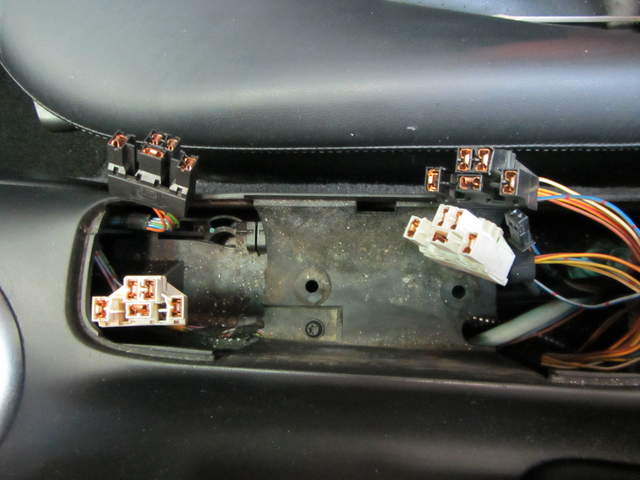
3) Unplug wiring harnesses from the power window and seat heater switches (if so equipped). On my Boxster, the white plastic wiring harness connectors went to the driver's side switches, and the black plastic harness connectors went to the passenger's side switches. There was also a small harness that attached to the small light bulb that needs to be disconnected as well. The power window and seat heater switches are held in place by small protrusions at their base. I inserted a jeweler's screwdriver between the switch and the tabs that hold the switch to the housing, and gently pried while I pressed the switch from the front side. All four switches popped out without incident, thankfully.
4) I popped out each switch one at a time and inserted them in their corresponding openings in the ashtray delete housing, making sure to maintain their orientation as they were in the old ashtray housing. When all four switches were popped into the ashtray delete housing, I re-connected the corresponding wiring harnesses.

5) With everything attached to the ashtray delete housing, I inserted the assembly back in the console opening. I tucked the small wiring harness that connected to the small light in the ashtray back into the console tunnel, since it isn't used with the ashtray delete.
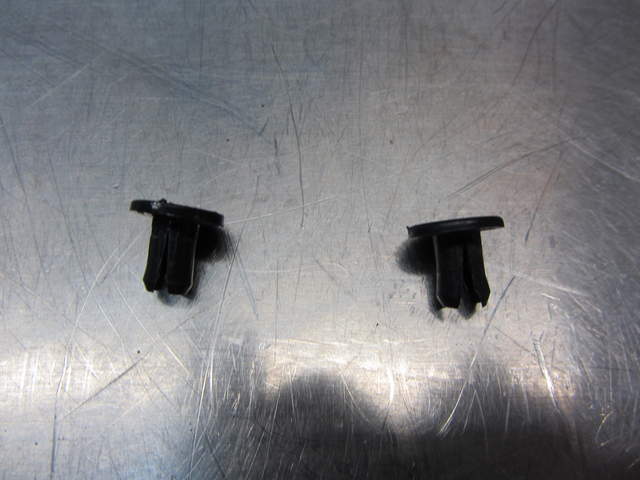
6) There are two, black plastic expandable inserts in the bottom of the old ashtray housing. Carefully remove those inserts and pop them into the two holes in the bottom of the ashtray delete housing. Once the inserts are popped into the housing, and the housing is back in the console, screw in the two plastic Torx screws. The last item to install is the rubber pad in the bottom of the storage area cup. You just lay it in place and you're done!
You now have an extra storage space for your cell phone, iPod or MP3 player, or anything else that you want to keep readily accessible (except cigarettes). As an arcane aside, for any weight weenies, the ashtray delete weighs less that the factory ashtray insert. If you want to know how much less, order the parts, make the swap and weigh the pieces. I'm sure the ashtray delete will shave seconds off your best lap times at your home track. Enjoy!
Last edited by Spyderman; 03-16-2012 at 06:14 AM.
|

|

|
|
03-14-2012, 07:05 PM
|
#2
|
|
Custom User Title Here
Join Date: Mar 2012
Location: Ft. Leonard Wood
Posts: 6,169
|
.................................................. .................................................. .............
Last edited by particlewave; 03-16-2012 at 02:10 PM.
|
|
|
|
|
03-14-2012, 08:57 PM
|
#3
|
|
1999 base
Join Date: Dec 2011
Location: Coral Springs FL
Posts: 1,617
|
Nice
What was the total cost of the parts and shipping?
|
|
|
|
|
03-15-2012, 06:39 AM
|
#4
|
|
Registered User
Join Date: Apr 2011
Location: Rockville, MD
Posts: 43
|
Total cost came to $56.89 ($49.90 for the parts and $6.99 for UPS shipping). Items were not in stock when I placed my order, but Andraya ordered them, and they were waiting on my front porch in five days from when they were ordered.
Last edited by Spyderman; 03-16-2012 at 06:08 AM.
|
|
|
|
|
12-18-2012, 08:05 PM
|
#5
|
|
Registered User
Join Date: Oct 2012
Location: Oceanside, OR 97141
Posts: 12
|
I just completed this project, very easy and a nice useful change. Sunset Porsche has the parts for even less then the earlier post.
also, I picked up the mirror switch trim piece at sunset Porshe cheaper then I could buy it used.
Now on to the dreaded oil filler tube replacement :ah:
|
|
|
|
|
12-22-2012, 10:49 PM
|
#6
|
|
Registered User
Join Date: Nov 2012
Location: Southern, CA
Posts: 460
|
Quote:
Originally Posted by tsunamiboy

I also, I picked up the mirror switch trim piece at sunset Porshe cheaper then I could buy it used.
|
If the this is the triangular piece on thr drivers side door, do you have a part number? I looked it up but there was some confusion as to the actual part. The search kept pulling up the electrical switch when I went to order.
Thanks,
Art
|
|
|
|
|
12-24-2012, 08:58 AM
|
#7
|
|
Registered User
Join Date: Aug 2012
Location: mexico
Posts: 173
|
Thanks for the photos. Liked the idea so much I ordered the parts for my 2002S. They wanted $176 for the ashtray alone which I don't need or want. It cost me about $15 more at my dealer but I couldn't find the parts at Pel.ican or Vertex.
|
|
|
|
|
12-26-2012, 06:03 AM
|
#8
|
|
Registered User
Join Date: Jul 2012
Posts: 34
|
The kit is available on bumper plugs for $69
|
|
|
|
|
12-29-2012, 11:48 AM
|
#9
|
|
Registered User
Join Date: Oct 2012
Location: NY
Posts: 61
|
Awesome! I just got these parts and will tackle the project soon. Thanks!!!
PS where did u get the e brake cover?
|
|
|
|
|
01-17-2013, 04:50 AM
|
#10
|
|
Registered User
Join Date: Apr 2011
Location: Rockville, MD
Posts: 43
|
Greetings Springman26,
The emergency brake cover is one of the factory options on my car (X98 - Aluminum/Leather Parking Brake Handle, along with X97 - Aluminum/Leather Shift Knob).
Glad the project went well for you. In my quest to make additional space available, I did a bit of dash reconfiguring as well.
I removed the cup holder module, that was at the top of my 'dash stack' above the radio, and moved the climate control module to the old cup holder position. I bought a factory storage cubby module, and inserted that where the climate module originally resided, leaving the CD storage module in its original location below the radio. While I may make it sound like moving these modules around is like playing with Legos, getting the wiring harnesses re-positioned does take considerable patience and nimble fingers. Snaking the climate control module harness up through the back of the metal support bracketry was a PITA. Being possessed with the patience of Job, I managed to get everything re-positioned and looking factory spec in about an hour.
At the end of the day, I never trusted the factory pop-out cup holders to securely hold any kind of beverage container. When I'm behind the wheel, having a beverage handy is probably last on my list of gotta' haves anyway. I'm too focused on wringing the last ounce of GO from my car to be worried about sipping on a soda.
Enjoy!
Last edited by Spyderman; 01-17-2013 at 05:01 AM.
|
|
|
|
|
01-17-2013, 10:59 AM
|
#12
|
|
Registered User
Join Date: Oct 2012
Location: NY
Posts: 61
|
Syperman that sounds awesome! Of course now we need some pictures!! I hate the factory cup holders but the wifey needs a spot for the Starbucks ya know  I was almost thinking of adding the cupholder kit that goes in the center arm rest but not sure how I would like that.
|
|
|
|
|
10-16-2015, 08:52 AM
|
#13
|
|
Registered User
Join Date: Jun 2015
Location: MN
Posts: 65
|
Quote:
Originally Posted by Spyderman
Greetings Springman26,
The emergency brake cover is one of the factory options on my car (X98 - Aluminum/Leather Parking Brake Handle, along with X97 - Aluminum/Leather Shift Knob).
Glad the project went well for you. In my quest to make additional space available, I did a bit of dash reconfiguring as well.
I removed the cup holder module, that was at the top of my 'dash stack' above the radio, and moved the climate control module to the old cup holder position. I bought a factory storage cubby module, and inserted that where the climate module originally resided, leaving the CD storage module in its original location below the radio. While I may make it sound like moving these modules around is like playing with Legos, getting the wiring harnesses re-positioned does take considerable patience and nimble fingers. Snaking the climate control module harness up through the back of the metal support bracketry was a PITA. Being possessed with the patience of Job, I managed to get everything re-positioned and looking factory spec in about an hour.
At the end of the day, I never trusted the factory pop-out cup holders to securely hold any kind of beverage container. When I'm behind the wheel, having a beverage handy is probably last on my list of gotta' haves anyway. I'm too focused on wringing the last ounce of GO from my car to be worried about sipping on a soda.
Enjoy! |
I complete the same transformation you did and I will agree moving the harness for the AC controls up to the top cup holder spot was a bit a PIMA but patience does go along way with this project. I just a bent up wire coat hanger fished through the cup holder slot down the AC controls and attached to the harness. This enabled me to get the harness started in its journey north through the very tight space behind the console brackets. I then removed the side panels for the center console and was able to get my fingers to manipulate the harness enough so I push it up to the cup hold slot. Once the harness was in this slot there is not alot of extra length to play with so connecting the harness to the AC controller was a good test of memory and soft touch when plugging in.
All the trouble was way worth it for me as I to did not trust the cup holders and thought it was a disaster waiting to happen. The new setup is great for me and now just need to source the extra storage bin to replace the CD holder which I dont use.
__________________
2001 Boxster S Arctic Silver : LN IMS Retrofit, Sport Package, AUX cable mod, de-snorkeled.
|
|
|
|
|
01-31-2017, 10:31 AM
|
#14
|
|
So Blessed!
Join Date: Nov 2016
Location: SE Georgia
Posts: 389
|
I would like to do the Ashtray Delete, but $$$. No way!
__________________
Artic Silver Boxster S - Black Leather - Black Top - Convience Plus Package
|
|
|
|
|
01-17-2013, 11:26 AM
|
#15
|
|
Registered User
Join Date: Aug 2012
Location: mexico
Posts: 173
|
Spyderman can I asked what you did with the light that was in the ashtray. I'm going to install my parts this afternoon after work.
|
|
|
|
|
01-17-2013, 11:31 AM
|
#16
|
|
Registered User
Join Date: Oct 2012
Location: NY
Posts: 61
|
I just unplugged the bulb on mine and left it out.
|
|
|
|
|
01-18-2013, 05:45 AM
|
#17
|
|
Registered User
Join Date: Apr 2011
Location: Rockville, MD
Posts: 43
|
Greetings tanque55,
Bulb and socket remained with the factory ashtray assembly, and I just left the bulb harness plug loose in the console. Shouldn't cause any issues. Manufacturers have been leaving unconnected harness ends tucked away in cars for a long time. Cheaper to install a wiring harness to accommodate a large array of factory options, than it would be to have custom harnesses configured for specific options a customer might order.
Greetings again Springman26!
I looked at the cup insert that's available for the console storage compartment, but wasn't too crazy about how the compartment lid is just left open pointing straight up between the seats when this insert was in place. I also looked at the cup holders that fasten to the air ducts at the ends of the dashboard. Didn't like that idea too much either. I saw a post here, or on one of the other websites, where someone came up with a cup holder that attaches underneath the edge of the console tunnel on either side of the shifter area. Except for maybe bumping against it while driving, that one looked like a reasonable compromise to me.
I'll take a picture of my re-configured dash stack this weekend and post it here.
Last edited by Spyderman; 01-21-2013 at 06:18 AM.
|
|
|
|
|
01-21-2013, 07:44 AM
|
#19
|
|
Registered User
Join Date: Aug 2012
Location: mexico
Posts: 173
|
I bought the same cup holder, a little pricey at $28 but I like it. It's out of the way, you never come close to hitting it with your legs and it looks nice when you notice it, as it tucks out of the way, most people wouldn't know its there.
|
|
|
|
|
01-21-2013, 09:41 AM
|
#20
|
|
Registered User
Join Date: Oct 2012
Location: Connecticut
Posts: 133
|
Just ordered the ashtray delete too, great upgrade and some more storage! Super, thanks for the idea.
|
|
|
|
 Posting Rules
|
You may not post new threads
You may not post replies
You may not post attachments
You may not edit your posts
HTML code is On
|
|
|
All times are GMT -8. The time now is 07:59 AM.
| |


 Raven
Raven Bicycle
 Bicycle
 boxster S
 2001 Boxster S
 2001 Porsche Boxster 2.7
 Hybrid Mode


