 11-29-2022, 02:07 PM
|
#1
|
|
1998 Boxster Silver/Red
Join Date: Sep 2017
Location: 92262
Posts: 3,105
|
Just hit a truck... Arghhhhh.
Was following too closely behind a heavy equipoment truck... flatbed with a ditch digger on the bed. He slowed to turn left... I turned to the right to avoid a collision. Didn't.
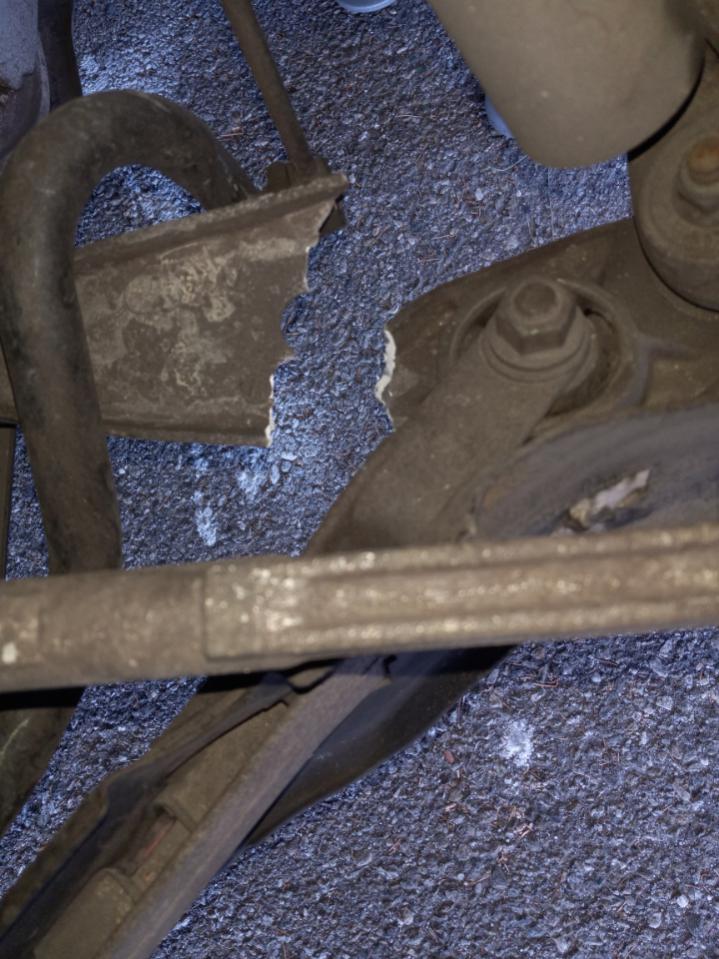
Front bumper cover clipped the passenger side corner of the flatbed. The contact sounded far worse than what the aesthetic damage revealed. Took about 2 inches, plastic still hanging, from the covver just in front of the wheel. The wheel is totaled, for there's a 2 inch chunk torn from the edge... where the tire touches the wheel (if that makes sense).
So... I'm thinking, "OK. Maybe a new bumper cover. I've an extra set of wheels and tires... so that's no big deal".
Tow truck arrives... we go to lower the car to the ground... and the wheel turns on it's own. Driver shows me the broken control arm. Points out that it's a two piece setup... and it's the aft piece that snapped. So... after I post this I'm going out to remove the damaged wheel and do some inspection.
So... and I know I can Google or employ the search bar to find the answers to my questions... but wanted to reach out to the fine folks on this board, get some fresh perspective.
I believe that I can replace the part myself. I've the tools, and it's not like I have to remove a head... remobe pistons, you know, internal stuff. External nuts and bolts, I'm faiely confident in my ability.
Is this something I can do myself? Any tips tricks? I know I'll need an alignment, but that's an afterthought.
Can I go used part? That would be less costly. What about a new aftermarket part (Autozone, Oreily, etc.?). Is this an afternoon job? What else should I be looking at while I'm inspecting for additional damage.
Finally, if I go the used part... who has one, and how much shipped to 92284?
Would the group like pictures after the wheel is removed? I'm heading back out now to remove the wheel.
Thank you, fellas. I'll check back in a bit. 
__________________
1998 Porsche Boxster
|

|

|
|
11-29-2022, 02:27 PM
|
#2
|
|
Motorist & Coffee Drinker
Join Date: Jul 2014
Location: Oklahoma
Posts: 3,955
|
Post noods and I'll show you my parts.
__________________
I am not an attorney, mechanic, or member of the clergy. Following any advice given in my posts is done at your own peril.
|
|
|
|
|
11-29-2022, 02:41 PM
|
#3
|
|
Registered User
Join Date: Oct 2019
Location: Central Florida
Posts: 253
|
Quote:
Originally Posted by 78F350

Post noods and I'll show you my parts. |
Lol!
To the OP, we always love to see pics, even bad ones. After doing a little work on my car there's nothing I'm not willing to try myself short of rebuilding a motor. And, even then, maybe?
|
|
|
|
|
11-29-2022, 03:16 PM
|
#4
|
|
1998 Boxster Silver/Red
Join Date: Sep 2017
Location: 92262
Posts: 3,105
|
Quote:
Originally Posted by 78F350
Post noods and I'll show you my parts. |
Real clever there! LOL!
Got the wheel off... ball joint... the part connected to the frame (?)... out of my league.
Phoned a mechanic I used when I purchased the car... he suggested a new part recommending Pelican... can squeeze me in Thursday... $100/$150 labor.
__________________
1998 Porsche Boxster
|
|
|
|
|
11-29-2022, 03:53 PM
|
#5
|
|
1998 Boxster Silver/Red
Join Date: Sep 2017
Location: 92262
Posts: 3,105
|
Going to order the Meyle part... ~$125.
Mechanic ~$150
Tow $180
~$455 not terrible.
Thanks guys!
__________________
1998 Porsche Boxster
|
|
|
|
|
11-30-2022, 04:21 AM
|
#7
|
|
1998 Boxster Silver/Red
Join Date: Sep 2017
Location: 92262
Posts: 3,105
|
Quote:
Originally Posted by 911monty
|
Thanks for the heads up. When the sun comes up this morning I'll go take a peek at the bushing. You recommend replacing both arms... is that because you suspect that the bushing on the other side, passenger, likely is in the same shape?
On another note... the joint seperator... what do you think of thisd part from Harbior Freight...
https://www.harborfreight.com/3-4-quarter-inch-forged-ball-joint-separator-99849.html
And... the three points connection. We've got the control arm link. I just remove the nut/bolt connecting it to the control arm... and let it hang there while waiting to install the new arm? That link doesn't have to be completely removed from the car, correct? Then remove the nut/bolt/ball joint... the the bolt/nut that connects it to the car frame, correct. I've replaced the water pump... AOS, motor mount, etc... general basic maintenance, and this job doesn't look terrible. I just don't want to "get into it" and find myself buried with some headache.
I've looked at the mess... and it looks pretty straightforward. My concern is that I remove the control arm and then, when reassembling with the new part... holes don't line up my a fraction of a milimeter, causing me headache. I really don't want to have to run to harbior freight/home depot and purchasing a come-along to get the holes to align. If I take my time, examining and being deliberate... and assuming the harbor fright tool (if you don't have a problem with it) properly works... I see a 2 hour job.
If I do it myself it saves me the tow fee (that $$$ covers the new part and the new tool). The part will arrive Thursday. The car will be delievered to the mechanic, 30 miles away in Palm Springs, on Thursday morning. I expect the part will be delivered to my home later that day. I then have to run the part to Palm Springs... but that will be Friday morning. The whole mess is a mini logistics hassle.
However, depending upon which direction I am encouraged to take (self-repair) and my level of confidence (no surprises... a "f**k" moment that causes a huge hassle) I may bang it out in my driveway.
Thank you.
Watcha think?
__________________
1998 Porsche Boxster
|
|
|
|
|
11-30-2022, 04:31 AM
|
#9
|
|
Registered User
Join Date: Oct 2019
Location: Central Florida
Posts: 253
|
I suggest giving it a shot in your own driveway. My 99 has been a dream to work on and I'm a 100% disabled vet. Well, that and I have a 17yo son who is a willing helper.
Good luck!
|
|
|
|
|
12-04-2022, 05:39 AM
|
#10
|
|
1998 Boxster Silver/Red
Join Date: Sep 2017
Location: 92262
Posts: 3,105
|
Dropped the car off at the mechanic Friday morning, picked it up yesterday morning. Used the $125 Meyele control arm. Part arrived a day late, but it worked out.
Car tracks the same as it did pre-accident: perfectly straight. No alignment in the near future. I'll post a pick of the torn bumper cover. Looks like an easy repair, and I'll be asking for opinions on repair or replacement. The tear is ~1"x1". Anyhow...
Tow home from accident 5 miles $60/$10 tip
Tow to mechanic 28 miles $120/$10 tip
Control arm $125
Mechanic $80/$20 tip
$425 total
Could have been a lot worse. I will be purchasing larger wrenches... for if I had them I could have done it in my driveway. Thank you, again, fellas for the help!
__________________
1998 Porsche Boxster
|
|
|
|
|
12-05-2022, 12:05 PM
|
#11
|
|
Registered User
Join Date: Dec 2009
Location: Orange County, CA
Posts: 2,014
|
Quote:
Originally Posted by Starter986
Could have been a lot worse. I will be purchasing larger wrenches... for if I had them I could have done it in my driveway. Thank you, again, fellas for the help!
|
I was planning to load my tools on my V70, including the alignment tools :-)
.
|

|
|
|
12-05-2022, 03:39 PM
|
#12
|
|
1998 Boxster Silver/Red
Join Date: Sep 2017
Location: 92262
Posts: 3,105
|
Quote:
Originally Posted by Gilles
I was planning to load my tools on my V70, including the alignment tools :-)
.
|
Oh, Man! We'll plan on it next time I wreck (ha-ha).
We'll see what you think about the bumper repair. Looks very doable. V E R Y. I'll post a pic in the next couple of days.
Thanks, again! You're the man.
__________________
1998 Porsche Boxster
|
|
|
|
|
12-05-2022, 07:05 PM
|
#13
|
|
Registered User
Join Date: Sep 2008
Location: Florida
Posts: 2,497
|
If you decide to do suspension work in the future, get a battery powered impact gun. Not going to recommend a specific one but something powerful, yet small enough to carry with you for flat repair. Most I can think of will easily handle suspension torque values (other than Axle nuts!). I'm thinking $150 will cover it.
I've done a decent amount of DYI suspension work in my garage....the impact gun made all the difference in the world in getting the jobs done without nearly the cussing typically required.
|
|
|
|
|
12-15-2022, 07:43 PM
|
#14
|
|
Registered User
Join Date: Jan 2019
Location: PA
Posts: 1,726
|
Starter, I just now saw this thread so hopefully my advice is not late. First, from what you've done in the past, and like others have said, you can most definitely do this. However, I can't tell from the pic of the Auto Zone tool, but tie rod joints are generally smaller than ball joints, so I don't know that those jaws would fit around the ball joint. I've had good luck with the Harbor Freight tool.
When using it, if you're using a ratchet (not an impact), my suggestion is to get it good and tight, but don't force it too much. Then hit it with a hammer. At the knuckle, not the tool. If that doesn't do it, tighten it more and repeat with the hammer.
EDIT: The Auto Zone tool will definitely NOT FIT. There is no clearance for the bolt. The HF tool has the bolt to the side, so the forks can slide in place. Here's how you set the tool: The split fork slides between the rubber boot and the knuckle. Be careful not to damage the boot, unless you're replacing the ball joint, in which case it doesn't matter. The single fork sets on top bolt of the ball joint. When you tighten the bolt on the tool, the single fork pushes down on the ball joint's bolt. It goes without saying that you'd have the ball joint's nut removed, or at least loosened before you use the removal tool.
Here's a visual: https://www.youtube.com/watch?v=ZcCfWmrVQfM&t=377s
You got this.
__________________
2002 Boxster Base - Arctic Silver - Tiptronic
2010 Subaru Forester
1980 Ford C-8000 Custom Cab Emergency-One Fire Truck
__________________
"I never lose. I either win or I learn." -Nelson Mandela
Last edited by piper6909; 12-15-2022 at 08:01 PM.
|
|
|
|
|
12-17-2022, 08:25 AM
|
#15
|
|
1998 Boxster Silver/Red
Join Date: Sep 2017
Location: 92262
Posts: 3,105
|
Quote:
Originally Posted by piper6909
Starter, I just now saw this thread so hopefully my advice is not late. First, from what you've done in the past, and like others have said, you can most definitely do this. However, I can't tell from the pic of the Auto Zone tool, but tie rod joints are generally smaller than ball joints, so I don't know that those jaws would fit around the ball joint. I've had good luck with the Harbor Freight tool.
When using it, if you're using a ratchet (not an impact), my suggestion is to get it good and tight, but don't force it too much. Then hit it with a hammer. At the knuckle, not the tool. If that doesn't do it, tighten it more and repeat with the hammer.
EDIT: The Auto Zone tool will definitely NOT FIT. There is no clearance for the bolt. The HF tool has the bolt to the side, so the forks can slide in place. Here's how you set the tool: The split fork slides between the rubber boot and the knuckle. Be careful not to damage the boot, unless you're replacing the ball joint, in which case it doesn't matter. The single fork sets on top bolt of the ball joint. When you tighten the bolt on the tool, the single fork pushes down on the ball joint's bolt. It goes without saying that you'd have the ball joint's nut removed, or at least loosened before you use the removal tool.
Here's a visual: https://www.youtube.com/watch?v=ZcCfWmrVQfM&t=377s
You got this. |
Hi Pipe!
All done. My guy in Palmn Springs... has a great shop... and does everything himself. Don't know how he does it. MBs, P Cars, Jags lined up the block. Because I was in a pinch I needed it done quick.
One bummer was that I didn't have a wrench big enough (the round end, what? 20MM+) to remove the bolts that attached the arm to the frame. Guess what's on my secret santa list. I'm confident I'll pick up that set fron the MIL Christmas dinner next week. 
I've bookmarked this thread because you guys have some great advice and instruction.
Merry Christmas!
__________________
1998 Porsche Boxster
|
|
|
|
 Posting Rules
|
You may not post new threads
You may not post replies
You may not post attachments
You may not edit your posts
HTML code is On
|
|
|
All times are GMT -8. The time now is 12:12 AM.
| |


 Parts Car, car parts
 Honda Del Sol(s)
 "Hers"
 My Original '99
 The 78 F350
 This
This That
That The S 2.5
 Other
Other Boxster
 1998 Porsche Boxster

 Hybrid Mode


