|
Jason's 99 Boxster doc thread
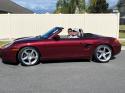
On 12/28 I picked up a 99 Boxster. Arena Red, 63k miles, spotless interior, manual, paint needs some work, nearly new tires, new top with glass rear window, cruise control, a wealth of weird noises when the road gets bumpy, and it seems to be an instant smile generator. I'll use this thread to document what I plan to do and have accomplished. Meaning, it will help me remember what I wanted to do and what I've done lol!
It was a local car so I called Porsche of Orlando and got a little bit of information on it. When it was in for service in May and August they recommended that the rear sway bar end links, rear brakes/rotors, and front tie rod ends be replaced and the service was declined. Some of the work may have been done elsewhere but the rear brakes and rotors are definitely due.
So, first order of business are the rear brakes, rear sway bar end links, may as well do the bushings at the same time, and the outer front tie rod ends. I'm very intrigued by the powerflex bushings. Haven't made up my mind quite yet.
While I'm doing those I can inspect everything else and go from there. I'll be getting what I hope is a nice paint touch up kit to start tackling all of the rock chips. When that's done, I may even consider attempting to put a PPF on it lol! I'll probably just ceramic coat it though. Oh yeah, water pump and spark plugs/coil packs will be after the suspension. I'd also like to get the LN spin on adapter before the next oil change.
Hopefully this ends up being a fun ride for a long time. My wife and I were joking the day after we got the car that it was our anniversary car since we were married in 99. On a whim, I went and checked the build month, same month. We're dedicated to this car now.
Also, it's amazing how quickly my kids said they wanted to learn to drive a stick once I brought it home lol! I'll teach them, but only once I'm confident that the car is squared away.
Last edited by Radman; 12-31-2020 at 03:54 AM.
|


 Boxster


 Threaded Mode


