 01-22-2017, 10:40 AM
|
#1
|
|
Registered User
Join Date: Feb 2016
Location: SE USA
Posts: 325
|
What does this spring do?
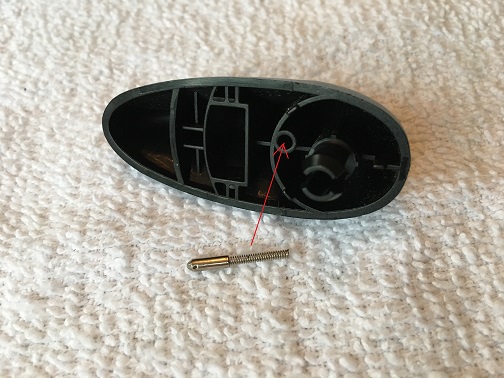
Ok, in my ongoing project to refurbish the interior trim, I have gotten around to the seat trim. In taking off the seatback adjustment lever, this little spring pops out and flies to God knows where. I finally found it in the seat rail and I now wonder if it does anything other than help hold the lever off of the seat trim panel. Any ideas??? I assume it goes into the hole I've highlighted in the photo (spring end first).
My second question. I have been covering all of the trim pieces in black lambskin leather and I must say am really pleased with the result. I have thought of trimming out the seat lever panel in leather as well as it does not get a lot of abuse. However what do you guys recommend for the umbrella pocket threshold trim. Paint, Plasti-Dip, just remove the soft touch crap and leave???
Thanks as always...
|

|

|
|
01-22-2017, 10:48 AM
|
#2
|
|
Custom User Title Here
Join Date: Mar 2012
Location: Ft. Leonard Wood
Posts: 6,169
|
Looks like a standard position lock or tactile piston (in some uses, this device would hold a lever or switch in its selected position, other uses would be to provide a tactile click in corresponding divots on the mating face).
|

|
|
|
01-22-2017, 11:16 AM
|
#3
|
|
Registered User
Join Date: Feb 2016
Location: SE USA
Posts: 325
|
Spring
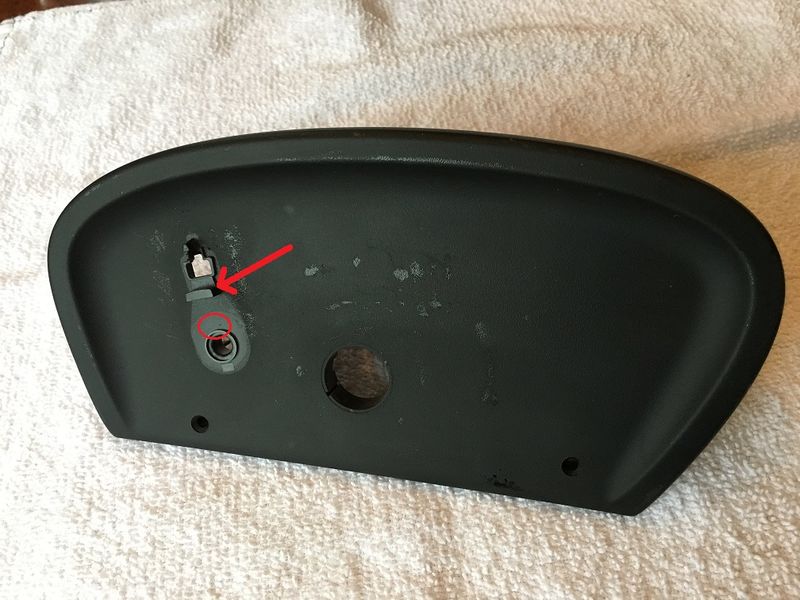
That's initially what I thought too. But, if you look at the photo of the seat trim plate, there is no detent for the pin to click into or indicate anything as it rides on the flat surface in the area that is circled. That is, it rides on that surface if it goes into the hole I indicated in my original photo.
If it goes somewhere else I can't figure out where that is. The tab that I have indicated with the thick arrow on the seat trim plate is actually what limits the travel of the lever when you are selecting forwards or backwards and there is a pin that fits into the space above that makes contact with the electrical portion of the switch to indicate forwards or backwards.
|
|
|
|
|
01-22-2017, 11:25 AM
|
#4
|
|
Custom User Title Here
Join Date: Mar 2012
Location: Ft. Leonard Wood
Posts: 6,169
|
Just had a look at mine and that's definitely where the spring goes...doesn't really seem to do anything. I think your theory about it keeping the lever off of the plate is sound, though my lever doesn't seem to have any in/out play when snapped in.
|
|
|
|
|
01-22-2017, 12:25 PM
|
#5
|
|
Registered User
Join Date: Sep 2013
Location: Chandler, AZ
Posts: 1,796
|
I need to redo this exact piece too but in stone gray. Did you need to remove the seat to get to the buttom screws (torx?)? How did you pop of the seat adjustment piece without breaking it.
__________________
03 Carrera
02 Boxster S Guards Red, black interior with matching hardtop
89 Carrera 4
89 944 S2
78 911SC
|
|
|
|
|
01-22-2017, 01:03 PM
|
#6
|
|
Registered User
Join Date: Feb 2016
Location: SE USA
Posts: 325
|
Spring
Thanks PW. As one of the best electrical gurus on this forum, I figured if you didn't know what this thing did then no one would.
To Porsche9, no I did not have to remove the seat to access the screws. In fact I didn't have the proper size torx so I used a very small Phillips screw driver and pressed firmly so I didn't strip the head and they came out easily even though the screw driver was at a relatively steep angle. I used a plastic pry tool to ease the lever off working one side then the other until it popped off. That's when the spring came flying out so be aware! Once the levers are off just press up towards the roof to release the snaps and pull off.

|
|
|
|
|
01-28-2017, 01:01 PM
|
#7
|
|
Registered User
Join Date: Sep 2013
Location: Chandler, AZ
Posts: 1,796
|
Quote:
Originally Posted by Jgkram

Ok, in my ongoing project to refurbish the interior trim, I have gotten around to the seat trim. In taking off the seatback adjustment lever, this little spring pops out and flies to God knows where. I finally found it in the seat rail and I now wonder if it does anything other than help hold the lever off of the seat trim panel. Any ideas??? I assume it goes into the hole I've highlighted in the photo (spring end first).
My second question. I have been covering all of the trim pieces in black lambskin leather and I must say am really pleased with the result. I have thought of trimming out the seat lever panel in leather as well as it does not get a lot of abuse. However what do you guys recommend for the umbrella pocket threshold trim. Paint, Plasti-Dip, just remove the soft touch crap and leave???
Thanks as always...
|
I took mine apart and where you are pointing is exactly where this spring goes with the shiny bit poking out. Based on this thread I took mine off really carefully to avoid it from flying out.
By the way, how did the refinishing go?
__________________
03 Carrera
02 Boxster S Guards Red, black interior with matching hardtop
89 Carrera 4
89 944 S2
78 911SC
|
|
|
|
|
01-28-2017, 05:04 PM
|
#8
|
|
Registered User
Join Date: Feb 2016
Location: SE USA
Posts: 325
|
Spring
Thanks for checking on the spring thing. I'm not an electrical type guy but I think I convinced myself it must be important. When I was taking off the driver side trim plate, I removed the lever that actuates the seat back. I then "tested" the small white knob on the switch itself and could not get the seat back to move. Just for giggles, I placed the lever back on the plate with the spring in contact with the plate, and the switch worked! What's up with that?
The refinishing Is going well and is still in process. I stripped all of the rubbery coating off of both sill plates and seat trim plates. What a pita! I decided to treat the sill plates with C Quartz DLUX ceramic coating. It's tough as nails and lasts forever. The sills turned out really nice. Deep black with a satin finish. The seat trim plate, when stripped, turned out to be a gray color instead of black. I didn't like the way it looked on black seats so I have decided to plastidip it in black with a glossifier coating on top. It should be ok as it doesn't take a lot of hits. Check back in next week and I'll have photos posted.
|
|
|
|
|
01-28-2017, 10:08 PM
|
#9
|
|
Registered User
Join Date: Sep 2013
Location: Chandler, AZ
Posts: 1,796
|
It is a pain to remove the rubber coating and yes the seat trim plate is grayish. My interior is graphite gray but figured the plate would be black. Now I have the tough task of matching the color or just go with black.
Curious as how the sills look and if plasti dip holds up. My plate looks pretty rough so I concerned plasti dip won't hold long.
__________________
03 Carrera
02 Boxster S Guards Red, black interior with matching hardtop
89 Carrera 4
89 944 S2
78 911SC
|
|
|
|
|
01-29-2017, 12:00 PM
|
#10
|
|
Registered User
Join Date: Feb 2016
Location: SE USA
Posts: 325
|
Promised Photos
So here are the promised photos of my continued interior refurbishment. I have tried to give a couple of comparison shots of before and after as well as a couple of close ups. I have not finished the plastidip application on the seat trim plates yet but will post those later this week.
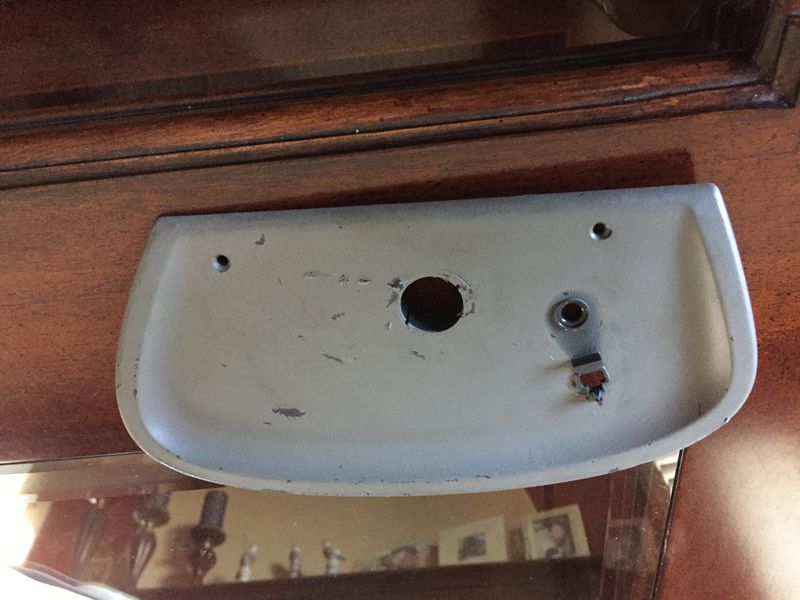
#1 = Comparison of the seat trim plates. Bottom one is stripped of OEM coating and top one is coated with C. Quartz. Although it looks black it's actually gray when on the black leather, therefore the reason I am trying the Plastidip.
#2 = Comparison of drive side sill plate before and after C. Quartz application.
#3 = 100% coated drive side sill plate.
#4 = Passenger side sill coated with C. Quartz.
#5 = Passenger side sill close up.
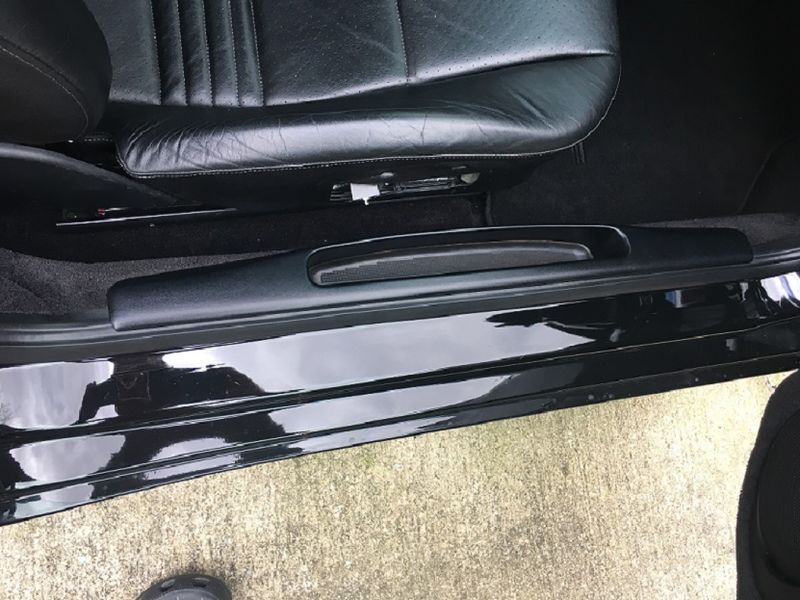
#6 = Driver side door trim showing lambskin leather covering armrest and door pull cover.
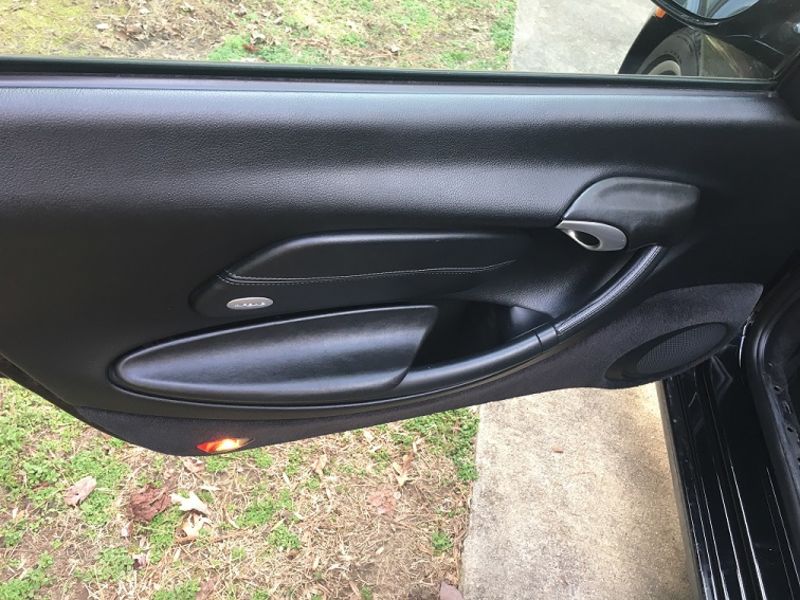
#7 = Passenger side door trim showing lambskin leather coverings. 


|
|
|
|
|
01-29-2017, 08:58 PM
|
#11
|
|
Registered User
Join Date: Sep 2013
Location: Chandler, AZ
Posts: 1,796
|
Real nice results!
I went ahead and tried a product made by Rust Oleom called Flexidip. I appears to be similar to Plastidip but they had a grey color really close to what I'm looking for. I need to let it dry for 24 hours and then I'm going to reinstall it. I may need to do the other plastic trim that covers the hinges to get everything matching as the color match is close but not perfect.

__________________
03 Carrera
02 Boxster S Guards Red, black interior with matching hardtop
89 Carrera 4
89 944 S2
78 911SC
|
|
|
|
|
01-30-2017, 01:05 AM
|
#12
|
|
Registered User
Join Date: Sep 2013
Location: Montreal, QC. (currently expat to Shanghai)
Posts: 3,249
|
Why are you posting those pics here man? should really be in the diy section into a new thread. Sure some others would be inspired with your techniques and materials idea.
Read your thread last week but admitting I've clicked on it a second time by accident 
Loving that Ceramic quartz idea, better than oem from the look of it. Amazing work/skills with the leather also, looking just like factory from the pics
__________________
______________________________
'97 Boxster base model 2.5L, Guards Red/Tan leather, with a new but old Alpine am/fm radio.
|
|
|
|
|
01-30-2017, 02:46 AM
|
#13
|
|
Registered User
Join Date: Feb 2016
Location: SE USA
Posts: 325
|
Diy
Fred, you're right. The thread started out as a question on a part and then exploded into the diy from a prompt from Porsche9. I should have moved it, my fault.
Porsche9, I had a can of Flexidip in my hand at Home Depot before I settled on the Plastidip. Yours looks great! Let's hope these things hold up as well as I hope they do. Now all I've got left are the seat hinge covers and the center console. Whew!
|
|
|
|
|
02-05-2017, 08:41 PM
|
#14
|
|
Registered User
Join Date: Sep 2013
Location: Chandler, AZ
Posts: 1,796
|
The flexidip so far seems pretty durable. I was pleased with the results on this piece and went ahead and did the other side. Not sure it would be durable enough for the sills especially on the driver's side were I hit it all them time in situations were I can't open the door all the way (garage). Then again the factory finish isn't either. I'm going to give it a try anyways. Worst case I have some "fun" sanding it off and do something different. Show us the results for the center console. That's a pretty big piece. Leather might be more durable long term.
__________________
03 Carrera
02 Boxster S Guards Red, black interior with matching hardtop
89 Carrera 4
89 944 S2
78 911SC
|
|
|
|
|
02-06-2017, 06:06 AM
|
#15
|
|
Registered User
Join Date: Feb 2016
Location: SE USA
Posts: 325
|
Seat hinge cover
I will follow up on the center console with photos once I decide what to do. I really like the door sills stripped and coated with the CQuartz. We'll see how durable over time that turns out to be. I agree that the Flexidip is not durable enough for that area.
By the way does anyone happening to catch this thread know how to remove the seat hinge cover in one of my photos? I've tried but cannot get it to release. It looks like there is a catch at the front of the piece which attaches to the rear of the seat bottom. I may just have to refinish these pieces with the on the seat. 
|
|
|
|
|
02-06-2017, 07:03 AM
|
#16
|
|
On the slippery slope
Join Date: Mar 2014
Location: Austin and Palm Springs
Posts: 3,807
|
What did you do to strip the factory soft coating
how did you prepare it for the C Quartz?
__________________
2004 Boxster S 6 speed - DRL relay hack, Polaris AutoTop DIY
2004 996 Targa Tip
Instructor - San Diego region
2014 Porsche Performance Driving School
2020 BMW X3, 2013 Ram 1500, 2016 Cmax, 2004 F-150 "Big Red"
|
|
|
|
|
02-06-2017, 07:38 AM
|
#17
|
|
Registered User
Join Date: Sep 2013
Location: Chandler, AZ
Posts: 1,796
|
I used 180 grit sand paper.
__________________
03 Carrera
02 Boxster S Guards Red, black interior with matching hardtop
89 Carrera 4
89 944 S2
78 911SC
|
|
|
|
|
02-06-2017, 07:50 AM
|
#18
|
|
Registered User
Join Date: Feb 2016
Location: SE USA
Posts: 325
|
I was not quite so aggressive for fear of scratching the plastic surface underneath the coating. So I used alcohol and green scrubbing pads. It comes off pretty easily and I periodically washed under water to remove the residue.
I finished cleaning the window and ashtray piece along with the panel beneath the handbrake this weekend. I had two handbrake panels so I covered one in leather and one I coated with CQuartz. I'll post photos to see which one you like best.
|
|
|
|
|
04-01-2017, 12:14 PM
|
#19
|
|
Registered User
Join Date: Sep 2013
Location: Chandler, AZ
Posts: 1,796
|
Update. I used the flexidrip on the sill and it is holding up really well. No issues so far with everyday use. So far I'd recommend it.
__________________
03 Carrera
02 Boxster S Guards Red, black interior with matching hardtop
89 Carrera 4
89 944 S2
78 911SC
|
|
|
|
|
04-01-2017, 03:42 PM
|
#20
|
|
Registered User
Join Date: Feb 2016
Location: SE USA
Posts: 325
|
My sill, covered in CQuartz is also doing well. The seat trim plates that I covered in Flexidip have also worked out really well. That stuff is tougher than I had first thought.
|
|
|
|
 Posting Rules
|
You may not post new threads
You may not post replies
You may not post attachments
You may not edit your posts
HTML code is On
|
|
|
All times are GMT -8. The time now is 04:02 AM.
| |


 2004 Porsche Boxster S
 2004 Porsche 996 Targa
 Linear Mode


